2-318-868-11 (1) This warranty is valid only in the United States.
WARNING To prevent fire or shock hazard, do not expose the unit to rain or moisture. Do not install the appliance in a confined space, such as a bookcase or built-in cabinet. To prevent fire, do not cover the ventilation of the apparatus with newspapers, tablecloths, curtains, etc. And don’t place lighted candles on the apparatus. To prevent fire or shock hazard, do not place objects filled with liquids, such as vases, on the apparatus.
Table of Contents Create Your Own ATRAC CDs ................ 4 Which discs can you play on this CD player? .......................................................5 Precautions ............................................ 7 On safety ....................................................7 On the CD player .......................................7 On handling CDs ........................................7 On headphones/earphones ..........................7 Getting Started Checking the Supplied Accessories.....
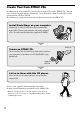
Create Your Own ATRAC CDs In addition to the usual audio CDs, you can play an original CD, called “ATRAC CD,” that you create with the supplied software, SonicStage. Using SonicStage, about 30 audio CDs* can be recorded on one CD-R or CD-RW. The following is a quick overview of how you listen to music on your ATRAC CD. Install SonicStage on your computer. SonicStage is software that takes music downloaded from audio CDs on your computer and creates original CDs.
Which discs can you play on this CD player? Audio CDs: CD-DA format CDs CD-DA (Compact Disc Digital Audio) is a recording standard used for Audio CDs. ATRAC CDs: CD-R/CD-RW on which audio data compressed in the ATRAC3plus format has been recorded by using SonicStage* ATRAC3plus (Adaptive Transform Acoustic Coding3plus) is audio compression technology that satisfies the demand for high sound quality and high compression rates.
Music discs encoded with copyright protection technologies This product is designed to play back discs that conform to the Compact Disc (CD) standard. Recently, various music discs encoded with copyright protection technologies are marketed by some record companies. Please be aware that among those discs, there are some that do not conform to the CD standard and may not be playable by this product. Difference in file structures of ATRAC CDs and MP3 CDs ATRAC CDs and MP3 CDs consist of "files" and "groups.
Precautions On safety • Should any solid objects or liquid fall into the CD player, unplug it and have it checked by qualified personnel before operating it any further. • Do not put any foreign objects in the DC IN 3 V (external power input) jack. On the CD player • Keep the lens on the CD player clean and do not touch it. If you do so, the lens may be damaged and the CD player will not operate properly. • Do not put any heavy object on top of the CD player. The CD player and the CD may be damaged.
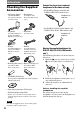
Getting Started Checking the Supplied Accessories • AC power adaptor (AC-ES3010K2) (not supplied with USA/ Canadian models) • Earphones • Headphones (for D-NE321 AR2, E92, E18/4, MX2 models only*) • Earphones (for D-NE320 European (for other models) models and D-NE321 HK4, E18/1 models only*) • Remote (for D-NE320 European models and D-NE321 HK4, E18/1 models only*) (for D-NE320 USA/ Canadian models and D-NE321 E92, E18/4, MX2 models only*) • For D-NE320 USA/Canadian models and D-NE321 E92, E18/4, M
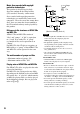
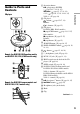
Guide to Parts and Controls Operation button (play/pause)1)/ENTER CD player CD player: – button ( page 15-17, 22) Remote: +/– buttons ( page 15) Getting Started ( page 14-17, 21-23, 25) / ( page 15, 17, 21, 23) 1)/ ( page 16, 17, 19, 21-23, 25) VOL +/– ( page 14) CD player: D-NE321 HK4, E18/1 models2): (stop)/CHG button ( page 11, 15-17) Other models: (stop)button ( page 15-17) Remote: (stop)button ( page 15) SEARCH button ( page 16, 17) DISPLAY/MENU button ( page 18, 1
Display Preparing a Power Source (Dry Battery) Use only the following dry battery type for your CD player: • LR6 (size AA) alkaline battery 1 Slide the OPEN switch to open the lid of your player. Character information display ( page 18) Atrac3plus/MP3 indicator ( page 5) Disc indicator ( page 14) OPEN switch Battery indicator ( page 12) Play list indicator Group indicator 2 Bookmark indicator ( page 21) Open the battery compartment lid inside the player.
To remove the battery Remove the battery as illustrated below. 4 /CHG When using a rechargeable battery (for D-NE321 HK4, E18/1 models only*) Charge the rechargeable battery before using it for the first time or when it is depleted. To maintain the original battery capacity longer, charge the battery only when it is completely depleted (“Low Battery” appears on the display). to DC IN 3V * For the area code of the model you purchased, check the upper left side of the bar code on the package.
Note on the useful life of the rechargeable battery and when to replace it If the battery is new or has not been used for a long time, it may not charge completely. In that case, charge it until “Charging” disappears from the display and then use the player until the battery is completely depleted (“Low Battery” appears on the display). Repeat this procedure several times.
When using the AC power adaptor You can use the player powered by the AC power adaptor without the battery. Getting Started to DC IN 3V AC power adaptor to AC outlet 1 Connect the AC power adaptor to the DC IN 3V jack of your CD player and an AC outlet. Notes on the AC power adaptor • Disconnect all power sources when the player is not to be used for a long time. • Use only the AC power adaptor supplied.
Playback 4 Playing a CD Adjust the volume by pressing VOL +/–. VOL +/– 1 Slide the OPEN switch to open the player lid. Connect the headphones/earphones to the player beforehand. to (headphones) OPEN switch Headphones/earphones 2 On the remote: D-NE320 USA/Canadian models and D-NE321 E92, E18/4, MX2 models: After placing the CD on the tray in step 2, press and adjust the volume by pressing VOL +/–. Place the CD on the tray and close the lid.
Basic playback operations (Play, stop, search) To Play Play from the first track Operation From stop, press and hold /ENTER ( on the remote) until playback starts. Stop Pause/Resume play after pausing Press /ENTER ( on the remote). Stop playback Search Find the beginning of the current track Press (stop) 4). 1) Press once. Press repeatedly. Find the beginning of the next track 1) Press once.
Locking the controls (HOLD) You can prevent accidental button presses while carrying the player by locking the controls. 1 Searching for Your Favorite Track/File Searching by viewing groups (File View) Slide the HOLD switch on the back of the player in the direction of the arrow. “HOLD” flashes if you press any button when the HOLD function is activated.
Checking CD information on the display You can search for a track/file by checking the format type of the music source and the names of groups and files. You can check CD information on the display. Depending on the region in which you purchased your CD player, the default language may not be “ENGLISH.” Change the LANGUAGE setting, if necessary ( page 26). When you are playing an MP3 CD containing files with an ID3 tag, ID3 tag information is displayed.
To check information on the display Press DISPLAY/MENU repeatedly.
Changing Playback Options (PLAY MODE) 1 Press DISPLAY/MENU until the menu screen appears. When “REPEAT” appears, select “ON” or “OFF” and press / ENTER. To return to normal play Select “ALL” in the PLAY MODE menu. Continued Playback You can use various playback options such as selecting songs you want to listen to, and playing songs in your favorite order. For details about playback options, see page 20.
Playback options Display on the CD player ALL GROUP 1 SHUFFLE GROUP SHUFFLE BOOKMARK PLAYLIST AUTO RANKING RANKING SHUF PROGRAM INTRO (PLAY MODE) Explanation All tracks on the CD are played in a track number order. For the ATRAC CD/MP3 CD, a playing order is different according to the setting of the “PLAY ORDER” in the OPTION menu. All files in the selected group or all groups are played (ATRAC CD/MP3 CD only) ( page 21). The current track is played once.
Playing groups 1 2 Perform steps 1 and 2 of “Changing Playback Options (PLAY MODE)” ( page 19). In step 3, select “GROUP” or “GROUP SHUFFLE” and press /ENTER. 3 Press /ENTER for 2 seconds or more. The player starts playback of all files in the group you have selected. 4 When “REPEAT” appears, select “ON” or “OFF” and press / ENTER. Note If the group has no tracks, “Invalid” appears on the display.
Playing tracks in your favorite order (PGM play) Playing tracks repeatedly 1 1 While the player is stopped, select “PROGRAM” in step 3 of “Changing Playback Options (PLAY MODE)” ( page 19), and then press / ENTER. 2 Press or to select a track, and press and hold /ENTER until display changes. When playing an ATRAC CD/MP3 CD: You can also select a file in another group by pressing + or –. 3 Repeat step 2 to select tracks in your favorite order. You can select up to 64 tracks.
Changing Sound Quality For details about the setting of SOUND items, see page 24. 2 Press or for 2 seconds or more to select the frequency range. 3 Press or repeatedly to select the shape of the wave. There are 3 shapes stored in memory for each frequency range. Selecting the sound quality 1 Press DISPLAY/MENU until the menu screen appears. 2 Press or to select “ SOUND.” Low Frequency range 4 Press or to select the sound volume. The sound volume can be adjusted in 7 levels.
SOUND items To return to the previous screen, press . To cancel the setting operation, press for 2 seconds or more.
Changing Optional Settings For details about the setting of OPTION items, see page 26. Setting various functions 1 Press DISPLAY/MENU until the menu screen appears. 2 Press or to select “ 3 After pressing /ENTER, press or to select the item you want to set up and press /ENTER. 4 Press or to select an option and press /ENTER. When you are setting the “LANGUAGE” or “PLAY ORDER,” repeat step 3.
OPTION items To return to the previous screen, press . To cancel the setting operation, press for 2 seconds or more. Items LANGUAGE (Language for menu, etc.
Items POWER SAVE (Saving power) PLAY ORDER 1) (Playback order) Options (: Default settings) The POWER SAVE function does not work. OFF ON TRACK GROUP OFF ON Playback CD-EXTRA 1) 4) (Playback by disc format) Setting of the SOUND items is not effective. Play back the music source in the order of NORMAL recording. ID3TAG TNO Play back in the order of ID3 tag number. FILE NAME Play back in the alphabetical order of the file names. Play back the music source in the order of OFF recording.
Additional Information Troubleshooting Should any problem persist after you have checked these symptoms, consult your nearest Sony dealer. Power 1) Symptom The rechargeable battery cannot be charged. Cause and/or corrective action The rechargeable battery is not inserted in the battery compartment. Insert the rechargeable battery ( page 11). You pressed on the remote. During stop, press /CHG on the CD player. 2) Sound Symptom The volume does not increase even if you press VOL + repeatedly.
Symptom “Low Battery” appears on the display, and the CD does not play. Cause and/or corrective action “Hi DC in” appears on the display. An AC power adaptor which is rated higher than the one supplied or recommended is being used. Use only the supplied AC power adaptor or the car battery cord recommended in “Optional Accessories” ( page 32). The CD does not play, or “No Disc” appears on the display when a CD is placed in the player. The CD is dirty or defective. Clean it or change it.
Symptom The LCD display becomes hard to see or slows down. Cause and/or corrective action Even though you have not selected “BOOKMARK,” (Bookmark) flashes. If you have selected a playback option other than “BOOKMARK,” (Bookmark) flashes. Play stopped abruptly. The off timer has been set. Change the setting of “TIMER” to “OFF” ( page 26). The rechargeable battery or the dry battery is used up completely.
Maintenance Specifications To clean the casing Use a soft cloth slightly moistened in water or a mild detergent solution. Do not use alcohol, benzine or thinner. System Compact disc digital audio system Laser diode properties Material: GaAlAs Wavelength: λ = 770 - 800 nm Emission duration: Continuous Laser output: Less than 44.6 µW (This output is the value measured at a distance of 200 mm from the objective lens surface on the optical pick-up block with 7 mm aperture.
Optional Accessories AC power adaptor * AC-E30HG Active speaker system SRS-Z1 SRS-Z30 DCC-E345 Car battery cord Car battery cord with car connecting pack DCC-E34CP Car connecting pack CPA-9C Earphones (except for the customers in France) MDR-EX71SL MDR-G04SL MDR-J20SP MDR-E808SP MDR-E808LP Earphones (for the customers in France) * Specifications for AC power adaptors vary for each area. Check your local voltage and the shape of the plug before purchasing.
H Index HEAVY 24 HOLD function Symbols I (Battery) 11, 12 (disc) 14 1 20 (Timer) 26 ID3 tag INTRO LANGUAGE 26 List View 17 M 8 m3u play list play 21 MENU 26 Mix-Mode CD 5 MP3 CD 5 20 O Battery carrying case 8 Battery compartment lid 10, 11 Battery life 12 BEEP 26 BOOKMARK 20, 21 C 8 D Display 10 Dry battery 10 E Earphones 8 EQUALIZER 23, 24 F File View 16 G G-PROTECTION 26 GROUP 20, 21, 27 Group 6 GROUP SHUFFLE 20, 21 OPTION 26 Optional Accessories 32 P Pause 15 Play 15 PLAYLIST 20
This warranty is only valid in Canada.