4-169-139-12(1) The software of this player may be updated in the future. To find out details on any available updates, please visit: http://www.sony.
WARNING To reduce the risk of fire or electric shock, do not expose this apparatus to rain or moisture. To avoid electrical shock, do not open the cabinet. Refer servicing to qualified personnel only. The AC power cord must be changed only at a qualified service shop. Batteries or batteries installed apparatus shall not be exposed to excessive heat such as sunshine, fire or the like. Precautions • To prevent fire or shock hazard, do not place objects filled with liquids, such as vases, on the apparatus.
Owner’s Record The model and serial numbers are located at the rear of the unit. Record the serial number in the space provided below. Refer to them whenever you call upon your Sony dealer regarding this product. Notes About the Discs • To keep the disc clean, handle the disc by its edge. Do not touch the surface. Dust, fingerprints, or scratches on the disc may cause it to malfunction. Model No.______________ Serial No.
Precautions The power requirements and power consumption of this player are indicated on the back of the player. Check that the player’s operating voltage is identical with your local power supply. Power requirements and power consumption m On placement • Place the player in a location with adequate ventilation to prevent heat build-up in the player. • Do not place the player on a soft surface such as a rug that might block the ventilation holes.
On connecting to the HDMI OUT jack Observe the following as improper handling may damage the HDMI OUT jack and the connector. • Carefully align the HDMI OUT jack on the rear of the player and the HDMI connector by checking their shapes. Make sure the connector is not upside down or tilted. IMPORTANT NOTICE Caution: This player is capable of holding a still video image or on-screen display image on your television screen indefinitely.
14)Refer all servicing to qualified service personnel. Servicing is required when the apparatus has been damaged in any way, such as power-supply cord or plug is damaged, liquid has been spilled or objects have fallen into the apparatus, the apparatus has been exposed to rain or moisture, does not operate normally, or has been dropped.
Table of Contents WARNING . . . . . . . . . . . . . . . . . . . . . . . . . . . . . . . . . . . . . . . . . . . . . . . . . . . . 2 Precautions . . . . . . . . . . . . . . . . . . . . . . . . . . . . . . . . . . . . . . . . . . . . . . . . . . . 4 Guide to Parts and Controls . . . . . . . . . . . . . . . . . . . . . . . . . . . . . . . . . . . . . . 8 Hookups and Settings Step 1: Preparing the Player . . . . . . . . . . . . . . . . . . . . . . . . . . . . . . . . . . . . .
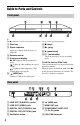
Guide to Parts and Controls Front panel z The N button has a tactile dot. Use the tactile dot as a reference when operating the player. A Disc tray F x (stop) B Power indicator G N (play) Lights up in white when the player is turned on. C Remote sensor H Z (open/close) I [/1 (on/standby) Turns on the player, or sets to standby mode. D Front panel display N, X: Lights up during playback or pause. : Lights up when enabling the repeat setting.
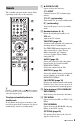
Remote The available functions of the remote differ depending on the disc or the situation. A Z OPEN/CLOSE Opens or closes the disc tray. -TV- INPUT Switches between TV and other input sources. -TV- [/1 (on/standby) Turns on the TV, or sets to standby mode. [/1 (on/standby) Turns on the player, or sets to standby mode. B Number buttons (0 - 9) Enters the title/chapter numbers, etc. VOL +/– Adjusts the TV volume. THEATER (page 33) Switches to the optimum video mode for watching movies automatically.
HOME Enters the player’s home menu. Displays the wall paper when pressed on the category icon of the home menu. RETURN Returns to the previous display. Skips to the previous/next chapter, track, or file.
Step 1: Preparing the Player Check that you have the following items: • Audio/video cable (phono plug ×3) (1) • HDMI cable (1) (BDP-BX37 for U.S. models only) • Remote commander (remote) (1) • Size AA (R6) batteries (2) Hookups and Settings Checking the supplied accessories Preparing the remote Insert two Size AA (R6) batteries by matching the 3 and # ends on the batteries to the markings inside the battery compartment.
Step 2: Connecting the Player Do not connect the AC power cord until you have made all the connections. Connecting to your TV Select one of the following connection methods according to the input jacks on your TV. Match the color of the plug to that of the jack when connecting. HDMI cable* High quality Audio/video cable (supplied) Component video cable (not supplied) Audio/video cable (supplied) Standard quality * See “Checking the supplied accessories” (page 11).
Connecting to your AV amplifier (receiver) Select one of the following connection methods according to the input jacks on your AV amplifier (receiver). When you select A or B, make the appropriate settings in the “Audio Settings” setup (page 23). Hookups and Settings HDMI cable*1 HDMI cable (not supplied) t Set “BD Audio MIX Setting” (page 23).
Step 3: Easy Setup Connecting to the Network When turned on for the first time Wait for a short while before the player turns on and starts “Easy Setup.” 1 Plug the player into the AC outlet. Wired Setup Use a LAN cable to connect to the LAN (100) terminal on the player. LAN cable (not supplied) to AC outlet 2 Press [/1 to turn on the player.
To set the network settings Select “Network Settings,” “Internet Settings,” then “USB Wireless Setup” (page 26), and follow the on-screen instructions to complete the setup.
Playing a Disc For playable discs, see “Playable discs” (page 31). 1 Switch the input selector on your TV so that the signal from the player appears on your TV screen. 2 Press Z OPEN/CLOSE, and place a disc on the disc tray. Playing side facing down 3 Press Z OPEN/CLOSE to close the disc tray. appears on the home menu and playback starts. If playback does not start automatically, select in the (Video), (Music), or (Photo) category, and press ENTER.
3 Insert a BD-ROM with BONUSVIEW/ BD-LIVE. The operation method differs depending on the disc. Refer to the instruction manual supplied with the disc. You can play video/music/photo files on the connected USB device. For playable USB devices, see “Playable types of files” (page 32). 1 Connect the USB device to the USB jack on the player. Refer to the instruction manual supplied with the USB device before connecting.
Playing via a Network Streaming BRAVIA Internet Video Serves as a gateway delivering the selected Internet content and a variety of on-demand entertainment straight to your player. 1 Prepare for BRAVIA Internet Video. Connect the player to a network (page 14). 2 3 Select (Video), (Music), or (Photo) on the home menu using
Details Play/Pause Starts or pauses the playback. Top Menu Displays the BD’s or DVD’s Top Menu. Menu/Popup Menu Displays the BD-ROM’s Pop-up Menu or DVD’s menu. Title Search Searches for a title on BDROMs/DVD VIDEOs and starts playback from the beginning. Chapter Search Searches for a chapter and starts playback from the beginning. Angle Switches to other viewing angles when multi-angles are recorded on BD-ROMs/ DVD VIDEOs.
Using the Settings Displays Select (Setup) on the home menu when you need to change the settings of the player. The default settings are underlined. 1 Select (Setup) on the home menu using
Network Update Select “OK” to update the player’s software via the network. z • We recommend the network update every 2 months or so. • For information about update functions, visit the following website: http://www.sony.com/bluraysupport/ Screen Settings TV Type 16:9 Select this when connecting to a wide-screen TV or a TV with a wide mode function. 4:3 Select this when connecting to a 4:3 screen TV without a wide mode function.
Cinema Conversion Mode Auto Video Normally select this. The player automatically detects whether the material is video-based or film-based, and switches to the appropriate conversion method. The conversion method suited for video-based material will always be selected regardless of the material. Output Video Format HDMI Normally select “Auto.” Select “Original Resolution” to output the resolution recorded on the disc.
Audio DRC Audio Settings Auto Performs playback at the dynamic range specified by the disc (BD-ROM only). Other discs are played back at the “Standard” level. Standard Performs playback at a standard compression level. Wide Range No compression works. A more dynamic sound is produced. Audio (HDMI) Auto PCM Normally select this. Outputs audio signals according to the status of the connected HDMI device. Outputs PCM signals from the HDMI OUT jack.
BD/DVD Viewing Settings Parental Control Settings BD/DVD Menu Password Selects the default menu language for BDROMs or DVD VIDEOs. When you select “Select Language Code,” the display for entering the language code appears. Enter the code for your language by referring to “Language code list” (page 37). Sets or changes the password for the Parental Control function. A password allows you to set a restriction on BD-ROM or DVD VIDEO, and Internet video playback.
Auto Display Music Settings On Automatically displays information on the screen when changing the viewing titles, picture modes, audio signals, etc. Off Displays information only when you press DISPLAY. Super Audio CD Playback Layer Super Audio CD Plays the Super Audio CD layer. CD Plays the CD layer. Super Audio CD Playback Channel DSD 2ch Plays the 2ch area. DSD Multi Plays the multi-channel area. On Turns on the screen saver function.
Network Settings Internet Settings Connect the player to the network beforehand. For details, see “Connecting to the Network” (page 14). View Network Status Displays the current network status. Wired Setup Select this when you connect to a broadband router directly. USB Wireless Select this when you use a Setup USB wireless LAN adapter. For further details, visit the following website and check the FAQ contents: http://www.sony.
Troubleshooting If you experience any of the following difficulties while using the player, use this troubleshooting guide to help remedy the problem before requesting repairs. Should any problem persist, consult your nearest Sony dealer. Picture There is no picture or the picture is not output correctly. Additional Information Additional Information , Check that all the connecting cables are securely connected (page 12). , Switch the input selector on your TV to display the signal from the player.
Sound There is no sound or the sound is not output correctly. , Check that all the connecting cables are securely connected (page 12). , Switch the input selector on your AV amplifier (receiver) so that the audio signals of the player are output from your AV amplifier (receiver). , If the audio signal does not come through the DIGITAL OUT (OPTICAL/ COAXIAL)/HDMI OUT jack, check the audio settings (page 23). , For HDMI connections, try the following: 1Turn the player off and on again.
BRAVIA Internet Video The picture/sound is poor/certain programs display a loss of detail, especially during fast-motion or dark scenes. , Picture/sound quality may be poor depending on Internet content providers. , Picture/sound quality may be improved by changing the connection speed. We recommend the connection speed of at least 2.5 Mbps for standard definition video (10 Mbps for high definition video). , Not all videos will contain sound. , Press M to zoom in.
Others Playback does not start from the beginning of content. , Press OPTIONS, and select “Play from beginning.” , When “FAN ERR” appears, try the following: 1Check that the ventilation holes on the rear of the player are not blocked. 2Place the player in a location with adequate ventilation to prevent heat build-up in the player. The player does not respond to any button. Playback does not start from the resume point where you last stopped playing.
Specifications Playable discs System Blu-ray Disc*1 BD-ROM BD-R*2/BD-RE*2 DVD*3 DVD-ROM DVD-R/DVD-RW DVD+R/DVD+RW CD*3 CD-DA (Music CD) CD-ROM CD-R/CD-RW Super Audio CD Laser: Semiconductor laser Inputs and outputs General Power requirements: U.S. and Canada models: 120 V AC, 60 Hz Models for other areas: 110-240 V AC, 50/60 Hz See page 4 for further information. Power consumption: 22 W Dimensions (approx.): 430 mm × 219 mm × 36 mm (17 in. × 8 5/8 in. × 1 7/16 in.) (width/depth/height) incl.
Note on playback operations of BDs/DVDs Some playback operations of BDs/DVDs may be intentionally set by software producers. Since this player plays BDs/ DVDs according to the disc contents the software producers designed, some playback features may not be available. Note about double-layer BDs/DVDs The playback pictures and sound may be momentarily interrupted when the layers switch.
b About the BRAVIA Sync features (for HDMI connections only) By connecting Sony components that are compatible with the “Control for HDMI” function with an HDMI cable (supplied with BDP-BX37 only), operation is simplified as below: • One-Touch Play With one touch of the following buttons, the connected TV turns on and the input selector on the TV is switched to the player automatically. – [/1 – HOME: The home menu appears automatically (page 10, 16, 20). – N PLAY: Playback starts automatically.
z • When connecting the Sony TV that is compatible with the “Control for HDMI” Easy Setting function using the HDMI cable, the “Control for HDMI” setting of the player automatically switches to “On” if the “Control for HDMI” setting on the connected TV is set to “On.” Refer to the instruction manual supplied with the TV.
Copyrights and Trademarks • Other system and product names are generally trademarks or registered trademarks of the manufacturers. ™ and ® marks are not indicated in this document. ,continued Additional Information • This product incorporates copyright protection technology that is protected by U.S. patents and other intellectual property rights.
Code numbers of controllable TVs If more than one code number is listed, try entering them one at a time until you find the one that works with your TV.
Language code list For details, see “BD/DVD Viewing Settings” (page 24). The language spellings conform to the ISO 639: 1988 (E/F) standard. Code Language Additional Information not specified Parental control/area code For details, see “Parental Control Area Code” (page 24).
Index S FAVORITES 9 “Screen Settings” 21 “Setup” 20 Software update 21, 25 SUBTITLE 9 System Power-Off 33 “System Settings” 25 Words in quotations appear in the on-screen displays.