4-169-137-13(1) The software of this player may be updated in the future. To find out details on any available updates, please visit: http://www.sony.
WARNING This label is located on the laser protective housing inside the enclosure. Precautions This symbol is intended to alert the user to the presence of uninsulated “dangerous voltage” within the product’s enclosure that may be of sufficient magnitude to constitute a risk of electric shock to persons. FCC WARNING To reduce the risk of fire or electric shock, do not expose this apparatus to rain or moisture. To avoid electrical shock, do not open the cabinet.
b This equipment has been tested and found to comply with the limits for a Class B digital device, pursuant to Part 15 of the FCC Rules. These limits are designed to provide reasonable protection against harmful interference in a residential installation. This equipment generates, uses, and can radiate radio frequency energy and, if not installed and used in accordance with the instructions, may cause harmful interference to radio communications.
• Do not use solvents such as benzine, thinner, commercially available disc/ lens cleaners, or anti-static spray intended for vinyl LPs. • If you have printed the disc’s label, dry the label before playing. • Do not use the following discs. – A lens cleaning disc. – A disc that has a nonstandard shape (e.g., card, heart). – A disc with a label or sticker on it. – A disc that has cellophane tape or sticker adhesive on it. • Do not resurface the playing side of a disc to remove surface scratches.
On cleaning Clean the cabinet, panel, and controls with a soft cloth. Do not use any type of abrasive pad, scouring powder or solvent such as alcohol or benzine. On cleaning discs, disc/ lens cleaners Do not use cleaning discs or disc/lens cleaners (including wet or spray types). These may cause the apparatus to malfunction. On connecting to the HDMI OUT jack Observe the following as improper handling may damage the HDMI OUT jack and the connector.
Important Safety Instructions 1) 2) 3) 4) 5) Read these instructions. Keep these instructions. Heed all warnings. Follow all instructions. Do not use this apparatus near water. 6) Clean only with dry cloth. 7) Do not block any ventilation openings. Install in accordance with the manufacturer’s instructions. 8) Do not install near any heat sources such as radiators, heat registers, stoves, or other apparatus (including amplifiers) that produce heat.
Table of Contents WARNING . . . . . . . . . . . . . . . . . . . . . . . . . . . . . . . . . . . . . . . . . . . . . . . . . . . . 2 Precautions . . . . . . . . . . . . . . . . . . . . . . . . . . . . . . . . . . . . . . . . . . . . . . . . . . . 4 Guide to Parts and Controls . . . . . . . . . . . . . . . . . . . . . . . . . . . . . . . . . . . . . . 8 Hookups and Settings Step 1: Preparing the Player . . . . . . . . . . . . . . . . . . . . . . . . . . . . . . . . . . . . .
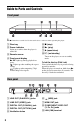
Guide to Parts and Controls Front panel z The N button has a tactile dot. Use the tactile dot as a reference when operating the player. A Disc tray E x (stop) B Power indicator F N (play) Lights up in white when the player is turned on. C Remote sensor G Z (open/close) H [/1 (on/standby) Turns on the player, or sets to standby mode. D Front panel display N, X: Lights up during playback or pause. : Lights up when enabling the repeat setting.
Remote The available functions of the remote differ depending on the disc or the situation. A Z OPEN/CLOSE Opens or closes the disc tray. -TV- INPUT Switches between TV and other input sources. -TV- [/1 (on/standby) Turns on the TV, or sets to standby mode. [/1 (on/standby) Turns on the player, or sets to standby mode. B Number buttons (0 - 9) Enters the title/chapter numbers, etc. VOL +/– Adjusts the TV volume. THEATER (page 32) Switches to the optimum video mode for watching movies automatically.
HOME Enters the player’s home menu. Displays the wall paper when pressed on the category icon of the home menu. RETURN Returns to the previous display. Skips to the previous/next chapter, track, or file.
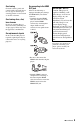
Step 1: Preparing the Player Check that you have the following items: • Audio/video cable (phono plug ×3) (1) • Remote commander (remote) (1) • Size AA (R6) batteries (2) Hookups and Settings Checking the supplied accessories Preparing the remote Insert two Size AA (R6) batteries by matching the 3 and # ends on the batteries to the markings inside the battery compartment.
Step 2: Connecting the Player Do not connect the AC power cord until you have made all the connections. Connecting to your TV Select one of the following connection methods according to the input jacks on your TV. Match the color of the plug to that of the jack when connecting. High quality HDMI cable (not supplied) Audio/video cable (supplied) Component video cable (not supplied) Audio/video cable (supplied) Standard quality b Do not connect the player through a VCR.
Connecting to your AV amplifier (receiver) Select one of the following connection methods according to the input jacks on your AV amplifier (receiver). When you select A or B, make the appropriate settings in the “Audio Settings” setup (page 23). Hookups and Settings HDMI cable (not supplied) HDMI cable (not supplied) t Set “BD Audio MIX Setting” (page 23).
Step 3: Easy Setup Connecting to the Network When turned on for the first time Wait for a short while before the player turns on and starts “Easy Setup”. 1 Plug the player into the AC outlet. Wired Setup Use a LAN cable to connect to the LAN (100) terminal on the player. LAN cable (not supplied) to AC outlet 2 Press [/1 to turn on the player.
To set the network settings Select “Network Settings,” “Internet Settings,” then “USB Wireless Setup” (page 26), and follow the on-screen instructions to complete the setup.
Playing a Disc For playable discs, see “Playable discs” (page 30). 1 Switch the input selector on your TV so that the signal from the player appears on your TV screen. 2 Press Z OPEN/CLOSE, and place a disc on the disc tray. Playing side facing down 3 Press Z OPEN/CLOSE to close the disc tray. appears on the home menu and playback starts. If playback does not start automatically, select in the (Video), (Music), or (Photo) category, and press ENTER.
3 Insert a BD-ROM with BONUSVIEW/ BD-LIVE. The operation method differs depending on the disc. Refer to the instruction manual supplied with the disc. You can play video/music/photo files on the connected USB device. For playable USB devices, see “Playable types of files” (page 31). 1 Connect the USB device to the USB jack on the player. Refer to the instruction manual supplied with the USB device before connecting.
Playing via a Network Streaming BRAVIA Internet Video Serves as a gateway delivering the selected Internet content and a variety of on-demand entertainment straight to your player. 1 Prepare for BRAVIA Internet Video. Connect the player to a network (page 14). 2 3 Select (Video), (Music), or (Photo) on the home menu using
(Photo) only Details Slideshow Speed Changes the slideshow speed. Slideshow Plays a slideshow. Rotate Left Rotates the photo counterclockwise by 90 degrees. Rotate Right Rotates the photo clockwise by 90 degrees.
Using the Settings Displays Select (Setup) on the home menu when you need to change the settings of the player. The default settings are underlined. 1 Select (Setup) on the home menu using
Network Update Select “OK” to update the player’s software via the network. z • We recommend the network update every 2 months or so. • For information about update functions, visit the following website: http://www.sony.com/bluraysupport/ Screen Settings TV Type 16:9 Select this when connecting to a wide-screen TV or a TV with a wide mode function. 4:3 Select this when connecting to a 4:3 screen TV without a wide mode function.
Cinema Conversion Mode Auto Video Normally select this. The player automatically detects whether the material is video-based or film-based, and switches to the appropriate conversion method. The conversion method suited for video-based material will always be selected regardless of the material. Output Video Format HDMI Normally select “Auto.” Select “Original Resolution” to output the resolution recorded on the disc.
Downmix Audio Settings Surround Outputs audio signals with surround effects. Select this when connecting an audio device that supports Dolby Surround (Pro Logic) or DTS Neo 6. Stereo Outputs audio signals without surround effects. Select this when connecting an audio device that does not support Dolby Surround (Pro Logic) or DTS Neo 6. Audio (HDMI) Auto PCM Normally select this. Outputs audio signals according to the status of the connected HDMI device. Outputs PCM signals from the HDMI OUT jack.
BD/DVD Viewing Settings Parental Control Settings BD/DVD Menu Password Selects the default menu language for BDROMs or DVD VIDEOs. When you select “Select Language Code,” the display for entering the language code appears. Enter the code for your language by referring to “Language code list” (page 34). Sets or changes the password for the Parental Control function. A password allows you to set a restriction on BD-ROM or DVD VIDEO, and Internet video playback.
Screen Saver System Settings On Turns on the screen saver function. The screen saver image appears when you do not use the player for more than 10 minutes while an onscreen display is displayed. Off Turns off the function. OSD Selects your language for the player onscreen displays. Dimmer Bright Bright lighting. Dark Low lighting. On Off Turns off the lighting during playback. Low lighting other than during playback.
Network Settings Internet Settings Connect the player to the network beforehand. For details, see “Connecting to the Network” (page 14). View Network Status Displays the current network status. Wired Setup Select this when you connect to a broadband router directly. USB Wireless Select this when you use a Setup USB Wireless LAN Adapter. For further details, visit the following website and check the FAQ contents: http://www.sony.
Troubleshooting If you experience any of the following difficulties while using the player, use this troubleshooting guide to help remedy the problem before requesting repairs. Should any problem persist, consult your nearest Sony dealer. Picture There is no picture or the picture is not output correctly. Additional Information Additional Information , Check that all the connecting cables are securely connected (page 12). , Switch the input selector on your TV to display the signal from the player.
Sound There is no sound or the sound is not output correctly. , Check that all the connecting cables are securely connected (page 12). , Switch the input selector on your AV amplifier (receiver) so that the audio signals of the player are output from your AV amplifier (receiver). , If the audio signal does not come through the DIGITAL OUT (OPTICAL/ COAXIAL)/HDMI OUT jack, check the audio settings (page 23). , For HDMI connections, try the following: 1Turn the player off and on again.
Network connection The player cannot connect to the network. , Check the network connection (page 14) and the network settings (page 26). The message “A new software version has been found on the network. Perform update under "Network Update."” appears on the screen when turning the player on. , See “Network Update” (page 21) to update the player to a newer software version. The “Control for HDMI” function does not work (BRAVIA Sync). , Check that “Control for HDMI” is set to “On” (page 25).
, When “FAN ERR” appears, try the following: 1Check that the ventilation holes on the rear of the player are not blocked. 2Place the player in a location with adequate ventilation to prevent heat build-up in the player. The player does not respond to any button. , Moisture has condensed inside the player (page 4). , Hold down [/1 on the player for more than 10 seconds until the indicators on the front panel display turn off.
Discs that cannot be played • • • • • • • • • BDs with cartridge DVD-RAMs HD DVDs DVD Audio discs PHOTO CDs Data part of CD-Extras VCDs/Super VCDs Audio material side on DualDiscs A disc recorded in a color system other than NTSC, such as PAL (this player conforms to the NTSC color system). Note on Discs Note on playback operations of BDs/DVDs Some playback operations of BDs/DVDs may be intentionally set by software producers.
About the BRAVIA Sync features (for HDMI connections only) By connecting Sony components that are compatible with the “Control for HDMI” function with an HDMI cable (not supplied), operation is simplified as below: • One-Touch Play With one touch of the following buttons, the connected TV turns on and the input selector on the TV is switched to the player automatically. – [/1 – HOME: The home menu appears automatically (page 10, 16, 20). – N PLAY: Playback starts automatically.
WPA-PSK (AES), WPA2-PSK (AES) AES is a security technology that uses an advanced security method that is distinct from WEP and TKIP. AES assures a higher security level than WEP or TKIP. Copyrights and Trademarks While holding down -TV- [/1, enter the TV’s manufacturer code using the number buttons. If more than one code number is listed, try entering them one at a time until you find the one that works with your TV.
Language code list For details, see “BD/DVD Viewing Settings” (page 24). The language spellings conform to the ISO 639: 1988 (E/F) standard. Code Language not specified Parental control/area code For details, see “Parental Control Area Code” (page 24).
F S FAVORITES 9 A HDMI 22, 23 HOME 10, 20 Home menu 20 “Screen Settings” 21 “Setup” 20 Software update 21, 25 SUBTITLE 9 System Power-Off 32 “System Settings” 25 AUDIO 9 “Audio Settings” 23 I T Index Words in quotations appear in the on-screen displays.