Table of contents Operation Search Menu/Settings Search Index Handbook Mobile HD Snap Camera MHS-FS1/FS1K/FS2/FS2K © 2011 Sony Corporation 4-275-040-11(1) GB
Table of contents How to use this handbook Click on a button on the right to jump to the corresponding page. This is convenient when searching for a function you want to view. Operation Search Search for information by operation. Menu/Settings Search Search for information in a listing of menu/setting items. Marks and notations used in this handbook Menu/Settings Search Index Search for information by keyword. Operation Search Table of contents Search for information by function.
Notes on the battery pack Be sure to make a backup copy to protect your data. • The battery pack is built into the camera. Charge the camera before using for the first time. • You can charge the battery pack even if it is not completely discharged. In addition, even if the battery pack is not fully charged, you can use the partially charged capacity of the battery pack as is. • For details on the usable battery pack, see page 75.
Illustrations used in this handbook are for the MHS-FS2/FS2K, unless noted otherwise. Warning on copyright Television programs, films, videotapes, and other materials may be copyrighted. Unauthorized recording of such materials may be contrary to the provisions of the copyright laws. Menu/Settings Search • This camera supports “MP4 format” as movie file format. Therefore, movies recorded by this camera cannot be played on devices that do not support “MP4 format”.
Table of contents Life with “Bloggie” Capture your life Operation Search At a party Menu/Settings Search Record still images at maximum 5M (2592 × 1944) and movies at maximum 1920 × 1080 30p full high-vision (page 50, 52). Also, you can record still images during movie recording (page 32). During a walk Index Take compact “Bloggie” with you anywhere, anytime. Take it out, and record casually.
Menu/Settings Search You can upload images easily and intuitively, using the Bloggie Software pre-loaded on the internal memory (page 25, 49). You can also choose the images and the sharing site to upload in advance (Share it Later) (page 55). Operation Search Import and upload captured moments Table of contents Share your life Index Connect to TV Connect your “Bloggie” to a TV with an HDMI cable (sold separately), and enjoy images on the big screen (page 65).
Notes on using the camera Operation Search Menu/Settings Search How to use this handbook····································· 2 Notes on using the camera ··································· 3 Life with “Bloggie”·················································· 5 Operation Search ················································ 10 About operation buttons of the camera ··············· 11 Menu/Settings Search········································· 12 Identifying parts······································
Viewing································································ 40 Playback zoom···················································· 43 Volume control ···················································· 44 Settings Menu/Settings Search Recommended computer environment ··············· 45 Using the Bloggie Software································· 47 Importing images to a computer·························· 48 Uploading images to a media service ················· 49 Operation Search Computer Tab
Index ··································································· 79 Table of contents Index Operation Search Menu/Settings Search Index 9GB
Shooting (Movies) ··············································· 31 Changing image size Photo Size ····························································· 50 Movie Size ····························································· 52 Deleting images Delete ······································································ 53 Format ···································································· 63 Displaying enlarged images Playback zoom ················································
Table of contents About operation buttons of the camera Multi-selector buttons Operation Search You can use the multi-selector buttons (v/V/b/B) to activate functions such as zooming when shooting or playing back images. The function that is allocated to each multi-selector button is displayed on the LCD screen of the camera. The display changes according to how the camera is held (vertically or horizontally).
Table of contents Menu/Settings Search Menu items In the table below, indicates settings that can be changed, while – indicates settings that cannot be changed. Click an item to jump to the corresponding page. Shooting mode Playback mode – Photo Size – Movie Size Protect – Share it Later – Menu/Settings Search Delete – Operation Search Items 1 Press the ON/OFF (Power) button. Index ON/OFF (Power) button 2 Press the function button ([Menu]) to display the menu screen.
Table of contents 3 Select the desired menu item by using v/V to set. ) to exit the menu screen. Setting items In the table below, indicates settings that can be changed, while – indicates settings that cannot be changed. Click an item to jump to the corresponding page. Items Shooting mode Menu/Settings Search Press the function button ( Operation Search 4 Select the desired setting item by using b/B, then press the MOVIE/ ENTER button.
Select [Cancel], then press the MOVIE/ENTER button. If [Cancel] does not appear on the screen, directly set back to the previous setting. • Selected settings are retained even if the power is turned off.
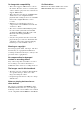
MHS-FS1/FS1K A Lens B Hook for wrist strap Table of contents Identifying parts C LCD screen D Function buttons F Microphone G Speaker H ON/OFF (Power) button I Charge lamp J (Shutter) button K Tripod receptacle • Do not hold the camera when attaching the tripod. L HDMI OUT jack (65) Menu/Settings Search • Press and hold the ON/OFF (Power) button for at least 7 seconds to force-quit the camera.
MHS-FS2/FS2K A Light B Lens Table of contents Identifying parts C Front display D Hook for wrist strap E Main display G Front display button H MOVIE/ENTER button Multi-selector buttons (v/V/b/B) Operation Search F Function buttons I Microphone K ON/OFF (Power) button • Press and hold the ON/OFF (Power) button for at least 7 seconds to force-quit the camera. L Charge lamp M (Shutter) button Menu/Settings Search J Speaker N Tripod receptacle • Do not hold the camera when attaching the tripod.
Icons are displayed on the screen to indicate the camera status.
Notes Table of contents • Indicators and their positions are approximate and differ from what you actually see. • The screen display shifts both horizontally and vertically depending on the camera aspect. • The screen display disappears automatically after about 5 seconds.
Table of contents How to hold the camera • Be careful not to block the lens or microphone with your finger when shooting. Operation Search Menu/Settings Search Index • Do not hold the USB jack or HDMI OUT jack cover. Also, do not hold the 360 Video Lens when it is attached to the camera. • Attach the strap and place your hand through its loop to prevent the camera from damage by being dropped.
movies Portrait images are recorded. Black bands appear on the left and right of the screen during playback on TV or computer. This is useful when shooting portrait objects.
• USB connection support cable (1) Menu/Settings Search • Wrist strap (1) • Software (page 25, 47) The following contents are included on the internal memory of this camera. – Bloggie Software (application software) – Bloggie Handbook (this manual) • Instruction Manual (1) • Important Notice (1) Operation Search Use this if the USB jack of the camera cannot be connected to the computer (page 22).
The camera’s battery is continuously charged whenever the camera is connected to a running computer. Table of contents Charging the camera 1 Press the ON/OFF (Power) button to turn off the camera. Operation Search 2 Slide the slide lever at the side of the camera. The USB jack comes out as shown in the illustration. Menu/Settings Search ON/OFF (Power) button Index Slide lever USB jack 3 Connect the camera to the computer that is turned on. The charge lamp lights up in orange, and charging starts.
Install Bloggie Software (pre-loaded on the internal memory) after completing the procedure above. Notes Perform the procedures from step 1 to 3 below before: • Disconnecting the USB connection support cable. • Turning off the camera. 1 Double-click the disconnect icon on the tasktray. Windows Vista (USB Mass Storage Device) t [Stop]. Windows XP 3 Confirm the device on the confirmation window, then click [OK].
Charging time Full charge time Table of contents z How long does it take to charge the camera? Approx. 200 min. • Time required to charge a fully depleted battery at a temperature of 25°C (77°F). Charging may take longer under certain circumstances or conditions. Operation Search zHow long can I record or play back images? Standard battery life Continuous recording time*2 Typical recording time* 3 Approx. 120 min. Approx. 70 min. Playback time Approx. 150 min.
You can do the following using the Bloggie Software (pre-loaded on the internal memory). – Import images shot with the camera to a computer, and play back. – Upload images to a network service. Table of contents Installing the software 1 Press the ON/OFF (Power) button to turn on the camera. Operation Search 2 Slide the slide lever at the side of the camera. Menu/Settings Search ON/OFF (Power) button Index Slide lever USB jack 3 Connect the camera to the computer that is turned on.
4 Activate the installer. Table of contents Windows 7 1 Click [Open folder to view files] on the AutoPlay screen. Operation Search 2 Double-click “Setup_Bloggie_Windows.exe” in the folder. Menu/Settings Search Windows Vista/Windows XP 1 Click [Setup Bloggie Software] on the AutoPlay screen. Index • If the AutoPlay screen does not appear, click [Start] t [Computer] (in Windows XP, [My Computer]), then double-click [Bloggie Software] t “Setup_Bloggie_Windows.exe.
3 Double click the “Bloggie” icon. Table of contents • For details on the Bloggie Software, see page 47. Notes • If you turn on or restart the computer while the camera is connected to the computer, the camera may malfunction. In this case, press and hold the ON/OFF (Power) button for at least 7 seconds, and forcequit the camera. Disconnect the camera from the computer before you turn on or restart the computer. • Even if you delete files such as “Setup_Bloggie_Windows.exe”/“Setup Bloggie Mac.
1 Press the ON/OFF (Power) button. The camera is turned on. The demonstration movie plays back when you turn on the camera for the first time. 3 Set the clock by using v/V/b/B. 1 Select the desired date display format by using v/V, then press the MOVIE/ENTER button. 2 Select the year, month, or day by using b/B and numeric value by using v/V, then press the MOVIE/ENTER button. 3 Press the function button ([OK]).
1 Press the ON/OFF (Power) button. ON/OFF (Power) button Operation Search 2 Compose the shot. Be sure not to place fingers on the lens. Press v to zoom in or V to zoom out. (Shutter) button halfway AE/AF lock indicator (Shutter) button When the image is in focus, a beep sounds and the z indicator (AE/AF lock) lights on the top of the display. Menu/Settings Search 3 Press the down. Table of contents Shooting (Still images) Index 4 Press the (Shutter) button fully down.
to focus on • When the camera detects faces, the white frames appear, and the focus and exposure are adjusted to the faces automatically. • The frames turn green when the faces are in focus by pressing the (Shutter) button half way down. • The camera may not detect faces depending on the shooting condition. Menu/Settings Search z When shooting portrait Operation Search • The shortest shooting distance is approximately 10 cm (4 inches).
1 Press the ON/OFF (Power) button. ON/OFF (Power) button Operation Search 2 Compose the shot. Be sure not to place fingers on the lens. Press v to zoom in or V to zoom out. MOVIE/ENTER button • Continuous recording is possible for approximately 29 minutes. • The maximum size of a single movie file is approximately 2 GB. Recording stops before 29 minutes if the file size reaches approximately 2 GB during movie recording. Index Notes Menu/Settings Search 3 Press the MOVIE/ENTER button.
• Press the (Shutter) button fully down during movie recording. • The recorded still image appears small on the LCD screen of the camera. – 1920 × 1080 30p: (1920 × 1080) Operation Search • The still image sizes are as follows, depending on the movie size.
You can enlarge the image when shooting. The camera’s zoom function can enlarge images up to 4 times. Table of contents Zoom 1 Press and hold v or V. Press and hold v to zoom in or V to zoom out. Operation Search • Only Digital zoom is available with this camera. • You may not be able to zoom in or out images smoothly when using zoom function. • Image quality decreases as the images are digitally processed.
You can shoot with the light of the camera turned on. 1 Press b on the shooting screen. Table of contents Light (MHS-FS2/FS2K only) Press b again to turn off the light. Operation Search • You can only use the light in shooting mode. Note that you cannot use it when the 360 Video Lens is attached to the camera. • The camera emits very bright light. Do not aim directly at eyes at close range. • Battery power wears down faster when the light is turned on.
1 Press B on the shooting standby screen. Table of contents Self-Timer Operation Search 2 Select the desired mode by using B. Does not use the self-timer. Sets the 2-second delay self-timer. When you press the (Shutter) button or the MOVIE/ENTER button, a self-timer icon flashes, and after rapid beep sounds are heard, the camera will shoot. (10sec) Sets the 10-second delay self-timer.
You can shoot self-portraits in mirror mode by displaying the image on the Front display. It enables you to confirm the desired angles or check faces. Table of contents Shooting in mirror mode (Selfportraits) (MHS-FS2/FS2K only) 1 Press the Front display button ( ). Index • A mirror-reversed image of the subject appears on the Front display during mirror mode, but it will be recorded normally. • You can shoot with the countdown timer on the Front display during self-timer mode (page 35).
By attaching the supplied 360 Video Lens to the camera, you can shoot 360-degree images of the area around the camera. Table of contents Shooting 360 Video images (MHSFS1K/FS2K only) Operation Search Menu/Settings Search 1 Take out the 360 Video Lens from its case. • Press and hold the f mark of the 360 Video Lens case to open it. 2 Press the ON/OFF (Power) button. Index ON/OFF (Power) button 3 Press and hold both sides of the 360 Video Lens (1), then attach it to the camera in the direction (2).
4 Start shooting (page 29, 31). Table of contents • • • • Do not attach or remove the 360 Video Lens during shooting. The still image size is fixed to 3M (16:9), and the movie size is fixed to 1920 × 1080 30p. When you attach the 360 Video Lens to the camera, you cannot operate zooming or settings. Do not hold the camera by the 360 Video Lens only. Attach the bottom part of the 360 Video Lens case to the bottom of the camera.
You can play back 360 Video images on the computer using the Bloggie Software. For details on the installation of the Bloggie Software, see page 25. Image played back on this camera Image played back on the computer using the Bloggie Software 360 Video image • You can play back each 1/4 portion of the 360-degree panoramic view image, scene by scene, on the camera in 360 playback mode (page 42).
1 Press the function button ( Table of contents Viewing ) to switch to playback mode. The index screen appears. Operation Search 2 Select an image by using v/V/b/B, then press the MOVIE/ENTER button. Movie Menu/Settings Search A single movie plays back when a movie is selected. The movie will be paused if you press the MOVIE/ ENTER button. Still image z To show the previous/next images Index Press b/B. Press b/B for the movies while playback is paused.
Table of contents z To go back to the shooting screen Do one of the following: – Press the function button ( ). Operation Search – Press the (Shutter) button. Menu/Settings Search (Shutter) button z To go back to the index screen Index Press v during playback of the still images or movies. zPlaying back with the Front display (MHS-FS2/FS2K only) By displaying the Front display during playback, you can share the playback images or movies with a person face-to-face.
only) Playback position 360 Video image Menu/Settings Search Full image of the 360 Video image Operation Search You can play back each 1/4 portion of the 360-degree panoramic view image, scene by scene, on the camera in 360 playback mode. In playback mode, select an image that was shot with the 360 Video Lens. While the 360 Video image is paused, press V to set 360 playback mode, then press the MOVIE/ENTER button to play back.
Enlarges the played back still images. 1 Press the function button ( ) to switch to playback mode. Table of contents Playback zoom 2 Select a still image, then press the MOVIE/ENTER button. 3 Press the MOVIE/ENTER button. Operation Search 4 Adjust the magnification and the part to enlarge. Shows the displayed area of the whole image Note • You cannot operate playback zoom when an HDMI cable (sold separately) is connected.
You can adjust the volume for playback movies. 1 Press the function button ( ) to switch to playback mode. Table of contents Volume control 2 Select a movie, then press the MOVIE/ENTER button. 3 Press V. Operation Search 4 Press B to increase or b to decrease the volume.
Table of contents Recommended computer environment Windows Microsoft Windows XP*1 SP3/Windows Vista*2 SP1/ Windows 7 Others CPU: Intel Core Duo 1.66 GHz or faster, Intel Core 2 Duo 1.20 GHz or faster Memory: 1 GB or more Hard Disk: Disk space required for installation: approximately 200 MB Display: 1,024 × 768 dots or more *1 Windows XP 64-bit editions and Starter (Edition) are not supported. *2 Starter (Edition) is not supported.
To play back and edit movie files (MPEG-4 AVC/H.264) recorded by the camera on your computer, you need to install the software compatible with MPEG-4 AVC/H.264 or the Bloggie Software. Note • Operations are not guaranteed, even on computers fulfilling the above system requirements. For example, other open or background applications currently running may limit product performance.
Activating On-screen items Operation Search 1 Double-click the Bloggie Software (preloaded on the internal memory) shortcut icon on the desktop. Table of contents Using the Bloggie Software Menu/Settings Search Index A Sharing site: Drag and drop the thumbnail. B Displays the images in the “Bloggie.” C Displays imported images in the computer. D Thumbnails: Double-click to play. (movie), (imported) • Press and hold the Ctrl key (for Windows)/command key (for Macintosh) for multiple selections.
To connect the camera to your computer, see page 45. Table of contents Importing images to a computer Windows When not using the Bloggie Software When the AutoPlay Wizard appears after making a USB connection between the camera and a computer, click [Open folder to view files] t [OK] t [DCIM] or [MP_ROOT] t copy the desired images to the computer. When using the Bloggie Software See page 47. The image files are copied to the hard disk.
1 Choose images and the sharing site to upload with the camera in advance (page 55). Bloggie Software starts automatically and the confirmation screen for uploading images appears. Notes Notes on Bloggie Software (pre-loaded on the internal memory) Menu/Settings Search • Set [LUN Setting] to [Multi]. • When uploading images over the Internet, the cache may remain in the computer being used depending on the service provider. This is also true when the camera is used for this purpose.
The photo size determines the size of the image file that is recorded when you take an image. The larger the photo size, the more detail will be reproduced when the image is printed on largeformat paper. The smaller the photo size, the more images can be recorded. Table of contents Photo Size 1 Press the function button ([Menu]) to display the menu screen. Photo Size (2592×1944) Usage guidelines No.
A digital image is made up of a collection of small dots called pixels. If it contains a large number of pixels, the image becomes large, it takes up more memory, and the image is displayed in fine detail. “Image size” is shown by the number of pixels. Although you cannot see the differences on the screen of the camera, the fine detail and data processing time differ when the image is printed or displayed on a computer screen. Image size: 5M 2,592 pixels × 1,944 pixels = 5,038,848 pixels 2 Image size: 0.
The larger the movie size, the higher the movie quality. The movies shot with the camera will be recorded in MPEG-4 AVC/H.264 Main Profile, approximately 30 or 60 frames per second, Progressive, AAC LC, “MP4 format”. Table of contents Movie Size 1 Press the function button ([Menu]) to display the menu screen.
Allows you to select unwanted images for deletion. 1 Press the function button ( ) to switch to playback mode. Table of contents Delete 2 Press the function button ([Menu]) to display the menu screen. (Delete) by using v/V. Then press the MOVIE/ENTER button to (This Image) (Multiple Images) Deletes the image that is being selected. Deletes more than two images at once. Can be selected from only the index screen. 2Press the function button ([OK]).
Protects recorded images against accidental erasure. The mark is displayed when playing back registered images. 1 Press the function button ( Table of contents Protect ) to switch to playback mode. 2 Press the function button ([Menu]) to display the menu screen. (This Image) (Multiple Images) Protects the image that is being selected. Operation Search 3 Select (Protect) by using v/V. Then press the MOVIE/ENTER button to decide. Protects more than two images at once.
You can install the Bloggie Software (pre-loaded on the internal memory) to upload images for sharing. You can also choose images and the sharing site to upload in advance. For information on how to upload images, see page 49. 1 Press the function button ( Table of contents Share it Later ) to switch to playback mode. 3 Select (Share it Later) by using v/V. Then press the MOVIE/ENTER button to decide. Shares the image that is being selected. Select the sharing site and press the function button ([OK]).
Curbs the flicker generated by fluorescent by using the electro-shutter. 1 Press the function button ([Menu]) t Select Reduction] t desired mode Uses the Flicker Reduction. Off Does not use the Flicker Reduction.
Sets the sound for when you operate the camera. 1 Press the function button ([Menu]) t Select desired mode. (Settings) t [Beep] t Turns on the beep sound when you press the the MOVIE/ENTER button. Off Turns off the beep sound.
Selects the language to be used in the menu items, warnings and messages. 1 Press the function button ([Menu]) t Select Setting] t desired language.
Performs a demonstration of the camera. 1 Press the function button ([Menu]) t Select Mode] t desired mode. Performs a demonstration. Off Does not perform a demonstration. Note • The demonstration stops when operating any of the following. – Press the (Shutter) button or the MOVIE/ENTER button. – Turn off the power.
Table of contents Initialize Initializes the setting to the default setting. Even if you execute this function, the images are retained. 1 Press the function button ([Menu]) t Select t Press the function button ([OK]). (Settings) t [Initialize] Operation Search Note • Perform initialization after charging the camera to prevent the camera from turning off during the process.
Sets the display method for the recording media displayed on a computer screen or other monitor when the camera is connected with a computer or AV component using a USB connection. 1 Press the function button ([Menu]) t Select Setting] t desired mode. Table of contents LUN Setting (Settings) t [LUN Select this setting when you connect the camera to a computer. Single Select this setting in cases where the images are not displayed when the camera is connected to a device other than a computer.
Selects the type of signal to be output to a TV from the HDMI OUT jack. If images are not displayed on the TV clearly, changing the setting may improve the display. 1 Press the function button ([Menu]) t Select Output] t desired mode. Outputs with 60Hz. 50Hz Outputs with 50Hz.
Formats the internal memory. 1 Press the function button ([Menu]) t Select Press the function button ([OK]). (Settings) t [Format] t Table of contents Format Note Operation Search • Note that formatting permanently erases all data including even protected images.
Sets the date and time again. 1 Press the function button ([Menu]) t Select Time Setting]. (Settings) t [Date & Table of contents Date & Time Setting 2 Select the desired item to set. Sets the date and time (page 28). Daylight Savings Pushes forward an hour.
Connect the camera to a TV which has an HDMI jack with an HDMI cable (sold separately). Refer also to the instruction manuals of the TV. Table of contents Viewing images on a TV 1 Turn off both the camera and the TV. Operation Search 2 Open the jack cover and connect the camera to the TV with the HDMI cable (sold separately). HDMI jack 2 To HDMI OUT jack 3 Turn on the camera. Menu/Settings Search 1 To HDMI jack HDMI cable 4 Turn on the TV and set the input.
You can use the camera as a Web camera by connecting it to a computer (USB streaming). Table of contents Using the camera as a Web camera 1 Connect the camera to a computer. Notes • The movie size is fixed to 640 × 480. • Use the computer’s microphone during Web camera mode. Operation Search 2 Press the function button ([Menu]) t Select [Web Camera].
If you want to view images on a TV screen, you need a TV with an HDMI jack and an HDMI cable (sold separately). The color system of the TV must match that of the camera. Check the following lists for the TV color system of the country or region where the camera is used, and set [HDMI Output] (page 62).
If you experience trouble with the camera, try the following solutions. 1 Check the items on pages 68 to 73. Table of contents Troubleshooting 2 Turn the power off and then on again. Be aware that by sending the camera for repair, you give consent that the contents of the internal memory, music files may be checked. Battery pack and power Index Additional information on this product and answers to frequently asked questions can be found at our Customer Support Website. http://www.sony.
Cannot charge the camera. Table of contents Operation Search • Turn off the camera and make the USB connection. • Disconnect the USB connection support cable, and then reconnect it. • Use the USB connection support cable (supplied). • Charge the battery in an ambient temperature of 10°C to 30°C (50°F to 86°F). • Turn on the computer and connect the camera. • Release the computer from sleep or hibernation status. • Connect the camera directly to a computer using the supplied USB connection support cable.
The top and bottom edges of images are trimmed slightly on a connected TV. Table of contents • The LCD screen of the camera can display recording images across the entire screen (full pixel display). However, this may cause slight trimming of the top, bottom, right, and left edges of images when played back on a TV that is not compatible with full pixel display. Black bands appear on the left and right of the screen.
The camera does not work properly. • Press and hold the ON/OFF (Power) button for at least 7 seconds, and force-quit the camera. Then turn the camera on again. Table of contents Others The lens gets fogged. The camera becomes warm when you use it for a long time. • This is not a malfunction. Operation Search • Moisture condensation has occurred. Turn off the camera and wait about an hour for the moisture to evaporate. The Language/Clock Setting screen appears when you turn on the camera.
If the following messages appear, follow the instructions. System error • Turn the power off and then on again. Camera overheating Allow it to cool • The camera temperature has risen. The power may turn off automatically, or you may be unable to record movies. Leave the camera in a cool location until the temperature goes down. • Turn the power off and then on again. Index Internal memory error Menu/Settings Search • If you record movies for an extended period, the camera temperature rises.
Image size over limit Maximum number of images already selected • Up to 100 files can be selected when using [Delete], [Share it Later] and [Protect]. Table of contents • You are playing back an image with size that cannot be played back on the camera. Operation cannot be executed for movie files Invalid operation • This message appears if you perform an invalid operation. Operation Search • Playback zoom cannot be performed on movies.
The number of still images and recordable time may vary depending on the shooting conditions. Table of contents Number of still images and recordable time of movies Still images 4:3 (5M) 16:9 (3M) 1309 16:9 (0.4M) 16105 2890 • When the number of remaining recordable images is greater than 9,999, the “>9999” indicator appears. • When images recorded using other cameras are played back on this camera, the display may differ from the actual image size.
On charging the battery pack • We recommend charging the battery pack in an ambient temperature of between 10°C to 30°C (50°F to 86°F). The battery pack may not be effectively charged in temperatures outside this range. • When usable battery life becomes half the usual time, even after charging the battery fully, the battery should be replaced. Consult your nearest Sony dealer. • Battery performance decreases in low temperature surroundings.
Do not use/store the camera in the following places Operation Search • In an extremely hot, cold or humid place In places such as in a car parked in the sun, the camera body may become deformed and this may cause a malfunction. • Under direct sunlight or near a heater The camera body may become discolored or deformed, and this may cause a malfunction.
Camera [System] Menu/Settings Search Index Power: Built-in rechargeable battery pack USB charging (supplied from the computer by connecting with the supplied USB connection support cable) Charging time: Approx. 200 mins. (full charge) (when charging from the USB connector of the computer) Power consumption (during shooting): 1.7 W (when the movie image size is [1280×720 30p]) Operating temperature: 0°C to 40°C (32°F to 104°F) Storage temperature: –20°C to +60°C (–4°F to +140°F) Dimensions (Approx.
Trademarks THIS PRODUCT IS LICENSED UNDER THE AVC PATENT PORTFOLIO LICENSE FOR THE PERSONAL AND NON-COMMERCIAL USE OF A CONSUMER TO (i) ENCODE VIDEO IN COMPLIANCE WITH THE AVC STANDARD (“AVC VIDEO”) AND /OR (ii) DECODE AVC VIDEO THAT WAS ENCODED BY A CONSUMER ENGAGED IN A PERSONAL AND NONCOMMERCIAL ACTIVITY AND/OR WAS OBTAINED FROM A VIDEO PROVIDER LICENSED TO PROVIDE AVC VIDEO. NO LICENSE IS GRANTED OR SHALL BE IMPLIED FOR ANY OTHER USE. ADDITIONAL INFORMATION MAY BE OBTAINED FROM MPEG LA, L.L.C.
Numerics M 360 Video images .............................................................37 Macintosh computer ........................................................45 Table of contents Index Movie Size ...........................................................................52 B N Beep ........................................................................................57 Number of still images ...................................................74 Bloggie Software .........................
W Web camera ........................................................................66 Windows computer ..........................................................45 Table of contents Warning messages............................................................72 Z Zoom ......................................................................................