4-178-243-16(1) Blu-ray Disc/DVD Home Theatre System Operating Instructions BDV-E870 / E570 / E470 / E370 / T57 / T37 ©2010 Sony Corporation
doctor) before allowing young children to watch 3D video images. Adults should supervise young children to ensure they follow the recommendations listed above. WARNING Do not install the appliance in a confined space, such as a bookcase or built-in cabinet. To reduce the risk of fire, do not cover the ventilation opening of the apparatus with newspapers, tablecloths, curtains, etc. Do not place the naked flame sources such as lighted candles on the apparatus.
NOTE: This equipment has been tested and found to comply with the limits for a Class B digital device, pursuant to Part 15 of the FCC Rules. These limits are designed to provide reasonable protection against harmful interference in a residential installation. This equipment generates, uses, and can radiate radio frequency energy and, if not installed and used in accordance with the instructions, may cause harmful interference to radio communications.
800-222-7669 or visit http:// www.sony.com/ on the Internet. The telephone number below is for FCC-related matters only. Regulatory Information Declaration of Conformity Trade Name: SONY Model: UWA-BR100 Responsible Party: Sony Electronics Inc. Address: 16530 Via Esprillo, San Diego, CA 92127 U.S.A. Telephone Number: 858-9422230 This device complies with part 15 of the FCC rules.
registered trademarks of the manufacturers. ™ and ® marks are not indicated in this document. About These Operating Instructions surround back amplifier, or S-AIR receiver is used. • The instructions in these Operating Instructions describe the controls on the remote. You can also use the controls on the unit if they have the same or similar names as those on the remote.
Table of Contents About These Operating Instructions ....... 5 Unpacking ............................................... 7 Index to Parts and Control .................... 10 Getting Started Step 1: Installing the System .......15 Step 2: Connecting the System ...22 Step 3: Performing the Easy Setup ........................................28 Step 4: Selecting the Source .......29 Step 5: Enjoying Surround Sound .......................................30 Playback Playing a Disc ..............................
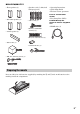
Unpacking BDV-E870 • Front speakers (2) • Subwoofer (1) • R6 (size AA) batteries (2) • Calibration mic (1) • FM wire antenna (aerial) (1) • Bases (2) or • Speaker cords (3, blue/gray/ green) • Screws (6) • Speaker-bottom covers (2) • Surround speakers (2) • Video cord (1) • Center speaker (1) • Remote commander (remote) (1) • • • • • Operating Instructions Speaker Installation Guide Quick Setup Guide End user license agreement Easy Setup Disc (DVD) 7US
BDV-E570/BDV-E470/BDV-T57 • Front speakers (2) • FM wire antenna (aerial) (1) or • Surround speakers (2) • Speaker cords (6, white/red/ blue/gray/green/purple) • Center speaker (1) • Video cord (1) • • • • Operating Instructions Quick Setup Guide End user license agreement Easy Setup Disc (DVD) For BDV-E570/BDV-T57 • USB Wireless LAN Adapter (UWA-BR100) • UWA-BR100 External cable • Remote commander (remote) (1) • Subwoofer (1) For BDV-T57 • R6 (size AA) batteries (2) • Calibration mic (1) 8US
BDV-E370/BDV-T37 • Front speakers (2) • Speaker cords (5, white/red/ blue/gray/green) • Operating Instructions • Quick Setup Guide • End user license agreement For U.S.
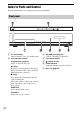
Index to Parts and Control For more information, refer to the pages indicated in parentheses. Front panel FUNCTION A "/1 (on/standby) C (USB) port (page 33) D Front panel display Z (open/close) (page 32) E Opens or closes the disc tray. F Power indicator N (play) Starts or re-starts playback (resume play). Plays a slideshow when a disc containing JPEG image files is inserted. x (stop) Stops playback and remembers the stop point (resume point).
Front panel display About the indications in the front panel display A Displays the current sound format. B Lights up when the system is playing via the PARTY STREAMING function. C Lights up when outputting 1920 × 1080p/24 Hz video signals. D Lights up when outputting 720p/1080i/ 1080p video signals from the HDMI OUT jack or 720p/1080i video signals from the COMPONENT VIDEO OUT jacks.
Rear panel Screws* VIDEO OUT LAN(100) ARC Y PB / CB PR / CR OUT COMPONENT VIDEO OUT SPEAKERS SPEAKERS SAT/CABLE TV DIGITAL IN DIGITAL IN EZW-T100 A.
B Number buttons (pages 43, 54) Remote control Enters the title/chapter numbers, radio frequencies, etc. AUDIO (pages 39, 40) THEATER ONE-TOUCH PLAY Selects the audio format/track. TV 1 BRAVIA Sync 1 2 3 4 5 6 7 8 9 SLEEP 9 SYSTEM MENU FAVORITES AUDIO BLUE RED D.TUNING GREEN Selects the radio frequencies.
F Playback operation buttons See “Playback” (page 32). ./> (previous/next) Skip to the previous/next chapter, track, or file. (replay/advance) Briefly replay the current scenes for 10 seconds./Briefly fast forwards the current scenes for 15 seconds. Displays the playback information on the TV screen. When the function is “TV” or “SAT/ CABLE” and digital signals are input via the DIGITAL IN jack, displays the stream information in the front panel display. I Z (open/close) Opens or closes the disc tray.
Getting Started Getting Started Step 1: Installing the System Positioning the speakers For the best possible surround sound, place all speakers at the same distance from the listening position (A). The distance can be between 0 to 23 feet (0.0 to 7.0 meters). If you cannot place the center speaker and surround speakers at the same distance as (A), place them within 23 feet (7.0 meters) of the listening position. Place the surround speakers to the rear of the listening position (B).
Getting Started To add the optional surround back speakers You can enjoy 7.1 surround sound by purchasing the Wireless Surround Speaker Kit (WAHT-SBP2, optional). The optional product lineup differs depending on the area. For the position of the surround back speakers, refer the illustration below (C).
To disassemble the speaker (Front speakers of BDV-E870 only) Disconnect the speaker cords from the speaker. Getting Started 1 Rear of the speaker 2 Remove the screw (pre-installed) at the rear of the speaker. This screw is used when reassembling the speaker. Be sure not to lose the screw. Screw 3 Rear of the speaker Disassemble the speaker by lifting the upper part of the speaker.
4 Pull out the speaker cord from the bottom of the lower part of the speaker. Getting Started The removed speaker cord is used when installing the speaker on a wall. Lower part of the speaker , Speaker cord 5 Remove the protection paper from the speaker-bottom cover, then attach the speakerbottom cover to the bottom of the upper part of the speaker.
To install the speakers on a wall Color tube Front left speaker (L): White Front right speaker (R): Red Center speaker: Green Surround left speaker (L): Blue Surround right speaker (R): Gray 1 Prepare screws (not supplied) that are suitable for the hole on the back of each speaker. See the illustrations below.
Getting Started 2 Fasten the screws to the wall.
3 Hang the speakers on the screws.
Getting Started Step 2: Connecting the System For connecting the system, read the information on the following pages. Do not connect the AC power cord (mains lead) of the unit to a wall outlet (mains) until all the other connections are made. Note • When you connect another component with a volume control, turn down the volume of the other components to a level where sound is not distorted.
Connecting the TV (Video connection) Getting Started This connection sends a video signal to the TV. Depending on the jacks on your TV, select the connection method. Rear panel of the unit B Component video cable (not supplied) VIDEO OUT ARC OUT PB / CB Y COMP ONEN T VID PR / CR EO OUT A HDMI cable* C Video cord (supplied) To the component video input jacks of the TV. To the video input jack of the TV. To the HDMI IN jack of the TV.
Getting Started Connecting the TV (Audio connection) This connection sends an audio signal to the unit from the TV. To listen to TV sound via the system, perform this connection. Rear panel of the unit AUDIO DIO IN R AU L TV ABLE SAT/C L IN DIGITA L DIGITA IN AL OPTIC IAL COAX Digital optical cord (not supplied) To the digital optical out jack of the TV. With a digital audio connection, the system receives a Dolby Digital multiplex broadcast signal and you can enjoy multiplex broadcast sound.
Connecting the other components TV Signal flow System : Video signal : Audio signal You can enjoy connected components via the system’s speakers. • VCR or digital satellite receiver, etc. (not supplied), which has a digital coaxial output jack: D • VCR, digital satellite receiver, PlayStation, or portable audio source, etc.
Getting Started Connecting the antenna (aerial) To connect the antenna (aerial) Rear panel of the unit FM AL 75 COAXI A NN ANTE or FM wire antenna (aerial) (supplied) Note • Be sure to fully extend the FM wire antenna (aerial). • After connecting the FM wire antenna (aerial), keep it as horizontal as possible. Tip • If you have poor FM reception, use a 75-ohm coaxial cable (not supplied) to connect the unit to an outdoor FM antenna (aerial) as shown below.
Connecting to the network Wireless LAN Adapter and the wireless LAN router closer to each other. To set the network settings Use a LAN cable to connect to the LAN (100) terminal on the unit. For details, see [Network Settings] (page 61) and follow the on-screen instructions to complete the setup.
Getting Started Step 3: Performing the Easy Setup 2 Connect the calibration mic to the A.CAL MIC jack on the rear panel. Set up the calibration mic at ear level using a tripod, etc. (not supplied). The front of each speaker should face the calibration mic, and there should be no obstruction between the speakers and the calibration mic. Before performing Step3 Make sure all connections are secure, and then connect the AC power cord (mains lead).
5 For details about [Auto Calibration] settings in [Easy Setup], see “Calibrating the Appropriate Settings Automatically” (page 51). Step 4: Selecting the Source You can select the playback source. To recall the Easy Setup Display 1 Press HOME. 1 2 3 4 5 6 7 8 9 The home menu appears on the TV screen. 2 3 4 Press C/c to select Getting Started Perform the [Easy Setup]. Follow the on-screen instructions to make the basic settings using C/X/x/c, and . 0 [Setup].
Getting Started Step 5: Enjoying Surround Sound After performing the previous Steps and starting playback, you can easily enjoy surround sound. You can also select pre-programmed surround settings that are tailored to different kinds of sound sources. They bring the exciting and powerful sound of movie theaters into your home. SYSTEM MENU 1 2 3 4 5 6 7 8 9 0 X/x/c, Selecting surround settings based on your listening preference 1 2 3 Press SYSTEM MENU. Press X/x repeatedly until “SUR.
Sound from Effect • 2 channel source: The system simulates surround sound from 2 channel sources and outputs sound from the 5.1 channel speakers by duplicating 2 channel source sound across each speaker. • Multi-channel source: The system outputs sound from the speakers depending on the number of channels of the source. (AUTO FORMAT DIRECT MULTI) “PRO LOGIC” “PLII MOVIE” • 2 channel source: The system simulates surround sound from 2 channel sources and outputs sound from the 5.1 channel speakers.
Tip Playback Playing a Disc For playable discs, see “Playable Discs” (page 72). 1 2 Switch the input selector on your TV so that the signal from the system appears on your TV screen. Press Z, and place a disc on the disc tray. • Delete unnecessary data in internal memory or USB memory. Select [Erase BD Data] in [Video] to delete unnecessary data. If you use USB memory as local storage, all saved data in the [BUDA/BUDB] folder is deleted.
Displaying the play information Example: when playing a BD-ROM You can play video/music/photo files on the connected USB device. For playable types of files, see “Playable Types of Files” (page 73). 1 Playback You can check the playback information, etc., by pressing DISPLAY. The displayed information differs depending on the disc type and player status. Playing from a USB Device Connect the USB device to the (USB) port on the unit.
Enjoying an iPod To operate the iPod using the remote You can enjoy the sound and charge the battery of an iPod via the system. You can operate the iPod using the buttons on the remote. The following table shows an example of buttons that can be used. Compatible iPod models The compatible iPod models are as follows. Update your iPod with the latest software before using with the system. Press Operation N, X Same operation as the N/X button of the iPod. x Pause. m or M Fast reverse or forward. .
Playing files stored on a DLNA server (DLNA Player) Playing via a Network BRAVIA Internet Video serves as a gateway delivering the selected Internet content and a variety of on-demand entertainment straight to your unit. 1 You can play video/music/photo files on your home server, such as a DLNA-certified network audio system or a PC with software that enables a DLNA-certified server function, by connecting the system to your home network. 1 Prepare for playing files on a DLNA server.
You can play the same audio at the same time across all Sony components which are compatible with the PARTY STREAMING function. The component that plays audio for the party through the use of [Start Party] is called the “party host.” A component that is invited to the party from the party host and plays the same audio as the party host is called a “party guest.” To close a party For the party host Press x, then press HOME. For a party guest Press OPTIONS, press X/x to select [Close Party], then press .
[Video] only Available Options Items Details [3D Output Setting] Sets whether or not to output 3D video automatically. [Video Settings] • [Picture Quality Mode]: Selects the picture settings for different lighting environments. • [FNR]: Reduces the random noise appearing in the picture. • [BNR]: Reduces the mosaic-like block noise in the picture. • [MNR]: Reduces minor noise around the picture outlines (mosquito noise). [Play/Pause] Starts or pauses playback.
[Photo] only Items Details [Slideshow] Starts a slideshow. [Slideshow Speed] Changes the slideshow speed. [Slideshow Effect] Sets the effect when playing a slideshow. [Slideshow BGM] • [Off]: Turns off the function. • [My Music from USB]: Sets the music files registered in [Add Slideshow BGM]. If no music file is registered, [(Not registered)] is displayed. • [Play from disc]: Sets the tracks on CD-DAs (music CDs).
Sound Adjustment Selecting the Effect to Suit the Source 1 2 3 4 5 6 7 8 9 0 SOUND MODE Selecting the Audio Format, Multilingual Tracks, or Channel When the system is playing a BD/DVD VIDEO or DATA CD/DATA DVD (DivX video files*) recorded in multiple audio formats (PCM, Dolby Digital, MPEG audio, or DTS) or multilingual tracks, you can change the audio format or language.
displayed two or more times, the BD/DVD VIDEO is recorded in multiple audio formats. x DVD-VR The types of sound tracks recorded on a disc are displayed. Example: • [ Stereo] • [ Stereo (Audio1)] • [ Stereo (Audio2)] • [ Main] • [ Sub] • [ Main/Sub] 1 2 3 4 5 6 7 8 9 0 AUDIO Note • [ Stereo (Audio1)] and [ Stereo (Audio2)] do not appear when only one audio stream is recorded on the disc. x DATA CD (DivX video file)/DATA DVD (DivX video file) (Except for U.S.
2 3 Press X/x repeatedly until “NIGHT MODE” appears in the front panel display, then press or c. Press X/x to select a setting. • “NIGHT ON”: On. • “NIGHT OFF”: Off. 4 Press SYSTEM MENU. Note • When sound is output from the center speaker, this effect is more pronounced, as speech (movie dialog, etc.) is easy to hear. When sound is not output from the center speaker, the system optimally adjusts the volume. Sound Adjustment The system menu turns off.
3 Tuner If an FM program is noisy Listening to the Radio You can enjoy radio sound with the system’s speakers. If an FM program is noisy, you can select monaural reception. There will be no stereo effect, but reception will improve. 1 2 "/1 SYSTEM MENU Adjust the volume by pressing VOL +/–. 1 2 3 4 5 6 7 8 9 Press SYSTEM MENU. Press X/x repeatedly until “FM MODE” appears in the front panel display. Number buttons D.TUNING 0 3 4 C/X/x/c, HOME TUNING +/– x or c.
5 Press X/x to select the preset number you want. Tip • You can select the preset number directly by pressing the number buttons. 6 Press 1 Repeat Steps 2 to 6 to store other stations. Press SYSTEM MENU. 2 3 4 Press FUNCTION repeatedly until “TUNER FM” appears in the front panel display. Press D.TUNING. Press the number buttons to select the frequencies. Press Tuner 8 When you know the frequencies, you can select radio stations by inputting the frequencies directly. .
Note External Audio Device Using an S-AIR Product When you purchase the S-AIR product, you need to perform the following settings to activate wireless transmission. About S-AIR products • When you insert the wireless transmitter/transceiver, make sure that the AC power cord (mains lead) is not connected to a wall outlet (mains). • Do not touch the terminals of the wireless transmitter/ transceiver. To insert the wireless transmitter into the unit 1 There are two types of S-AIR product.
3 Make sure to use the same screws to secure the wireless transmitter. 3 4 Rear of the unit 5 EZW-T100 Press C/c to select [Setup]. Press X/x to select [System Settings], then press . Press X/x to select [S-AIR Settings], then press . The [S-AIR Settings] display appears. 6 7 Press X/x to select [ID], then press . Press X/x to select the desired ID. You can select any ID (A, B, or C). 0 -T10 EZW 8 Press . The setting is made.
Enjoying the system’s sound in another room For the S-AIR receiver Enjoying the S-AIR receiver while the unit is in standby mode For the S-AIR receiver You can enjoy the system’s sound in another room by using the S-AIR receiver. 1 Press HOME. The home menu appears on the TV screen. 2 3 4 Press C/c to select 6 Press X/x to select [System Settings], then press . Press X/x to select [S-AIR Settings], then press . Press X/x to select [Mode], then press .
Identifying the unit with a specific S-AIR sub unit (Pairing operation) 8 x For the surround amplifier Refer to the operating instructions of the surround amplifier. x For the S-AIR receiver For the surround amplifier For the S-AIR receiver 1 2 Press HOME. 6 Press C/c to select [Setup]. Press X/x to select [System Settings], then press . Press X/x to select [S-AIR Settings], then press . The [S-AIR Settings] display appears. 7 Press X/x to select [Pairing], then press .
4 Press X/x to select [S-AIR Settings], then press . The [S-AIR Settings] display appears. 5 6 Press X/x to select [RF Change], then press . Press X/x to select the desired setting, then press . • [Auto]: Normally select this. The system changes [RF Change] to [On] or [Off] automatically. • [On]: The system transmits sound by searching for the better channel for transmitting. • [Off]: The system transmits sound by fixing the channel for transmitting. 7 Press . The setting is made.
Other Operations Using the Control for HDMI Function for “BRAVIA” Sync Control for HDMI is a mutual control function standard used by CEC (Consumer Electronics Control) for HDMI (High-Definition Multimedia Interface). The Control for HDMI function will not work when you connect this system to a component which is not compatible with the Control for HDMI function. There are convenient buttons on the system’s remote for operating the TV, such as THEATER, ONE-TOUCH PLAY, and TV "/1.
6 Press X/x to select the setting, then press . • [On]: On. • [Off]: Off. Turning the system off in sync with the TV (System Power Off) When you turn the TV off by using the POWER button on the TV’s remote or TV "/1 on the system’s remote, the system turns off automatically. Note • This function depends on the settings of your TV. For details, refer to the operating instructions of the TV. Watching BD/DVD by a single button press (One-Touch Play) Press ONE-TOUCH PLAY.
Receiving the digital audio signal of the TV (Audio Return Channel) The system can receive the digital audio signal of the TV via an HDMI cable when your TV is compatible with the Audio Return Channel function. You can enjoy TV sound via the system by using just one HDMI cable. For details, see [Audio Return Channel] (page 60). 1 Press HOME. The home menu appears on the TV screen. 2 3 4 Press C/c to select [Setup]. Press X/x to select [Audio Settings], then press .
7 Press . [Auto Calibration] starts. The system adjusts the speaker settings automatically. Be quiet during the measurement. Note • Before [Auto Calibration], make sure that the surround amplifier turns on and you install the surround amplifier in the appropriate location. If you install the surround amplifier in an improper location, such as another room, proper measurement will not be obtained.
[Subwoofer] Tip [Yes] • You can change measurement units (feet or meters) by pressing the color button (RED). x [Distance] When you move the speakers, be sure to set the parameters of the distance (A) from the listening position to the speakers. You can set the parameters from 0 to 23 feet (0.0 to 7.0 meters). x [Level] The speakers in the illustration correspond to the following: [Front Left/Right] 0.0 dB: Set the front speaker level. [Center]* 0.0 dB: Set the center speaker level.
9 Press X/x to select [Off], then press . Note • The test tone signals are not output from the HDMI OUT jack. Tip • To adjust the volume of all the speakers at one time, press VOL +/–. Using the Sleep Timer You can set the system to turn off at a preset time, so you can fall asleep listening to music. The time can be preset in intervals of 10 minutes. Press SLEEP. Each time you press SLEEP, the minutes display (the remaining time) changes by 10 minutes.
Saving Power in Standby Mode Check that the following settings are made: – [Control for HDMI] in [HDMI Settings] is set to [Off] (page 49). – [Standby] in [S-AIR Settings] is set to [Off] (page 46). – [Quick Start Mode] is set to [Off] (page 60).
Icon Explanation [Audio Settings] (page 58) Settings and Adjustments Using the Setup Display You can make various adjustments of items such as picture and sound. Select (Setup) on the home menu when you need to change the settings of the system. The default settings are underlined. Note Makes the audio settings according to the type of connecting jacks. [BD/DVD Viewing Settings] (page 58) Makes detailed settings for BD/ DVD playback.
x [TV Type] [16:9]: Select this when connecting to a widescreen TV or a TV with a wide-mode function. [4:3]: Select this when connecting to a 4:3 screen TV without a wide-mode function. x [Screen Format] [Original]: Select this when connecting to a TV with a wide-mode function. Displays a 4:3 screen picture in 16:9 aspect ratio even on a wide-screen TV. [Fixed Aspect Ratio]: Changes the picture size to fit the screen size with the original picture aspect ratio.
[Audio Settings] • When the System Audio Control function (page 50) is activated, this setting may change automatically. x [Sound Effect] x [BD Audio MIX Setting] [On]: Outputs the audio obtained by mixing the interactive audio and secondary audio to the primary audio. [Off]: Outputs the primary audio only. Select this when outputting HD audio signals to an AV receiver. x [Audio DRC] You can compress the dynamic range of the sound track. You can set the system’s sound effects (SOUND MODE, “D.
Enter the code for your language by referring to “Language Code List” (page 77). x [Subtitle] You can select the default subtitle language for BD-ROMs or DVD VIDEOs. When you select [Select Language Code], the display for entering the language code appears. Enter the code for your language by referring to “Language Code List” (page 77). x [BD Hybrid Disc Playback Layer] [BD]: Plays BD layer. [DVD/CD]: Plays DVD or CD layer. x [BD Internet Connection] [Allow]: Normally select this.
[Off]: Off. [System Settings] You can make the system-related settings. x [OSD] You can select your language for the system onscreen displays. x [S-AIR Settings] You can set up the S-AIR settings. For details, see “Using an S-AIR Product” (page 44). [ID]: You can set the ID of the system. [Pairing]: You can pair the system and S-AIR sub unit, such as a surround amplifier or S-AIR receiver. [RF Change]: If wireless transmission is unstable, set this function.
x [Gracenote Settings] [Network Settings] (Except for BDV-E370 (U.S. models)) [Auto]: Automatically downloads disc information when you stop playback of the disc. To download, the system must be connected to the network. [Manual]: Downloads disc information when you select [Playback History List] or [Information Display] in the options menu. You can make detailed settings for Internet and network. x [DivX® VOD] [View Network Status]: Displays the current network status.
x [Party Auto Start] [On]: Starts a party or joins an existing party at the request of a networked device compatible with the PARTY STREAMING function. [Off]: Off. x [BD Remote Device Registration] Registers your “BD remote” device. x [Registered BD Remote Devices] Displays a list of your registered “BD remote” devices. [Easy Setup] Re-runs the Easy Setup to make the basic settings. Follow the on-screen instructions.
Additional Information Precautions On safety • To prevent fire or shock hazard, do not place objects filled with liquids, such as vases, on the system, or place the system near water, such as near a bathtub or shower room. Should any solid object or liquid fall into the cabinet, unplug the system and have it checked by qualified personnel before operating it any further. • Do not touch the AC power cord (mains lead) with wet hands. Doing so may cause an electric shock.
IMPORTANT NOTICE Caution: This system is capable of holding a still video image or on-screen display image on your television screen indefinitely. If you leave the still video image or on-screen display image displayed on your TV for an extended period of time you risk permanent damage to your television screen. Projection televisions are especially susceptible to this. Notes about the Discs On handling discs • To keep the disc clean, handle the disc by its edge. Do not touch the surface.
Troubleshooting If you experience any of the following difficulties while using the system, use this troubleshooting guide to help remedy the problem before requesting repairs. Should any problem persist, consult your nearest Sony dealer. Note that if service personnel changes some parts during repair, these parts may be retained. In the event of a problem with the S-AIR function, have a Sony dealer check the entire system together (S-AIR main unit and sub unit).
Symptom Problems and solutions Video signals are only output • Set [Output Video Format] in [Screen Settings] to [Component Video] from the HDMI OUT jack when (page 57). connecting the HDMI OUT jack and other video output jacks at the same time. The dark area of the picture is too • Set [Picture Quality Mode] to [Standard] (default) (page 37). dark/the bright area is too bright or unnatural. The picture is not output correctly. • Check the [Output Video Format] settings in [Screen Settings] (page 57).
Symptom Problems and solutions There is no digital sound from • Set [Control for HDMI] in [HDMI Settings] of [System Settings] to [On] the HDMI OUT jack when using (page 60). Also, set [Audio Return Channel] in [HDMI Settings] of [System the Audio Return Channel Settings] to [Auto] (page 60). function. • Make sure that your TV is compatible with the Audio Return Channel function. • Make sure that an HDMI cable is connected to a jack on your TV that is compatible with the Audio Return Channel function.
Symptom Problems and solutions The disc does not play. • You are attempting to play a disc with a format that cannot be played back by this system (page 72). • The region code on the BD/DVD does not match the system. • Moisture has condensed inside the unit and may cause damage to the lenses. Remove the disc and leave the unit turned on for about half an hour. • The system cannot play a recorded disc that is not correctly finalized (page 72). File names are not displayed correctly.
Symptom Problems and solutions The Control for HDMI function • Set [Control for HDMI] in [HDMI Settings] of [System Settings] to [On] does not work. (page 60). • Make sure that the connected component is compatible with the [Control for HDMI] function. • Check the connected component’s setting for the Control for HDMI function. Refer to the operating instructions supplied with the component.
S-AIR Symptom Problems and solutions There is no sound from the S-AIR sub unit, noise is heard from the S-AIR sub unit, or sound from the S-AIR sub unit skips. • If you use another S-AIR main unit, place it more than 25 feet (8 meters) away from the unit. • Place the S-AIR main unit and S-AIR sub unit closer together. • Avoid use of equipment that generates electromagnetic energy, such as a microwave oven. • Place the S-AIR main unit and S-AIR sub unit away from other wireless products.
USB Wireless LAN Adapter (BDV-E570 and BDV-T57 only) Symptom Problems and solutions The system cannot connect to the • The distance between the unit and the wireless LAN router is too far (page 27). network or the network • Change the USB Wireless LAN Adapter position. connection is unstable. Other Symptom Problems and solutions “Exxxx” appears in the front panel display. • Contact your nearest Sony dealer or local authorized Sony service facility and give the error code.
Playable Discs Blu-ray Disc BD-ROM1) BD-R/BD-RE2) DVD3) DVD-ROM DVD-R/DVD-RW DVD+R/DVD+RW CD3) CD-DA (Music CD) CD-ROM CD-R/CD-RW Super Audio CD 1)Since the Blu-ray Disc specifications are new and evolving, some discs may not be playable depending on the disc type and the version. Also, the audio output differs depending on the source, connected output jack, and selected audio settings. 2)BD-RE: Ver.2.1 BD-R: Ver.1.1, 1.2, 1.
6) Playable Types of Files Video7) The system plays SD resolution only via the DLNA function. 7)The system does not play these files via the renderer function. Note File format Extensions MPEG-1 Video/PS1)5) MPEG-2 Video/PS, TS1)6) “.mpg,” “.mpeg,” “.m2ts,” “.mts” DivX2) “.avi,” “.divx” MPEG4/AVC1)5) “.mkv,” “.mp4,” “.m4v,” “.m2ts,” “.mts” WMV91)5) “.wmv,” “.asf” AVCHD 3)5) Music File format Extensions MP3 (MPEG-1 Audio Layer III) “.mp3” AAC1)4)5) “.m4a” “.wma” LPCM “.
Supported Audio Formats Audio formats supported by this system are as follows. Format LPCM 2ch LPCM 5.1ch, LPCM 7.1ch Dolby Digital Dolby TrueHD, Dolby Digital Plus DTS DTS-ES Discrete 6.1, DTS-ES Matrix 6.1, DTS96/24 DTS-HD High Resolution Audio DTS-HD Master Audio “BD/DVD” a a a a a a a a “SAT/CABLE” “TV” (DIGITAL IN) a – a – a – – – Function a: Supported format. –: Unsupported format.
Specifications Maximum current: Amplifier Section LAN Section U.S. models: POWER OUTPUT AND TOTAL HARMONIC DISTORTION: (FTC) Front L + Front R: With 3 ohms loads, both channels driven, from 180 - 20,000 Hz; rated 60 watts per channel minimum RMS power, with no more than 1% total harmonic distortion from 250 milli watts to rated output.
Dimensions (approx.) Mass (approx.) 290 mm × 49 mm × 49 mm (11 1/2 in × 1 15/16 in × 1 15/16 in) (w/h/d) 0.28 kg (10 oz) Subwoofer (SS-WSB101) for BDV-E870/ BDV-E370/BDV-T37 Speaker system Speaker unit Rated impedance Dimensions (approx.) Mass (approx.) Subwoofer Bass reflex 160 mm (6 3/8 in) cone type 3 ohms 260 mm × 320 mm × 260 mm (10 1/4 in × 12 5/8 in × 10 1/4 in) (w/h/d) 5.
Language Code List The language spellings conform to the ISO 639: 1988 (E/F) standard.
BD-ROM Glossary AVCHD The AVCHD format is a high-definition digital video camera format used to record SD (standard definition) or HD (high definition) signals of either the 1080i specification* or the 720p specification** on DVDs, using efficient data compression coding technology. The MPEG-4 AVC/H.264 format is adopted to compress video data, and the Dolby Digital or Linear PCM system is used to compress audio data. The MPEG-4 AVC/H.
Dolby Pro Logic II DTS-HD Master Audio Dolby Pro Logic II creates five full-bandwidth output channels from 2 channel sources. This is done using an advanced, high-purity matrix surround decoder that extracts the spatial properties of the original recording without adding any new sounds or tonal colorations. DTS-HD Master Audio has a maximum transmission rate of 24.5 Mbps, and uses lossless compression, and DTS-HD Master Audio corresponds to a maximum sampling frequency of 192 kHz, and maximum of 7.1ch.
Pop-up menu An enhanced menu operation available on BDROMs. The pop-up menu appears when POP UP/MENU is pressed during playback, and can be operated while playback is in progress. Progressive format (sequential scanning) In contrast to the Interlace format, the progressive format can reproduce 50 - 60 frames per second by reproducing all scanning lines (525 lines for the NTSC system). The overall picture quality increases and still images, text and horizontal lines appear sharper.
Index Numerics D M 24p True Cinema 80 3D 32 3D Output Setting 56 Multiplex broadcast sound 40 Music Settings 59 A/V SYNC 38 Attenuate - AUDIO 58 Audio 58 Audio DRC 58 Audio Output 58 Audio Return Channel 60 Audio Settings 58 Auto Calibration 51, 58 Auto Display 60 Auto Standby 60 AVCHD 78 D. C. A. C. (Digital Cinema Auto Calibration) 51, 78 D.
Screen Format 57 Screen Saver 60 Screen Settings 56 SLEEP 54 Slideshow 38 Sound Effect 58 Speaker Settings 52, 58 Connection 52 Distance 53 Level 53 Subtitle 59 Super Audio CD Playback Channel 59 Super Audio CD Playback Layer 59 Surround amplifier 44 System Information 61 SYSTEM MENU 30, 38, 40, 41 T Test Tone 53 TV Screen Size Setting for 3D 56 TV Type 57 U Update 56 USB 33 W WEP 27 WPA2-PSK (AES) 27 WPA2-PSK (TKIP) 27 WPA-PSK (AES) 27 WPA-PSK (TKIP) 27 82US
The software of this system may be updated in the future. To find out details on any available updates, please visit: http://www.sony.