/&' 'LJLWDO &RORXU 79 2SHUDWLQJ ,QVWUXFWLRQV ,QVWUXFWLRQV DERXW ³,QVWDOOLQJ :DOO 0RXQW %UDFNHW´ DUH LQFOXGHG ZLWKLQ WKLV 79¶V LQVWUXFWLRQV PDQXDO .'/ 9 [[ .'/ : [[ .'/ 9 [[ .'/ : [[ .'/ 9 [[ .'/ : [[ .'/ 9 [[ .'/ : [[ .'/ 9 [[ .
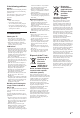
NOTICE FOR CUSTOMERS IN THE UNITED KINGDOM A moulded plug complying with BS1363 is fitted to this equipment for your safety and convenience. Should the fuse in the plug supplied need to be replaced, a 10 AMP fuse approved by ASTA or BSI to BS 1362 (i.e., marked with or ) must be used. When an alternative type of plug is used it should be fitted with a 10 AMP FUSE otherwise the circuit should be protected by a 10 AMP FUSE at the distribution board.
Table of Contents Start-up Guide 4 Safety Information ............................................................................................................................ 8 Precautions ....................................................................................................................................... 9 Remote and TV Controls/Indicators ............................................................................................. 10 Watching TV Watching TV........................
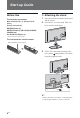
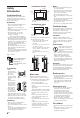
Start-up Guide Before Use To check the accessories Mains lead (Type C-6)* (1) (Except for 37/32 inches) 1: Attaching the stand 1 Open the carton box and take out the stand and the screws. 2 Place the TV set on the stand. Take care not to interfere with cables. Stand (1) and screws (4) RM-ED020 Remote (1) RM-ED018 Remote (1) (KDL-46/40/37/32W5820/ 5830/5840 only) Size AA batteries (R6 type) (2) * Do not remove the ferrite cores. To insert batteries into the remote Push and lift the cover to open.
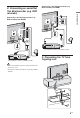
Start-up Guide 2: Connecting an aerial/Set Top Box/recorder (e.g. DVD recorder) Connecting a Set Top Box/recorder (e.g. DVD recorder) with HDMI Connecting a Set Top Box/recorder (e.g. DVD recorder) with SCART Set Top Box/recorder (e.g. DVD recorder) Set Top Box/recorder (e.g. DVD recorder) 3: Preventing the TV from toppling over • Screw the satellite connector softly with hand, do not use any tool. • TV must be switched off when connecting satellite antenna.
1 Install a wood screw (4 mm in diameter, 3 not supplied) in the TV stand. 2 Install a machine screw (M4 × 20, not supplied) into the screw hole of the TV. 3 Tie the wood screw and the machine screw with a strong cord. Follow the instructions on the screen. 4: Bundling the cables Satellite Auto Tuning: Confirm that the tuning settings are the same that your satellite settings. Digital Auto Tuning: When you select “Cable”, we recommend that you select “Quick Scan” for quick tuning.
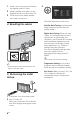
Adjusting the viewing angle of the TV Start-up Guide This TV can be adjusted within the angles shown below. Adjust the angle left and right (swivel) Top view Front Detaching the Table-Top Stand from the TV ~ • Remove the screws guided by the arrow marks of the TV. • Do not remove the Table-Top Stand for any reason other than to wall-mount the TV.
Installed on the wall Safety Information Notes 30 cm 10 cm 10 cm Installation/Set-up Install and use the TV set in accordance with the instructions below in order to avoid any risk of fire, electrical shock or damage and/or injuries. 10 cm Leave at least this space around the set. Installation • The TV set should be installed near an easily accessible mains socket. • Place the TV set on a stable, level surface. • Only qualified service personnel should carry out wall installations.
Ask your dealer or Sony service centre to have it checked by qualified service personnel. contact with rubber or vinyl materials may result in damage to the screen surface and cabinet material. • Periodic vacuuming of the ventilation openings is recommended to ensure to proper ventilation. • When adjusting the angle of the TV set, move it slowly so as to prevent the TV set from moving or slipping off from its table stand.
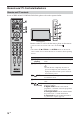
Remote and TV Controls/Indicators Remote and TV controls In case of KDL-46/40/37/32W5820/5830/5840, please refer to the separate leaflet. Buttons on the TV will work the same as those on the remote. * In the TV menu, these buttons will work as F/f/G/g/ . z • The number 5, N, PROG + and AUDIO buttons on the remote have a tactile dot. Use the tactile dots as a reference when operating the TV. Button/Switch Description 1 "/1 (TV standby) 2 1 (Power) Press to turn the TV on and off from standby mode.
6 F/f/G/g/ 7 OPTIONS 8 HOME 9 Coloured buttons q; Number buttons Press F/f/G/g to move the on-screen cursor. Press to select/confirm the highlighted item. When playing a photo file: Press to pause/ start a slideshow. Press F/G to select the previous file. Press f/g to select the next file. When playing a music/video file: Press to pause/start the playback. Press and hold G/g to fast forward/fast reverse, then release the button at the point where you want to resume playback.
ql DIGITAL w; ANALOG wa BRAVIA Sync Switches from analogue mode to the last selected digital mode (DVB-S or Antenna/ Cable). Toggles between two digital modes (DVB-S and Digital (Antenna/Cable)) when the TV set operates in Digital mode. When viewing pictures from connected equipment: Press to return to normal TV mode. Press to display the analogue channel that was last viewed. When viewing pictures from connected equipment: Press to return to normal TV mode.
Indicators Indicator Description 1 Light sensor Do not put anything over the sensor, doing so may affect its function. 2 Remote control sensor Receives signals from the remote. Do not put anything over the sensor. The sensor may not work properly. 3 (Picture Off / Lights up in green when you select “Picture Off”. Timer) Lights up in orange when you set the timer. 4 1 (Standby) Lights up in red when the TV is in standby mode. 5 " (Power) Lights up in green when the TV is on.
Watching TV To select a digital programme using the Digital Electronic Programme Guide (EPG). Watching TV In digital mode An information banner appears briefly. The following icons may be indicated on the banner.
To access Analogue Text z • You can also jump directly to a page by selecting the page number displayed on the screen. Press and F/f/G/g to select the page number, then press . • When four coloured items appear at the bottom of the Text page, you can access pages quickly and easily (FasText). Press the corresponding coloured button to access the page. To change the Screen Format manually Press repeatedly to select the desired Screen Format. 14:9* Displays the 14:9 picture in the correct proportion.
Instruction Manual Instruction Manual Displays the instruccion manual on the screen. Navigating through the Instruction Manual 1 Press HOME to display the XMB™. Media Category Bar Category Object Bar 2 Press G/g to select Settings. 3 Press F/f to select Instruction Manual, then press . 4 Press F/f to select topic from the Table of Contents, then press . Use the corresponding coloured button to go to next or previous page and to return to Table of Contents.
Additional Information Installing the Accessories (Wall-Mount Bracket) To Customers: For product protection and safety reasons, Sony strongly recommends that installing of your TV be performed by Sony dealers or licensed contractors. Do not attempt to install it yourself. To Sony Dealers and Contractors: Provide full attention to safety during the installation, periodic maintenance and examination of this product. Your TV can be installed using the SU-WL500 Wall-Mount Bracket (sold separately).
TV installation dimensions table Screen centre point Unit: cm Model Name Display dimensions Screen centre dimension Length for each mounting angle Angle (0q) Angle (20q) A B C D E F G H KDL-52V58xx 126.2 82.2 3.9 47.8 16.9 40.7 77.8 51.5 KDL-52W58xx 126.2 82.3 3.9 47.8 16.9 40.9 77.8 51.5 KDL-46V58xx 112.3 72.3 8.4 47.1 15.0 35.8 68.5 50.2 KDL-46W58xx 112.3 72.5 8.4 47.1 15.0 35.9 68.6 50.3 KDL-40V58xx 98.7 63.6 12.2 46.3 14.7 32.8 60.4 49.
Screw and Hook locations diagram/table Screw location Hook location KDL-52V58xx Model Name d, g b KDL-52W58xx d, g b KDL-46V58xx d, g b KDL-46W58xx d, g b KDL-40V58xx d, g b KDL-40W58xx d, g b KDL-37V58xx d, g b KDL-37W58xx d, g b KDL-32V58xx e, g c KDL-32W58xx e, g c Screw location When installing the Mounting Hook on the TV. Hook location When installing the TV onto the Base Bracket.
Specifications System Panel system LCD (Liquid Crystal Display) Panel TV system Analogue: Depending on your country/area selection: B/G/H, D/K, L, I Digital: DVB-T/DVB-C Satellite: DVB-S/DVB-S2 Colour/video system Analogue: PAL, PAL60 (only video input), SECAM, NTSC3.58, NTSC4.43 (only video input) Digital: MPEG-2 MP@ML/HL, H.
Model name KDL52V58xx, 52W58xx KDL46V58xx, 46W58xx KDL40V58xx, 40W58xx KDL37V58xx, 37W58xx KDL32V58xx, 32W58xx Power and others Power requirements 220 V – 240 V AC, 50 Hz Screen size (measured diagonally) 52 inches / Approx. 46 inches / Approx. 40 inches / Approx. 37 inches / Approx. 32 inches / Approx.
PC input signal reference chart for Resolution Signals VGA SVGA XGA WXGA SXGA HDTV Horizontal (Pixel) 640 640 720 800 800 1024 1024 1024 1280 1280 1280 1280 1360 1280 1920 1920 × Vertical (Line) × 480 × 480 × 400 × 600 × 600 × 768 × 768 × 768 × 720 × 768 × 768 × 960 × 768 × 1024 × 1080 × 1080 PC and HDMI IN 1, 2, 3, 4 Horizontal frequency (kHz) 31.5 37.5 31.5 37.9 46.9 48.4 56.5 60.0 45.0 47.4 47.8 60.0 47.7 64.0 66.6 67.
Troubleshooting Check whether the 1 (standby) indicator is flashing in red. When the 1 (standby) indicator is flashing The self-diagnosis function is activated. 1 Count how many times the 1 (standby) indicator flashes between each two second break. For example, the indicator may flash three times, go off for two seconds, then flash again three times.
Condition Explanation/Solution No picture from the connected • Turn the connected equipment on. • Check the cable connection. equipment appears on the screen. • Press to display the list of inputs, then select the desired input. • Correctly insert the memory card or other storage device in the digital still camera. • Use a digital still camera memory card or other storage device that has been formatted according to the instruction manual supplied with the digital still camera.
Condition Explanation/Solution Changes on the server are not • Sometimes changes are not applied to displays on the TV even though being applied or displayed content has been added and/or deleted on the server. If this happens, go content differs from content back up one level and try opening the folder or server again. on the server. Photo, music and/or video Preliminary Check files do not appear or icons are • Check that the connected device supports DLNA. not displayed.
Condition Explanation/Solution The TV turns off automatically (the TV enters standby mode). • Check if the “Sleep Timer” is activated, or confirm the “Duration” setting of “On Timer”. • Check if the “Idle TV Standby” is activated. • If no signal is received and no operation is performed in the TV mode for 30 minutes, the TV automatically switches to standby mode. The TV turns on automatically. • Check if the “On Timer” is activated.
Additional Information Keep this Instruction manual safe you’ll need it Television in the UK is going digital, bringing us all more. Please see overleaf to find out when your area switches to digital. Digital UK is the independent, non-profit organisation leading the process of digital TV switchover in the UK. Digital UK provides impartial information on what people need to do to prepare for the move to digital, and when they need to do it.
How to re-tune: 1 2 3 4 5 6 Press "HOME" on the remote Press G/g to select "Settings" Press F/f to select "Digital Set-up", then press Press to select "Digital Auto Tuning" Press G to select "Yes" then press to start "Digital Auto Tuning" Follow the on screen instructions. If you are missing any channels, it may be that they are not available in your area, or that your aerial needs upgrading.