4-543-850-11(1) Television Operating Instructions Introducing Your New BRAVIA® Getting Started Operating the TV Using Features Using the Menus Other Information Sony Customer Support U.S.A.: http://www.sony.com/tvsupport Canada: http://www.sony.ca/support United States 1.800.222.SONY Canada 1.877.899.
Owner’s Record The model and serial numbers are located at the side and rear of the TV. Record these numbers in the spaces provided below. Refer to them whenever you call upon your Sony dealer regarding this TV. Model Name Serial No. CAUTION To prevent electric shock and blade exposure, do not use this polarized AC plug with an extension cord, receptacle or other outlet unless the blades can be fully inserted. Operate the TV only on 110-240 V AC (USA/Canada 120 V AC).
Contents Introducing Your New BRAVIA® BRAVIA® Welcome to the World of . . . . . . . .4 Experiencing Stunning HD with Your BRAVIA . . . . . . . . . . . . . . . . . . . . . . . . . . .4 The Four Steps to a Stunning HD Experience . . . . . . . . . . . . . . . . . . . . . . . . .4 If You Cannot Connect to the Internet . . . . . 32 Adjusting the Server Display Settings. . . . . . 32 Browsing Websites . . . . . . . . . . . . . . . . . . . . 33 Enjoying Sony Entertainment Network . . . . .
® Introducing Your New BRAVIA Welcome to the World of BRAVIA® Thank you for choosing this Sony BRAVIA® high-definition television. Use the documentation listed below to get the most out of your TV. Safety Booklet Contains precautionary measures to keep you and your TV safe. Read this information prior to setting up your TV. Quick Setup Guide Provides TV setup information with sample connection diagrams. Operating Instructions Provides the most detailed information to operate your TV.
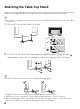
Getting Started Setting Up Your TV Some TV models are packaged with a detached Table-Top Stand so you can mount your TV to a wall right away. If you are not mounting the TV to a wall, you will need to attach the Table-Top Stand. You will need a Phillips screwdriver (not supplied) and the supplied screws to complete the task. Look for the supplied Table-Top Stand instruction leaflet. Be sure to consider the following while setting up your TV: Disconnect all cables when carrying the TV.
Attaching the Table-Top Stand Refer to the supplied Table-Top Stand instruction leaflet for proper attachment. • Be careful to not pinch your hands or the AC power cord when you install the TV set to the TableTop Stand. 1 Place the TV set on the Table-Top Stand. 2 Fix the TV to the Table-Top Stand using the supplied screws. The arrow marks indicate the location of the screw holes used for securing the Table-Top Stand. • Hold the TV with one hand to avoid it dropping when attaching.
• Be sure the TV is on the vertical position before switching on. • TV set must not powered on with LCD panel face down to avoid uneven picture uniformity.
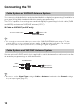
Locating Inputs and Outputs Rear Panel Item 1 VIDEO IN/ COMPONENT IN/R-AUDIO-L (MONO) Side Panel Description This input port can be used as a composite video input (VIDEO) or as a component video input (COMPONENT). For composite use, connect the yellow jack to Y for video and use audio L (mono) and R for audio signal. For component connection, use Y, PB, PR for video signals and also connect the audio L (mono) and R for audio signal.
Item Description 3 CABLE/ ANTENNA 4 AUDIO OUT RF input that connects to your Cable or VHF/UHF antenna. 5 LAN You can enjoy contents stored in DLNA Certified™ devices via a network (page 29), and also IPTV, applications and Internet Browser are available. Connects to the audio input jack of your analog audio equipment. You can use this output to listen to your TV’s audio through your stereo system.
Connecting the TV Cable System or VHF/UHF Antenna System You can enjoy high-definition and standard-definition digital programming (if available in your area) along with standard-definition analog programming. This TV is capable of receiving unscrambled digital programming for both cable (QAM and 8VSB) and external VHF/UHF antenna (ATSC).
HD Cable Box/HD Satellite Box You can enjoy high-definition programming by subscribing to a high-definition cable service or a high-definition satellite service. For the best possible picture, make sure you connect this equipment to your TV via the HDMI or component video (with audio) input located on the back of your TV.
Connecting Other Equipment USB MHL device VCR/Game system/ Camcorder Blu-ray Disc Player/“PS3” DVD player Digital satellite receiver Digital cable box Digital recorder CABLE/ANTENNA Analog audio equipment (A/V Receiver/ HomeTheater) Audio system Router/Modem Digital audio equipment (A/V Receiver/Home Theater) • Refer to the Quick Setup Guide (supplied) when connecting other equipment to your TV.
When Installing the TV Against a Wall or Enclosed Area Make sure that your TV has adequate ventilation. Allow enough space around the TV as shown below. Avoid operating the TV at temperatures below 41 °F (5 °C). Installed on the wall Installed with stand 11 7 /8 inches (30 cm) 4 inches (10 cm) 2 3 /8 inches 4 inches (10 cm) (6 cm) 11 7/ 8 inches (30 cm) 4 inches (10 cm) 4 inches (10 cm) Leave at least this much space around the set. Never install the TV set as follows: Air circulation is blocked.
Securing the TV Sony strongly recommends taking measures to prevent the TV from toppling over. Unsecured TVs may topple and result in property damage, serious bodily injury or even death. Preventing the TV from Toppling Secure the TV to a wall and/or stand. Do not allow children to play or climb on furniture and TV sets. Avoid placing or hanging items on the TV. Never install the TV on: • Slippery, unstable and/or uneven surfaces.
2 Secure the TV to the stand. Use the optional hardware listed below (not supplied): • M4 machine screw (screwed into the screw hole of the TV). • A screw or similar (attach it to the TV stand). • Rope or chain (strong enough to support the weight of the TV). Make sure that there is no excess slack in the rope or chain.
3 Anchor the TV to the wall. Anchor the TV to the wall by using bolts, wall anchor and chain (or rope). Wall-mount holes Anchor bolts (not supplied) Wall-anchor (not supplied) Rope or chain (not supplied) • Securing the TV to the stand without securing the TV and the stand to the wall provides minimum protection against the TV toppling over. For further protection, be sure to follow the three measures recommended. • Your TV is shipped with screws attached to the rear of the TV depending on the TV model.
Running Initial Setup Complete your cable connections before beginning the Initial Setup. Refer to the Quick Setup Guide (supplied) for sample connection diagrams. 1 Turn on the TV. The Initial Setup screen will appear. Getting Started 2 Use the remote control buttons described below to navigate through the Initial Setup. V/v/B/b buttons: Allow you to navigate and highlight options where applicable. button: Allows you to select the highlighted option and advance to the next screen.
Operating the TV Using the Remote Control To Insert Batteries into the Remote Control Insert two size AAA batteries (supplied) by matching e and E on the batteries to the diagram inside the battery compartment of the remote control. Guidelines to Follow • Point your remote control directly at the IR sensor located on your TV. • Make sure that no objects are blocking the path between the remote control and the IR sensor on your TV.
Remote Control Button Description Description 1 INPUT Press to display the connected equipment list and select the input source. Press repeatedly to toggle through the inputs. 2 WIDE Press repeatedly to cycle through the available Wide Mode settings. See page 24. 3 PIC OFF Press to turn picture off, and sound remains on.
Button Description 6 PHOTO FRAME Press to display the Photo Frame. See page 28. 7 SLEEP Press repeatedly until the TV displays the time in minutes (Off/15/30/45/60/90/120) that you want the TV to remain on before shutting off. To cancel the sleep timer, press SLEEP repeatedly until Off appears. 8 RETURN Press to go back to the previous screen or exit from the screen when displaying menu items and settings. 9 HOME Press to display the menu with TV functions and settings.
Description qh SYNC MENU Press to display the BRAVIA Sync Menu and then select connected HDMI/MHL equipment from Device Selection. qj SEN Enables selection of content from the online service “SEN” (Sony Entertainment Network). If “SEN” is unavailable, the “SEN” category is not displayed. qk NETFLIX Press to display the NETFLIX menu. ql V/v/B/b Press V/v/B/b to move focus/highlight. Press to select/confirm an item. w; OPTIONS Press to display a list of convenient functions and menu shortcuts.
TV Controls and Indicators Item Description 1 "/1 (Power) Press to turn on and off the TV. 2 – 2 + Press to adjust the volume, or select a channel/external input. When the volume Up/Down screen is displayed by pressing 2 +/–, volume can be adjusted. When the channel Up/Down screen is displayed by pressing CH/ INPUT, channels can be selected. When the input select screen is displayed by pressing CH/INPUT, external input can be selected.
Using Features Using PIP Feature Using PAP Feature PIP (picture in picture) displays a picture from a connected PC in full screen, and a TV program or other external input (see below “To Enter PIP” table) in an inset window. (Closed Captions (CC) is not available with PIP mode.) PAP (picture and picture) displays two pictures (left and right) on the screen simultaneously (e.g. external input and TV program). For details on external equipment, see page 12.
Favorites Wide Mode Your favorite channels and external inputs can be accessed by pressing the HOME button once they are added to the list. x To change the Wide Screen mode 1 Press WIDE repeatedly to select the wide mode. 1 Press HOME. 2 Press V/v to select Favorites, then press Wide Zoom* Normal Full Zoom* . * Parts of the top and bottom of the picture may be cut off. For HDMI PC Input (PC timing) Normal Full 2 The favorites list appears.
Playing back Photo/ Music/Video via USB You can enjoy photo/music/video files stored in a Sony digital still camera or camcorder through a USB cable or USB storage device on your TV. 1 Connect a supported USB device to the TV. 2 Press HOME. 3 Press V/v to select Media, then press V/v/B/b to select Photo, Music, Video, then press . to select a device. 5 Press V/v/B/b to select a file or folder, then press . When you select a folder, select a file, then press . Playback starts.
USB Video format Extension Container Video Codec Xvid .avi AVI MPEG2 MP MPEG1 H.264 BP/MP/HP MPEG-4 SP/ASP Audio Codec PCM / MPEG1 Layer1, 2 / MP3 / MPEG2 AAC (2ch) / MPEG4 AAC (2ch) / MPEG4 HE-AAC (2ch) / Dolby Digital (2ch) / Dolby Digital Plus (2ch) / WMA v8 WMV v9 .wmv .asf ASF Xvid MP3 / WMA v8 MPEG-4 SP/ASP VC-1 .mp4 .mov .3gp H.264 BP/MP/HP MP4 H.263 H.264 BP/MP/HP MPEG-4 SP/ASP .mkv MKV WMV v9 VC-1 VP8 .mpg .mpeg .vob .
Home Network Connecting to a Home Network You can enjoy various content (e.g. photo/ music/video files) stored on DLNA Certified™ media servers. The home network feature allows you to enjoy network content in other rooms. 2 Select files or folders to play from the list. • The server is required to be DLNA Certified™.
Photo Frame Photo Frame displays the clock and calendar at the same time as displaying a photo and listening to music. 1 Press HOME. 2 Press V/v then to select Photo Frame Mode. x Duration To save power, the TV continually plays back in photo frame mode for up to 24 hours before powering off automatically. After automatic power off, do not use photo frame mode for at least one hour to avoid panel burn-in. You can change the setting of the Duration in the Photo Frame Settings (page 45).
Using Home Network Features Setting up the Internet Connection When you connect this TV to the Internet, you can enjoy multiple functions: enjoying Internet video, etc. Using the network feature you can connect the TV to the Internet. The set-up procedure differs depending on the type of network and LAN router. Before setting up the Internet connection, be sure to set up a LAN router. Check your wireless LAN environment using the following chart.
Type 1: Secured network with Wi-Fi Protected Setup™ (WPS) The WPS standard makes security of a wireless home network as straightforward as pressing the WPS button on the wireless LAN router. Before setting up a wireless LAN, check the location of the WPS button on the router and verify how to use it. For security purpose, WPS (PIN) provides a PIN code for your router. PIN code is renewed every time you select WPS (PIN). 1 Press HOME, then select Settings > Setup > Network > Network Setup.
Type 3: Unsecured network with any type of wireless LAN router To set up a wireless LAN, SSID (wireless network name) will be required. 1 Press HOME, then select Settings > Setup > Network > Network Setup. 2 IP Address setting/Proxy server: – automatic setting: Set up network connection > Auto – manual setting: Set up network connection > Custom > Wireless Setup from the list of scanned wireless networks. 4 Follow the instructions on the set-up screen.
If You Cannot Connect to the Internet Adjusting the Server Display Settings Use the diagnosis to check possible causes for network connection failures, and settings. You can select home network servers to be displayed on the Home Menu. Up to 10 servers can be displayed in the Home Menu automatically. 1 Press HOME, then select Settings > Setup > Network > Network Setup. 2 Select View Network settings and status. 3 Select Check Connection. This may take several minutes.
Browsing Websites When the TV is connected to the Internet, you can browse websites. Enjoying Sony Entertainment Network • Web content may not be displayed correctly, or some functions may not work properly, if the TV does not support functions provided by certain Internet services. Also, the TV may not support functions developed in the future. • Be sure to connect your TV to the broadband Internet and complete Network Setup (page 44).
• To update Sony Entertainment Network content services, Press HOME, then select Settings > Setup > Network > Refresh Internet Content. x Seeking forward/backward in video content Press the buttons on the remote controls that correspond with the control indications on the screen. Enjoying Applications With the applications, you can display a variety of information on the screen. Applications provide easy access to interactive content when your TV is connected to the Internet.
Using the Menus Navigating through TV Menus The HOME button allows you to access a variety of TV settings and USB media files. 1 2 3 4 Sony Entertainment Network Press on the remote control to display the menu options. Press V/v/B/b to navigate on the menu or adjust the settings. Press to select or confirm. Press to exit. Sony Entertainment Network serves as a gateway to Internet content, delivering a variety of on-demand entertainment straight to your TV.
Media Photo Music The Photo, Music, and Video icons organize your photo, music, and video files from DLNA Certified™ networked equipment or Sony USB connected equipment. Be sure to select the correct icon when accessing files. Refer to the feature section for more information on these icons. Video Photo Frame Mode Settings You can select the frame image which enables you to enjoy with photo, music and clock. For details, see page 28.
Option Description Adjust to brighten or darken the picture. Adjust to increase or decrease color intensity. Adjust to increase or decrease the green tones. Adjust to sharpen or soften the picture. Cool Select to give the white colors a bluish tint. Neutral Select to give the white colors a neutral tint. Warm Select to give the white colors a reddish tint. Noise Reduction Select to reduce the picture noise level. Select from Auto, High, Medium, Low and Off.
• Available Picture options, including options in Advanced Settings depend on Scene Select and Picture Mode. Using the Sound Settings Option Description Sound Mode Customized sound listening Sets a sound mode. Sound Mode includes options best suited for video and photographs, respectively. Standard Optimizes sound quality for general content. Music Lets you experience dynamic and clear sound, like that of a concert. Cinema Optimizes surround sound for movies.
Option Description Adjusts the volume with the TV’s remote control, when using an external audio system. Fixed Adjusts the volume using the connected audio system’s remote control. Digital Audio Out Select Auto if the device connected via DIGITAL AUDIO OUT (OPTICAL) is compatible with Dolby Digital. Select PCM if the device is not compatible with Dolby Digital. Audio Out Variable • MTS Audio is only available for analog programs.
Option Description Display Area Each setting depends on the resolution you are watching. Full Pixel Displays pictures in their original size when parts of the picture are cut off (available depending on the TV model). +1 Displays pictures in their original size. Normal Displays pictures in their recommended size. -1 Enlarges the picture so that the edges are outside the visible display area. Allows you to move the position of the picture left and right. (Available in Wide Zoom and Zoom.
Using the Channel Settings Option Description Signal Type Cable Auto Program Add Digital Channels Show/Hide Channels Analog Fine Tune • • • • You should run Auto Program after changing the Signal Type setting. Running Auto Program will clear the Favorites list. Channels that you set to be hidden can be accessed by the 0-9 and buttons. You can set channels to be hidden that are automatically set in Auto Program.
Option Description Country U.S.A. Canada Off Rating Child Youth Young Adult Custom Downloadable U.S. Rating (Available only in U.S.A. where advanced ratings exist) Unrated (Available only when Country is set to U.S.A.) Channel Block External Input Block Off Custom Clear All Select to use U.S.A. ratings (page 43). Select to use Canadian ratings (page 43). Turn Parental Lock off. No programs are blocked from viewing. Maximum ratings permitted are: U.S.
x US Models: Selecting Custom Parental Lock Rating Options To select custom rating options for the U.S., select U.S.A. in the Country setting (page 42). Option Description Movie Rating G PG PG-13 R TV Rating Block programs by their rating, content or both Using the Menus All children and general audience. Parental guidance suggested. Parental guidance for children under 13. Restricted viewing, parental guidance is suggested for children under 17. NC-17 and X No one 17 or under allowed.
Option Description French Rating G General programming. 8 ans+ Not recommended for young children. 13 ans+ Not recommended for ages under 13. 16 ans+ Not recommended for ages under 16. 18 ans+ Programming restricted to adults. See “US Models” on page 43 for details. U.S.A. Rating x Viewing Blocked Programs You can view blocked programs by entering your password. Press when tuned to a blocked program, then enter the password. This temporarily deactivates the parental control feature.
Option Description Home Network Show/Hide Setup Media Servers Media Server Troubleshooting Renderer Photo Frame Display Mode Settings Clock Display Image Selection Music Selection Slideshow Setting Music Playback Setting Duration USB Auto Start Diagnoses whether the TV can connect to each server on the home network. Renderer Enables the TV to play photo/ music/video files on a device (e.g. digital still camera) by operating the device via the network.
Option Description Closed Captions (CC) Allows you to select from several closed caption modes (for programs that are broadcast with closed captioning). CC Display On Closed Captions (CC) is turned on. Off Closed Captions (CC) is turned off. On when Closed Captions (CC) is turned on when the TV Muting is muted. Analog CC Allows you to select basic analog (EIA-608) closed caption options. CC1, CC2, Displays a printed version of the dialog or sound CC3, CC4 effects of a program.
Option Description Select Small to display minimal channel and program title or select Large to display detailed channel and program information along with the TV icon if you are viewing the TV. Select Hidden to hide information about the TV channel or program. This information will appear if it is available from the broadcaster. Info Banner appears on the screen each time the channel and external inputs are changed or when DISPLAY on the remote control is pressed.
Option Description BRAVIA Sync Communicates with equipment compatible with the BRAVIA Sync Control Settings function. BRAVIA Sync Links the operations of the TV and the equipment. Control For specific Sony equipment compatible with BRAVIA Sync Control, this setting is applied automatically to the connected equipment when set to On. Device Auto Select On to have your connected equipment with BRAVIA Power Off Sync Control function power off automatically when the TV is turned off.
Option Description Software Update Automatic Software Download Product Support Updates the TV system using USB memory or through Network. Select USB or Network to update. Select On to download the software automatically. Select Off to disable it. Contact Sony Signal Diagnostics Initialize Personal Information Sony contact information is available on this screen for your convenience.
Other Information PC Input Signal Reference Chart for HDMI/MHL IN After connecting the PC to the TV, set the output signal from the PC according to the chart below. Resolution Signals Horizontal (Pixel) × Vertical (Line) Horizontal frequency (kHz) Vertical frequency (Hz) Standard VGA 640 × 480 31.5 60 VGA SVGA 800 × 600 37.9 60 VESA Guidelines XGA 1,024 × 768 48.4 60 VESA Guidelines WXGA 1,280 × 768 47.4 60 VESA 1,280 × 768 47.8 60 VESA 1,360 × 768 47.
Using a Wall-Mount Bracket This TV’s instruction manual only shows the steps on preparing the installation of the TV before installing to the wall. Your TV can be mounted on a wall using a Wall-Mount Bracket (not supplied) out of the box as packaged. If the Table-Top Stand is attached to the TV, the TV may require detaching the Table-Top Stand. Prepare the TV for the Wall-Mount Bracket before making cable connections. Sony does not supply the Wall-Mount Bracket or the installing service.
Troubleshooting Many of the poor pictures and poor sound conditions are related to improper connection of the cables; refer to the Quick Setup Guide provided for connections. If you have questions, service needs, or require technical assistance related to the use of your Sony TV even after you read this operating instructions manual, contact the following: For US Support: http://www.sony.com/tvsupport or call 1-800-222-SONY (7669) For Canadian Support: http://www.sony.
Condition Explanation/Solution TV is locked to one channel • Perform Auto Program to add receivable channels that are not present in the TV’s memory (see pages 17 and 41). Cannot receive or select channels • Perform Auto Program to add receivable channels that are not present in the TV’s memory (see pages 17 and 41). • To receive or select cable channels, make sure that Signal Type in the Channel settings is set to Cable (see page 41).
Condition Explanation/Solution No sound / Noisy sound No sound but good picture • Check the volume control. • Press MUTING or VOL + so that “Muting” disappears from the screen (see page 20). • Set Speakers to TV Speakers in the Sound settings (see page 38). If it is set to Audio System, sound is not output from the TV’s speakers regardless of the TV’s volume control. • When using HDMI input with Super Audio CD or DVD-Audio, DIGITAL AUDIO OUT (OPTICAL) may not provide an audio signal.
Condition Explanation/Solution Applications Apps are inaccessible • Check that the LAN cable or AC power cord of the router/ modem* has been connected properly. * Your router/modem must be set in advance to connect to the Internet. Contact your Internet service provider for router/modem settings. • Try using apps later. The app content provider’s server may be out of service.
Condition Black bands appear at the edges of the screen Explanation/Solution • Some wide screen programs are filmed in aspect ratios that are greater than 16:9 (this is especially common with theatrical releases). Your TV will show these programs with black bands at the top and bottom of the screen. For more details, check the documentation that came with your DVD/Blu-ray (or contact your program provider). • Programs in 4:3 aspect ratio will have bands on left and right sides of the screen.
Condition Explanation/Solution Photo images appear small in the screen • Set display size to expanded. • Whether photo images can be displayed in full screen or not depends on the resolution or aspect ratio of the file. Photo images or folders take time to display • Depending on the image dimension, file size, and number of files in a folder, some photo images or folders take time to display.
Condition Explanation/Solution Your TV cannot connect to the server • Check the LAN cable or connection to your server and your TV. • Check if your network is properly configured on your TV. A message appears starting that the TV cannot connect to your network • Check the current network settings. Press HOME, then select Settings > Setup > Network > Network Setup > View Network settings and status. If all of your network settings are “-”, your server may not be connected properly.
Important Notices Declaration of Conformity Trade Name: SONY Model: KDL-60R510A Responsible Party: Sony Electronics Inc. Address: 16530 Via Esprillo, San Diego, CA 92127 U.S.A. Telephone Number: 858-942-2230 This device complies with part 15 of the FCC rules. Operation is subject to the following two conditions: (1) This device may not cause harmful interference, and (2) this device must accept any interference received, including interference that may cause undesired operation.
Specifications System Television system NTSC: American TV standard ATSC (8VSB terrestrial): ATSC compliant 8VSB QAM on cable: ANSI/SCTE 07 2000 (Does not include CableCARD functionality) Channel coverage Analog terrestrial: 2 - 69 / Digital terrestrial: 2 - 69 Analog Cable: 1 - 135 / Digital Cable: 1 - 135 Panel system LCD (Liquid Crystal Display) Panel (LED backlight) Speaker output 10 W + 10 W Input/Output jacks CABLE/ANTENNA 75-ohm external terminal for RF inputs VIDEO IN VIDEO: 1 Vp-p, 75 ohm
Model name KDL- 60R510A Power and others Power requirement 110-240 V AC, 50/60 Hz (U.S.A./Canada 120 V AC, 60 Hz) Power consumption 175 W in use in standby Less than 0.3 W with 120 V AC and with 240 V AC less than 0.3 W Screen size* (measured diagonally) (inches) 60 (cm) 152.
Index "/1 button 22 0-9 buttons 20 4:3 Default 39 F A H Add Digital Channels 41 Advanced Settings 37 Alternate Audio 38 Analog Fine Tune 41 Applications 34 Audio Description 46 AUDIO OUT 9 Audio Out 39 Auto Display Area 39 Auto Program 17, 41 Auto Shut Off 49 Auto Wide 39 Automatic Software Download 49 AV Setup 47 Favorites 24 French Rating 44 HDMI IN 8 HOME button 20 Horizontal Center 40 Hue 37 I Idle TV Standby 49 Info Banner 47 Initial Setup 47 INPUT button 19 Installing the TV on a wall 51 Interne
For Your Convenience Be sure to register your TV. Online Registration: United States Canada http://productregistration.sony.com http://www.sony.ca/registration Your TV is capable of receiving software updates. For the latest information about software updates for your TV, visit: Software Updates: United States Canada http://www.sony.com/tvsupport http://www.sony.