3-238-177-21 (3) FM/MW/SW Cassette Car Stereo Operating Instructions GB Manual de instrucciones ES CT For installation and connections, see the supplied installation/connections manual. Para obtener información sobre la instalación y las conexiones, consulte el manual de instalación/conexiones suministrado.
Welcome ! Thank you for purchasing this Sony Cassette Player. You can enjoy its various features even more with: • Optional CD/MD units (both changers and players)*1. • CD TEXT information (displayed when a CD TEXT disc*2 is played on a connected optional CD unit with the CD TEXT function). *1 This unit works with Sony products only. *2 A CD TEXT disc is an audio CD that includes information such as the disc name, artist name, and track names. This information is recorded on the disc.
Table of Contents Location of controls . . . . . . . . . . . . . . . . . . . 4 Precautions . . . . . . . . . . . . . . . . . . . . . . . . . . 5 Notes on Cassettes . . . . . . . . . . . . . . . . . . . . . 5 Getting Started Resetting the unit . . . . . . . . . . . . . . . . . . . . . . 6 Detaching the front panel . . . . . . . . . . . . . . . 6 Setting the clock . . . . . . . . . . . . . . . . . . . . . . 7 Cassette Player Listening to a tape . . . . . . . . . . . . . . . . . . . . .
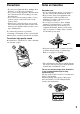
Location of controls Refer to the pages listed for details. ATT SEEK AMS VOL SOURCE D-BASS MODE MBP SEL SENS + DISC – RELEASE 1 2 REP 3 SHUF BL SKIP/-ALBM +/ATA MTL 4 5 6 BTM DSPL OFF XR-CA440X XR-CA440 a SOURCE (Power on/Tape/Radio/CD/ MD) select button b MODE (o) button Selecting the source. c VOL +/– button d ATT (attenuate) button e Display window f Z (eject) button 8 g SEEK/AMS button Tape: Fast-forwarding, reversing a tape Radio: Tuning in stations automatically.
Precautions Notes on Cassettes • If your car was parked in direct sunlight, allow the unit to cool off before operating it. • If no power is being supplied to the unit, check the connections first. If everything is in order, check the fuse. • If no sound comes from the speakers of a twospeaker system, set the fader control to the centre position. • When a tape is played back for a long period, the cassette may become warm because of the built-in power amplifier. However, this is not a sign of malfunction.
Getting Started Detaching the front panel You can detach the front panel of this unit to protect the unit from being stolen. Resetting the unit Before operating the unit for the first time or after replacing the car battery, you must reset the unit. Remove the front panel and press the RESET button with a pointed object, such as a ballpoint pen. Caution alarm If you turn the ignition switch to the OFF position without removing the front panel, the caution alarm will beep for a few seconds.
Attaching the front panel Attach part A of the front panel to part B of the unit as illustrated and push the left side into position until it clicks. Setting the clock The clock uses a 12-hour digital indication. Example: To set the clock to 10:08 1 Press (DSPL) for 2 seconds. The hour indication flashes. A 1 Press either side of (VOL) to set the hour. B to go forward VOL Notes • Be sure not to attach the front panel upside down.
Fast-winding the tape Cassette Player During playback, press and hold either side of (SEEK/AMS). Fast-forward Listening to a tape SEEK AMS Insert a cassette. Playback starts automatically. Rewind To start playback during fast-forwarding or rewinding, press (MODE) (o). Locating a specific track — Automatic Music Sensor (AMS) If a cassette is already inserted, to start playback, press (SOURCE) repeatedly until “TAPE” appears.
Playing a tape in various functions You can play the tape in various functions: • REP (Repeat Play) repeats the current track. • BL SKIP (Blank Skip) skips blanks longer than 8 seconds. • ATA (Automatic Tuner Activation) turns on the tuner automatically when fast-winding the tape. • MTL (Metal) lets you play a metal or CrO2 tape. During tape playback, press the desired function button repeatedly until “ON” in the display appears.
Storing only the desired stations You can manually preset the desired stations on any chosen number button. 1 Press (SOURCE) repeatedly to select the radio. 2 Press (MODE) repeatedly to select the band. 3 Press either side of (SEEK/AMS) to tune in the station that you want to store. 4 Press the desired number button ((1) to (6)) for 2 seconds until “MEM” appears. The number button indication appears in the display.
Other Functions Changing the sound and display settings — Menu Adjusting the sound characteristics You can adjust the bass, treble, balance, and fader. 1 Select the item you want to adjust by pressing (SEL) repeatedly. Each time you press (SEL), the item changes as follows: BAS (bass) t TRE (treble) t BAL (leftright) t FAD (front-rear) 2 Adjust the selected item by pressing either side of (VOL). Note Adjust within 3 seconds after selecting the item. The following items can be set: SET (Set Up) • A.
Boosting the bass sound — My Best sound Position (MBP) — D-bass When you drive without passengers, you can enjoy the most comfortable sound environment with “My Best sound Position.” “My Best sound Position” has two presets, which are best suited for the front seats. You can select one very easily with the MBP button. You can enjoy a clear and powerful bass sound. The D-bass function boosts the low frequency signal and high frequency signal with a sharper curve than conventional bass boost.
CD/MD Unit (optional) Display items This unit can control external CD/MD units (optional). If you connect an optional CD unit with the CD TEXT function, the CD TEXT information will appear in the display when you play a CD TEXT disc. When the disc/track changes, any prerecorded title*1 of the new disc/track is automatically displayed (if the Auto Scroll function is set to “ON,” names exceeding 8 characters will be scrolled).
Locating a specific track — Automatic Music Sensor (AMS) During playback, press either side of (SEEK/AMS) momentarily for each track you want to skip. To locate succeeding tracks SEEK AMS To locate preceding tracks Locating a specific point in a track — Manual Search During playback, press and hold either side of (SEEK/AMS). Release when you have found the desired point. To search forward Playing tracks repeatedly — Repeat Play You can select: • REP-TRACK — to repeat a track.
MP3 playable CD Unit (optional) Display items Displayable items • Music source • Function This unit can control external MP3 playable CD units. If you connect optional MP3 playable CD units, you can play a disc containing MP3 files. Album*1 (Disc) number Listening to an MP3 file 1 Press (SOURCE) repeatedly to select “CD.” 2 Press (MODE) repeatedly until the appropriate indication for the MP3 playable CD unit (“CD1,” “CD2,” etc.) appears. Playback starts.
Locating a specific track — Automatic Music Sensor (AMS) During playback, press either side of (SEEK/AMS) momentarily for each track you want to skip. To locate succeeding tracks SEEK AMS To locate preceding tracks Locating a specific point in a track — Manual Search During playback, press and hold either side of (SEEK/AMS). Release when you have found the desired point. Playing tracks repeatedly — Repeat Play You can select: • REP-TRACK — to repeat a track. • REP-ALBM*1 — to repeat an album.
Additional Information Notes • For safety, turn off the ignition before cleaning the connectors, and remove the key from the ignition switch. • Never touch the connectors directly with your fingers or with any metal device. Maintenance Removing the unit Fuse replacement When replacing the fuse, be sure to use one matching the amperage rating stated on the original fuse. If the fuse blows, check the power connection and replace the fuse.
Specifications Cassette Player section General Tape track Wow and flutter Frequency response Signal-to-noise ratio Outputs 4-track 2-channel stereo 0.08 % (WRMS) 30 – 18,000 Hz Inputs Cassette type TYPE II, IV 61 dB TYPE I 58 dB Tone controls Power requirements Tuner section Dimensions FM Mounting dimensions Tuning range FM tuning interval: 50 kHz/200 kHz switchable 87.5 – 108.0 MHz (at 50 kHz step) 87.5 – 107.
Troubleshooting The following checklist will help you remedy problems you may encounter with your unit. Before going through the checklist below, check the connection and operating procedures. General No sound. • Adjust the volume with (+). • Cancel the ATT function. • Set the fader control to the centre position for a 2-speaker system. The contents of the memory have been erased. • The RESET button has been pressed. t Store again into the memory. • The power cord or battery has been disconnected.
Error displays (when an optional CD/MD unit is connected) Error displays The following indications will flash for about 5 seconds, and an alarm sound will be heard. NO MAG The disc magazine is not inserted in the CD/ MD unit. t Insert the magazine in the CD/MD unit. NO DISC No disc is inserted in the CD/MD unit. t Insert discs in the CD/MD unit. ERROR*1 • A CD is dirty or inserted upside down.*2 t Clean or insert the CD correctly. • An MD does not playback because of some problem.*2 t Insert another MD.
Bienvenido Gracias por adquirir este reproductor de casetes Sony. Disfrutará incluso más de sus distintas funciones con: • Unidades opcionales de CD/MD (cambiadores y reproductores)*1. • Información de CD TEXT (que se muestra al reproducir discos CD TEXT*2 en una unidad de CD opcional conectada que disponga de la función CD TEXT). *1 Esta unidad funciona solamente con productos Sony.
Tabla de contenido Ubicación de los controles . . . . . . . . . . . . . . 4 Precauciones . . . . . . . . . . . . . . . . . . . . . . . . . 5 Notas sobre casetes . . . . . . . . . . . . . . . . . . . . 5 Procedimientos iniciales Restauración de la unidad . . . . . . . . . . . . . . . 6 Extracción del panel frontal. . . . . . . . . . . . . . 6 Ajuste del reloj . . . . . . . . . . . . . . . . . . . . . . . 7 Reproductor de casetes Audición de una cinta . . . . . . . . . . . . . . . . . .
Ubicación de los controles Consulte las páginas indicadas para obtener información detallada. ATT SEEK AMS VOL SOURCE D-BASS MODE MBP SEL SENS + DISC – RELEASE 1 2 REP 3 SHUF BL SKIP/-ALBM +/ATA MTL 4 5 6 BTM DSPL OFF XR-CA440X XR-CA440 a Botón de selección SOURCE (Encendido/Cinta/Radio/CD/MD) b Botón MODE (o) Selección de la fuente.
Precauciones Notas sobre casetes • Si estaciona el automóvil bajo la luz solar directa, deje que la unidad se enfríe antes de utilizarla. • Si la unidad no recibe alimentación, compruebe primero las conexiones. Si todo está en orden, compruebe el fusible. • Si los altavoces no emiten ningún sonido en un sistema de dos altavoces, ajuste el control de equilibrio en la posición central.
Procedimientos iniciales Extracción del panel frontal Puede extraer el panel frontal de esta unidad para evitar que la roben. Restauración de la unidad Alarma de precaución Antes de utilizar la unidad por primera vez o después de sustituir la batería del automóvil, es preciso restaurar la unidad. Extraiga el panel frontal y presione el botón RESET con un objeto puntiagudo, como por ejemplo un bolígrafo.
Instalación del panel frontal Instale la parte A del panel frontal en la parte B de la unidad, tal como muestra la ilustración, y presione del lado izquierdo hasta que encaje en posición. Ajuste del reloj El reloj emplea la indicación digital de 12 horas. Ejemplo: Para ajustar el reloj a las 10:08 1 Presione (DSPL) durante 2 segundos. La indicación de hora parpadea. 1 Presione el lado correspondiente del botón (VOL) para ajustar la hora.
Avance o retroceso rápido de una cinta Reproductor de casetes Durante la reproducción, presione y mantenga presionado el lado correspondiente de (SEEK/AMS). Avance rápido Audición de una cinta Inserte un casete. La reproducción se inicia automáticamente. SEEK AMS Retroceso Para iniciar la reproducción durante el avance o retroceso rápido, presione (MODE) (o).
Reproducción de una cinta con diversas funciones Es posible reproducir una cinta mediante diversas funciones: • REP (Reproducción repetida) de la pista actual. • BL SKIP (Saltar espacios en blanco) omite los espacios en blanco de duración superior a 8 segundos. • ATA (Activación automática del sintonizador) activa el sintonizador automáticamente durante el avance o retroceso rápido de la cinta. • MTL (Metal) le permite reproducir una cinta de metal o CrO2.
Almacenamiento de las emisoras deseadas Si la sintonización programada no funciona — Sintonización automática/Modo de búsqueda local Puede memorizar manualmente las emisoras que desee en cualquier botón numérico. Sintonización automática: 1 Presione (SOURCE) varias veces para seleccionar la radio. 2 Presione (MODE) varias veces para seleccionar la banda. 3 Presione el lado correspondiente de (SEEK/AMS) para sintonizar la emisora que desee almacenar.
Otras funciones Cambio de los ajustes de sonido y la pantalla — Menú Ajuste de las características del sonido Es posible ajustar los graves, agudos, el balance y el equilibrio. 1 Seleccione el elemento que desee ajustar presionando (SEL) varias veces. Cada vez que presione (SEL), el elemento cambia de la siguiente forma: BAS (graves) t TRE (agudos) t BAL (izquierda-derecha) t FAD (frontal- posterior) 2 Ajuste el elemento seleccionado presionando el lado correspondiente de (VOL).
Potenciación del sonido de graves — Mi mejor posición de sonido (MBP) — D-bass Cuando maneje solo, podrá disfrutar de un entorno acústico más comfortable gracias a “Mi mejor posición de sonido”. “Mi mejor posición de sonido” contiene dos programas, más adecuados para los asientos delanteros. Mediante el botón MBP podrá seleccionar sin problemas cualquiera de ellos. Le permite disfrutar de un sonido de graves claro y potente.
Unidad de CD/MD (opcional) Esta unidad permite controlar unidades de CD/ MD externas (opcional). Si conecta una unidad opcional de CD con la función de CD TEXT, la información de CD TEXT aparece en la pantalla al reproducir discos CD TEXT. Si conecta unidades de CD con capacidad para reproducir MP3 (p. ej. el cambiador de CD MP3), podrá reproducir archivos MP3, archivos de audio comprimidos con calidad de sonido. Consulte “Unidad de CD con capacidad para reproducir MP3 (opcional)” en la página 15.
Localización de una pista específica — Sensor de música automático (AMS) Durante la reproducción, presione el lado correspondiente de (SEEK/AMS) durante unos segundos para cada pista que desee omitir. Para localizar las pistas siguientes Reproducción repetida de pistas — Reproducción repetida Es posible seleccionar: • REP-TRACK — para repetir una pista. • REP-DISC* — para repetir un disco. * Disponible solamente cuando hay conectada una o más unidades opcionales de CD (MD).
Unidad de CD con capacidad para reproducir MP3 (opcional) Esta unidad permite controlar unidades de CD externas con capacidad para reproducir MP3. Si conecta unidades de CD opcionales con capacidad para reproducir MP3, puede reproducir un disco que contenga archivos MP3. Cuando termine el último archivo del disco La indicación de número de archivo regresa a “1” y la reproducción se reinicia a partir del primer archivo del disco.
Elementos de la pantalla Elementos visualizables • Fuente de la música • Función Localización de una pista específica — Sensor de música automático (AMS) Durante la reproducción, presione el lado correspondiente de (SEEK/AMS) durante unos segundos para cada pista que desee omitir.
Reproducción repetida de pistas — Reproducción repetida Es posible seleccionar: • REP-TRACK — para repetir una pista. • REP-ALBM*1 — para repetir un álbum. • REP-DISC*2 — para repetir un disco. Durante la reproducción, presione (4) (SHUF) varias veces hasta que el ajuste deseado aparezca en la pantalla. Se inicia la reproducción aleatoria. Para regresar al modo normal, seleccione “SHUF-OFF”. Nota “SHUF-ALL” no reproduce las pistas en orden aleatorio entre unidades de CD y de MD.
Información complementaria Notas • Por razones de seguridad, apague el encendido antes de limpiar los conectores y extraiga la llave del encendido. • No toque nunca los conectores directamente con los dedos o con algún dispositivo metálico. Mantenimiento Extracción de la unidad Sustitución del fusible 1 1 Extraiga el panel frontal (página 6). Al reemplazar el fusible, asegúrese de utilizar uno cuyo amperaje sea idéntico al especificado en el original.
Especificaciones Sección del reproductor de casetes Sección del amplificador de potencia Pista de la cinta Salidas Fluctuación y trémolo Respuesta de frecuencia Relación señal-ruido estéreo de 4 pistas y 2 canales 0,08 % (WRMS) 30 – 18 000 Hz Impedancia de altavoz Salida de potencia máxima Tipo de casete TIPO II, IV 61 dB Generales TIPO I 58 dB Salidas Sección del sintonizador FM Entradas Rango de sintonización Intervalo de sintonización de FM: 50 kHz/200 kHz intercambiable 87,5 – 108,0 MHz
Solución de problemas La siguiente lista le ayudará a solucionar los problemas que puedan producirse con la unidad. Antes de consultar la siguiente lista, compruebe los procedimientos de conexión y empleo. Generales No se oye el sonido. • Ajuste el volumen con (+). • Cancele la función ATT. • Ajuste el control de equilibrio en la posición central para un sistema de 2 altavoces. El contenido de la memoria se ha borrado. • Ha presionado el botón RESET. t Vuelva a almacenar en la memoria.
Indicaciones de error Si estas soluciones no ayudan a mejorar la situación, consulte con el proveedor Sony más próximo. (cuando hay conectada una unidad de CD/MD opcional) Indicaciones de error Las siguientes indicaciones parpadean durante unos 5 segundos y se oye una alarma. NO MAG El cargador de discos no está insertado en la unidad de CD/MD. t Inserte el cargador en la unidad de CD/ MD. NO DISC No hay ningún disco insertado en la unidad de CD/MD. t Inserte discos en la unidad de CD/MD.
!"#$ % • & ! '()*( +, -./ 0 12 34 *1 • '( 5675 89 -: '( 5675 ;/ *2 2<= >!?@ '( 5675 $ !& '( +,A B C89DE4 *1 !"# *2 $% &'(& )*+",-.
FGHI, JJJJJJJJJJJJJJJJJJJJJJJJJJK LMNO# JJJJJJJJJJJJJJJJJJJJJJP !MNO# JJJJJJJJJJJJJJJJJJP QR JJJJJJJJJJJJJJJJJJJJJJJJJJJJS TULVW JJJJJJJJJJJJJJJJJJJJJJJJJJS XYBZ JJJJJJJJJJJJJJJJJJJJJJJJJJJJ[ \] JJJJJJJJJJJJJJJJJJJJJJJJJJJJ^ _`$ JJJJJJJJJJJJJJJJJJa bcdefg h ijklmn$ -o5*4 JJJJJJJa pde
¦§¨© ª«¬¤® ATT SEEK AMS VOL SOURCE D-BASS MBP MODE SEL SENS + DISC – RELEASE 1 REP 2 3 SHUF BL SKIP/-ALBM +/ATA MTL 4 5 6 BTM DSPL OFF XR-CA440X XR-CA440 a b c d e f g h i j k l m 4 o &w¯ ! "#$ Z % &' ( 8 ) ° z±²³ \w ° bck´fg µc¶·fg '( -* 4¸ *(° ¹º *+ ,-.
• !"#$ %&'()*+, • Ñ Ò@f¯ÓÔ ªÕÖ×=>ØÙ ÑÚÛ»Ü ÝªÖ×Þß • ÑàáâvHãäA!âvHåæv ª¾ çèFGH, AéI, • êBé Úë ì í3,$Ì îHïæð åºñòó ¡ Ñ @ôõÎ !ö÷øù ï ¨©ÈÒ@úû ªü ý! þ B : Û ¾ Å • ª A ! V í • 3 y !X ! âvH0 îH "# Å<$%!8 9&'() • ª ¾ *+ ,-.;²}/0 1!23A • 45! ì 678 9 í: 2+ L ª ;<=>!??@´ !ABACD45! 2 • E! 04c!FGHì 2 I´J¤BæKö÷ ª£L .
2_Ú` L .
!|? ¬ m ®rsL{F¯° ±² ³´L{F µ¶F¦§¨)x Z[ ·¸uG F¹º» ¼¢½¾¿ ±² 2 (SEL) ~ZE 3 (VOL) -.
::; 4 ) (SEEK/AMS) -.! / %& SEEK AMS 6789 bcÍ q2 z±³ AÍ ìà (MODE) ÃÄ o !" #$% &'()* Ñt+´ qÍ B à (SOURCE) ÃÄ,pDE Ê5 6Ï ; 4 <=>?@A -BCDE FG !H (SEEK/AMS) -.
'()*+, ì _`$ ° • i6 - 4:L • o -¹º4¹ºº ^ u! • 5 -klHbcc42 zBbc ÍklH • *5 - ¡4 ¢ ¡ '£q ; I JK @A-LM N O PQRS(T;UVWX :2¦bº§AqklfgB O i jklmn$ ¨æKO -./012 1 2 3 !° 5 $ + DISC 1 2&Y!¤Å©&ª½i!f g òÃy «!Ë̱¬de * );+ (5): (6): (BTM): – i"ìde¿Ú¤Å -r*r r* r* *¥ ¥r 0 ¥4! S Àfg !+,-.
5678 -.9: !" -.;<=>?@ 3/045 12 ::&_;.`Y2-ab Xc @eA-fg 1 2 3 4 d1 JK (SOURCE) YZ[\ JK (MODE) YZ]^ (SEEK/AMS) -.!h Aij-fg 7&e )@A-ab (1) O (6) k l * +m NOUV PnonS ÁÂÃÄEl2DEŤ® 9:;<= (SEEK/AMS) -.!h0qrf g LM : >\ÚÀfgB ¯°lZ# !:,p>\?@AB= s tuvw DJK (SENS) NOUV PxQyzx{QRS !" HH~çèFTUV`lÞ àáIKGUVé" ålÞ ßnUê lÞLëMN p?@±9½!fg &k´ %&6/0 12 Ñq²³ qrrÏ 1 2 3 HH~ìíîÚï lÞ.ð Ie (SEEK/AMS) IK ñ"òLó.
BC:DEFG!" !LJ ìXY #° 789:;< )M4 &8 * ì ku}w²¼w²½¾0w~çè 1 JK (SEL) YZA }-~ ¿ÃÚ` (SEL) ÃÄ #¿! ° !"# $%&' t ()* $+&' t !", $- . /' t 0"1 $2 . ' 2 (VOL) -.
HI: JK@: !VWXYZZ Íb¦bïwÎÏB ìÐÑ Ê !ijwIÏ< ¢!iÒÓ!vw3Ô Ê!ijwIÏ@ÕÀÌÕXY iÓ L¢]I *o ÃÄ ìUVY Ú *o ° iÓ L]IÅ!Ö *o o° iÓ ×L]IÅ!Ö JK (MBP) 0& -[| ì ÜÝQÞï@ß!}w ( $ àÜ}w áâ!x }Ë9½0¼Ë9½ ì QÞY]}wx ïËBw~ ãË (o ÃÄ ì ä4Y Pòku}w ,- !S +, T &(3U* D.BASS-3 D.BASS-2 D.BASS-3 D.BASS-1 D.BASS-2 D.
FGè>! '()*( + , -& 4 Ñ=>Úg& ! '( 5675 $ ! '( +, : '( 5675 ;/B C '( 5675 89¾¤®2DEÅ FG :;/ ) B ì;/ ) ! Ì$F÷ * 1 l&bcDE -ÑbcÃcD E$ XY Êq»Ï º ^ ÀÂí!îï ¾&ÃcDE4 ìDE# • &67 • 89 Ñ=>ì * ! '( +, -! * '( ./ 4 éì ±jw * ²êëwË «¬_ rP ® Êì * ! '( +, -& 4 Ï ./01 +,LMNLOLPN 1 JK (SOURCE) YZ PyS Pnn*S 2 JK (MODE) NOUV@A-6 '()*( lÍ ìDE# • 4, • :;< = • >?@A * B CD@ * • 6EFG * Ð Ã + Ã, Ã-. / 0123 40-.
!" #$% &'()* ; 4 <=>?@A -BCD !H (SEEK/AMS) -.!/ SEEK AMS !pqrs12 ì &° • i6 5i' h Ú • i6 ( '* h Úð;/ Ð L "ÞEÞ M $% Ã% O f g !h >? ; 4 ) (SEEK/AMS) -.! / ;T@A-"4# 23 SEEK AMS 23 ijklmno ; I (1) y (2) y 2:L+,A!
!" # FGè>!ì * ! '( + , ! =>& !ì * ! '( + , éì @ * !;/ &LPYZL[\ 1 2 FG ìDE# • &67 • 89 45 *1 (./+01 JK (SOURCE) YZ PyS JK (MODE) NO(T_ n - y 6 PySPy*S - ¡¢V Í 8 Z# (OFF) ¹º;/ ;/& (1) (2) ö (5) (6) ö ¹º÷ø ÷ø& ¹º bc wù H (SEEK/AMS) .
!" #$% &'()* ; 4 <=>?@A -BCD !H (SEEK/AMS) -.!/ SEEK AMS f g !h >? ; 4 ) (SEEK/AMS) -.
$%&' • $2 u#v Fwx > y kz v\]^ G_ {| • }~Å oñ q¦ ^_ j 1 .ÞßB dOÛ< !Þ ßýRÞß!ÆþÁãË ÑÞß ªÖ×f¯=>ò .Þß Ñ Þß .
`a "#$ rsu yG YZ ! Yl GHI JK ® ¯ °°Q°t P JK ® ¯ ° / JK eqrs -.% GH %&'( =>?@ E -FGHI MNI "#$ 0 ! O&STU VWI HI %&'( GHI JI ) %&*+ , -. / 0 !1 0 ! 2 *34 5 / ! 67 / 0 ! 89:; 5 / 5 < ! 67 0 ! 89:; AB=>CBD 5 ! JKL 0 ! O8 5/ JK P/ JK 6 ;Q P JK 6R ; 5% 6 ;Q /% 6R ; 0 ! O JK / ! %&*+ , -.
bcde Ö× @ Bì !ö÷ 2 V!Ö× L ªÖ×=> 0 Ä »Û yG KLM • (+) kuw~ • ²³ 55 $ • ¾àáâvHãä!çèFGXY2A I, NOPQRST M • tà i6 65 ÃÄ t ¾XYd´mnA • f¯xfct& Í • f¯=>xk&»Û=> K UVVWLM ÊvvÏv$ &²³ -_ rr ® 4 XYZ[\Y] T^ _ `ab \Y] M • ! Ã7 (OFF) ÃÄ uØ B ZDE¾³( t Â`Ã7(OFF) ÃÄ uØì BZìDE • cdefghijk ST M lmnRopM qrst uvw x uGG ' y z{|LM xýab f¯=>Hk»Û K}fM • Ö×f¯!=> ÑÚÛ»Ü ÝªÖ ×Þß • abå?@ '' I, t à (SOURCE) ÃÄ -+´Úð; /4 +,Í
fgFG -:=>@& ! '()*( +,B4 ?E¾ uZ ¾ v vu H ;/ k+´ '()*( +, t ¾;/ +´ '()*( +, vu ¡¢J '()*( +,Ak+´;/ t ¾;/+´ '()*( +, £¤¤u¤-*1 • '( ¹ '( Å + ¹ *2 »ÛY+´ '( • : *( å *2 t +´ Úð *( • : '()*( å t +´ Úð '()*( t ¾ '( vu H¥J¢ ì * ! '( +,A+´¹ww ! '( t ¾w '( +´ì * ! '( +,A ¦§ v¨-*1 *( Å @ *2 t @! *( ¤£J£ : '()*( +,å Ä t à ! i6 65 ÃÄ vu ¤£ ¡© *( +,! & Í *( k&»ÛY+ ´ t Å »ÛY+´ *( ª¢ £H« !"# s $ t %