Help Guide Camera Control Box CCB-WD1 This “Help Guide” explains how to operate the product or a camera connected to the product from a web browser on your computer. When the product is connected to a camera, you can turn the camera on/off or shoot images with the camera through operations in the web browser. Connecting multiple cameras to multiple camera control boxes allows you to shoot images simultaneously with multiple cameras or apply camera settings to multiple cameras at once.
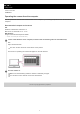
Help Guide Camera Control Box CCB-WD1 Operating the camera from the computer You can operate the camera from a web browser on the computer by connecting the product to the camera and the computer. Recommended computer environment OS: Windows 7/Windows 8.1/Windows 10 Mac OS X 10.11/macOS 10.12 - 10.13 Web browser: Google Chrome/Internet Explorer*/Safari * Version 11.0 or later (as of December 2017) 1 Launch a web browser on the computer, and then enter the following URL into the address bar.
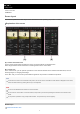
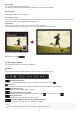
Help Guide Camera Control Box CCB-WD1 Screen layout This section explains the screen layout of the web browser when operating the product or camera. Explanation of the screen (A): Camera information area The live views and shooting information for each connected camera are displayed here. Select target cameras in this area before controlling them from the control area.
Control area 4-735-434-11(1) Copyright 2018 Sony Corporation 4
Help Guide Camera Control Box CCB-WD1 Camera information area The live views and shooting information for each connected camera are displayed. Camera information (A): Camera control box information A temporarily assigned number indicating the product’s position in the series, a checkbox to select the camera, the camera label for the connected camera, and the software version of the product are displayed. Checkbox You can switch the selection status by clicking the checkbox.
Camera label You can edit the camera label by clicking it. The camera’s model name and camera ID are displayed as the camera label initially. (B): Live view The live view for the camera is displayed. Live-view frame rate You can switch between “Low” and “Standard” as the live-view frame rate by double-clicking the live view. The current frame rate of the live view is displayed below the live view. Focus button If you move the cursor over the live view, the “Focus” button will appear.
Note When you change the combination of a camera control box and camera, any edited camera label is deleted. The model name and camera ID of the connected camera are displayed as the camera label. Setting the frame rate of the live view to “Standard” for multiple cameras may slow down the computer.
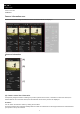
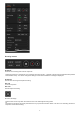
Help Guide Camera Control Box CCB-WD1 Control area You can operate and configure the camera and the product. “Camera” tab You can perform shooting operations and change the settings for selected cameras using the “Camera” tab.
Shooting buttons AF/AE ON Performs auto-focusing and locks the exposure. During execution of “AF/AE ON,” the message “Executing AF/AE...” appears in the shooting information field (camera information area). You cannot change the settings for the camera while this message is displayed. AF/AE OFF Cancels auto-focusing and exposure locking. AEL ON Locks the exposure. AEL OFF Cancels exposure locking. Shoots a still image. This button works only when the camera is set to the still-image shooting mode.
Starts movie recording. This button works only when the camera is set to the movie recording mode. Stops movie recording. Cont. Shooting (Continuous shooting) These buttons work only when the camera is set to the still-image shooting mode and the drive mode is set to the continuous shooting mode. Start Starts continuous shooting. During continuous shooting, the message “Executing Cont. Shooting...” appears in the shooting information field (camera information area).
On Turns the cameras on. Standby Turns the cameras off. Memory Card (Memory card) Import Displays the screen for file transfers. To import files to the computer 1. Select the camera. You can select a camera by its camera label using the pull-down menu at the top of the file import screen. The images shot by the camera that corresponds to the selected camera label will be listed. 2. Select the desired images using the checkboxes on the file import screen. 3. Click the “Start Import” button.
Imports files with the camera label prefixed to the original file names of the selected images. Keep Original Name: Imports files with the original file names of the selected images. Note If the images on the memory card inserted into the camera do not transfer, check the security level settings of the computer.
You can change the shooting settings for the cameras. Select the desired setting from the pull-down menu for each setting item. Click next to a setting title to collapse the items. Click next to a setting title to expand it. “Box” tab You can set the synchronization signal, update the software, or initialize all of the connected camera control boxes using the “Box” tab.
Licensing Information (Licensing information) You can view the licensing information for the software included in the product. Initialize (Initialization) You can initialize the settings, etc. for the camera control boxes. Do not shut down the power source during initialization. This may cause the products to malfunction.
Help Guide Camera Control Box CCB-WD1 Trademarks Microsoft, Windows and Internet Explorer are registered trademarks or trademarks of Microsoft Corporation in the United States and/or other countries. Mac and Safari are registered trademarks or trademarks of Apple Inc., registered in the U.S. and other countries. Google Chrome is a trademark or registered trademark of Google Inc.