S 0 MY® 3-800-475-23 (1) Video Camera Recorder CCD- TR44/TR541TR64/TR Operation Manual Before operating the unit, please and retairL it for fulule reference. Owner's The model read Serial and serial numbers are located manual thoroughl_,, No CCD- Video8 by Sony on the bottom. Mode! Serial CCD-TR54 Handgcam Corporation Record below.
Welcome Congratulations on your purchase of this can capture life's precious moments with loaded with advanced features, but at the producing home video that you can enjoy 1:o video [] Sony Handyca m® camcorder With your Hand ycam, you superior picture and sound quality. Your Handycam is same time it is very easy to use. You will soon be for yeRrs to come. Eel lilt' _l/i1v _uilict _ l. t'l/R'l 11+._711t,_l ulll \oli 1-80i)-222-{qONY (UIfiR'd Stales only) Per tile To prevent fire or shock hazard
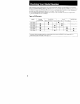
Before You Begin Notes and Precautions Checking Checking 4 Supplied Accessories Your Model Number 5 6 Getting Started Charging and Installing the Battery Pack 7 Inserting a Cassette 11 Basic Operations Camera Recording 12 Using the Zoom Feature 15 Hints i'or Better Shooting 16 Checking the Recorded Picture Connections Playing for Playback Back a Tape Advanced Using 17 18 19 Operations Alternati_ Recording with Power Sources 2l the Date or Time 23 Using the PROGRAM AE Function S
You Be( Note on 1_/Color Systems TV color systems are different depending on tile countries If ytm view the playback picture on a TV, you need an NI_oC system based TV. When you want to use a PAl, M system based TV, you will need an NTSC/PAL M transcoder (as this is an NTSC system based camcorder). Please check tile list on page 42 to see tile TV color system of your coutltry. Precaution on Copyright Tdevision programs, films, video tapes, and other materials In,I} b,-' copyrighted.
Check that th_ following accessories are supplied [] with your camcorder. @ z o O [] [] r_ 5 Q [] [] [] NP-33 Battery [] A/V connecting [] Shoulder Pack (1) (p. 7) strap cable (1) (p. 51) AC-V15/V16/V16A CR2025 Lithium Already installed Wireless Remote (1) (p. 18) AC power Battery adaptor (1} (p. 31) in the camcorder Commander (1) (p. 19, 51) For CCD-TR54/TR64/TR74/TR84iTR94 Size AA (R6) battery for Remote For CCD_TR54/TR64iTR74/TR84/TR94 [] Battery (1) (p.
The instructions in this manual are for six models listed below. Before check your model number by looking at the bottom of your camcorder. you start reading The CCD-TR54 for illustration purposes. Otherwise, the model name is indicated in the illustrations. operation are clearly indicated in the text, Ior example, "For CCD-TR84 only" As you read through this manual, buttons and settings on the camcorder are shown e.g.
Getting ° Before pack, using use your Charging Charge camcorder, the supplied you AC power first need to charge and install the battery pack. To charge the batte_ then the battery adaptor. the Battery Pack the battery pack on a flat pl;_ce without vibration (1) Connect the AC power adaptor to the wall outlet. (2) Align the right s_de of the battery pack with the line pack in _he direction of the arrow.
Battery Life CCD-TR44/TR54 _T_o _ -ua_ery pacK " II (supplied! NP-33 ica! recording time -*-. i NP-98198D NP'80180DI NP-68166H _0 175 150 NP-33 (supplied) NP-98/g8D NP-80/80E tinuous recording time** i 265i 105 NP-C65 NP-60D 85 I CCD-TR64 Battery pack NP-C65 NP-60D i 45 ]7o 1.45 100 85 70 recording time** l 85 3O0 255 175 155 130 NP-33 (supplied) NP-98/98D NF-C65 NP..
LJsing EDITSEARCH, viewfinder. (1) While pressing you the small {2) Turn STANDBY tip. (3) Press EDITSEARCH. pl;_ys back can review Press green the time last recorded button (_) scene on the POWER side momentarily, or check switch, turn the recorded picture in the it to CAMERA. the last few seconds of the recorded portion (Rec Review). I hHd d_wn the - side of F_DITSEARCI t until tlme camcorder recorded portion is played back.
Installing the Battery Pack (1) lnser! the !op of the ba!tery pack hlto the top of the batte_ (2) Push the battery pack so that it attaches firmlv Removing the Battery Pack Slide BATT, and then pull the lower part of the battery pack.
Make sure that a power source is installed. (1) While pressing the small blue button, slide ELECTin the direction of the arrow. The cassette compartment automatically opens. {2) Insert a cassette (nol supplied) with the window facing out. (3) Press the PUSH mark on the cassette compartment to close it. The cassette compartment automatically closes.
blake sure that a power source When you use the camcorder 33) before you start recording. and 10 seconds after you start rtmording Before you record one-time events, using the camcorder correctly. (1) While pressing the small green (2) Slide the START!STOP MODE (3) Turn STANDBY up. The (4) Press START!STOP (red to the "REC" indicator. a cassette is inserted.
Note on Standby mode If you leave the camcorder for 5 minutes or more with a cassette inserted in Standby mode, the camcorder goes off automatically. This prevents wearing down the battery and wearing out the tape. To resume Standby mode, turn STANDBY down once and turn it up again. To start recording, press START/STOP. To Focus the Viewfinder If the viewfinder is not in focus the viewfmder lens.
Note When on recording you recording. record This from the beginning prevents Notes on recording of the tape, the camcorder from run missing the tape any for about start-up 15 seconds scenes when you before play actual back the tap,,. mode • This camcorder rec;n'ds in the SP mode (approximately 19/32 inch (1.43 cm)isecondt and il_the LP mode (app_oximalelv 5/I_ inch (0.72 oral/second) (p. 29) and can play back m the SP mode and LP mode.
Using the Zoom Feature Zooming is a'recording technique that lets you change tile size of the subject in the scene. For more professional-looking recordings, use the zoom sparingly. T side: for telephoto (subject appears closer) W side: for wide-angle (subject appears farther away) l o _a. Zooming Speed Turn the pow_.zoom When you shoot lever fully fora high-speed a subject using a telephoto zoom. Turn it lightly fora relatively slow zoom.
For hand-held suggestions: shots, you'll gel better results holding the caincorder [al according to tile following [bl • Hold the camcorder controls with your right firmly thumb. elbow and [a] the grip your • Place • Place y¢_ur left hand under the camcorder to support yore eye firmly against the viewfinder eye_ up frame your it with • Place • Use the viewfinder against secure so that you can easily manipulate the side.
LJsing EDITSEARCH, viewfinder. (1) While pressing you the small {2) Turn STANDBY tip. (3) Press EDITSEARCH. pl;_ys back can review Press green the time last recorded button (_) scene on the POWER side momentarily, or check switch, turn the recorded picture in the it to CAMERA. the last few seconds of the recorded portion (Rec Review). I hHd d_wn the - side of F_DITSEARCI t until tlme camcorder recorded portion is played back.
You can use this camcorder as a VCR by connecting the house current as the power source (p. 21). If a VCR Connect input selector It is recommended to IINE on the VCR IN on the VCR to 1.INE. by using Set the [V/VCR the supplied selector AiV connecting cable. Set the to VCP, on the TV VIDEO OUT VIDEO IN AUDIO OUT AUDIO iN : Signal flow Connecting Connect selector Directly to a I"M the camcorder to your to VCR on the TV.
You can mtmitor the playbackpicture connecting the camcorder You can control playback in tile viewfinder. to the TV/VCR (p. 18), using the supplied Remote Yon can also Commander* monitor on the TV screen, after (For CCD-TR54!TR64!TR74iTR84/ TR94 only, p. 51 ). * For CCD-TR44 users: The Remote Commanders are available on option, (1) While (2) Insert pressing the small green button on the recorded tape with the window (3) Press liP" Playback tile POWEP, facing out.
Various Playback Modes To view a still picture (playback pause) Press II during playback. To resume playback, press II or I_ To locate a scene (Picture Search) Keep p_essing _ To monitor Keep pressing press I_. or IMb during the high-speed _ playback. picture during while rewinding or _ Io resume normal playback, fast-forward or rewind while advancing the tape To view the picture in a sequence of stop-motion images Press ED1TSEARCH in playback pause mode.
Advanced Operations You can cho6se any of the following power sources for your camcorder: battery pack (P.7), the house current, alkaline battery, and 12/24 V car battery. Choose the appropriate power source depending on _.vbeFe want to use your calllcorder.
WARNING AC power cord must only be changed at qualified service shop. PRECAUTIONS lt_e set is not di_onneeted outlet, even if the set itself Notes on the • The POWER POWER lamp lamp will remain • If the POWER cord. After from the AC power has been turned off. lamp about does one minute, To remove the adaptor "Ihe adaptor is removed lit for a while nut light, source even set tile ._-lector (mains) if the unit to VTR as long as it is connected is unplugged (DC OUT) after and use.
Using a Car Battery Use the DCP-77"DC pack (not of a car (12 V or 24 V). Connect To remove Ihe the 13(" pa_k supplied). Connect the DC_ pack the cord to the battery of the DC pack mounting surface to the cigarette lighter DC pack is removed m the same way as the battery pa_k (p 10). Before you start rectcding, press DATE or TIME. You can record the date or time displayed viewfinder with the picture.
You can select from three I_ROGP, AM AE (Auto Exposure) you use PROG, RAM AE, you can capture Selecting the high-speed modes to suit your shooting Best Mode Select the best mode by usin_ the tollowing examples K. Sports .) .
When yousFloot a subiect with the light source behind the subject or a subject with a light background, use the BACK LIGHT. Press BACK I,IGHT. The [] indicator appears inside the viewfinder. [a] [a] Subject is too dark Because of backlight. [b] Subject becomes bright with backlight compensation. E After Shooting Press BACK LIGHT again to let the [] indicator go out under picture will be too bright under normal lighting condition .T normal lighting condition.
Long, continuous shots of scenery tend to be dull, and have to be edited to make an interesting video With the 5 SEC (5-second recording) mode, the camcorder records for about 5 seconds and then switches to Standby mode, so that you will automatically take a series ot quick shots resulting 11) Slide the START/STOP MODE switch to 5 SEC. in a lively video. (2) Turn STANDBY up and press START!STOP Re__ording starts Five dots appears in the viewfinder The dots disappear at a rate ot one per second.
You can selei:t from nine preset titles to superimpose it on the picture during recording. Each time you press TITLE, the preset titles appear one by one. To (1) (2) (3) (4) (5) Superimpose from the Beginning Turn the POWER switch to CAMER!\. Turn STANDB'f up. l'ress Tt ILE repeatedly until the desired title appears. Pl ess '5IA RTiSTOP to start recording. Press T1TIF when you want to turn off the title.
-- CCD-IRg4/TR94 only You can use lhe Steady. Shot to compensate a stationary object with a tripod. Using the _lid_ STEADY STEADY SHOT for camera-shake. Do not use the Steady SHOT Function l_ t)N STEADYSHOTON CCD-TR84 To Release the Steady Shot Slide STEADY SHOT to OFF, Notes on the Steady Shot ,, The Steady Shot will not correct • When 28 you switch Shot when excessive camera*shake. the Steady" Shot on or off, tile exposure may fluctuate.
You can change the mode settings to fl2rther enjoy tile features (1) Slide the cover to tile left, You will find the mode switches. (2) Set _he mode switches to the desired mode (3) Close and functi_3ns. tile c(t\ er .... / ZOOM ×24i x12'\ COMMANDER\ \ dENEp[_ OFF _, ON _ OFF \ \ REC MODE SP _ LP Selecting the Mode Setting of Each Item ZOOM (CCD-TR74/TR84/TR94 • Set to ×24 to activate digital • Set to x12 otherwise, lhe COMMANDER • The zooming ability becomes x12.
You cal_ create Vt {S, vlls[] yore VH_, own video program SLvII_,I_ S-VHSC, • by editing Betamax with any or _ other _. 8 mm. ED Betamax HiQ-" I ]i8, _,'_lsVItS, VCR that has video/audio S_,'_ inputs. Alter ¢omlecting the camcorder to the VCR (p. 18), {'1) Turn the POWEI< switch to PLAYEI'{. (2) Insert (3) lec_Ided lat',t into I]le cannorder.
Additional Your camcorder under normal Information is supplied operation. with When the lithium the battery batte D' installed. becomes for alx_ut 5 seconds when you set the POWER with the Sony CR2025 or Duracell DL-2025 risk of fire or explosion. weak switch lithium The lithium or dead, _ battery indlcalor to CAMERA.
Changing the Lithium Battery When replacing {he lithium battery, you wil! need to reset the date and 32 (1) Slide the cover (2) P.sh t|_e batterv (3) (4) Install Align and align in once keep time. the mark and pull the battery of the cover it out fr/Jm pack to that or other power uf the body. source Press attached. down Otherwise, the cover the bolder. the lithium battely with the t_tsilive (+) side facing out. the mark of the euver to that of the body.
Reset the date and time using the DATE(+) (1) Turn the POWER switch to CAMERA. (2) Turn STANDBY up. (3) Press DATE(* ) and TIME(NEXT) (4) Set year, DATE(÷) and TIME(NEXT) buttons. 9 simultaneously monlh, day, time, minute by pressing pressed, the digits advance faster until DATE( tile year * ) and indicator TIME(NEXT) flashes in the viewfinder.
The playback mode is sek, cted automatically according to the recording syslem (SP/LP mode) in which the ta pe was recorded. Foreign 8 mm video hou camlnt play suftware ft;>m colmllw to _ ounlry, 42 Io check the '[\ coIor • "h s s c _1 S|loV_'S recorded on a different TV c_ior _ou may not be able to play system of foreign _ounlrles VO1J ho\_. - w.)u get can the nlost out back s_ stem furcign of your Because the '1V color systems _ftv,,are.
When the remaining battery indicator reaches the lowest point, the c\J indicatol appeais and starts flashing in the viewfinder. [bl Wheil the ,r_\_indicator in the viewfmder changes from slow flashing to rapid flashing while you are recording, turn the POWER switch to OFF on the camcorder and replace the batk.ry pack l,eave the tape in the camcorder to obtain smooth trm_sition between scenes alter the battery is rep{aced.
Charging Temperature You should cbarge batteries at temperatures re*tuire a longer charging time. from 50°F to 86°F (from tiY'C to 30°C). Lower temperatures Sony Batteries are Recommended Use of n_m Son} batteries may damage your t tandy_am camcordcr Notes on Charging A Brand-new Battery A brand-new battery pack is not charged. After Long Storage Recharge the battery for a long be shorter time (about 1 year), than normal. After original Before using the batter), pack, charge it completely.
Notes on the Bakery Case • Use only vv_th alkaline batteries. size AA rechargeable remarkably You cannot use the Battery • • Keep the metal part clean. If it gets dirty, Do not disassemble or convert the batlery • • Do not expose the battery ease t,_ az W mechanical During recording, the battery case heats up This • Prevent • If you will not use the battery ease for a long remove the batteries from the battery case.
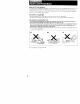
Moisture Condensation If the eamcorder is brought camcorder, on the surface and be damaged circumstances, directly from a cold place to a warm place, moisture may condense inside the of tile tape, or on the tens. If this happens, the tape may stick to the head drum or the camcorder ]nay not operate correctly. To prex ent possible the camcorder is furnished with moisture sensors However, take damage under the following these precautions.
Video Head Cleaning To ensure playback clc_ar pictures, pictures are clean "noisy" the vicleo or hardly heads. When visible, _ the video appears beads in the viewfinder may mode or ID [a] [a] [b] in CAMERA be contaminated. Slight contamination Critical contamination P_ m If this happens, clean checking tile picture, the video heads witil tile Sony V8-25CLH cleaning cassette (not supplied) if it is still "noisy", repeat the cleaning (Do not repeat cleaning more than After 5 times.
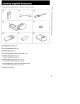
Removing -- Dust from inside the Viewfinder CCD-TR44/TR54/TR64/TR84 only (1) Re,move the screw with a screwdriw.,r (not supplied). I]3en, the eyecup in the direction of the arrow anc_ pul! it out. (2) Clean the surface with a commercially available while sliding the RELEASE blower 1 2 \ To Reattach (1) Align (2) Turn the the groove the eyecup Eyecup on th eyecup witb in the direction the • mark of the arrow. 1 on the barrel. Then, replace the screw.
Precautions Camcorde_ Operation -Operate the eamcorder using 60 V (battery pack), or Z5 V (AC power adaptor). o For DC or AC operation, use ouly timerecommended accessories. • Should any solid object or liquid latl into the casing, unplug the eamcorder and have il ch_'cked by w_ur nearest Sony dealer berate operaling it any hzrther. • Avoid rough handling or mechanical shock.
Each country the following Power has its own electricity points: and TV color systems. Before using your camcorder abroad, check Sources You can use your camcorder in any c_mntry AC, 50/_'_0 1 tz. Use a commercially avaiiaHe of the wall {lutlet [b] with the supplied A'L plug adaptor AC power adaptor within [a], if necessary, depending [a] Difference 1 l0 V to 240 V on the design [b] in Color Systems This canworcler is an NTSC system-based camcorder.
If you run inte any problem using the camcorder, use the following table to troubleshoot the problem. Camcorder Symptom Corrective Cause Tile power is not o11. The battery pack is not attached or not attached Attach iirmly. part The battery firmly is dead. and the lower battery to a wall pack. 7 21 outlet. STANDBY turn 10 pack. the AC power adaptor Turn While being operated in CAMERA mode, the camcorder has been in the The power goes off.
The image on the viewfinder screen is not clear. A vertical band appears when a subject such as lights or a candle flame is shot against a dark background. The conlrast The picture is "noisy", Tile video heads may be dirU. Clean the heads using the Sony V8-25CLH cleaning cassette. The supplied Remote Commander does not work. COMMANDER Set it to ON. (For CCD-TR54iTR64/ TR74iTR84/TR94 only) Something is blocking infrared rays, There is dust in the viewfinder.
AC Power Adaptor Symptom Cause The POWER lamp do_._ not light _ _ _. _ "_'g TlleCHARGE flashes. Corrective Actions Set the selector page to VTR ( DC OUT) arid disconnect the AC power cord. After about one minute try again. 9 lamp See the following chart. When the CHARGE Lamp Flashes Check through tl_e following chart. I the AC power adaptor.pack Remove the battery from Install the same battery pack again.
Video Camera Recorder System Video recording system Two rotary heads, Helical _am_ing, FM system Audio recording system Rotary beads, FM system Video signal NTSC color, EIA standards Usable cassette 8 mm vid_-,o formal cassetle (standard 8 mm) Recording/Playhack time SP mode: 2 hours (P6-120) LP mode: 4 hours (P6-120) Fastforward/rewind time Approx. 5 rnin.
AC power adaptor Power requirements 1 t0 - 240 V AC*, 50/60Hz Power consumption AC-V15:18 W AC-V16:20 AC V16A: W 22 W Output voltage DC OUT in _peration AC-V!5:7.5 V, 1.6 A AC-V16/V]6A: Battery " charge 75 mode V, 1.8 A terminal I0 V, 1 .I A in charge Application mode Sony battery packs NP 33 (supplied), NP-60D, NP-C65, NP-66H, NP,,68, N P-80/80D, NP-98/98D Operating temperature 32°F to 104°F (0°C to 40°C) Storage temperature -4°F to +I40°F (-20°C Dimensions -4 to +60_'C) Approx.
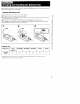
[] % [] [] [] [] ® [] CCD-TR84 POWER switch DATE(+) button TIME(NEXT) COUNTER (p. 23, 33) button TITLE button STEADY (p. 12, 19) (p. 23, 33) (p. 27) RESET button SHOT mode switch For CCD-TR84/TR94 Eyecup Battery LANCe (p. 14) (p. 28) only (p. 16) mounting control surface (p. 10) jack Connect tile [,ANC _ connecting In this case, set the COMMANDER sytem. The _' conlrol peripherals connected L or REMOTE. BATT (battery) 48 cable to a wired remote control mode to OFF _,p. 29).
@ [] [] [] [] o- 5" [] Power zoom lever (p. 15) [] ELECT knob (p. 11) [] Eyecup release knob (p. 40) For CCD-TR44/TR54/TR64/TR84 only Hooks for shoulder strap (p, 51) [] START/STOP button (p. 12) [] STANDBY switch (p. 12) [] Grip strap (p. !6) Cassette compartment {p. 11) _, VIDEO OUT jack (p. 18) [] RFU DC OUT (RFU adaptor DC out) jack ___ AUDIO OUT jack (p. 18) [] Jack cover [] MIC (microphone) jack Connect an optional external microphone. Tripod receptacle (p.
CCD-TR94 [] [] Tape transport • STOP buttons (p. 19, 20) _e_ REW (rewind) II_ FLAY (playback) FF (fast forward) |1 PAUSE These buttons will function [] in PLAYER mode. EDITSEARCH Button (p. 17) 2_ Lens cover Built-in microphone [] Remote sensor (p. 53) [] Camera recording/battery Lithium [_ Lamp battery compartment (p. 32) DEW lamp (p. 38) Viewfinder adjustment ring (p. 13) For CCD-TR44/TR54/TR64/TR84 only Lighting aperture For CCD-TR74iTR94 __5]Viewflnder Viewfinder only (p.
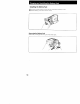
Attach ng the shoulder strap Attach the supplied shoulder strap to the hooks for the shoulder strap ([] on page 49). Remote Commander -- For CCD-TR.S4/TR64/TR74/TR84/TR94 only The buttons that have the same name on the Remote Commander and on the camcorder function identically. [] z [] [] [] [] [] Transmitter Point toward camcorder. the remote sensor to control the camcorder [] Tape transport buttons (p. 19, 20) [] Size AA (R6) battery holder (p.
Preparing the To use the Remote (R6) batteries. (1) Remove (2) Insert (3) Put the battery Remote the battery both Commander Commander, cover of the size AA cover back you from insert the Remote (R6) batteries onto with the Remote two size AA (R6) batteries. size AA operatio_. the Commander. correct p_}larity Commander.
Remote Control Direction Aim the Remote Commander to the remote sensor Notes on the Remote within the range as shown below, Commander • Keep the re=note sensor away from slrong light sources such as direct sunlight or illumination. Otherwise, the remote control may not be effective. • Be sure that there is no obstacle betwc'en the remote sensor and the Remote Commander.
In the Viewfinder The indicatorsappear in CAMERAmode only ® [] [] [] [] [] [] [] [] [] [] [] Power zoom indicator (p. 15) For CCD-TR74!TR84/TR94 _2_ Backlight indicator Warning indicator Lithium battery (p. 25) (p, 55) indicator Recording lamp/battery Recording in LP mode Tape transport Tape counter AUTO mode (p. 31) lamp (p. 12) (p. 12) (p. 12) (p. 14) DATE indicator Remaining only battery (p. 12) indicator 4i]÷÷÷÷÷_]÷_;Z] Date, 54 Time or Title (p.
All ind cal_ rs appear onh' wl e 1 you use tile ca ncorder in CAMERA mode. If indicators flash in the viewiil_der, or a caution lamp on the eamcorder flashes, check the following: 2: You can hear the beep s_nmd when BEEP is set to ON (p. 29). L_J .... _eoe ,Ic ® [] _*,i# ?ill A*. i "' <' 1":" g. g g .9 r_ g % i 3. i Igl 7. _,.7 g i i +'e_,,7-JUL 4 '95 i Q.
Index A AC power adaptor ..............7, 21 Adjusting viewfinder ............. 13 AUTO DATE ...................... 12 A iV connectil_g cab]e ............ 18 B BACK I,I(;H I ........................ 25 Battery .............................. 52 Battery case ..............................22 Battery, lamp ......................35, 55 Battery pack ............................ 7 BEEP ............................ 14, 29 C Camera recording ................... 12 Car batterx ...............................