
Operating Instructions


109
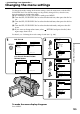
Customizing Your Camcorder
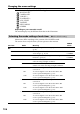
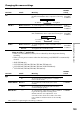
Icon/item
LCD BRIGHT
LCD B. L.
LCD COLOR
VF B.L.*
3)
POWER
switch
VCR*
1)
/
PLAYER*
2)
CAMERA
VCR*
1)
/
PLAYER*
2)
CAMERA
VCR*
1)
/
PLAYER*
2)
CAMERA
VCR*
1)
/
PLAYER*
4)
CAMERA
Changing the menu settings
To reduce
intensity
To increase
intensity
Mode
—––
z BRT NORMAL
BRIGHT
—––
z BRT NORMAL
BRIGHT
Meaning
To adjust the brightness on the LCD screen with
the SEL/PUSH EXEC dial to adjust the following
bar.
To set the brightness on the LCD screen normal.
To brighten the LCD screen.
To adjust the color on the LCD screen, turn the
SEL/PUSH EXEC dial to adjust the following bar.
To set the brightness on the viewfinder screen
normal.
To brighten the viewfinder screen.
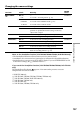
Notes on VF B.L.*
3)
and LCD B.L.
•When you select BRIGHT, battery life is reduced by about 10 percent during
recording.
•When you use power sources other than the battery pack, BRIGHT is automatically
selected.
*
1)
DCR-TRV140 only
*
2)
CCD-TRV107/TRV108/TRV308/TRV408/TRV608 only
*
3)
CCD-TRV107/TRV308/TRV408/TRV608, DCR-TRV140 only
*
4)
CCD-TRV107/TRV308/TRV408/TRV608 only
Icon/item
REC MODE
AUDIO MODE*
1)
ORC TO SET*
2)
ORC stands for “Optimizing the Recording Condition.”
Mode
z SP
LP
z 12BIT
16BIT
—––
Meaning
To record in the SP (Standard Play) mode.
To increase the recording time to 1.5 times*
1)
/
twice*
2)
the SP mode.
To record in the 12-bit mode (two stereo
sounds).
To record in the 16-bit mode (the one stereo
sound with high quality).
To automatically adjust the recording condition
to get the best possible recording. Press
START/STOP to start adjustment. Your
camcorder takes about 10 seconds to check the
tape condition and then returns to the standby
mode.
POWER
switch
CAMERA
CAMERA
CAMERA
To lightenTo darken