3-072-314-13 (1) Video Camera Recorder Operating Instructions Before operating the unit, please read this manual thoroughly, and retain it for future reference. Owner’s Record The model and serial numbers are located on the bottom. Record the serial number in the space provided below. Refer to these numbers whenever you call upon your Sony dealer regarding this product. Model No. CCD-TRV Model No. AC- Serial No. Serial No.
Welcome! Congratulations on your purchase of this Sony Handycam VisionTM. With your Handycam VisionTM, you can capture life’s precious moments with superior picture and sound quality. Your Handycam VisionTM is loaded with advanced features, but at the same time it is very easy to use. You will soon be producing home video that you can enjoy for years to come. WARNING To prevent fire or shock hazard, do not expose the unit to rain or moisture. For the customers in the U.S.A.
For the customers in the U.S.A. If you have any questions about this product, you may call: Sony Customer Information Center 1-800-222-SONY (7669). The number below is for the FCC related matters only. For the customers in CANADA CAUTION TO PREVENT ELECTRIC SHOCK, MATCH WIDE BLADE OF PLUG TO WIDE SLOT, FULLY INSERT. Regulatory Information Declaration of Conformity Trade Name: SONY Model No.: CCD-TRV608 Responsible Party: Sony Electronics lnc. Address: 680 Kinderkamack Road, Oradell, NJ 07649 U.S.
Main Features Taking moving images, and playing them back •Recording a picture (p. 19) •Playing back a tape (p. 29) Capturing images on your computer*1) •Viewing images recorded on a tape (p. 59) •Viewing images live from your camcorder (p. 59) Others Functions to adjust exposure in the recording mode •BACK LIGHT (p. 25) •NightShot (p. 26) •PROGRAM AE (p. 38) •Built-in light*2) (p. 46) •Manual exposure (p. 40) Functions to give images more impact •Digital zoom (p. 22) The default setting is set to OFF.
Table of contents Main Features .......................................... 4 Quick Start Guide ............................. 6 Editing Dubbing a tape ...................................... 49 Dubbing a tape easily – Easy dubbing ............................... 51 Getting started Using this manual ................................... 8 Checking supplied accessories ............ 10 Step 1 Preparing the power supply ... 11 Installing the battery pack ............ 11 Charging the battery pack .............
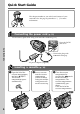
Quick Start Guide This chapter introduces you to the basic features of your camcorder. See the page in parentheses “( )” for more information. Connecting the power cord (p. 15) Use the battery pack when using your camcorder outdoors (p. 11). Open the DC IN jack cover. Quick Start Guide Connect the plug with its v mark facing up. AC power adaptor (supplied) Inserting a cassette 1 Open the lid of the cassette compartment, and press Z EJECT. The cassette compartment opens automatically. CT EJE 6 (p.
Recording a picture 1 Remove the lens cap. (p. 19) 2 Set the POWER PL AY OFF(CHG) CA ER POW ER ME RA switch to CAMERA while pressing the small green button. 4 Press START/STOP. POW ER OFF(CHG) CA ME RA while pressing OPEN. The picture appears on the LCD screen. ER 3 Open the LCD panel PL AY Your camcorder starts recording. To stop recording, press START/STOP again. When you purchase your camcorder, the clock setting is set to off.
— Getting started — Using this manual The instructions in this manual are for the five models listed in the table below. Before you start reading this manual and operating your camcorder, check the model number by looking at the bottom of your camcorder. The CCD-TRV608 is the model used for illustration purposes. Otherwise, the model name is indicated in the illustrations. Any differences in operation are clearly indicated in the text, for example, “CCD-TRV608 only.
Using this manual Note on TV color systems TV color systems differ from country to country. To view your recordings on a TV, you need an NTSC system-based TV. Lens and LCD screen/finder (on mounted models only) •The LCD screen and the finder are manufactured using extremely high-precision technology so over 99.99% of the pixels are operational for effective use.
Checking supplied accessories Make sure that the following accessories are supplied with your camcorder. 1 3 2 4 5 8 9 1 Wireless Remote Commander (CCDTRV107/TRV408 only) (1) (p. 96) 6 7 5 A/V connecting cable (1) (p. 32) 6 Shoulder strap (1) (p. 91) 2 AC-L10A/L10B/L10C AC power adaptor (1), Power cord (1) (p. 15) 3 NP-FM30 battery pack (1) (p. 11, 12) 4 Size AA (R6) battery for Remote Commander (CCD-TRV107/TRV408 only) (2) (p. 96) 7 Lens cap (1) (p. 19, 95) 8 USB Cable (CCD-TRV608 only) (1) (p.
Step 1 Preparing the power supply Installing the battery pack Slide the battery pack down until it clicks. Getting started To remove the battery pack Slide the battery pack out in the direction of the arrow while pressing V BATT down.
Step 1 Preparing the power supply Charging the battery pack Use the battery pack after charging it for your camcorder. Your camcorder operates only with the “InfoLITHIUM” battery pack (M series). See page 81 for details of the “InfoLITHIUM” battery pack. (1) Open the DC IN jack cover and connect the AC power adaptor supplied with your camcorder to the DC IN jack with the plug’s v mark facing up. (2) Connect the power cord to the AC power adaptor. (3) Connect the power cord to a wall outlet.
Step 1 Preparing the power supply Note Prevent metallic objects from coming into contact with the metal parts of the DC plug of the AC power adaptor. This may cause a short-circuit, damaging the AC power adaptor. Getting started Remaining battery time indicator The remaining battery time you record with the viewfinder is displayed. The remaining battery time indicator in the display window roughly indicates the recording time with the viewfinder.
Step 1 Preparing the power supply CCD-TRV608 Battery pack NP-FM30 (supplied) NP-FM50 NP-FM70 NP-QM71 NP-FM90 NP-FM91/QM91 Recording with the viewfinder Continuous* Typical** 165 90 265 145 540 295 640 350 820 450 955 525 Recording with the LCD screen Continuous* Typical** 100 55 160 90 335 185 390 215 505 275 585 320 Approximate number of minutes when you use a fully charged battery pack * Approximate continuous recording time at 25°C (77°F).
Step 1 Preparing the power supply Connecting to a wall outlet When you use your camcorder for a long time, we recommend that you power it from a wall outlet using the AC power adaptor. 1 Getting started (1) Open the DC IN jack cover, and connect the AC power adaptor to the DC IN jack on your camcorder with the plug’s v mark facing up. (2) Connect the power cord to the AC power adaptor. (3) Connect the power cord to a wall outlet.
Step 2 Setting the date and time Set the date and time settings when you use your camcorder for the first time. “CLOCK SET” will be displayed each time when you set the power switch to CAMERA unless you set the date and time settings. If you do not use your camcorder for about 6 months, the date and time settings may be released (bars may appear) because the built-in rechargeable battery in your camcorder will have been discharged. First, set the year, then the month, the day, the hour and then the minute.
Step 2 Setting the date and time To check the preset date and time The year changes as follows: t 1995 T . . . . t 2002 T . . . . t 2079 T Getting started Press DATE to display the date indicator. Press TIME to display the time indicator. Press DATE (or TIME) and then press TIME (or DATE) to simultaneously display the date and time indicator. Press DATE and/or TIME again. The date and/or time indicator disappears.
Step 3 Inserting a cassette When you want to record in the Hi8 system, use Hi8 video cassettes. (1) Prepare the power supply (p. 11). (2) Open the lid of the cassette compartment, and press Z EJECT. The cassette compartment opens automatically. (3) Insert a cassette into the cassette compartment with its window facing out and the write-protect tab on the cassette up. mark on the cassette (4) Close the cassette compartment by pressing the compartment. The cassette compartment automatically goes down.
— Recording – Basics — Recording a picture Your camcorder automatically focuses for you. 1 3 Recording – Basics (1) Remove the lens cap by pressing both knobs on its sides and attach the lens cap to the grip strap. (2) Install the power source and insert a cassette. See “Step 1” to “Step 3” for more information (p. 11 to 18). (3) Set the POWER switch to CAMERA while pressing the small green button. Your camcorder is set to the standby mode. (4) Open the LCD panel while pressing OPEN.
Recording a picture To enable smooth transition You can make the transition between the last scene you recorded and the next scene smooth as long as you do not eject the cassette even if you turn off your camcorder. When you change the battery pack, set the POWER switch to OFF (CHG). If you leave your camcorder in the standby mode for 5 minutes while the cassette is inserted Your camcorder automatically turns off. This is to save battery power and to prevent battery and tape wear.
Recording a picture During recording in the mirror mode DATE and TIME on your camcorder do not work. Adjusting the brightness of the LCD screen (1) In CAMERA mode, select LCD BRIGHT in in the menu settings (p. 69). (2) Turn the SEL/PUSH EXEC dial to adjust the brightness of the LCD screen. 1 Recording – Basics Indicators in the mirror mode •The STBY indicator appears as Xz and REC as z. Some of other indicators appear mirror-reversed and others are not displayed.
Recording a picture Using the zoom feature Move the power zoom lever a little for a slower zoom. Move it further for a faster zoom. Using the zoom function sparingly results in better-looking recordings. “T” side: for telephoto (subject appears closer) “W” side: for wide-angle (subject appears farther away) W W T W T T To use zoom greater than 20× Zoom greater than 20× is performed digitally. To activate digital zoom, select the digital zoom power in D ZOOM in the menu settings.
Recording a picture To record pictures with the viewfinder – Adjusting the viewfinder If you record pictures with the LCD panel closed, check the picture with the viewfinder. Adjust the viewfinder lens to your eyesight so that the indicators in the viewfinder come into sharp focus. Recording – Basics Lift up the viewfinder and move the viewfinder lens adjustment lever. Viewfinder backlight (CCD-TRV107/TRV308/TRV408/TRV608 only) You can change the brightness of the backlight. Select VF B.L.
Recording a picture Indicators displayed in the recording mode The indicators are not recorded on tape. Remaining battery time indicator Hi8 format indicator This appears while playing back or recording in Hi8 format. Recording mode indicator/Mirror mode indicator STBY/REC indicator 40min SP REC 0:00:01 Tape counter indicator Remaining tape indicator This appears after you insert a cassette and record or play back for a while.
Recording a picture Shooting backlit subjects – BACK LIGHT When you shoot a subject with the light source behind the subject or a subject with a light background, use the backlight function. Recording – Basics Press BACK LIGHT in CAMERA mode. The . indicator appears on the screen. To cancel, press BACK LIGHT again. BACK LIGHT If you press EXPOSURE when shooting backlit subjects The backlight function will be canceled.
Recording a picture Shooting in the dark – NightShot The NightShot function enables you to shoot a subject in a dark place. For example, you can satisfactorily record the environment of nocturnal animals for observation when you use this function. While your camcorder is in CAMERA mode, slide NIGHTSHOT to ON. and “NIGHTSHOT” indicators flash on the screen. To cancel the NightShot function, slide NIGHTSHOT to OFF.
Recording a picture Superimposing the date and time on pictures You can record the date and/or time displayed on the screen superimposed on the picture. Carry out the following operations in CAMERA mode. Press DATE and/or TIME again. The date and/or time indicator disappears. DATE Recording – Basics Press DATE to record the date. Press TIME to record the time. Press DATE (or TIME), then press TIME (or DATE) to record the date and time.
Checking the recording – END SEARCH You can use this button to record a picture from the last recorded scene successively. END SEARCH You can go to the end of the recorded section after you record. Press END SEARCH in CAMERA mode. The last 5 seconds of the recorded section are played back and returns to the standby mode. You can monitor the sound from the speaker.
— Playback – Basics — Playing back a tape You can monitor the playback picture on the LCD screen. If you close the LCD panel, you can monitor the playback picture in the viewfinder. (1) (2) (3) (4) (5) (6) You can control playback using the Remote Commander supplied with your camcorder. (CCD-TRV107/TRV408 only) 5 2 PL AY 4 Playback – Basics Install the power source and insert the recorded tape. Set the POWER switch to PLAYER while pressing the small green button.
Playing back a tape When monitoring on the LCD screen You can turn the LCD panel over and move it back to the camcorder body with the LCD screen facing out [a]. You can adjust the angle of the LCD panel by lifting the LCD panel up by 7 degrees [b]. [a] [b] 7° To display the screen indicators – Display function Press DISPLAY on your camcorder or the Remote Commander (CCD-TRV107/TRV408 only) supplied with your camcorder. The indicators appear on the screen.
Playing back a tape Various playback modes To operate video control buttons, set the POWER switch to PLAYER. To view a still image (playback pause) Press X during playback. To resume playback, press X or N. To advance the tape To rewind the tape Press m in the stop mode. To resume normal playback, press N. To locate a scene monitoring the picture (picture search) Playback – Basics Press M in the stop mode. To resume normal playback, press N. Keep pressing m or M during playback.
Viewing the recording on TV Connect your camcorder to your TV with the A/V connecting cable supplied with your camcorder to watch the playback picture on the TV screen. You can operate the playback control buttons in the same way as when you monitor playback pictures on the LCD screen. We recommend that you power your camcorder from a wall outlet using the AC power adaptor, when monitoring the playback picture on the TV screen (p. 15). Refer to the operating instructions of your TV. Open the jack cover.
— Advanced Recording Operations — Using the wide mode You can record a cinema-like picture (CINEMA) or a 16:9 wide picture to watch on the 16:9 wide-screen TV (16:9FULL). Refer to the operating instructions of your TV. CINEMA Black bands appear on the screen during recording in the CINEMA mode [a], playing back on a normal TV [b] or a wide-screen TV [c]. If you set the screen mode of the widescreen TV to the zoom mode, a picture without black bands appears [d].
Using the wide mode In CAMERA mode, set 16:9WIDE to CINEMA or 16:9FULL in (p. 68). in the menu settings MENU To cancel the wide mode Set 16:9WIDE to OFF in the menu settings. If the wide mode is set to 16:9FULL (CCD-TRV308/TRV408/TRV608 only) The SteadyShot function does not work. If you select 16:9FULL in the menu settings when the SteadyShot function is working, flashes and the SteadyShot function does not function. In the wide mode You cannot select the bounce function with FADER.
Using the fader function You can fade in or out to give your recording a professional appearance. FADER STRIPE Advanced Recording Operations M.FADER (mosaic) BOUNCE (Fade in only) MONOTONE When fading in, the picture gradually changes from black-and-white to color. When fading out, the picture gradually changes from color to black-and-white.
Using the fader function (1) When fading in [a] In the standby mode, press FADER until the desired fader indicator flashes. When fading out [b] In the recording mode, press FADER until the desired fader indicator flashes. The indicator changes as follows: t FADER t M.FADER t STRIPE t BOUNCE* no indicator T MONOTONE T The last selected fader mode is indicated first of all. * Fade in only (2) Press START/STOP. The fader indicator stops flashing.
Using special effects – Picture effect You can digitally process images to obtain special effects like those in films or on the TV. PASTEL [a] : (1) In CAMERA mode, select P EFFECT in in the menu settings (p. 68). (2) Select the desired picture effect mode in the menu settings, then press the SEL/ PUSH EXEC dial. 1 Advanced Recording Operations The contrast of the picture is emphasized, and the picture looks like an animated cartoon. NEG.ART [b] : The color and brightness of the picture are reversed.
Using the PROGRAM AE function You can select the PROGRAM AE (Auto Exposure) mode to suit your specific shooting requirements. SPOTLIGHT (Spotlight) This mode prevents people’s faces, for example, from appearing excessively white when shooting subjects lit by strong light in the theater. PORTRAIT (Soft portrait) This mode brings out the subject while creating a soft background for subjects such as people or flowers.
Using the PROGRAM AE function (1) In CAMERA mode, select PROGRAM AE in in the menu settings (p. 68). (2) Select the desired PROGRAM AE mode in the menu settings, then press the SEL/PUSH EXEC dial. 1 [ ME N U ] : E N D MENU To cancel the PROGRAM AE function Set PROGRAM AE to AUTO in the menu settings.
Adjusting the exposure manually You can manually adjust and set the exposure. Adjust the exposure manually in the following cases: – The subject is backlit – Bright subject and dark background – To record dark pictures (e.g. night scenes) faithfully (1) In CAMERA mode, press EXPOSURE. The exposure indicator appears on the screen. (2) Turn the SEL/PUSH EXEC dial to adjust the brightness. 1 EXPOSURE 2 To return to the automatic exposure mode Press EXPOSURE.
Focusing manually You can gain better results by manually adjusting the focus in the following cases: •The autofocus mode is not effective when shooting: – subjects through glass coated with water droplets. – horizontal stripes. – subjects with little contrast with backgrounds such as walls and sky. •When you want to change the focus from a subject in the foreground to a subject in the background. •Shooting a stationary subject when using a tripod.
Superimposing a title You can select one of eight preset titles and two custom titles (p. 44). You can also select the language, color, size, and position of titles. (1) In CAMERA mode, press TITLE to display the title menu. , and then press the dial. (2) Turn the SEL/PUSH EXEC dial to select (3) Select the desired title in the menu settings, then press the SEL/PUSH EXEC dial. The titles are displayed in the language you selected. (4) Change the color, size, or position, if necessary.
Superimposing a title To superimpose the title while you are recording Press TITLE while you are recording, and carry out steps 2 to 5. When you press the SEL/PUSH EXEC dial at step 5, the title is superimposed. To select the language of a preset title If you want to change the language, select language and return to step 2. before step 2. Then select the desired If you display the menu or title menu while superimposing a title The title is not recorded while the menu or title menu is displayed.
Making your own titles You can make up to two titles and store them in your camcorder. Each title can have up to 20 characters. (1) In CAMERA or PLAYER mode, press TITLE. , then press the dial. (2) Turn the SEL/PUSH EXEC dial to select (3) Turn the SEL/PUSH EXEC dial to select the first line (CUSTOM1 SET) or the second line (CUSTOM2 SET), then press the dial. (4) Turn the SEL/PUSH EXEC dial to select the column of the desired character, then press the dial.
Making your own titles To change a title you have stored In step 3, select CUSTOM1 SET or CUSTOM2 SET, depending on which title you want to change, then press the SEL/PUSH EXEC dial. Turn the SEL/PUSH EXEC dial to select [C], then press the dial to delete the title. The last character is erased. Enter the new title as desired. If you select [ ] The menu for selecting alphabet and Russian characters appears. Select [ to the previous screen. To erase a character Select [C]. The last character is erased.
Using the built-in light – CCD-TRV107/TRV308/TRV408/TRV608 only You can use the built-in light to suit your shooting situation. The recommended distance between the subject and camcorder is about 1.5 m (5 feet). Press LIGHT repeatedly, until the indicator appears on the screen while your camcorder is in CAMERA mode. The built-in light turns on. If you turn the POWER switch to OFF (CHG), the built-in light turns off simultaneously.
Using the built-in light Replacing the bulb Use the Sony XB-3D halogen lamp (optional). The supplied halogen lamp is not commercially available. Purchase the Sony XB-3D halogen lamp. Remove the power source before replacing the bulb. Advanced Recording Operations Notes •The built-in light turns off automatically in the following cases: – When it stays on in the AUTO mode ( ) for more than 5 minutes. – When you leave it on for more than 5 minutes with no cassette inserted or after the tape has run out.
Using the built-in light CAUTION •When replacing the bulb, use only the Sony XB-3D halogen lamp (optional) to reduce the risk of fire. •To prevent possible burn hazard, disconnect the power source before replacing and do not touch the bulb until the bulb becomes cool enough to handle (for about 30 minutes or more). Note To prevent the bulb from being smudged with finger prints, handle it with a dry cloth, etc. If the bulb is smudged, wipe it completely.
— Editing — Dubbing a tape Using the A/V connecting cable Connect your camcorder to the VCR using the A/V connecting cable supplied with your camcorder. You can record and edit a picture with the connected VCR by using your camcorder as a player. Set DISPLAY to LCD in in the menu settings (The default setting is set to LCD.) If you do not make the indicators disappear, they are recorded on tapes.
Dubbing a tape When you have finished dubbing a tape Press x on both your camcorder and the VCR. To prevent deterioration of pictures when dubbing Set EDIT to ON in the menu settings before dubbing. You can edit on VCRs that support the following systems: , Digital 8 , VHS , S-VHS , VHSC 8 mm , Hi8 Betamax , ED Betamax , mini DV , or DV , S-VHSC , If your VCR is a stereo type Connect the audio plug of the A/V connecting cable supplied to the left (white) input jack of your VCR.
Dubbing a tape easily – Easy Dubbing VCR operation for dubbing can be controlled easily by using your camcorder when the VCR is connected. You can select one of eight preset titles and two custom titles stored in your camcorder as instructed in “Making your own titles” (p. 44). Select the desired color, size, and background color of titles. Using the Easy Dubbing function Step 1 Connecting the VCR (p. 51). Step 2 Step 3 Step 4 Step 5 Setting the VCR to operate with your camcorder (p. 52 to 55).
Dubbing a tape easily – Easy Dubbing Step 2: Setting the VCR to operate with your camcorder You can control the VCR by wireless remote control. (1) Setting the modes to cancel recording pause on the VCR 1 Set the POWER switch to PLAYER on your camcorder. 2 Turn the power of the connected VCR on, then set the input selector to LINE. When you connect a video camera recorder, set its power switch to VTR/VCR. 3 Press EASY DUBBING to display the menu.
Dubbing a tape easily – Easy Dubbing (2) Setting the IR SETUP code 1 Turn the SEL/PUSH EXEC dial to select IR SETUP, then press the dial. 2 Turn the SEL/PUSH EXEC dial to select the IR SETUP code of your VCR, then press the dial. Check the code in “About the IR SETUP code” (p. 54).
Dubbing a tape easily – Easy Dubbing About the IR SETUP code The IR SETUP code is stored in the memory of your camcorder. Be sure to set the correct code depending on your VCR. The default setting is Code number 3. Brand IR SETUP code Brand IR SETUP code Sony 1, 2, 3, 4, 5, 6 Mitsubishi/MGA 28, 22, 23, 24, 29 Admiral (M. Wards) 89 Multitech 23, 80, 32 Aiwa 80, 47, 54 NEC 21, 33, 35 Akai 49, 51 Olympic 77, 78 Audio Dynamic 21, 35 Optimus 22 Bell&Howell (M.
Dubbing a tape easily – Easy Dubbing (3) Setting your camcorder and the VCR to face each other Locate the Infrared rays emitter of your camcorder and face it towards the remote sensor of the VCR. Set the devices about 30 cm (12 in.) apart, and remove any obstacles between the devices. Infrared rays emitter Editing Remote sensor A/V connecting cable (supplied) (4) Confirming the VCR operation 1 Insert a recordable tape into the VCR, then set to recording pause.
Dubbing a tape easily – Easy Dubbing Step 3: Selecting the title You can select title, color, size, and background color. CUSTOM1 and CUSTOM2 are custom titles stored in your camcorder as instructed in “Making your own titles” (p. 44). HELLO! (1) Press EASY DUBBING to display the menu. (2) Turn the SEL/PUSH EXEC dial to select TITLE SEL, then press the dial. (3) Select the desired title in the menu settings, then press the dial. The title is displayed.
Dubbing a tape easily – Easy Dubbing Step 4: Selecting the dubbing mode You can choose either normal recording (NORMAL) or interval recording (PREVIEW). (1) Turn the SEL/PUSH EXEC dial to select MODE SEL, then press the dial. (2) Turn the SEL/PUSH EXEC dial to select the mode to dub, then press the dial. – NORMAL: you can record into the VCR normally. – PREVIEW: you can make a time-lapse dubbing by setting the camcorder to automatically playback and standby sequentially.
Dubbing a tape easily – Easy Dubbing Step 5: Performing Easy Dubbing Make sure that your camcorder and VCR are connected, and that the VCR is set to recording pause. When you use a video camera recorder, set its POWER switch to VTR/VCR. Set the POWER switch of your camcorder to PLAYER. (1) Turn the SEL/PUSH EXEC dial to select START, then press the dial. (2) Turn the SEL/PUSH EXEC dial to select EXECUTE, then press the dial. When dubbing ends, your camcorder and VCR stop automatically.
— PC Connection — Viewing images using your computer – USB Streaming (Windows users only) – CCD-TRV608 only If you connect your camcorder and computer by the supplied USB cable, you can view images live from your camcorder and images recorded on a tape on your computer. Furthermore, if you caputure images live from your camcorder and images recorded on a tape to your computer, you can process or edit it by computer software and append it to e-mail.
Viewing images using your computer – USB Streaming (Windows users only) Notes • Operations are not guaranteed if you connect 2 or more pieces of USB equipment to a single computer at the same time or when using a hub. • Depending on the type of USB equipment used simultaneously, some equipment may not operate. • Operations are not guaranteed for all the recommended computer environments mentioned above.
Viewing images using your computer – USB Streaming (Windows users only) (4) Follow the on-screen messages to install the USB driver. (5) Connect the AC power adaptor to your camcorder and then to a wall outlet. (6) Set the POWER switch to CAMERA or PLAYER. (7) Select USB STREAM to ON in in the menu settings (p. 71). (8) With the CD-ROM inserted, connect the USB jack on your camcorder to the USB connector on your computer using the supplied USB cable.
Viewing images using your computer – USB Streaming (Windows users only) 3 Connect the AC power adaptor, and set the POWER switch to CAMERA or PLAYER. 4 Open your computer’s “Device Manager.” Windows XP: Select “Start” t “Control Panel” t “System” t “Hardware” tab, and click the “Device Manager” button. If “System” is not in the control panel, the “Pick a Category” screen appears. In this case, click “Switch to Classic View” instead.
Viewing images using your computer – USB Streaming (Windows users only) 6 Set the POWER switch to OFF (CHG), and then disconnect the USB cable. 7 Reboot your computer. Step 2 Install the USB driver Perform the entire procedure listed in “Installing the USB driver” on the page 60. Installing “PIXELA ImageMixer Ver.1.0 for Sony” Install “PIXELA ImageMixer Ver.1.0 for Sony” to your computer. “PIXELA ImageMixer Ver.1.0 for Sony” is contained on the CD-ROM supplied with your camcorder.
Viewing images using your computer – USB Streaming (Windows users only) Viewing images Viewing images recorded on a tape (1) Turn on your computer and allow Windows to load. (2) Connect one end of the USB cable to the USB jack on the camcorder and the other end to the USB connector on your computer using the supplied USB cable. To the USB connector To the Computer (USB) jack USB cable (supplied) (3) (4) (5) (6) Connect the AC power adaptor and insert a cassette to your camcorder.
Viewing images using your computer – USB Streaming (Windows users only) Viewing images live from your camcorder (1) Follow the procedure (1) - (2) on page 64, and then connect the AC power adaptor to your camcorder and then to a wall outlet. (2) Set the POWER switch to CAMERA. (3) Follow the procedure (5) - (8) on page 64. The images live from your camcorder appears in the preview window. Capturing images Capturing still images Preview window PC Connection 1 2 Thumbnail list window (1) Select .
Viewing images using your computer – USB Streaming (Windows users only) Notes •When you view images using your computer with the USB connection, the following conditions may occur, but do not indicate malfunction: – The image may fluctuate. – The image may contain noise, etc. – The image does not appear properly if the image signal is of a different TV color system from your camcorder. •When your camcorder is in the standby mode with a cassette inserted, it turns off automatically after 5 minutes.
— Customizing Your Camcorder — Changing the menu settings To change the mode settings in the menu settings, select the menu items with the SEL/ PUSH EXEC dial. The default settings can be partially changed. First, select the icon, then the menu item and then the mode. (1) In CAMERA or PLAYER mode, press MENU. (2) Turn the SEL/PUSH EXEC dial to select the desired icon, then press the dial to set. (3) Turn the SEL/PUSH EXEC dial to select the desired item, then press the dial to set.
Changing the menu settings Menu items are displayed as the following icons: MANUAL SET CAMERA SET PLAYER SET LCD/VF SET TAPE SET SETUP MENU OTHERS Depending on your camcorder model The menu display may be different from that in this illustration. Selecting the mode setting of each item z is the default setting. Menu items differ according to the position of the POWER switch. The screen shows only the items you can operate at the moment.
Changing the menu settings Notes on the SteadyShot function* •The SteadyShot function will not correct excessive camera-shake. •Attachment of a conversion lens (optional) may influence the SteadyShot function. •SteadyShot does not operate in the 16:9FULL mode. If you set STEADYSHOT to ON in the menu settings, the indicator flashes. If you cancel the SteadyShot function* The SteadyShot off indicator appears. Your camcorder prevents excessive compensation for camera-shake.
Changing the menu settings Notes on VF B.L.* and LCD B.L. •When you select BRIGHT, battery life is reduced by about 10 percent during recording. •When you use power sources other than the battery pack, BRIGHT is automatically selected. * CCD-TRV107/TRV308/TRV408/TRV608 only Icon/item REC MODE Mode Meaning POWER switch z SP To record in the SP (Standard Play) mode. CAMERA LP To increase the recording time to twice the SP mode.
Changing the menu settings Notes on ORC setting •Each time you eject the cassette, the ORC setting will be canceled. If necessary, set the setting. •You cannot use this setting on a tape with the red mark on the cassette exposed. (i. e. the tape is write-protected) •When you set ORC TO SET, a non-recorded section of about 0.1 second appears on the tape. However, note that this non-recorded section disappears from the tape when you continue recording from this section.
Changing the menu settings Icon/item Mode WORLD TIME BEEP —— z MELODY COMMANDER* To output the melody when you start/stop recording or when an unusual condition occurs on your camcorder PLAYER CAMERA To output the beep instead of the melody To cancel the melody and beep sound z LCD V-OUT/LCD REC LAMP CAMERA OFF z ON z ON OFF POWER switch To set the clock to the local time. Turn the SEL/PUSH EXEC dial to set the time difference. The clock changes by the time difference you set here.
— Troubleshooting — Types of trouble and their solutions If you run into any problem using your camcorder, use the following table to troubleshoot the problem. If the problem persists, disconnect the power source and contact your Sony dealer or local authorized Sony service facility. If “C:ss:ss” appears on the screen, the self-diagnosis display function has worked. See page 77. In the recording mode Symptom START/STOP does not operate. The image on the viewfinder screen is not clear.
Types of trouble and their solutions Symptom Cause and/or Corrective Actions • If 10 minutes elapse after you set the POWER switch to CAMERA or DEMO MODE is set to ON in the menu settings without a cassette inserted, your camcorder automatically starts the demonstration. c Insert a cassette and the demonstration stops. You can also cancel DEMO MODE. (p. 71) The picture is recorded in incorrect or • NIGHTSHOT is set to ON. unnatural colors. c Set it to OFF. (p.
Types of trouble and their solutions Symptom The end search function does not work. The battery pack discharges quickly. The remaining battery time indicator does not indicate the correct time. The cassette cannot be removed from the holder. The % and Z indicators flash and no functions except for cassette ejection work. The remaining tape indicator is not displayed.
Types of trouble and their solutions Symptom You cannot install the USB driver.*1) USB Streaming function does not work*1) The Remote Commander supplied with your camcorder does not work.*2) The date or time indicator does not appear, and the bars “--:--:--” appear. The melody or beep sounds for 5 seconds. No function works though the power is on. While charging the battery pack, no indicator appears or the indicator flashes in the display window.
Self-diagnosis display Your camcorder has a self-diagnosis display function. This function displays the current condition of your camcorder as a 5-digit code (a combination of a letter and figures) on the LCD screen, in the viewfinder or in the display window. If a 5-digit code is displayed, check the following code chart. The last two digits (indicated by ss) will differ depending on the state of your camcorder.
Warning indicators and messages If indicators and messages appear on the screen or in the display window, check the following: See the page in parentheses “( )” for more information. Warning indicators The video heads are dirty Slow flashing: – You need to clean the heads using the Sony V8-25CLD cleaning cassette (optional). (p. 85) The battery pack is dead or nearly dead Slow flashing: – The battery pack is nearly dead. (P.
Warning indicators and messages Warning messages •CLOCK SET Set the date and time. (p. 16) •FOR “InfoLITHIUM” BATTERY ONLY Use an “InfoLITHIUM” battery pack. (p. 81) •Q NO TAPE*1) Insert a cassette tape. •Q TAPE END*1) The tape has reached the end. • CLEANING CASSETTE*2) The video heads are dirty. (p. 85) •START/STOP KEY Press START/STOP to activate the ORC setting. This message is displayed in white. (p. 70) •ORC The ORC setting is working. This message is displayed in white. (p.
— Additional Information — About video cassettes Selecting the cassette type You can use both Hi8 and standard 8 mm video cassettes on your camcorder. video cassette, recording and playback are carried out in the When you use a Hi8 Hi8 system. When you use a standard 8 mm video cassette, recording and playback are carried out in the standard 8 mm system. video cassette in the LP mode, recording is However, if you record on a Hi8 carried out in the standard 8 mm system.
About the “InfoLITHIUM” battery pack What is the “InfoLITHIUM” battery pack? The “InfoLITHIUM” battery pack is a lithium-ion battery pack that has functions for communicating information related to operating conditions between your camcorder and the AC adaptor/charger (optional). The “InfoLITHIUM” battery pack calculates the power consumption according to the operating conditions of your camcorder, and displays the remaining battery time in minutes.
About “InfoLITHIUM” battery pack Battery life •The battery life is limited. Battery capacity drops little by little as you use it more and more, and as time passes. When the available battery time is shortened considerably, a probable cause is that the battery pack has reached the end of its life. Please buy a new battery pack. •The battery life varies according to storage and operating conditions, and environment for each battery pack.
Using your camcorder abroad Using your camcorder abroad You can use your camcorder in any country or area with the AC power adaptor supplied with your camcorder within 100 V to 240 V AC, 50/60 Hz. When charging the battery pack, use a commercially available AC plug adaptor [a], if necessary, depending on the design of the wall outlet [b]. AC-L10A/L10B/L10C [a] [b] Your camcorder is an NTSC system based camcorder.
Maintenance information and precautions Moisture condensation If your camcorder is brought directly from a cold place to a warm place, moisture may condense inside your camcorder, on the surface of the tape, or on the lens. In this condition, the tape may stick to the head drum and be damaged or your camcorder may not operate correctly. If there is moisture inside your camcorder, the beep sounds and the % indicator flashes.
Maintenance information and precautions Maintenance information Cleaning the LCD screen If fingerprints or dust make the LCD screen dirty, we recommend using a LCD Cleaning Kit (optional) to clean the LCD screen. Cleaning the video head To ensure normal recording and clear pictures, clean the video heads. The video head may be dirty when: – the x indicator and “ CLEANING CASSETTE” message appear one after another on the screen or the x indicator flashes on the screen. – playback pictures contain noise.
Maintenance information and precautions Charging the built-in rechargeable battery in your camcorder A built-in rechargeable battery is supplied with your camcorder so as to retain the date and time, etc., regardless of the setting of the POWER switch. The rechargeable battery is always charged as long as you are using your camcorder. The battery, however, will get discharged in about 6 months if you do not use your camcorder at all.
Maintenance information and precautions Built-in light (CCD-TRV107/TRV308/TRV408/TRV608 only) •Do not knock or jolt the built-in light while it is turned on as it may damage the bulb or shorten the life of the bulb. •Do not leave the built-in light on while it is resting on or against something; it may cause a fire or damage the built-in light. On handling tapes Do not insert anything into the small holes on the rear of the cassette.
Maintenance information and precautions About care and storage of the lens •Wipe the surface of the lens with a soft cloth in the following instances: – When there are fingerprints on the lens surface – In hot or humid locations – When the lens is used in environments susceptible to salt such as the seaside •Store the lens in a well-ventilated location subject to little dirt or dust. To prevent mold from growing on the lens, periodically perform the above.
Specifications Video camera recorder System Input/output connectors S video output 4-pin mini DIN Luminance signal: 1 Vp-p, 75 Ω (ohms), unbalanced Chrominance signal: 0.286 Vp-p, 75 Ω (ohms), unbalanced Audio/Video output AV MINIJACK, 1 Vp-p, 75 Ω (ohms), unbalanced, sync negative 327 mV, (at output impedance more than 47 kΩ (kilohms)) Output impedance with less than 2.2 kΩ (kilohms)/Monaural minijack (ø 3.5 mm) RFU DC OUT Mini-mini jack (ø 2.
Specifications Battery pack Maximum output voltage DC 8.4 V Output voltage DC 7.2 V Capacity 5.0 Wh (700 mAh) Operating temperature 0 °C to 40 °C (32 °F to 104 °F) Dimensions (approx.) 38.2 × 20.5 × 55.6 mm (1 9/16 × 13/16 × 2 1/4 in.) (w/h/d) Mass (approx.) 65 g (2.3 oz) Type Lithium ion Design and specifications are subject to change without notice.
— Quick Reference — Identifying the parts and controls Camcorder 1 7 2 8 3 9 4 5 q; 6 qa 6 SEL/PUSH EXEC dial (p. 16, 67) 2 Viewfinder lens adjustment lever (p. 23) 7 Power zoom lever (p. 22) 3 V BATT release lever (p. 11) 4 USB connector (p. 61) (CCD-TRV608 only) 5 OPEN button (p. 19) 8 POWER switch (p. 19) 9 START/STOP button (p. 19) Quick Reference 1 Eyecup 0 DC IN jack (p. 12, 15) qa Hooks for shoulder strap (p.
Identifying the parts and controls qs qd qj qk qf ql qg w; qh qs Video control buttons (p. 29, 31) x STOP (stop) m REW (rewind) N PLAY (playback)* M FF (fastforward) X PAUSE (pause) qd LIGHT button (p. 46) (CCD-TRV107/TRV308/TRV408/ TRV608 only) qf Recording lamp (p. 19) qg Infrared rays emitter (p. 26) * This button has a tactile dot. 92 qh Remote sensor (p. 96) (CCD-TRV107/TRV408 only) qj NIGHTSHOT switch (p. 26) qk Display window (p. 97) ql Microphone (p.
Identifying the parts and controls wj wa wk ws wl wd e; ea wf wg es wh ed wk END SEARCH button (p. 28) ws Speaker wl Viewfinder (p. 23) wd LCD screen (p. 19) e; FADER button* (p. 35) wf EXPOSURE button (p. 40) ea BACK LIGHT button (p. 25) wg TITLE button (p. 42, 44) es FOCUS button (p. 41) wh EASY DUBBING button (p. 51) ed MENU button* (p. 67) Quick Reference wa VOLUME +*/– buttons (p. 29) wj DISPLAY button (p. 30) * This button has a tactile dot.
Identifying the parts and controls ef eg eh ef DATE button (p. 27) eg TIME button* (p. 27) eh COUNTER RESET button (p. 20) * This button has a tactile dot.
Identifying the parts and controls ej r; ra ek rs el rd rf ej Z EJECT button (p. 18) ek Cassette compartment (p. 18) el Grip strap ra S VIDEO OUT jack (p. 32, 49, 51) rd A/V OUT jack (p. 32, 49) rf RFU DC OUT (RFU adaptor DC output) jack (p. 32) Fastening the grip strap Fasten the grip strap firmly. Quick Reference r; RESET button (p. 76) rs Built-in light (p. 46) (CCD-TRV107/TRV308/TRV408/ TRV608 only) Attaching the lens cap Attach the lens cap to the grip strap as illustrated.
Identifying the parts and controls Remote Commander — CCD-TRV107/TRV408 only The buttons that share the same name on the Remote Commander and your camcorder function identically to the buttons on your camcorder. 1 4 2 5 3 1 Transmitter Point toward the remote sensor to control the camcorder after turning on the camcorder. 3 DISPLAY button (p. 30) 4 START/STOP button (p. 19) 5 Power zoom button (p. 22) 2 Tape transport buttons (p.
Identifying the parts and controls Operation indicators LCD screen and Viewfinder 1 2 3 4 5 6 7 8 Display window 2 wd 3 qf qg 40 min W REC 0:00:00 T M . F ADER C I N EMA E ND S E A RCH FULL AM PM qh qj wf SEP I A qk JUL 4 2002 1 2 : 0 5 : 5 6 AM 1 Recording mode indicator (p. 70)/ Mirror mode indicator (p. 20) 2 Hi8 format indication (p. 24) 3 Remaining battery time indicator (p. 24) 4 Zoom indicator (p. 22)/ Exposure indicator (p. 40) wa ws qg Tape counter indicator (p.
Index A, B I, J, K, L S AC power adaptor ............... 15 Adjusting viewfinder .......... 23 A/V connecting cable ........................ 32, 49, 55 BACK LIGHT ....................... 25 Battery pack .......................... 11 BEEP ...................................... 72 BOUNCE ............................... 35 “InfoLITHIUM” battery ..... 81 Infrared rays emitter ........... 26 LCD screen ........................... 20 LP mode ................................ 70 Self-diagnosis display ........
Sony Corporation Printed in Japan *307231413*