Video Camera Recorder Operating Instructions Before operating the unit, please and retain it for future reference. Owner's The model read this manual thoroughly, Record and serial numbers are located on the bottom. Record the serial number in the space provided below. Refer to these numbers whenever you call upon your Sony dealer regarding this product. Model No. CCD-TRV Model Serial No. No. AC-L Serial No.
Welcome! Congratulations on your purchase of this Sony Handycam Vision rM camcorder. Withyour Handycam Vision, you can capture life's preciO_iS rttotaents with superior picture and sound quality. Your Handycam Vision is loaded with advanced features, but at the same time it is very easy to use. You will soon be producing home video that you can enjoy for years to come. DISPOSAL To prevent fire or shock hazard, not expose the unit to rain or moisture. do OF LITHIUM ION BATTERY. LITHIUM ION BATTERY.
Table of contents Quick Start Guide ............................. 4 Advanced Playback Operations Getting started Using this manual Checking ................................... 6 accessories 8 supplied Step I Preparing the power .............. supply ..... 9 Installing the battery pack Charging the battery pack ............. 10 to a wall outlet ........... 14 Connecting Step 2 Inserting Recording a cassette .............. ...................
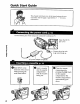
Quick Start Guide This chapter Mtroduces you to the basic features of your camcordel See the page m parentheses "( )" for more reformation Use the battery pack when using your camcorder outdoors (p. 9) Open the DC IN jack cover ,O e- Connect the plug w_th ds • mark facing up e- E AC power adaptor (supphed) A _l Slide EJECT m the direction of the arrow while small pressing the blue button.
O wilde pressing the small green button POWER Turn STANDBY picture appears to STANDBY. The on the LCD screen GE) START STOP O Press the red button Your camcorder starts recording. To stop recording, press the red button again START STOP O Open the LCD panel while pressing OPEN. /Q_ Viewfinder When the LCD panel Ls closed, use the vlewfinder placing your eye against its eyecup The picture in the vlewfinder is black and white.
Getting started -- Using this manual The instructions in this manual are for the four models listed in the table below. Before you start reading this manual and operating your camcorder, check the model number by looking at the bottom of your camcorder. The CCD-TRV87 is the model used for illustration purposes. Otherwise, the model name is indicated in the illustrations. Any differences in operation are clearly indicated in the text, for example, "CCD-TRV87 only.
Using Note this manual on TV color systems TV color systems differ from country need an NTSC system-based TV. Copyright to country. To view your recordings on a TV you precautions u_ Television programs, films, vzdeo tapes, and other materials may be copyrighted. Unauthorized recording of such materials may be contrary to the provis_on of the copyright laws Precautions on camcorder m care • The LCD screen and the viewfinder are manufactured using high-precision technology.
Checking Make sure supplied that the following accessories accessories are supplied with your camcorder. [] [] [] [] [] Q [] Wireless or Remote Commander (1) [] (p. 84) only AC-L10A/L10B/L10C AC power adaptor (1), Power cord (1) (p. 10) [] NP-F330 [] CR2025 battery lithium pack (1) (p. 9, 10) battery The lithium battery in your camcorder. for Remote (2) (p. 84) CCD-TRV57/TRV67/TRV87 [] A/V connecting * for stereo [] only cable (1) (p. 27) model Shoulder strap (I) (p.
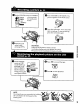
Step 1 Preparing Installing the battery Install Shde supply pack the batte D, pack the battery the power to use your camcorder pack down outdoors until zt clicks ro To remove the Slide the batte D, pack RELEASE down. battery pack out m the direction of the arrow whzle pressing _ BATT BATr RELEASE After installing the battery Do not carry your camcorder may shde off your camcorder pack by holding the battery pack.
Step 1 Preparing Charging the power the battery Use the battery Your camcorder (1) Open your supply pack pack after charging it for your camcorder. operates only with the "lnfoLITHIUM" battery the DC IN jack cover camcorder and cozmect (2) Connect the power cord to the AC power (3) Connect the power cord to a wall outlet (4) Set the POWER the AC power to the DC IN jack with the plug's switch to OFF (CHARGE).
Step 1 Preparing the power supply Notes • Prevent metallic objects from coming into contact with the metal parts of the DC plug of the AC power adaptor. This may cause a short-circuit, damaging the AC power adaptor. • Keep the battery pack dry. • When the battery pack is not to be used for a long time, charge the battery pack once fully and then use it until it fully discharges again.
Step 1 Preparing Charging the power supply time Battery pack Full charge (Normal charge) 150 (90) NP-F330 ('supplied) NP-F530/F550 210 (150) NP-F730 / F730H / F750 300 (240) NP-F930/F950 390 (330) NP-F960 420 (360) Approxunate Recording number of minutes to charge an empty battery pack time CCD-TRV17/TRV37/TRV57/TRV67 Recording with the viewfinder Battery pack Continuous* Typical** Recording with the LCD screen Continuous* Typical** NP-F330 (supplied) 140 (125) 75 (70) 120
Step 1 Preparing Playing the power supply time CCD-TRV17/TRV37/TRV57/TRV67 Battery pack Playing time on LCD screen Playing time with LCD closed NP-F330 (supplied) NP-F530 NP-F550 NP-F730 125 215 250 430 (110) (190) (220) (385) 145 260 295 525 NP-F730H/F750 NP-F930 NP-F950 NP-F960 510 680 780 915 (460) (610) (700) (820) 610 (550) 825 (740) 930 (830) 1090 (980) 10 (130) (230) (260) (475) _a to Q.
Step 1 Preparing Connecting the power to a wall outlet supply When you use your camcorder for a long hme, we recommend wall outlet using the AC power adaptor (1) Open the DC IN lack cover, iack on your camcorder and with connect the plug's the AC power • mark (2) Connect the power cord to the AC power (3) Connect the power cord to a wall facing that you power adaptor it from a to the DC IN up adaptor. outlet.
Step 2 Inserting When you want TRV87 only) (1) Prepare (2) Slide to record in the Hi8 system, the power EJECT a cassette supply in the direction use Hi8 video cassette I-li !_1. (CCD-TRV67/ (p. 9). of the arrow The cassette compartment automatically (3) Insert a cassette with its window facing while pressing the small blue lifts up and opens. out and the tab on the cassette (4) Close the cassette compartment by pressing the _ compartment. The cassette compartment automatically button. up.
m Recording - Basics Recording a picture Your camcorder automatically focuses for you. (1) Install the power source and insert a cassette. See "Step 1" and "Step 2" for more information (p. 9 to 15), (2) Set the POWER switch to CAMERA while pressing the small green button. The lens cover opens. (3) Open the LCD panel while pressing OPEN. The viewfinder automatically turns off. (4) Turn (5) Press STANDBY to STANDBY. START/STOP. Your camcorder starts recording. The appears.
Recording a picture If you leave your camcorder is inserted in the standby mode for 5 minutes while the cassette Your camcorder automatically turns off. Tills is to save battery power and to prevent battery and tape wear To resume the standby mode, turn STANDBY down and Lip again To start recording, press START/STOP To set the counter to 0:00:00 Press COUNTER RESET (p. 82) r_ O After 8. recording 5 I (1) (2) (3) (4) (5) Turn STANDBY down to LOCK. Close the LCD panel. Eject the cassette.
Recording a picture Using the zoom feature Move the Using the "T" side "W" side: power zoom lever a little for a slower zoom Move tt further zoom funchon spanngly results in better-looking recordings. for telephoto (sublect appears closer) for wide-angle (sublect appears farther away) Zoom greater than 20x is performed digitally. To activate dlg,tal zoom, select the digital zoom power m D ZOOM settings. (p.
Recording To record viewfinder a picture pictures with the viewfinder - adjusting the If you record pictures with the LCD panel closed, check the pLcture with tile v_ewfmder Adjust tile vlewflnder lens to }'our eyestght so that the indicators m tile v_ewfmder come tnto sharp focus. Lift up the v_ewfmder and move the vlewflnder lens adjustment lever O I m.
Recording Indicators a picture displayed The indicators in the recording are not recorded Hi8 format Tills appears =_I_I_RE[Recording mode on tape. indicator while (CCD-TRV67/TRV87 playing only) back or recording in Hi8 format mode indicator STBY/REC indicator Tape counter Remaining tape indicator Th_s appears after you insert or play back for awhlle.
Recording a picture Shooting in the dark (NightShot) The NightShot function can sattsfactordy record you use th_s function enables you to shoot a sublect the environment of nocturnal m a dark place For example, you ammals for observation when While }'our camcorder is m the standby mode, shde NIGHTSHOT to ON. and "NIGHTSHOT" indicators flash on the LCD screen or m the vlewfmder. cancel the NlghtShot functmn, slide NIGHTSHOT to OFF.
Recording a picture The SUPER NIGHTSHOT button does not work (CCD-TRV87 only): -whtle the fader function ts set or m use - while - when the digital effect function is in use NIGHTSHOT _s set to OFF NightShot Light NlghtShot Light rays are infrared and so are invisible The maximum shooting distance using the N_ghtShot Light is about 10 feet (3 m) Tl_e shooting distance w_ll be twice or more m the Super NlghtShot mode ICCD-TRV87 only) Superimposing the date and time on pictures You can record the dat
Checking - END SEARCH the recording / EDITSEARCH You can use these buttons between the last recorded / Rec Review to check the recorded picture or shoot so that the transltLon scene and the next scene you record Ls smooth + EDITSEARCH - _) 8 I w END SEARCH You call go to the end of the recorded Press END SEARCH m the standby sectLon after you record.
-- Playback - Basics -- Playing back a tape You can monitor the playback picture on the LCD screen or in the viewfinder. If you close the LCD panel, you can monitor the playback picture in the viewfinder. You can control playback using the Remote Commander supplied with your camcorder. (CCD-TRV57/TRV67/TRV87 only) (1) Installff_epowersourceandinserttherecordedtape. (2) Set the POWER switchto VTR (CCD-TRV87) or PLAYER (CCD-TRV 17/ TRV37/TRV57/TRV67) whilepress'mgthesmallgreenbutton.
Playing back a tape To control the display of the screen indicators Press DISPLAY on your camcorder or the Remote TRV87 only) supphed with your camcorder The indicators appear on tile LCD screen. Commander To make the indicators again.
Playing back a tape Various playback modes To operate video control buttons, set the PLAYER (CCD-TRV17/TRV37/TRV57/TRV67 POWER switch only). To view a still picture (playback pause) Press I| dunng playback. To resume playback, press To advance the tape Press I_l_m the stop mode. To resume To rewind Press the I| or I_, normal playback, press De-. mode To resume normal press a scene monitoring Keep pressing button.
Viewing the recording on TV Connect your camcorder to your TV or VCR with the A/V connecting cable supplied with your camcorder to watch the playback picture oil the TV screen You can operate the playback control buttons in tile same way as when you momtor playback pLctures on the LCD screen When monitonng the playback pLcture oil the TV screen, we recommend that you power your camcorder from a wall outlet using tile AC power adaptor (p. 14) Refer to the operating mstruchons of your TV or VCR.
Viewing the recording on TV If your TV or VCR is a monaural - CCD-TRV87 type only Connect the yellow plug for video and the whLte plug for audio on both your camcorder and the TV or the VCR (you do not connect the red plug) With thts connection, the sound is monaural To connect to a TV or VCR without VideolAudio input jacks Use an NTSC system RFU adaptor (not supplied) Refer to the operating instructions of your TV or VCR and tl_e RFU adaptor.
Viewing the recording on TV To cancel the super laser link function Press S.LASER LINK. The lamp on the S.LASER LINK button goes out. If you turn the power Super laser If you use a Sony TV off link turns off automatically. • You can turn on tile TV automatically when you press S.LASER so, set AUTO TV ON to ON in the menu then do either of the following: settings - Point the SUPER LINK. at the TV's remote LASER LINK emitter LINK or I_.
Advanced Recording Operations -- Recording a still image -Tape Photo recording - CCD-TRV87 on a tape only You can record a still picture like a photograph. record a picture such as a photograph or when (not supplied). NORMAL PHOTO This mode is useful when you want to you print a picture using a video printer This mode records a still picture for about seven seconds. FADE PHOTO SHUTTER PHOTO (1) While menu your camcorder settings (p. 55).
Recording a still image on a tape - Tape Photo recording Notes • Dunng tape photo functions - recording, you caru-_ot change the mode or setting of the following Digital effect Fader PROGRAM AE PLcture effect - Exposure - WLde mode - Backhght - Super NlghtShot • The PHOTO button - whde - while ci. does not work the digital effect function _s set or m use the fader funchon is in use • When recording fluctuate a stdl picture, do not shake your camcorder The picture to ci.
Using the wide You can record 16:9 wide-screen mode a cinema-like picture (CINEMA) or a 16:9 wide picture to watch on the TV (16:9FULL). Refer to the operating instructions of your TV. CINEMA Black bands appear on the screen during recording in the CINEMA mode [a], playing back on a normal TV [b] or a wide-screen TV [c]. If you set the screen mode of the widescreen TV to the zoom mode, a picture without black bands appears [d].
Using the wide mode In the standby (p. 55). mode, set 16:9WIDE to CINEMA or 16:9FULL in the menu settings O. < o. o MENU o To cancel the wide Set 16:9WIDE "o mode to OFF in the menu (1) settings. O If the wide mode is set to 16:9FULL (CCD-TRV57/TRV67/TRV87 only) The SteadyShot function does not work. If you select 16:9FULL in the menu settings when the SteadyShot function is working, '_" flashes and the SteadyShot function does not function.
Using the fader function You can fade in or out to give your recording a professional appearance. [aI FADER M.FADER (mosaic) STRIPE BOUNCE .1) (Fade in only) OVERLAP -21 (Fade in only) WIPE -3) (Fade in only) [b] MONOTONE When When fading fading in, the picture gradually out the picture gradually •1_You can use this function •2_CCD-TRV87 only •3_CCD-TRV87 34 only when only. The sound changes changes from black-and-white to color. from color to black-and-white. D ZOOM is set to OFF.
Using the fader function (1) Whenfadingin[ a] In the standby mode, press Whenfadingout[ b] In the recording mode, The indicator changes FADER --4 M.FADER (2) FADER press until FADER as follows: _ STRIPE the desired until fader the desired --_ BOUNCE _ (CCD-TRV87 first of all. Press stops The fader indicator indicator flashes. flashes. MONOTONE OVERLAP (CCD-TRV87 only) ---* WIPE The last selected fader mode is indicated START/STOP.
Using the Fader function Note (CCD-TRV87 only) You cannot use the following functions while using the fader use tile fader function while using the following functions. - Digital effect - Low lux mode of PROGRAM - Super NightShot -Tape Photo recording AE (Overlap/Wipe function function. Also, you cannot only) The date, time indicator and title do not fade in or fade out Erase them before operating the fader function If you do not record anything (CCD-TRV87 only) if they are not needed.
Using special You can digitally TV. PASTEL [a] : effects process images - Picture to obtain special effect effects like those Thecontrastofthepictureisemphasized, arumated cartoon. in films or on the andthepicturelookslikean NEG. ART [b] : Thecolorandbrightnessofthepictureisreversed. SEPIA : B&W : SOLARIZE [€]: MOSAIC [d] : The picture is sepia. The picture is monochrome Thelightintensityisclearer, Thepictureismosaic. SLIM [e] : Thepictureexpandsvertically.
Using special - CCD-TRV87 effects - Digital effect only You can add special effects to recorded sound is recorded normally. pictures using the various digital functions. STILL You call record a still picture so that it is superimposed on a moving picture. FLASH (FLASH MOTION) You can record still pictures successively at constant intervals. LUMI. (LUMINANCEKEY) You can swap a brighter area in a still picture with a moving picture.
Using special effects (1) While your EFFECT. (2) Turn - Digital camcorder The digital is in the standby effect the SEL/PUSH and STILL LUMI. of flash LUMI. - The color TRAIL swapped with - The vanishing SLOW SHTR scheme - Shutter slower MOVIE The more appear modes, bars to adjust the desired digital effect mode. *---* SLOW SHTR _ The DIGITAL MOVIE appear. in memory. as follows: to superimpose on the moving CL in the still picture larger which is to be t-i r_ D.
Using special effects - Digital Effect Notes • The following functions do not work - Fader - Low lux mode of PROGRAM AE - Tape Photo recording - Super NightShot • The following function - Exposure - PROGRAM AE does not work • The following functions - Exposure - Wide mode - Picture effect - PROGRAM AE When you turn the The digital When Auto power in the slow digital effect: in the slow shutter mode: in the old movie mode: off effect will be automatically recording shutter focus may not
Using the PROGRAM You can select PROGRAM requirements. O Spotlight AE function AE (Auto Exposure) mode to suit your specific mode This mode prevents people's faces, for example, from appearing when shooting subjects lit by strong light in the theater. _ shooting Soft portrait excessively white mode This mode brings out tile subject people or flowers.
Using the PROGRAM (1) Press AE function PROGRAM AE in the standby appears. (2) Turn the SEL/PUSH The O indicator _ _ EXEC dial to select changes as follows: _ '_" _-_ _-_ mode. _ _ The PROGRAM the desired _[]_ AE indicator PROGRAM AE mode. 2 (CCD-TRV87only) 1 2 To turn the PROGRAM Press PROGRAM AE. AE function off Notes • In the spotlight, sports lesson and beach & ski modes, you cannot take close-ups.
Adjusting the exposure manually You can manually adjust and set the exposure. Adjust the exposure manually in the following cases: • The subject is backlit • Bright subject and dark background • To record clark pictures (e.g. night scenes) faithfully (1) Press EXPOSURE in the standby or recording The exposure indicator appears. (2) Turn the SEL/PUSH EXEC dial to adjust mode. the brightness, F 1 Q. EXPOSURE ¢D D. ¢D 0 0 2 ¢B 0 To return to the automatic Press EXPOSURE again.
Focusing manually You can gain better results by manually adjusting the focus in the following cases: • The autofocus mode is not effective when shooting - subjects through glass coated with water droplets - horizontal stripes -subjects with little contrast with backgrounds such as walls and sky °When you want to change the focus from a subject in the foreground to a subject in the background • Shooting a stationary subject when using a tripod (1) Set FOCUS to MANUAL appears, (2) Turn NEAR/FAR in the
Superimposing a title You can select one of eight preset titles and two custom the language, color, size and position of titles. titles (p. 47). You can also select (1) Press TITLE in the standby mode. (2) Turn the SEL/PUSH EXEC dial to select r'n, then press the dial. (3) Turn the SEL/PUSH EXEC dial to select the desired title, then press the dial. The titles are displayed in the language you selected. (4) Change the color, size, or position, if necessary.
Superimposing a title Note Both the date and time or either position of the title. of them may not be displayed depending on the size or If you display the menu or title menu while superimposing a title The title is not recorded while the menu or title menu is displayed. To use the custom title If you want If you have to use the custom title, select 133 in step 2. not made any custom title, "- - - - ...
Making your own titles You can make up to two titles and store them to 20 characters. in your camcorder. Each title can have (1) Press TITLE in the standby or VTR (CCD-TRV87)/PLAYER TRV37/TRV57/TRV67) mode. (CCD-TRV17/ (2) Turn the SEL/PUSH EXEC dial to select TD, then press {3) Turn the SEL/PUSH EXEC dial to select the first line (CUSTOM1) or second the column of the desired character, the desired character, line (CUSTOM2), then press the dial.
Making your own To change titles a title you have stored In step 3, select CUSTOM1 or CUSTOM2, depending on which title you want to change, then press the SEL/PUSH EXEC dial. Turn the SEL/PUSH EXEC dial to select [(-], then press the dial to delete the title. The last character is erased. Enter the new title as desired. If you take 5 minutes or longer to enter characters cassette is in your camcorder The power automatically goes off.
Using the built-in light You can use the built-in light to suit your shooting situation. The recommended distance between the subject and camcorder is about 5 feet (1.5 m). Slide LIGHT turns 011. The built-in to ON while your camcorder light turns on/off by turning is in the standby STANDBY mode. The built-in light to STANDBY/LOCK. I-r ...a r0 G. ¢D o o "O To turn off the built-in Slide LIGHT to OFF. light To turn on the built-in light Slide LIGHT o automatically to AUTO.
Using the built-in Replacing the light bulb Use the Son}' XB-3D halogen lamp (not supphed) The supphed halogen lamp is not on the market. Purchase the Sony XB-3D halogen lamp Remove the power source before replacing the bulb. (1) Remove the built-in light unit while pushing the hole under the built-in light unit using a wire. (2) Turn the bulb housing unit. counterclockwise (3) Replace a dry cloth. (4) Attach unit.
-- Advanced Playback Playing Operations -- back a tape - CCD-TRV87 with digital effects only During playback, you can process a scene using the digital effect fm_ctlons: STILL, FLASH, LUMI. and TRAIL {1) Durmgplayback, press DIGITAL untllthedestreddigltaleffect ttash_ (2) PresstheSEL/PUSH Thechgitaleffect EFFECTand indicator tumtheSEL/PUSH (STILL, FLASH, LUMI.or EXEC&al TRAIL) EXEC dial. mchcatorlights up and thebarsappear. LUIvII.mode,thepicturewhereyou in memotTasastiUplctme.
Editing w Dubbing a tape Using the A/V connecting (not supplied) Connect your camcorder your camcorder. (1) Insert a blank the recorded to the VCR using tape (or a tape tape (2) Set the input cable or S video into your selector you the A/V want connecting connecting to record over) cable cable supplied into the VCR, and camcorder. on the VCR to LINE. Refer to the operating instructions of your VCR for more (3) Set the POWER switch to VTR (CCD-TRV87) or PLAYER information.
Dubbing a tape If you have displayed the screen indicators on the TV Make the indicators disappear by pressing DISPLAY so that they will not be superimposed on tile edited tape. You can edit on VCRs that support the following systems [] 8 mm, Him Hi8, [) DigitalS, _ VHS, _ S-VHS, _ VHSC, SI!!!$1_t S-VHSC, I_ Betamax, _ ED Betamax, M'_I_ mini DV or l_ "TDV If your VCR is a monaural type (CCD-TRV87 only) Coru_ect the yellow plug for video and the white plug for audio on both your camcorder and the VCR.
Recording video - CCD-TRV87 or TV programs only You can record a tape from another audio outputs. Use your camcorder camcorder while editing. Otherwise, (1) Insert a blank tape (or a tape VCR or a TV program from a TV that has video/ as a recorder. Turn down the volume of your the picture may be distorted. you want you are recording a tape from the VCR, (2) Set the POWER switch to VTR.
Customizing Your Changing Camcorder the -- menu settings To change the mode settings in the menu settings, select the menu items with the SEL/ PUSH EXEC dial. Tile default settings can be partially changed. First, select tile icon, then the menu item and then the mode. (1) In the standby TRV67) press (CCD-TRV17/TRV37/TRV57/ MENU. (2) Turn set. the SEL/PUSH EXEC dial to select the desired icon, then press the dial to (3) Turn set.
Changing the menu settings Menu items are displayed [] [] [] [] [] SETUP MENU OTHERS Depending Selecting on your camcorder display the mode model may be different Setting only) from that in this illustration. of each item •sfl_edefaultset_ingi Menu items differ according to whether the POWER switch is set to VTR (CCD-TRV87)/ PLAYER(CCD-TRV17/TRV37/TRV57/TRV67) or CAMERA. The LCD screen shows only the items you can operate at the moment.
Changing the Icon/item [] HiFi SOUND menu settings Meaning • STEREO To play back a stereo tape or dual sound track (CCD-TRV87 only) EDIT POWER switch Mode 1 To play back a monaural tape or dual sound track tape with main sound 2 To play back a dual sound track tape with sub sound • OFF VTR/PLAYER ON To minimize • ON TBC VTR tape picture deterioration when editing To correct jitter OFF VTR/PLAYER To not correct jitter.
Changing the Icon/item [] RE(; MODE menu settings POWER switch Mode Meaning • SP To record in SP (Standard Play) mode VTR LP To increase the recording mode time to twice the SP CAMERA ORC TO SET To automatically adjust the recording condition to get the best possible recording. Press START/STOP to start adjustment. Your camcorder takes about 10 seconds to check the tape condition mode.
Changing the Icon/item menu settings Mode CLOCK SET AUTO DATE Meaning To reset the date or time (p. 61) • ON To record the date for 10 seconds recording OFF AUTO TV ON (CCD-TRV87 only) TV INPUT (CCD-TRV87 only) POWER switch • OFF ON • VIDEO1 VIDEO2 VIDEO3 CAMERA after CAMERA has started To cancel the auto date function -- VTR To automatically turn on the Sony TV when using the super laser link function (p.
Changing the Icon/item [] menu settings Mode WORLD TIME BEEP • MELODY COMMANDER (CCD-TRV57/ TRV67/TRV87 POWER switch Meaning To set the clock to the local time. Turn the SEL/ PUSH EXEC dial to set a time difference. The clock changes by the time difference you set here. If you set the time difference to 0, the clock returns to the originally set time.
Resetting the date and time The default clock setting is set to East Coast Standard Time. The date and time are held in memory by the lithium battery. If you replace the lithium battery with the battery pack or other power source connected, you need not reset the date and time. You must reset the date and time when the lithium battery becomes dead power source installed. First, set the year, then the month, the day, the hour and then the minute. (1} While menu.
Resetting the To check Press Press Press date Press date and time the preset date and time DATE to display the date indicator. TIME to display the time indicator. DATE (or TIME) and then press TIME (or DATE) and time indicator. DATE and/or TIME again. The date and/or to simultaneously time indicator display the disappears. The year changes as follows: 1999 *'-* 2000 *-- ....
Additional Usable Selecting Information -- cassettes the cassette and playback modes type - CCD-TRV67/TRV87 only You can use both Hi8 and standard 8 mm video cassettes on your camcorder _be n_vou use a HL8 video cassette, recording and playback are camed out m tile HL8 system When you use a standard 8 mm wdeo cassette, recording and playback are carned out in the standard 8 mm system.
Usable cassettes Copyright and playback modes signal When you record - CCD-TRV87 only Youcalulotrecordsoftwareonyourcamcorderthatcontalnscopyr_ghtcontrolsLgnals for copyright protectxonofsoftware "COPY INHIBIT" appears on the LCD screen, m the vlewfmder or on the TV screen you tD, to record such so fhvare.
Changing camcorder the lithium battery in your When replacing the lithium battery, keep the battery pack or other power source attached. Otherwise, you will need to reset the date, time and other items in the menu settings hold in memory by the lithium battery. Insert the battery with the positive (+) side facing out. When the battery becomes weak ordead, the _%indicator flashesin theviewfinder for about 5 secondswhenyou set the POWER switch to CAMERA.
Changing the lithium battery in your camcorder (1) Open the LCD panel and open the lid of the lithiumbattery compartment. (2) Push the lithiumbattery down once and pullit out from theholder. (3) Install a Sony CR2025 or Duracell DL-2025 lithium battery with the positive side facing out. (4) Close thelid.
Troubleshooting If you run into any problem using your camcorder, use the following table to troubleshoot the problem. If the problem persists, discortnect the power source and contact your Sonydealer orlocal authorizedSonyservice facility.If"C: E3E3:IZIE3" appears on the LCD screen or in the viewfinder, the self-diagnosis display function has worked. See page 70. In the recording mode Cause and/or Corrective Symptom START/STOP does not operate.
Troubleshooting Symptom Cause and/or Corrective Actions Some troy white spots appear m the v_ewfinder or o11 the LCD screen. (CCD-TRV87 only) • Slow shutter, low lux or Super NlghtShot achvated ThLs Ls not a malfunction An unknown p_cture is d_splayed m the vlewfmder ol on tile LCD • If 10 minutes elapse after you set the POWER sw_tch to CAMERA or DEMO MODE is set to ON m tile menu screen The picture or unnatural is recorded colors m incorrect ° NIGHTSHOT is set to ON. .
Troubleshooting Symptom The battery discharged Cause and/or Actions • The operating temperature _s too low • The battery pack is not fully charged 4" Charge the batter), pack agan*l. (p.
Self-diagnosis display Your camcord function. display er has a self-diagnosis Viewfinder This function displays the current condition of your camcorder as a 5-digit code (a combination of a letter and figures) in the view finder, on the LCD screen o r in the display wind ow. I f a 5-digit cod e is displayed, check the following code chart. The last two digits (indicated by [3FI) will differ depending on the state of your camcorder. -- (or LCD screen) - C:21 :OOq _/llIl\ 1 Self-diagnosis display
Warning indicators and messages If indicators and messages appear in the viewfinder, on the LCD screen or in the display window, check the following: See the page inparentheses"( )" for moreinformation. The indicators and messages are displayed in yellow. Warning indicators The video heads are dirty Slow flashing: • You need to clean the heads using the Sony V8-25CLD cleaningcassette (not supplied) (p. 74). The battery is dead or nearly dead Slow flashing: • The battery is nearly dead. (p.
Using your camcorder Using your camcorder abroad abroad You can use your camcorder m any country or area with the AC power supphed with vour camcorder within 100 V to 240 V AC 50/60 Hz When charging the battery pack use a commercmlly necessary dependmgon the destgnof the walloutlet available [b].
Maintenance precautions Moisture information and condensation If your camcorder _sbrought d_rectly from a cold place to a warm place, moisture condense msLde your camcorder, on the surface of the tape, or on the lens In this may condition, the tape may shck to the head drum and be damaged or),our camcorder may notoperatecorrectly If there Is moisture ms_deyour camcorder, the beep sounds and the []mdlcatorflashes.Whenthe _--mdlcatorflashesatthesametm_e, thecassettels inserted m your camcorder.
Maintenance information Maintenance and precautions information Cleaning the video head To ensure normal recording and clear pictures, clean the video heads.
Maintenance information and precautions Precautions operation Camcorder • Operate },our camcorder • For DC ol AC operahon, instrucbons. on 7 2 V (batter}, pack) or 8.4 V (AC power adap tor) use the accessories recommended m this operating • If anysohd oblect or hquLd get reside the casing, unplug your camcorder and have it checked by a Sony dealer be fore operating it any further • Avoid rough handhng or mechamcal shock.
Maintenance information AC power and precautions adaptor • Unplug the unit from the wall outlet when you are not using the unit for a long time. To disconnect the power cord, pull it out by the plug. Never pull the power cord itself. • Do not operate the unit with a damaged cord or if the unit has been dropped or damaged. • Do notbend the power cord forcibly, or place a heavy object on it. This will damage the cord and may cause fire or electrical shock.
Specifications Focal length 5/32 - 2 7/8 in. (3.6 - 72 ram) When converted to a 35 mm still Video camera recorder carilera System Video recording system 2 rotary heads Helical scanning FM system Audio recording system Rotary heads, FM system Video signal NTSC color, EIA standards Usable cassette 8ram video format cassette CCD-TRV17/TRV37/TRV57: Standard 8 CCD-TRV67/TRV87:Hi8 or standard 8 Recording/playback 120 min. cassette) SP mode: 2 hours LP mode: 4 hours Fastforward/rewind 120 min.
Specifications AC power adaptor Power requirements 100 - 240 V AC, 50/60 Hz Power consumption 23 W Output voltage DC OUT 8 4 V, 1 5 A m operating mode Operating temperature 32 °F to 104 °F(O °C to 40 °C) Storage temperature 4 °F to ÷140 °F (-20 °C to +60 °C) Dimensions (approx.) 5×19/16x2 1/2m (125 x39 ×62rural(w/h/d) excluding prolectmg parts Mass (approx.) 9 8 oz (280 g) excluding power cord Battery pack Output voltage DC 7 2 V Capacity 50Wh Dimensions (approx.
Quick Reference Identifying the parts and controls Camcorder I_ [] [] [] [] [] [] [] [] [] \ [] [] @ _D [] rD [] POWER switch [] LCD BRIGHT buttons [] OPEN button [] FOCUS switch [] NEAR/FAR [] VOLUME [] Eyecup (p. 74) [] Eyecup RELEASE knob [] (p. 16) Vievvfinder lens adjustment lever /% _D (p.19) (p. 17) Power zoom lever (p. 18) (p. 16) [] (p. 44) button (CCD-TRV87 only) (p. 30) dial (p. 44) buttons PHOTO (p. 24) (p. 74) [] BATT RELEASE lever (p.
Identifying the parts and controls [] [] [] [] [] [] [] [] [] [] [] [] [] [] [] [] Video control buttons (p. 24, 26, 54) • STOP (stop) REW (rewind) I_ PLAY (playback) FF (fastforward) II PAUSE (pause) • REC (recording) (CCD-TRV87 only) [] Infrared [] Microphone [] SUPER NIGHTSHOT EDITSEARCH rays emitter (CCD-TRV87 only) [] NIGHTSHOT switch [] Display window S.LASER LINK button (CCD-TRV87 only) (p. 39) [] Remote Lens cover (p. 16) [] Camera button recording (p.
Identifying the parts and controls [] [] [] [] [] [] [] [] JD _=. [] Lithium battery compartment (p. 65) [] PROGRAM AE button EXPOSURE button (p. 42) _u r0 [] Speaker [] [] LCD screen (p. 17) [] SEL/PUSH [] DIGITAL [] MENU [] PICTURE EFFECT button only) EFFECT button (CCD-TRV87 (p. 39) [] FADER button [] BACK LIGHT button (p. 43) EXEC dial (p. 55) button tD t_ tD (p. 55) (p. 37) (p. 35) (p.
Identifying the parts and controls [] [] [] [] @ 82 [] COUNTER RESET button [] TIME [] DATE button button (p. 22) (p. 22) DISPLAY (p. 17) button (p. ?-5) [] END SEARCH button [] TITLE button (p. 45) (p.
Identifying the parts and controls [] [] [] [] [] [] [] [] \ [] [] [] [] Viewfinder [] (p. 5) [] EJECT switch (p. 15) [] LANC I_ control [] jack LANC stands for Local Application Control Bus System. The @ control [] Cassette [] Grip strap [] S VIDEO jack (CCD-TRV67/TRV87 only) compartment (p. 15) (p. 27) [] Built-in light [] LIGHT switch (p. 49) _=. _t _0 MIC jack (PLUG IN POWER) Connect an external microphone (not supplied).
Identifying Remote the parts and controls Commander - CCD-TRV57rrRv67/TRV87 only Thebuttonsthatlaave thesanaenanleontheRemoteConam_a_derasonyottrcamcorder fi-uachol'udentlcallyto thebuttoi_sonyottrcamcorder. [] [] [] [] Transmitter Point toward the remote sensor control your camcorder your camcorder. after Video (p. 26) control buttons To prepare turning the Remote on on the Remote DISPLAY button (p. 25) [] START/STOP button (p.
Identifying the parts Operation and controls indicators LCD screen and Viewfinder Display window [] [] [] [] E. [] Recording mode indicator (p. 58)/ Mirror mode indicator (p. 17) [] [] Hi8 format indicator (CCD-TRV67/ TRV87 only) (p. 20, 63) [] [] Remaining Tape counter indicator (p. 20)/Selfdiagnosis display indicator (p. 70)/ Photo mode indicator (CCD-TRV87 only) (p. 30) [] Remaining [] END SEARCH indicator [] NIGHTSHOT [] AUTO DATE indicator indicator (p.
Quick Function Functions Guide to adjust exposure (in the recording mode) • lnadarkplace NIGHTSHOT • Inimtffficientli_lt Low lux mode (CCD-TRV87only) (p.41) • [ndarkenviroranentssudaassunset, fireworks, (p. 21) Stuxset&moolxmode(p.41) org_leraMghtviews BACK LIGHT (p. 20) • SIKvtdngbaclditsubjeds • Inspotlight, sudaasattheflaeaterora formal Spotlightmode(p.41) Beach&skimode(p.
Index i A, B AC power adaptor .................. Adjusting viewfinder ............. AFM HiFi Sound ..................... A/V connecting cable .................................... 27, 52, BACK LIGHT .......................... Battery pack ............................... Beep .......................................... BOUNCE .................................. I, J, K, L 10 19 63 54 20 9 60 34 C, D Charging battery ..................... Clock set ...................................
SonyOline Sony Corporation Printed in USA http://www.world.sony.