3-866-363-23 (1) Compact Disc Player Operating Instructions GB Mode d’emploi FR CDP-CX350 1999 by Sony Corporation
WARNING To prevent fire or shock hazard, do not expose the unit to rain or moisture. To avoid electrical shock, do not open the cabinet. Refer servicing to qualified personnel only. This appliance is classified as a CLASS 1 LASER product. The CLASS 1 LASER PRODUCT MARKING is located on the rear exterior. This equipment is intended for home entertainment purposes only. The warranty shall be invalidated if used in commercial environments, such as by disc jockeys, etc., even within the Warranty Period.
TABLE OF CONTENTS Getting Started Unpacking ............................................................................................................................. 4 Hooking Up the System ...................................................................................................... 4 About the Supplied Remote Commander ........................................................................ 5 Setting Up the Remote ................................................................................
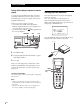
Getting Started Unpacking Check that you received the following items: • Audio cord (1) • CD booklet holders (3) and label (1) • Remote commander (remote) (1) • Size AA (LR6) batteries (3) Hooking Up the System Overview This section describes how to hook up the CD player to an amplifier. Be sure to turn off the power of each component before making the connections. How to use the CD booklet holder CONTROL A1 The CD booklet holder helps you locate discs easily.
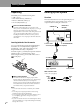
Getting Playing Started CDs Hookups Connecting the AC power cord When connecting the audio cord, be sure to match the color-coded cords to the appropriate jacks on the components: Red (right) to Red and White (left) to White. Be sure to make connections firmly to avoid hum and noise. Connect the AC power cord to a wall outlet. Amplifier CD player 2ND CD IN INPUT LINE Note on placement of the player Be sure to place the player in a flat, horizontal place.
Getting Started Turning off the player’s response to remote signals To use the remote supplied with another component compatible with the 2 way remote system, you must turn off this player’s response to signals of the remote supplied with this player. Set the 2 way remote system to off when: • you use the remote as RM-TP501, RM-TP501E, RM-LJ301 supplied with the receiver/amplifier (you can operate Disc 1 to Disc 200 only). • you use the remote with the mark supplied with the receiver/amplifier.
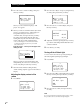
Getting Playing Started CDs How to move the cursor in the remote’s display 2 To move the cursor down, push the Easy scroll key downward as illustrated below. Move the cursor (”) to “Set up” by using the Easy scroll key, then press the Easy scroll key. CD1 P l aye r check Memo l o a d i n g Co n t r a s t a d j u s t Memo r y c l e a r 3 Move the cursor to “Player check,” then press the Easy scroll key. The display shows the disc data in the player after “Now player checking...” appears.
Getting Started 3 Move the cursor to “Memo loading,” then press the Easy scroll key. 2 Move the cursor (”) to “Set up” by using the Easy scroll key, then press the Easy scroll key. CD1 CD1 P l aye r check Memo l o a d i n g Co n t r a s t a d j u s t Memo r y c l e a r A l l memo d a t a Ma s t e r p l a y e r G r o u p memo When you connect another CD player, “2nd player” also appears.
Getting Playing Started CDs Erasing all data stored in the remote 1 Press MENU. CD1 Memo s e a r c h P r o g r am p l a y P r o g r am i n p u t Gr oup se l ec t 2 Move the cursor (”) to “Set up” by using the Easy scroll key, then press the Easy scroll key.
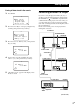
Getting Started What cords will I need? Inserting CDs • Audio cord (1) (Use the cord supplied with the player to be connected.) • Monaural (2P) mini-plug cord (1) (not supplied) 1 Connect the players with an audio cord (see also “Hookups” on page 5). 2ND CD IN I/u OPEN/CLOSE JOG CDP-CX230, etc. CDP-CX350 2 You can insert up to 300 discs into this player. +100 LINE OUT LINE OUT I/u L L L R R R Connect the players with a monaural (2P) miniplug cord. Playing position CDP-CX230, etc.
Getting Playing Started CDs The disc number at the loading position appears in the display. If the disc has a Disc Memo (see page 30), the Disc Memo appears instead of the disc number. As you turn the JOG dial, the disc number or the Disc Memo changes. ALL DISCS CD1 20 DISC *DISC-20* Disc number or the Disc Memo You can classify discs into eight groups by using the Group File function. This feature lets you easily find the disc you want to play. For details, see “Grouping Discs” on page 35.
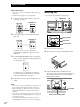
Basic Operations Playing a CD 2 3 5 4/5 +100 MENU/NO DISC/CHARACTER YES ≠ AMS ± STANDBY CONTINUE SHUFFLE PROGRAM REPEAT TIME/TEXT GROUP 1 GROUP 2 GROUP 3 GROUP 4 HIT LIST PUSH ENTER PUSH ENTER I/u TIMER GROUP 5 GROUP 6 GROUP 7 GROUP 8 EASY PLAY MEMO SEARCH CHECK CLEAR MEGA CONTROL X-FADE NO DELAY FADER GROUP FILE OFF PLAY KEYBOARD OPEN/ CLOSE DISC EJECT • See page 5 for hookup information. • Make sure you have inserted the discs correctly as indicated on page 10.
Basic Operations 5 When you turn off the player The player remembers the last playing disc and the play mode (Continuous, Shuffle, or Program (see pages 21 and 22)). When you turn on the player again, therefore, the player plays the same disc in the same play mode. Push the JOG dial or press · to start playing. The selected disc is set to the playing position, and the player plays all the discs from the selected one (ALL DISCS) or all the tracks once (1 DISC). Adjust the volume on the amplifier.
Playing CDs When you want to check another disc Using the Display You can check information about the disc using the display. JOG MENU/NO TIME/TEXT Press DISC SKIP +/– on the remote in the stop mode to select the disc you want to check. The total number of tracks and the total playing time of the selected disc appear momentarily. Display information of the playing disc While playing a disc, the display shows the current disc number, track number, playing time of the track, and the next disc number.
Playing CDs Playing CDs Getting Started Checking the information of CD TEXT discs CD TEXT discs have information, such as the disc titles or artist names, memorized in a blank space on the discs where, on normal discs, there is no information. The display shows the CD TEXT information of the disc so that you can check the current disc title, artist name and track title. When the player detects a CD TEXT disc, “CD TEXT” appears in the display.
Playing CDs The characters which are displayed as the first character. Locating a Specific Disc JOG +100 ≠ AMS ± ABCDEFGHIJKLMNOPQRSTUVWX YZ0123456789 +100 If “NOT FOUND” appears in the display while inputting the first character with the ≠ AMS ± dial, no disc has been labeled using the input character. I/u Notes • When searching for input characters, blanks and symbols before the first character in the Disc Memo are ignored.
Playing CDs Playing CDs Getting Started Locating a disc directly using the remote Locating a disc directly observing the remote’s display 1 Move the cursor (”) to the desired disc by using the Easy scroll key.
Playing CDs Locating a disc using the Disc Memo data on the remote You can search for and locate a desired disc by using the Disc Memo data on the remote. Before following the procedure below, be sure to load the Disc Memo data into the remote’s memory (see page 7). 1 Press MENU. 2 Move the cursor (”) to “Memo search” by using the Easy scroll key, then press the Easy scroll key. 3 Push the Easy scroll key up or down until the first character in the Disc Memo of the CD you want appears.
Playing CDs Playing CDs Getting Started Locating a Specific Track or a Point in a Track You can quickly locate any track while playing a disc by using the ≠ AMS ± (AMS: Automatic Music Sensor) dial or by using the =/+ buttons on the remote. You can also locate a specific point in a track while playing a disc.
Playing CDs Locating a specific track or a point in a track observing the remote’s display 1 During stop mode, press TRACK. CD1 D i sc123 * D I SC - 1 2 3 * 1 . ( TRACK 1 ) 2 . ( TRACK 2 ) 2 Move the cursor (”) to a desired track by using the Easy scroll key. CD1 3. 4. 5. 6. 3 ( TRACK 3 ) ( TRACK 4 ) ( TRACK 5 ) ( TRACK 6 ) Press the Easy scroll key or ·. Note When you select a CD TEXT disc, track titles appear in Step 2 instead of the track numbers.
Playing CDs Playing CDs Getting Started Playing Repeatedly You can play discs or tracks repeatedly in any play mode. REPEAT Playing in Random Order (Shuffle Play) You can have the player “shuffle” the tracks and play in random order. The player shuffles all the tracks on all discs or on the disc you specify. · SHUFFLE +100 JOG I/u +100 I/u Press REPEAT while playing a disc. “REPEAT” appears in the display.
Playing CDs Playing all tracks on all discs in random order 1 2 Press SHUFFLE. “ALL DISCS” and “SHUFFLE” appear in the display. Push the JOG dial or press ·. ALL DISCS Shuffle Play starts. ” appears in the display while the player is “ “shuffling” the discs or the tracks. Playing all tracks on a specified disc in random order 1 Press SHUFFLE twice. “1 DISC” and “SHUFFLE” appear in the display. 2 Turn the JOG dial until the desired disc number appears in the display.
Playing CDs Playing CDs Getting Started 4 Checking the programmed order Push the JOG dial. You can check your program before or after you start playing. The track being programmed 20 PROGRAM1 CD1 DISC 20 TRACK STEP 3 1 The disc being programmed 5 6 Playing order To program other discs/tracks, do the following: Press CHECK. Each time you press this button, the display shows the disc and track number of each step in the programmed order.
Playing CDs Creating a program using the remote Z 1 Press PROGRAM until the program number you want (PROGRAM 1, 2, or 3) appears in the display. 2 Press DISC. 20 PROGRAM1 CD1 PLAYER SELECT MENU TRACK DISC-[ BACK _] MENU Easy scroll key PUSH ENTER 3 · Press the number button of the disc. 20 PROGRAM1 CD1 CONTINUE SHUFFLE PROGRAM REPEAT DISC-[ 20] PROGRAM 4 DISC SKIP MEMO SCAN TIME/TEXT To program a whole disc, press ENTER and go to Step 6.
Playing CDs Playing CDs Getting Started Creating a program observing the remote’s display Z 6 You can create up to eight programs in the remote’s memory, each containing up to 32 steps by observing the remote’s display. To finish creating a program, press MENU. To play the program you create, see “Playing the program you create observing the remote’s display” on page 25. 1 Press MENU. To erase a track or disc, move the cursor to the step you want to erase in Step 3, then press CLEAR.
Playing CDs 3 Select the desired program by pressing the Easy scroll key up or down, then press Easy scroll key. CD1 P r o g r am Playing Using a Timer You can start playing a disc at any given time by connecting a timer (not supplied). Refer also to the instructions for the timer if you need help. da t a t r ans f e r TIMER Play mode buttons +100 CD1 I/u Di sc4 * D I SC 4 * Tr ack1 ( TRACK 1 ) Program Play starts when the player finishes loading the program data from the remote.
Playing CDs Playing CDs Getting Started Controlling Another CD Player (Advanced Mega Control) This unit can control a second CD player (see “Connecting Another CD Player” on page 9). Even when a second CD player is connected, the controls on both of the units will function. When you press the play button on either unit, the operating player stops and the idle player starts. Make sure “2nd DETECTED” appears in this player’s display after turning on both players.
Playing CDs Loading the Disc Memos of the second CD player Fading In or Out If the second CD player has the Disc Memo function (see page 30), you can load the Disc Memos of the second CD player into this player’s memory and display them on this player. You can manually fade the sound in or out to prevent tracks from starting or ending abruptly. Note that you cannot use this effect when you use the DIGITAL OUT (OPTICAL) connector. 1 Press MENU/NO.
Playing CDs Playing CDs Getting Started 3 Playing Alternately (No-Delay Play/X-Fade Play) When you connect the second player, you can play tracks in this player and those from the second player alternately from any play mode (see “Connecting Another CD Player” on page 9). Select one of the following methods: • No-Delay Play: The current player changes at each track.
Storing Information About CDs (Custom Files) What You Can Do With the Custom Files The player can store three types of information called “Custom Files” for each disc. Once you have stored Custom Files for a disc, the player automatically recalls what you have stored whenever you select the disc. Note that Custom Files will be erased if you do not use the player for about one month.
Storing Information About CDs (Custom Files) 4 Turn the JOG dial until the desired character appears in the display. The cursor disappears and the first space for the Disc Memo flashes. As you turn the JOG dial clockwise, the characters appear in the following order. Turn the JOG dial counterclockwise to go in reverse order. Changing the Disc Memo 1 Follow Steps 1 to 3 in “Labeling discs on the player” on page 30 to select the Disc Memo you want to change.
Storing Information About CDs (Custom Files) Labeling discs observing the remote’s display Z 4 Press CAPS to find the desired letter type. Each time you press the button, the letter type changes cyclically among capital letters (AB), small letters (ab), and numbers (12). To select a symbol, you have to select the capital or small letter type.
Storing Information About CDs (Custom Files) 6 7 Press another number button or the MEMO INPUT / button to go to the next space, then repeat Steps 4 to 6 to input more characters. To correct the character currently being input Press the Easy scroll key or ENTER when you finished inputting characters. “Transmit to SET?” appears in the display. To insert a character between the input characters 1 Press DEL to delete the incorrect character. 2 Input the correct character.
Storing Information About CDs (Custom Files) Storing Custom File Information Using a Keyboard Storing Specific Tracks (Delete Bank) You can store the Disc Memo for each disc, one by one, using an IBM-compatible PC keyboard* (not supplied). You can delete unwanted tracks and store only the tracks you want. When you select the disc containing a Delete Bank, the player will play only the remaining tracks. * Power consumption must be 120 mA or less.
Storing Information About CDs (Custom Files) Labeling groups (Group Memo) Grouping Discs (Group File) You might find that too many discs make it hard to find the disc you want. This player has a feature that lets you classify discs into eight groups. Each disc can be put into only one group. Once you classify discs, you can enjoy Continuous, Shuffle, or Repeat Play within a certain group (Group Play). You can label the preset group number anything you like, such as a category, using up to 13 characters.
Storing Information About CDs (Custom Files) Changing the Group Memo 1 2 Follow Steps 1 and 2 in “Labeling groups” on page 35 to select the Group Memo you want to change. Turn the ≠ AMS ± dial to move the cursor to the position you want to change. When the cursor position is on the character, the character flashes and the cursor position is on the blank space, the cursor ( ) appears in the display.
Storing Information About CDs (Custom Files) You can specify the disc to play when starting Group Play 1 Before you start playing, press MENU. After selecting the group, turn the JOG dial to select the disc, then push the JOG dial or press ·. CD1 Memo s e a r c h P r o g r am p l a y P r o g r am i n p u t Gr oup se l ec t Note If “NO ENTRY” appears in the display, no disc has been put into the selected group.
Storing Information About CDs (Custom Files) Storing Your Favorite Tracks (Hit List) You can store the tracks you play frequently and select those tracks by checking the track numbers or titles (see page 39) in the Hit List. You can put up to 32 tracks in the Hit List.
Storing Information About CDs (Custom Files) The Hit List remains until erased 4 Even if you replace discs, the Hit List you create remains. Therefore, the player will substitute the new existing tracks into the Hit List. Push the JOG dial to select the character. The selected character lights up, and the flashing cursor appears to indicate the next space to be input.
Additional Information On transportation Precautions On safety • Caution — The use of optical instruments with this product will increase eye hazard. • Should any solid object or liquid fall into the cabinet, unplug the player and have it checked by qualified personnel before operating it any further. • When transporting the player, open the front cover then remove all the discs from the player and turn the power off.
Additional Information Troubleshooting Specifications If you experience any of the following difficulties while using the player, use this troubleshooting guide to help you remedy the problem. Should any problem persist, consult your nearest Sony dealer. Compact disc player Laser Semiconductor laser (λ = 780 nm) Emission duration: continuous Laser output Max 44.
Additional Information Index Labeling a disc 30 Locating a specific point 19 a specific track 19 by monitoring 19 by observing the display 20 directly 17 discs 16 using AMS 19 A, B Advanced Mega Control 27 AMS 19 Automatic Music Sensor 19 C CD TEXT 15 Changing Disc Memo 31 Group Memo 36 Connecting 5 another CD player 9 Continuous Play 12 CONTROL A1 5 X-Fade Play 29 Custom Files Delete Bank 34 Disc Memo 30 Group File 35 Hit List 38 what you can do with 30 M Memo Scan 17 Memo Search 16 N, O No-Delay Play
Additional Information 43GB
AVERTISSEMENT Pour prévenir tout risque d’incendie ou d’électrocution, installez cet appareil à l’abri de la pluie ou de l’humidité. Pour prévenir tout risque de décharge électrique, abstenez-vous d’ouvrir le boîtier. Confiez l’entretien de votre lecteur exclusivement à un personnel qualifié. Cet appareil entre dans la catégorie des produits LASER DE CLASSE 1. L’etiquette indiquant l’appartenance de ce lecteur à la classe 1 est apposée au dos du boîtier.
TABLE DES MATIERES Préparation Déballage ............................................................................................................................... 4 Raccordement du système .................................................................................................. 4 A propos de la télécommande fournie ............................................................................. 5 Préparation de la télécommande .....................................................................
Préparation Déballage Assurez-vous que les accessoires suivants vous ont été livrés: • Câble audio (1) • Porte-livrets de CD (3) et étiquette (1) • Télécommande (1) • Piles AA (LR6) (3) Comment utiliser le porte-livrets de CD Le porte-livrets de CD vous aide à retrouver facilement un disque. Lorsque vous avez introduit un disque dans le lecteur, vous pouvez placer le livret du CD (remis avec tous les CD) dans le support fourni. Placez deux livrets de CD dos à dos dans une pochette.
Préparation Raccordement Branchement du cordon d’alimentation Lors du raccordement du câble audio, assurez-vous que le code de couleur des fiches correspond à celui des prises appropriées sur les différents appareils raccordés : le rouge (droit) sur le rouge et le blanc (gauche) sur le blanc. Assurez-vous de la qualité des connexions afin de prévenir les bruits de souffle et les parasites. Branchez le cordon d’alimentation sur une prise murale.
Préparation Désactivation de la réponse du lecteur aux signaux de commande à distance Pour utiliser la télécommande fournie avec un autre composant compatible avec le système de télécommande bidirectionnel, vous devez désactiver la réponse de ce lecteur aux signaux de commande à distance fournie qui l'accompagne.
Préparation Comment déplacer le curseur dans la fenêtre d’affichage de la télécommande 2 Pour déplacer le curseur vers le bas, poussez la touche de défilement rapide vers le bas comme illustré ci-dessous. Déplacez le curseur (”) sur “Set up” à l’aide de la touche de défilement rapide et appuyez ensuite sur la touche de défilement rapide.
Préparation 3 Déplacez le curseur sur “Memo loading” et appuyez ensuite sur la touche de défilement rapide. 2 Déplacez le curseur (”) sur “Set up” à l’aide de la touche de défilement rapide et appuyez ensuite sur la touche de défilement rapide. CD1 CD1 A l l memo d a t a Ma s t e r p l a y e r G r o u p memo Si vous raccordez un autre lecteur CD, l’indication “2nd player” s’affiche également.
Préparation Remarque Si vous effacez toutes les données mémorisées dans la télécommande (page 9), appliquez la procédure ci-dessus pour réactiver le rétro-éclairage. Effacement de toutes les données mémorisées dans la télécommande 1 Appuyez sur MENU.
Préparation Câbles de connexion indispensables • Câble audio (1) (Utilisez le câble fourni avec le lécteur à raccorder.) • Câble à minifiche monaural (2 broches) (1) (non fourni) Introduction des disques compacts 1 Vous pouvez introduire jusqu’à 300 disques compacts dans ce lecteur. Raccordez les lecteurs au moyen d’un câble audio (voir également “Raccordement” à la page 5). 2ND CD IN 2 I/u CDP-CX230, etc.
Préparation Le numéro du disque en position de chargement apparaît dans la fenêtre d’affichage. Si le disque comporte un mémo de disque (voir page 30), c’est le mémo du disque qui s’affiche au lieu du numéro du disque. Le numéro ou le mémo du disque change lorsque vous tournez le disque JOG. ALL DISCS CD1 20 DISC *DISC-20* Numéro de disque ou mémo de disque Vous pouvez classer les disques dans huit groupes différents au moyen de la fonction de fichier de groupe.
Opérations de base Lecture d’un disque compact 3 2 5 4/5 +100 MENU/NO DISC/CHARACTER YES ≠ AMS ± STANDBY CONTINUE SHUFFLE PROGRAM REPEAT TIME/TEXT GROUP 1 GROUP 2 GROUP 3 GROUP 4 HIT LIST PUSH ENTER PUSH ENTER I/u TIMER GROUP 5 GROUP 6 GROUP 7 GROUP 8 EASY PLAY MEMO SEARCH CHECK CLEAR MEGA CONTROL X-FADE NO DELAY FADER GROUP FILE OFF PLAY KEYBOARD OPEN/ CLOSE DISC EJECT • Reportez-vous à la page 5 pour les informations relatives au raccordement.
Opérations de base 5 Lorsque vous mettez le lecteur hors tension Le lecteur mémorise le dernier disque reproduit ainsi que le mode de lecture (continue, aléatoire ou programmée (voir pages 21 et 22)). Lorsque vous remettrez ensuite le lecteur sous tension, il sera prêt à reproduire le même disque dans le même mode de lecture. Poussez sur le disque JOG ou appuyez sur · pour démarrer la lecture.
Lecture de disques compacts Pour vérifier un autre disque Utilisation de la fenêtre d’affichage La fenêtre d’affichage vous permet de contrôler une série d’informations concernant le disque sélectionné. MENU/NO TIME/TEXT JOG Appuyez sur la touche DISC SKIP +/– de la télécommande en mode d’arrêt pour sélectionner le disque à vérifier. Le nombre total de plages et la durée totale de lecture du disque sélectionné s’affichent momentanément.
Lecture de disques compacts Vérification des informations des disques CD TEXT Les disques CD TEXT comportent des informations telles que le titre du disque ou le nom des artistes. Elles sont enregistrées dans une zone libre sur laquelle ne se trouve aucune information sur un disque normal. La fenêtre d’affichage indique les informations CD TEXT du disque de façon à ce que vous puissiez vérifier le titre du disque en cours, de la plage en cours et le nom de l’artiste.
Lecture de disques compacts Les caractères qui sont affichés comme le premier caractère. Localisation d’un disque déterminé JOG +100 ≠ AMS ± ABCDEFGHIJKLMNOPQRSTUVWX YZ0123456789 Si “NOT FOUND” apparaît dans la fenêtre d’affichage pendant la saisie du premier caractère à l’aide du disque ≠ AMS ±, cela signifie qu’aucun disque n’a été identifié avec ce caractère.
Lecture de disques compacts Localisation directe d’un disque avec la télécommande Localisation directe d’un disque en observant la fenêtre d’affichage de la télécommande 1 Déplacez le curseur (”) sur le disque voulu à l’aide de la touche de défilement rapide.
Lecture de disques compacts Localisation d’un disque à l’aide des mémos de disque de la télécommande Vous pouvez rechercher et localiser un disque déterminé au moyen des mémos de disque de la télécommande. Avant d’appliquer la procédure ci-dessous, n’oubliez pas de charger les données des mémos de disque dans la mémoire de la télécommande (voir page 7). 1 Appuyez sur MENU.
Lecture de disques compacts Localisation d’une plage déterminée ou d’un passage sur une plage PLAYER SELECT Vous pouvez localiser rapidement une plage pendant la lecture d'un disque à l'aide du disque ≠ AMS ± (AMS: détecteur automatique de musique) ou des touches =/+ de la télécommande. Vous pouvez également localiser un passage spécifique d’une plage pendant la lecture d’un disque.
Lecture de disques compacts Localisation d’une plage déterminée ou d’un passage sur une plage en observant la fenêtre d’affichage de la télécommande 1 En mode d’arrêt, appuyez sur TRACK. CD1 D i sc123 * D I SC - 1 2 3 * 1 . ( TRACK 1 ) 2 . ( TRACK 2 ) 2 Déplacez le curseur (”) sur la plage voulue à l’aide de la touche de défilement rapide. CD1 3. 4. 5. 6. 3 ( TRACK 3 ) ( TRACK 4 ) ( TRACK 5 ) ( TRACK 6 ) Appuyez sur la touche de défilement rapide ou sur ·.
LectureGetting de disques Playing compacts CDs Playing CDs Started Lecture répétée Vous pouvez activer la lecture répétée de disques ou des plages dans n’importe quel mode de lecture. REPEAT +100 Lecture des plages dans un ordre quelconque (lecture aléatoire) Vous pouvez programmer le lecteur pour qu’il “mélange” les plages et les reproduise dans un ordre aléatoire. Le lecteur mélange toutes les plages de tous les disques ou d’un disque que vous spécifiez.
Lecture de disques compacts Lecture de toutes les plages de tous les disques dans un ordre aléatoire 1 Appuyez sur SHUFFLE. Les indications “ALL DISCS” et “SHUFFLE” apparaissent dans la fenêtre d’affichage. 2 Poussez sur le disque JOG ou appuyez sur ·. La lecture aléatoire ALL DISCS démarre. L’indication “ ” apparaît dans la fenêtre d’affichage pendant que le lecteur “mélange” les disques ou les plages.
LectureGetting de disques Playing compacts CDs Playing CDs Started 4 Poussez sur le disque JOG. Numéro de la plage en cours de programmation 20 PROGRAM1 CD1 DISC 20 TRACK STEP 3 1 Disque en cours de programmation 5 6 Ordre de lecture Pour programmer d’autres disques/plages, appliquez la procédure suivante : Vérification de la séquence de programmation Vous pouvez vérifier votre programme musical avant ou après d’en démarrer la lecture. Appuyez sur CHECK.
Lecture de disques compacts Création d’un programme musical au moyen de la télécommande Z 1 Appuyez sur PROGRAM jusqu’à ce que le numéro de programme voulu (PROGRAM 1, 2 ou 3) apparaisse dans la fenêtre d’affichage. 2 Appuyez sur DISC. 20 PROGRAM1 CD1 DISC-[ PLAYER SELECT MENU TRACK MENU Touche de défilement rapide · _] BACK 3 PUSH ENTER Appuyez sur la touche numérique correspondant au disque de votre choix.
LectureGetting de disques Playing compacts CDs Playing CDs Started Création d’un programme musical tout en observant la fenêtre d’affichage de la télécommande Z 5 Vous pouvez créer dans la mémoire de la télécommande huit programmes comprenant jusqu’à 32 phases tout en observant la fenêtre d’affichage de la télécommande. 1 Sélectionnez le disque voulu en poussant la touche de défilement rapide vers le haut ou vers le bas.
Lecture de disques compacts Lecture du programme que vous avez créé en observant la fenêtre d’affichage de la télécommande Z 1 Appuyez sur MENU. Remarque Le programme musical que vous venez de créer à l’aide de la télécommande est mémorisé dans le lecteur sous PROGRAM 1. Faites attention que le PROGRAM 1 que vous aviez créé précédemment est effacé.
Playing CDs LectureGetting de disques compacts Playing CDs Started Commander un autre lecteur CD (Advanced Mega Control) Cet appareil peut commander un second lecteur CD (voir “Raccordement d’un autre lecteur CD” à la page 9). Même lorsqu’un second lecteur CD est raccordé, les commandes des deux appareils restent opérationnelles. Si vous appuyez sur la touche de lecture de l’un des deux appareils, le lecteur en train de fonctionner s’arrête et le lecteur libre démarre.
Lecture de disques compacts Téléchargement des mémos de disque du second lecteur CD Si le second lecteur CD est doté de la fonction de mémo de disque (voir page 30), vous pouvez télécharger les mémos de disque du second lecteur CD dans la mémoire de ce lecteur et les afficher sur ce lecteur. 1 Appuyez sur MENU/NO. 2 Tournez le disque JOG jusqu’à ce que l’indication “LOAD 2ndMEMO?” clignote dans la fenêtre d’affichage.
Playing CDs LectureGetting de disques compacts Playing CDs Started 3 Lecture alternée (lecture alternée sans transition/ enchaînée) Pour désactiver la lecture alternée sans transition/ enchaînée Si vous raccordez un second lecteur, vous pouvez reproduire alternativement des plages de ce lecteur et ceux du second lecteur dans n’importe quel mode de lecture (voir “Raccordement d’un autre lecteur CD” à la page 9).
Mémorisation d’informations relatives aux CD (fichiers personnalisés) Que pouvez-vous faire avec les fichiers personnalisés Identification des disques (mémo de disque) Le lecteur peut mémoriser trois types d’informations désignés “fichiers personnalisés” pour chaque disque. Lorsque vous avez mémorisé des fichiers personnalisés pour un disque, le lecteur rappelle automatiquement les informations que vous avez mémorisées chaque fois que vous sélectionnez ce disque.
Mémorisation d’informations relatives aux CD (fichiers personnalisés) 4 Tournez le disque JOG jusqu’à ce que le caractère voulu apparaisse dans la fenêtre d’affichage. Le curseur disparaît et le premier espace pour le mémo de disque se met à clignoter. Lorsque vous tournez le disque JOG dans le sens horaire, les caractères apparaissent dans l’ordre suivant. Tournez le disque JOG dans le sens antihoraire pour les faire défiler dans l’ordre inverse.
Mémorisation d’informations relatives aux CD (fichiers personnalisés) Identification des disques en observant la fenêtre d’affichage de la télécommande Z 4 PLAYER SELECT MENU TRACK Appuyez sur CAPS pour sélectionner le type de caractère voulu. Chaque fois que vous appuyez sur cette touche, le type de caractère change de façon cyclique dans l’ordre suivant: lettres majuscules (AB), lettres minuscules (ab) et chiffres (12).
Mémorisation d’informations relatives aux CD (fichiers personnalisés) 6 7 Appuyez sur une autre touche numérique ou sur la touche MEMO INPUT / pour passer à l’espace suivant et répétez ensuite les étapes 4 à 6 pour introduire d’autres caractères. Appuyez sur la touche de défilement rapide ou ENTER lorsque vous avez terminé la saisie des caractères. Le message “Transmit to SET?” apparaît dans la fenêtre d’affichage.
Mémorisation d’informations relatives aux CD (fichiers personnalisés) Mémorisation des informations des fichiers personnalisés au moyen d’un clavier Mémorisation de plages spécifiques (bloc de suppression) Vous pouvez mémoriser le mémo de disque pour chaque disque au moyen d’un clavier* d’ordinateur IBM ou compatible (non fourni). Vous pouvez supprimer les plages jugées indésirables et ne mémoriser que les plages que vous voulez écouter.
Mémorisation d’informations relatives aux CD (fichiers personnalisés) Identification des groupes (mémo de groupe) Groupement de disques (fichier de groupe) Si vous estimez qu’un trop grand nombre de disques complique la recherche d’un disque particulier, sachez que ce lecteur est doté d’une fonction qui vous permet de classer les disques en huit groupes. Un disque ne peut être classé que dans un seul groupe.
Mémorisation d’informations relatives aux CD (fichiers personnalisés) Changement du mémo de groupe 1 2 Exécutez les étapes 1 et 2 de la procédure “Identification des groupes” à la page 35 pour sélectionner le mémo de groupe que vous voulez modifier. Lecture de disques dans un groupe (lecture de groupe) Vous pouvez activer la lecture continue ou aléatoire dans un groupe. 1 Tournez le disque ≠ AMS ± pour déplacer le curseur sur la position que vous voulez modifier.
Mémorisation d’informations relatives aux CD (fichiers personnalisés) Vous pouvez spécifier le disque à reproduire lorsque vous démarrez la lecture de groupe 1 Avant de démarrer la lecture, appuyez sur MENU. Après avoir sélectionné le groupe, tournez le disque JOG pour sélectionner le disque et poussez ensuite sur le disque JOG ou appuyez sur ·.
Mémorisation d’informations relatives aux CD (fichiers personnalisés) Mémorisation de vos plages préférées (liste des hits) Vous pouvez mémoriser les plages que vous écoutez le plus fréquemment et sélectionner immédiatement ces plages en contrôlant les numéros ou les titres des plages (voir page 39) dans la liste des hits. Vous pouvez programmer 32 plages dans la liste des hits.
Mémorisation d’informations relatives aux CD (fichiers personnalisés) La liste des hits reste en mémoire jusqu’à ce que vous l’effaciez 3 Même si vous remplacez des disques, la liste des hits que vous avez créée reste enregistrée dans la mémoire. Le lecteur substitue par conséquent les nouvelles plages dans la liste des hits.
Informations complémentaires Transport Précautions Sécurité • Lorsque vous transportez le lecteur, appuyez sur OPEN pour retirer tous les disques du lecteur et mettez-le hors tension. • Attention — L’utilisation d’instruments optiques avec cet appareil augmente le risque de blessures aux yeux. • Si des liquides ou des solides venaient à tomber dans le châssis, débranchez le lecteur et faites-le vérifier par un personnel qualifié avant de le remettre en service.
Informations complémentaires Dépannage Spécifications Si vous rencontrez l’une des difficultés suivantes lors de l’utilisation du lecteur, consultez ce guide de dépannage pour tenter de remédier au problème survenu. Si le problème persiste, consultez votre revendeur Sony. Lecteur de disques compacts Il n’y a pas de son. /Vérifiez si le lecteur est correctement raccordé. /Assurez-vous que l’amplificateur fonctionne correctement. La lecture du disque ne démarre pas.
Index Lecture alternée sans transition (No-Delay) 29 Lecture alternée enchaînée (X-Fade) 29 Lecture continue 12 Lecture par programmateur 26 Liste des hits 38 Localisation avec l’AMS 19 de disques 16 directe 17 d’un passage spécifique 19 d’une plage spécifique 19 en contrôlant le son 19 en observant la fenêtre d’affichage 20 Index A Advanced Mega Control AMS 19 27 B Bloc de suppression 34 C CD TEXT 15 Changement mémo de disque 31 mémo de groupe 36 CONTROL A1 5 M, N, O D Manipulation des CD 40 Mémo