3-865-652-11 (1) FM/AM Compact Disc Player Operating Instructions Owner’s Record The model and serial numbers are located on the bottom of the unit. Record the serial number in the space provided below. Refer to these numbers whenever you call upon your Sony dealer regarding this product. Model No. CDX-2250␣ ␣ Serial No. For installation and connections, see the supplied installation/connections manual.
Warning Welcome ! This equipment has been tested and found to comply with the limits for a Class B digital device, pursuant to Part 15 of the FCC Rules. These limits are designed to provide reasonable protection against harmful interference in a residential installation. This equipment generates, uses, and can radiate radio frequency energy and, if not installed and used in accordance with the instructions, may cause harmful interference to radio communications.
Table of Contents Location of controls ................................................. 4 Getting Started Resetting the unit ................................................ 5 Setting the clock .................................................. 5 Additional Information Precautions ........................................................... 9 Maintenance ....................................................... 10 Dismounting the unit ....................................... 11 Specifications ...............
Location of controls MODE BTM SOUND SEEK/AMS SENS DSPL OFF 1 2 D - BASS SOURCE OFF REPEAT SHUF 1 2 3 4 5 6 CDX-2250 Refer to the pages for details.
Getting Started Setting the clock The clock has a 12-hour digital indication. Example: To set the clock to 10:08 Resetting the unit Before operating the unit for the first time or after replacing the car battery, you must reset the unit. Press the reset button with a pointed object, such as a ball-point pen. 1 Press (DSPL) during operation. If the POWER SELECT function is set to “ON,” go to step 2. If it is set to “OFF,” set to “ON” (page 8). 2 Press (DSPL) for two seconds.
Locating a specific track — Automatic Music Sensor (AMS) CD Player During playback, push the SEEK/AMS control up or down and release for each track you want to skip. To locate succeeding tracks Listening to a CD SEEK/AMS To locate preceding tracks Insert a CD. Playback starts automatically. Locating a specific point in a track — Manual Search Label side up During playback, push the SEEK/AMS control up or down and hold for about two seconds. Release when you have found the desired point.
Memorizing only the desired stations Radio You can store up to 6 stations on each band (a total of 18 for FM I, FM II, and FM III, and 6 for AM) in the order of your choice. Memorizing stations automatically 1 Press (SOURCE) repeatedly to select the tuner. 2 Press (MODE) repeatedly to select the band. 3 Push the SEEK/AMS control up or down to tune in the station that you want to store on the number button. 4 Press and hold the desired number button ((1) to (6)) until “MEM” appears.
If you cannot tune in a preset station Push and release the SEEK/AMS control up or down to search for the station (automatic tuning). Scanning stops when the unit receives a station. Push the SEEK/AMS control up or down repeatedly until the desired station is received. Note If the automatic tuning stops too frequently, press (SENS/BTM) repeatedly until “LCL” (local seek mode) is displayed. Only the stations with relatively strong signals will be tuned in.
Changing the sound and beep sound Additional Information Boosting the bass sound — D-bass Level You can enjoy a clear and powerful bass sound. The D-bass function boosts the low frequency signal with a sharper curve than conventional bass boost. You can hear the bass line more clearly even while the vocal remains at the same volume. You can emphasize and adjust the bass sound easily with the D-BASS control. This is similar in effect to an optional subwoofer system.
Do not expose the discs to direct sunlight or heat sources such as hot air-ducts, or leave them in a car parked in direct sunlight where there can be a considerable rise in temperature inside the car. Before playing, clean the discs with an optional cleaning cloth. Wipe each disc from the center out. Do not use solvents such as benzine, thinner, commercially available cleaners, or antistatic spray intended for analog discs.
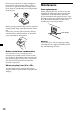
Dismounting the unit 1 Insert the supplied tool between the unit and the frame, and rotate 90° to release the hidden mounting spring. Repeat on the opposite side and remove the frame. 2 Insert a flathead screwdriver between the bracket and mounting spring. Gently pry the spring toward the unit while pulling the unit out a little. Repeat on the opposite side and remove the unit. 10 mm (13/32 in.) 4 mm (3/16 in.
Specifications AUDIO POWER SPECIFICATIONS POWER OUTPUT AND TOTAL HARMONIC DISTORTION 14 watts per channel minimum continuous average power into 4 ohms, 4 channels driven from 20 Hz to 20 kHz with no more than 1 % total harmonic distortion. Other specifications CD player section System Signal-to-noise ratio Frequency response Wow and flutter Laser Diode Properties Material Wavelength Emission Duration Laser output power Outputs GaAlAs 780 nm Continuous Less than 44.
Troubleshooting guide The following checklist will help you remedy the problems you may encounter with your unit. Before going through the checklist below, check the connection and operating procedures. General Problem Cause/Solution No sound. •Rotate the dial in a clockwise direction to adjust the volume. •Set the fader control to the center position for two-speaker systems. The contents of the memory have been erased. • The power cord or battery has been disconnected.
Error displays The following indications will flash for about five seconds. Display Cause Solution A CD is dirty or inserted upside down. Clean or insert the CD correctly. The CD player cannot be operated because of some problem. Press the reset button or 6. If the above-mentioned solutions do not help improve the situation, consult your nearest Sony dealer.
Sony Corporation Printed in Korea