S ONY 3-856-118-41 (1) @ FM/AM Compact Disc Player Operating Instructions __Wei Owner's Record The mixed and serial numbers are located on the bottom of the rit. Record the serial number in the space provided below. Refer 10 these numbers whenever you call upon your Sony dealer regarding this product. Model No. CD X-CS10DSP Serial No. For installation and connections, see the supplied installation /connections manual.
Warning “This equipment has been tested and found to comply with the limits for a Class B digital device, pursuant to Part 15 of the FCC Rules. These limits are designed to provide reasonable protection against harmful interference in a residential installation. This equipment generates, uses, and
Table of Contents This Unit Only Getting Started Resetting the unit Detaching the front panel Preparing the rotary cremate Setting the clock Player Listening toa €D Playing a CD in various modes Creating a program ~—
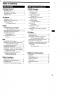
Resetting the unit Before operating the unit for the first time or after replacing the car battery, you must reset the unit. Press the reset button with a pointed object, such as 3 ball-point pen. DE 1 Reset button Nate When you connection the pore supply card to the i or reset the wit, wait fur about 10 seconds before you insert @ disc. Do ot insert & disc within hes 10 seconds, otherwise, the unit will wof be reset.
Setting the clock The clock has a 12-hour digital indication:, Example: Set the clock to 10:08 1 Press (BHIFD), then press () (SET UP). SET oo £ Press (D) SET “The hoer digit flashes. @ Set the hour, Food) Togo forward o —eos 1} tobacco SET . Nikon © Tress (D BET MYTH e SHEREE The minute digits lash. © Set the minute. 1o go forward 1090 back VL 2 press (SAD. 19:08 The clock stars.
Locating a specific point in a track ~— Manual Search During playback, press and hold either side of (SEVERANCE. Release the button when you hive found the desired paint. v § Yo search forward @ x| Yo search backward Note w1y appears in the display, that means you have reached the beginning o the end of the disc and you carrot go any further. Playing a CD in various modes You can play CDs in various modes: +INTRO (Intro Scan) lets you play the first 10 seconds of all the tracks.
3 Press repeatedly until the desired program appears. Program 1 playback Program 2 playback co ~] PEM 2 + Programs 1 and 2 playback LBa 142 + Normal playback .EaM oFF Program Play starts. To go back to the normal playback mode, select "PGM OFF” in step 3 above. Note “NO Data” appears in the display if mo track is stored in the program; Erasing the entire program 1 Press (SHED), then press D PLAY MODE] for two second: “P 17 shows Program 1 is defected. 2 Press (T repeatedly until “DEL” appears.
Erasing the tracks in the program 1 Press (SHIFT), then press (3) (LAY MODE} for two seconds. O “P 1" saws Program 1 is selected, o select Program 2, press (2 repeatedly until *P 2” appears. 2 press select the track you want to erase. Track sot number e LU BEEP ‘The track currently registered in 10t 6 of Program 1. 3 Press (5) (ENTER) for two seconds. When you erase a track from a soot numbs, the succeeding tracks shift up o fill the gap. 4 Yo continue erasing tracks, repeat steps 2nd 3.
Note If you try 1o store anther station on the same waterbed button, the previously stored station will be erased Receiving the memorized stations 1 press repeatedly to select the desired band. 2 Press the number button (3 to (7)) momentarily where the desired station is stored. if you cannot tune in a preset station Press either side of momentarily to search for the station {automatic ting. Scanning stops when the unit receives a station.
Displaying the station name Press during radio reception, FM1 3 KISSER Bach time you press (D8FL), the item changes as follows: E Station name"—# Frequency —» Clock ] * If the Station mare is nof stored, “NO Awe* appears in the display for one second. Erasing the station name 1 Tune in any station and press for two seconds. 2 press for two secants. 3 pass select the name that you want to erase. 4 Press (5) (ENTER) for two seconds. The name is erased.
3 press (D or repeatedly until the desired surround menu appears. SUR Hall 4 Press (STORED) for two seconds. SUR Effect 5 press adjust the level. You can adjust the level from 0t 10. Increase the level to enjoy more enhanced effects. SUR Effect B 6 Press (SIGURD) for two seconds.
Adjusting the listening position 1 press repeatedly unfit “POS” appears. 2 Press defect the desired listening position appears. 3 press for two seconds. 4 press adjust the center of the sound field to the left or right. Then set the center of the sound field. 4 45 Center moves ta the R {right). Neuter moves to the L (left), B Press back to select the listening position, press (3 6 Press adjust the center of the sound field to the front or rear. + 2o\ Center moves to the F (front).
4 press select the desired cutoff frequency. 125 Hz* — 157 Hz — 198 Hz * Factory-set frequency 5 Press (SOURS) for two seconds. To adjust volume of the suborder, press (on). Adjusting the volume of the bass and treble — Digital Tone Control The COX-BIOSPHERE has a bile-in DSP IC that uses digital progressing to create clearer adjustments to the bass and treble volume than analog circuits, _ The sharper tone slopes sed in this unit produce more obvious and effective tone responses.
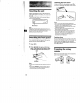
Using the rotary remote The rotary remote works by pressing buttons and /or rotating controls. You can control the optional CD or MD changer with the rotary remote. By pressing the button {the SOURCE button) 14 Every time you press (SOURCE), the source changes as follows: 01 > EMZ —s AM —» CDT =0 CD2 ~> MDT v MO2 s TV" s AUK® {video} * When the optional TV tater is connected. Tip Where the POWER SELECT switchback s set to position @, ‘you can trr o this unit by pressing (ARSED on the Notary remote.
1f you need'to mount the rotary remote on the sight of the steering column, you can reverse the operative direction of the controls. Press (FLUB) for twa seconds while pushing the VOL control. Tip Yau can caner the operation direction of controls with the uni, Adjusting the sound characteristics You can adjust bass, treble, balance and fared. Each source can store the bass and treble level respectively. T Select the item you want to adjust by pressing repeatedly.
You can control changers and MD changers with this unit. Playing Press (SOURCE) until the desired changer appears. CI/MI playback starts. Changing the displayed items ‘When changer is connected, ail the tracks play from the beginning. Each time you press (DB PLY during CD/MD playback, the item changes as follows: Elapsed playback time Disc name* Track name ok *1 f you have not labeled the D, “NO Name” appears in ihe display. If there is o prerecorded name for Name" appears in the display.
saying tracks repeatedly Repeat Play ou can select: REP 1 to repeat a track. REP 2 to repeat a disc. REP 3 to repeat all the discs in the current changer. Bering playback, press (SHAFT. Then press (2} (PLAY MODE] repeatedly until “REP" appears. Crass (D) repeatedly until the desired setting appears, Enema o REP 2 4 REP 3 REP OFF Repeat Play starts. g0 nick to the normal playback mode, «ect “REP OFF” in step 2 above.
Playing the stored program Changing the disc order in the changer will not affect program memory play. You can select: MPG 1 to play Program 1. MPG 2 to play Program 2. MPG 142 to play Programs 1 and 2 1 Press D). 2 Press (3) (PLAY MODE) repeated until “PGM" appears. 3 Press (D repeatedly until the desired program appears. E PGM I3 PGM 2 PGM 1+2PGM OFF d Program Play starts. To go back to the normal playback mode, select “PGM OFF” in step 3 above.
arsing the tracks in the program Press (SHIELDS, then press (5) (PLAY MODE] for two seconds. ST PELE “P 1~ shows Program 1 s selected. 1f you have labeled the disc, the bank edit mode appears. Press (3) (PLAY MODE) to display “P 1" above. To select Program 2, press (2 () repeatedly until “P 27 appears. Press select the track you want to erase. Track sot number C0Z g spat s . B33P The track currently registered in slot 6 of Program 1. Press (B (ENTER) for twa seconds.
Displaying the disc memo Press during €O playback. COT 5 == 1 SCHUBERT) Each time you press during CD playback, the item changes as follows: Elapsed playback time Disc name. R Erasing the disc memo 1 Press (SOURCE) to select the CD changer (for example CD2 or CD. 2 press for two seconds. 3 Press for two seconds. 4 Press select the name that you want ta erase. 5 press (5 (ENTER) for two seconds. The name s erased. Repeat steps 4 and 5 if you want to erase other names.
Playing the.specific tracks only You can defect: +BANK ON to play the tracks with the “PLAY” setting +BANK INV (Inverse) to play the tracks with the “SKIP” setting. 1 During playback, press (SHIED), then press (3) (PLAY MODE) repeatedly unit “BANK appears. 2 Press repeatedly until the desired setting appears. [: BANK ON —» BANK INV BANK OFF] Playback starts from the track following the current one. To go back to the normal playing mode, select “BANK OFF” in step 2 above.
Memorizing only the desired TV channels You can store up to 10 channels on the number buttons in the order of your chalice. T Press (SOURCE) repeatedly until “TV appears. 2 Press either side of (SEE RAMS) to tune in the TV program that you want to stare on the number button. 3 Keep the desired number button (D) to (38} pressed for two seconds until you hear a beep tone. The number butter indication appears in the display.
Watching the TV or video while fastening simultaneous Play The simultaneous play function does not quark while you are listening to the radio. 1 press for two seconds. SML 2 press (D SHL “hike 77 3 press repeatedly to select SML 4 Press @ SML Mg 5 Press repeatedly to select a TV or video. SHL M3 6 Press for two seconds. Simultaneous Play starts. Returning 1o the normal mode To cancel the the steps above and select —" in step 3. Yo cancel the TV or video, do the steps above and select “~ in step 5.
Before playing, clean the discs with an optional cleaning cloth. Wipe each disc from the center out. Do ot use solvents such as benzine, thinner, commercially available cleaners or anti static spray intended for analog discs. Notes on moisture condensation On & rainy day or in a very damp area, moisture may condense on the lenses inside the CD player. Should this occur, the unit will not operate properly. In this case, remove the disc and wait for about an hour until the moisture evaporates.
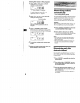
‘ R — Location of controls refer 1o the pages for details.
Location of controls Optional wireless [2113] remote (RM-X41) The buttons of the wireless remote work the same functions as those on this unit. 1] OFF button 6] MUTE button DIR button (3 buttons does not work with this unit. (3] SOURCE button SEAMS button PRESETTING button You antibiotic do the manual search and marl taming with fhe rote.
Specifications AUDIO POWER SPECIFICATIONS POWER OUTPUT AND TOTAL HARMONIC DISTORTION 15 watts per channel minimum continuous average power into 4 ohms, 4 channels driven from kHz with no more than 1 % total harmonic distortion.
Troubleshooting guide The following check will help you remedy the problems that you may encounter with your unit. Before going through the checklist below, check the connection and aerating procedures. General Problem Irresolution No sound « Adjust the volume with »Set the fared control ta the center position for two-speaker systems. The contents of the merry have been erased. « The power cord or battery has been disconnected. « The reset button has been pressed — Store again into the memory.
Error displays (when the optional CO/MD changer is connected) ‘The following indications will flash for about five seconds, and an alarm sound will be heard. Display Cause Solution N The disc magazine s not inserted in Insert the disc magazine with discs O Mag the CD/MD changer. into the CD/MD changer. NO Disc Error” Blank™ Push Reset Not Ready High Temp No disc is inserted in the CD/MD changer. A C Dis dirty ar inserted upside roved. = An MD does not play because of some problem.
B 30 Index A Automatic Music Sensor (AMS) 5,16 Automatic tuning 9 Auto Scroll 16 Balance 15 Bass 13,15 Bank Play 20 Beep tone 15 Best Tuning Memory (BTM) 8,21 < Caution alarm 4 CD playback 5,16 €D program memory 6,17 Clock 5 D Digital Signal Processor (DSP) 10 Digital Tone Control 13 Dimmer 15 Direct disc selection 16 Disc Memo 19 Disc Scan 16 Disc Sound Memory (DSM) 11 Display 5,9, 10,16, 20 Dual information 15 E Effect 10,11 F, G, H Wader 12,15 Front panel 4 Fuse 24 LLK Urination coral 15 Into Scan &, 16