3-263-561-31 (2) CD Radio Cassette-Corder Operating Instructions page 2GB GB Manual de instrucciones página 2ES ES CFD-E90 CFD-E90L © 2004 Sony Corporation
Warning About this manual To prevent fire or shock hazard, do not expose the player to rain or moisture. The instructions in this manual are for the CFDE90 and CFD-E90L. Before you start reading, check your model number. The CFD-E90L is the model used for illustration purpose. To avoid electrical shock, do not open the cabinet. Refer servicing to qualified personnel only. Warning Do not install the appliance in a confined space, such as a bookcase or built-in cabinet.
Table of contents Basic Operations Basic Operations Playing a CD .................................................. 4 Listening to the radio ...................................... 6 Playing a tape ................................................. 8 Recording on a tape ...................................... 10 The CD Player Using the display .......................................... 12 Locating a specific point in a track .............. 12 Playing tracks repeatedly (Repeat Play) ..........................
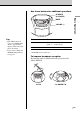
Basic Operations Playing a CD 3 1, 2 Connect the supplied mains lead (see page 23). 1 Press ZPUSH OPEN/CLOSE down to open the CD compartment and place the CD on the CD compartment. With the label side up 2 Close the lid of the CD compartment. 3 Press u. Display The player turns on (direct power-on) and plays all the tracks once.
Use these buttons for additional operations u x VOLUME +, – Jog dial OPERATE (or POWER) To Do this adjust the volume Press VOLUME +*, – (VOL +, – on the remote). stop playback Press x. pause playback Press u*. Press the button again to resume play after pause. go to the next track Turn the jog dial clockwise. (On the remote, press >.) Basic Operations ZPUSH OPEN/CLOSE go back to the previous track Turn the jog dial counterclockwise. (On the remote, press ..
Listening to the radio 1 2 Connect the supplied mains lead (see page 23). 1 Press RADIO•BAND•AUTO PRESET until the band you want appears in the display (direct poweron). Display Each time you press the button, the band changes as follows: CFD-E90: “FM” t “AM” CFD-E90L: “FM” t “MW” t “LW” 2 Hold down TUNE + or TUNE – until Indicates an FM stereo the frequency digits begin to change broadcast in the display. The player automatically scans the radio frequencies and stops when it finds a clear station.
Use these buttons for additional operations OPERATE (or POWER) VOLUME +, – Tips • If the FM broadcast is noisy, press MODE until “Mono” appears in the display and the radio will play in monaural. • If you need to change the AM/MW tuning interval, see page 24. To Press adjust the volume VOLUME +*, – (VOL +, – on the remote) turn on/off the radio OPERATE (or POWER, see page 2) Basic Operations MODE * VOLUME + has a tactile dot. To improve broadcast reception Reorient the aerial for FM.
Playing a tape 1 2 Connect the supplied mains lead (see page 23). 1 2 With the side you want Press xZ to open the tape to play facing you compartment and insert a recorded tape. Use TYPE I (normal) tape only. Close the compartment. Press n. The player turns on (direct power-on) and starts playing.
Use these buttons for additional operations VOLUME +, – m, M xZ X To Press adjust the volume VOLUME +*, – (VOL +, – on the remote) stop playback xZ fast-forward or rewind the tape m or M pause playback X Press the button again to resume play after pause. eject the cassette xZ turn on/off the player OPERATE (or POWER, see page 2) Basic Operations OPERATE (or POWER) * VOLUME + and n have a tactile dot.
Recording on a tape 1 3 Connect the supplied mains lead (see page 23). 1 2 With the side you want to Press xZ to open the tape compartment and insert a blank tape. record on facing you Use TYPE I (normal) tape only. Select the programme source you want to record. To record from the CD player, insert a CD (see page 4) and press x on the CD section. To record from the radio, tune in the station you want (see page 6).
3 Press z to start recording (n is depressed automatically). Basic Operations Use these buttons for additional operations OPERATE (or POWER) MODE n xZ X Tips • Adjusting the volume or the audio emphasis (see page 18) will not affect the recording level. • If the AM/MW/LW programme makes a whistling sound after you've pressed z in step 3, press MODE to select the position of ISS (Interference Suppress Switch) that decreases the noise the most. • For the best results, use the AC power as a power source.
The CD Player Using the display You can check information about the CD using the display. DISPLAY Locating a specific point in a track You can quickly find a specific point in a track while playing a CD. m M Checking the total track number and playing time Press DISPLAY in stop mode. Total playing time Total track number Checking the remaining time Press DISPLAY while playing a CD.
Playing tracks repeatedly (Repeat Play) To cancel Repeat Play Press MODE until “REP” disappears from the display. You can play tracks repeatedly in normal, shuffle or programme play modes (see page 14). u x 1 Press x. “Cd” appears in the display. 2 Proceed as follows: MODE The CD Player Jog dial To repeat Do this a single track 1 Press MODE until “REP 1” appears. 2 Turn the jog dial to select the track that you want to repeat. 3 Press u. all the tracks 1 Press MODE until “REP ALL” appears.
Playing tracks in random order (Shuffle Play) Creating your own programme (Programme Play) You can play tracks in random order. You can arrange the playing order of up to 20 tracks on a CD. u x MODE ENTER Jog dial 1 Press x. “Cd” appears in the display. 2 Press MODE until “SHUF” appears in the display. 3 Press u to start shuffle play. To cancel Shuffle Play Press MODE until “SHUF” disappears from the display. u MODE 1 Press x. “Cd” appears in the display.
To cancel Programme Play Press MODE until “PGM” disappears from the display. To change the current programme Press x once if the CD is stopped and twice if the CD is playing. The current programme will be erased. Then create a new programme following the programming procedure. The CD Player To check the order of tracks before play Press ENTER. Every time you press the button, the track number appears in the programmed order.
The Radio Presetting radio stations You can store radio stations into the player’s memory. You can preset up to 30 radio stations (CFD-E90), 20 for FM and 10 for AM in any order or 40 radio stations (CFDE90L), 20 for FM and 10 for MW and LW in any order. RADIO BAND AUTO PRESET 16GB Jog dial ENTER 1 Press RADIO•BAND•AUTO PRESET to select the band. 2 Hold down RADIO•BAND•AUTO PRESET for 2 seconds until “AUTO” appears in the display. 3 Press ENTER.
Playing preset radio stations Once you've preset the stations, use the jog dial on the player or PRESET + , – on the remote to tune in to your favourite stations. Jog dial 1 Press RADIO•BAND•AUTO PRESET to select the band. 2 Turn the jog dial to tune in the stored station. The Radio RADIO BAND AUTO PRESET On the remote 1 Press BAND until the band you want appears in the display. 2 Press PRESET + , – to tune in a stored station.
The Audio Emphasis Selecting the audio emphasis (MEGA BASS) You can adjust the audio emphasis of the sound you are listening to. MEGA BASS Reinforcing the bass sound Press MEGA BASS. “MEGA BASS” appears in the display. To return to normal sound, press the button again.
The Timer 3 Setting the clock “– –:– –” indication appears in the display until you set the clock. CLOCK/SLEEP/TIMER ENTER Jog dial Press ENTER. The clock starts from 00 seconds. Tip The time display system: CFD-E90: 12-hour system CFD-E90L: 24-hour system The Timer Before you set the clock, connect the power source (see page 23). 1 Hold down CLOCK/SLEEP/TIMER until “CLOCK” appears in the display. The hour digit flashes. 2 Turn the jog dial to set the current hour. Then press ENTER.
Waking up to music 4 You can wake up to music or a radio programme at a preset time. Make sure you have set the clock (“Setting the clock” on page 19). Set the timer to the hour and the minutes you want the music to go off. (Do as step 3.) 5 Select the music source (“Cd” or “RAdIO”) by turning the jog dial, then press ENTER. 6 Turn the jog dial to set the volume, then press ENTER. 7 Press STANDBY. The indication lights up and the power goes off.
Falling asleep to music You can set the player to turn off automatically after 10, 20, 30, 60, 90, and 120 minutes, allowing you to fall asleep while listening to music. CLOCK/SLEEP/TIMER ENTER Jog dial The Timer To use the player before a timer playback starts Just turn on the player, and then you can use it. If you turn off the player before the preset time, timer playback will start at the preset time.
Falling asleep to music (continued) To cancel the sleep function Press OPERATE (or POWER) to turn off the power. Note When you are playing a tape using this function: If the tape length of one side is longer than the set time, the player will not go off until the tape reaches the end. Tips • You can fall asleep and wake up to different music. Set the waking up timer first (see page 20), turn on the power, and then set the sleeping timer. However, you cannot store different radio stations.
Setting Up Choosing the power sources You can use the AC power or batteries as a power source. Setting Up 14 Battery compartment AC IN 2 to the mains 1 Inserting the back-up batteries Insert three R6 (size AA) batteries (not supplied) into the battery compartment. These batteries work to save the memory data. Replacing batteries Take out the batteries as illustrated. Note Before you replace the batteries, be sure to take out the CD from the player.
Choosing the power sources (continued) 2 Connecting the mains lead Insert one end of the supplied mains lead to the AC IN socket located at the rear of the player, and the other end to the mains. Changing the AM/MW tuning interval The AM/MW tuning interval is preset to 9 kHz at the factory. If you need to change the AM/MW tuning interval, do the following: 1 Press RADIO•BAND•AUTO PRESET until “AM” or “MW” is displayed. 2 Press ENTER for 2 seconds. 3 Press RADIO•BAND•AUTO PRESET for 2 seconds.
The type of the jack of the component to be connected You can record a CD on a MiniDisc or enjoy the sound from a VCR, TV or MiniDisc player/recorder through the speakers of this player. Be sure to turn off the power of each component before making connections. For details, refer to the instruction manual of the component to be connected. Square-shaped optical connector (MiniDisc recorder, DAT recorder, etc.) Optical miniplug (MiniDisc recorder, etc.
Connecting optional components (continued) Listening to TV, VCR and MiniDisc player/recorder TV, VCR, MiniDisc player/recorder, etc. to line output jack Rear panel of this player Audio connecting cable*(not supplied) to LINE IN jack * For MiniDisc recorder: a cable with a stereomini plug on both ends. For TV, VCR: a cable with a stereo-mini plug on one end and two phono plugs on the other end.
Additional Information Precautions On safety • As the laser beam used in the CD player section is harmful to the eyes, do not attempt to disassemble the casing. Refer servicing to qualified personnel only. • Should any solid object or liquid fall into the player, unplug the player, and have it checked by qualified personnel before operating it any further. • Discs with non-standard shapes (e.g., heart, square, star) cannot be played on this player. Attempting to do so may damage the player.
Precautions (continued) Notes on cassettes • Break off the cassette tab from side A or B to prevent accidental recording. If you want to reuse the tape for recording, cover the broken tab with adhesive tape. About CD-Rs/CD-RWs This CD player can play CD-Rs/CD-RWs recorded in the CD-DA format*, but playback capability may vary depending on the quality of the disc and the condition of the recording device. * CD-DA is the abbreviation for Compact Disc Digital Audio.
Troubleshooting General The power is not on. • Connect the mains lead to the AC IN socket and a wall outlet securely. • Make sure the batteries are inserted correctly. • Replace all the batteries with new ones if they are weak. • You cannot turn on the player with the remote when you operate the player on batteries. There is no audio. • Unplug the headphones when listening through speakers. The power is turned off abruptly. • Replace all the batteries with new ones. Unusual sound is heard.
Troubleshooting (continued) Tape Player The tape does not move when you press an operation button. • Close the tape compartment securely. The REC z button does not function. The tape does not play. • Make sure the safety tab on the cassette is in place. The tape does not erase completely. • Clean the erasing head (see page 31). • Replace all the batteries with new ones if they are weak. • The source which was recorded on TYPE II (high position) or TYPE IV (metal) tape using this unit is being played.
Maintenance Cleaning the lens If the lens becomes dirty, it may cause a skipping of sound during CD operation. Clean with a commercially available blower. Cleaning the tape heads and tape path Wipe the heads, the pinch roller and the capstan with a cleaning swab slightly moistened with cleaning fluid or alcohol after every 10 hours of operation for optimum playback and recording quality.
Specifications CD player section System Compact disc digital audio system Laser diode properties Material: GaAlAs Wave length: 780 nm Emission duration: Continuous Laser output: Less than 44.6 µW (This output is the value measured at a distance of about 200 mm from the objective lens surface on the optical pick-up block with 7 mm aperture.
Index A Audio emphasis 18 I, J, K Improving broadcast reception 7 B Batteries for memory 23 for player 24 for remote 24 C CD player 12 Choosing power sources 23 Cleaning cabinet 31 tape heads and tape path 31 Connecting mains lead 23 optional components 25 Creating your own programme 14 D, E, F, G, H Demagnetizing the tape heads 31 Display 12 L Listening to the radio 6 to the TV, VCR and MD player 26 Locating a specific track 12 M, N, O MEGA BASS 18 P, Q Playing a CD 4 a tape 8 preset radio stations
Advertencia Para evitar incendios o el riesgo de electrocución, no exponga el reproductor a la lluvia ni a la humedad. Acerca de este manual Para evitar descargas eléctricas, no abra el sistema. En caso de avería, solicite sólo los servicios de personal especializado.
Índice Procedimientos básicos Precauciones ................................................. 27 Solución de problemas ................................. 29 Mantenimiento .............................................. 31 Especificaciones ........................................... 32 Índice alfabético ........................................... 33 Reproductor de discos compactos (CD) Utilización del visor ..................................... 12 Localización de un punto específico en una pista .............
Procedimientos básicos Reproducción de un CD 3 1, 2 Conecte el cable de alimentación suministrado (consulte la página 23). 1 Presione ZPUSH OPEN/CLOSE para abrir el compartimiento de discos y coloque el CD. Con el lado de la etiqueta hacia arriba 2 3 Cierre la tapa del compartimiento de discos. Presione u. Visor El reproductor se enciende (activación directa) y reproduce todas las pistas una vez.
Utilice estos botones para realizar procedimientos adicionales u ZPUSH OPEN/CLOSE VOLUME +, – Dial de control OPERATE (o POWER) Para Realice lo siguiente ajustar el volumen Presione VOLUME +*, – (VOL +, – en el mando a distancia). detener la reproducción Presione x. realizar una pausa Presione u*. Vuelva a presionar el botón para reanudar la reproducción después de la pausa. Procedimientos básicos x pasar a la siguiente pista Gire el dial de control en el sentido de las agujas del reloj.
Radiorecepción 1 2 Conecte el cable de alimentación suministrado (consulte la página 23). 1 Presione RADIO•BAND•AUTO Visor PRESET hasta que la banda que desee aparezca en el visor (activación directa). Cada vez que pulse el botón, la banda cambiará de la siguiente forma: CFD-E90: “FM” t “AM” CFD-E90L: “FM” t “MW” t “LW” 2 Mantenga presionado TUNE + o Indica una emisión estéreo de FM TUNE – hasta que los dígitos de frecuencia comiencen a cambiar en el visor.
Utilice estos botones para realizar procedimientos adicionales MODE VOLUME +, – Sugerencias • Si la emisión en FM presenta ruido, presione MODE hasta que aparezca “Mono” en el visor; la radio sintonizará la emisión en modo monofónico. • Si es preciso cambiar el intervalo de sintonización de AM/MW, consulte la página 24.
Reproducción de cintas 1 2 Conecte el cable de alimentación suministrado (consulte la página 23). 1 2 Presione xZ para abrir el compartimiento de la cinta e inserte una cinta grabada. Emplee sólo cintas TYPE I (normal). Cierre el compartimiento. Con la cara que desee reproducir orientada hacia fuera Presione n. Visor El reproductor se enciende (activación directa) e inicia la reproducción.
Utilice estos botones para realizar procedimientos adicionales VOLUME +, – m, M xZ X Para Presione ajustar el volumen VOLUME +*, – (VOL +, – en el mando a distancia) detener la reproducción xZ avanzar rápidamente o rebobinar la cinta moM realizar una pausa X Vuelva a presionar el botón para reanudar la reproducción después de la pausa.
Grabación en una cinta 1 3 Conecte el cable de alimentación suministrado (consulte la página 23). 1 2 Presione xZ para abrir el compartimiento de cintas e inserte una cinta virgen. Emplee sólo cintas TYPE I (normal). Seleccione la fuente de programa que desee grabar. Para grabar desde el reproductor de discos compactos, inserte un CD (consulte la página 4) y presione x de la sección de CD. Para grabar desde la radio, sintonice la emisora que desee (consulte la página 6).
3 Presione z para iniciar la grabación (n se presiona automáticamente). OPERATE (o POWER) MODE Procedimientos básicos Utilice estos botones para realizar operaciones adicionales n xZ Sugerencias • El ajuste del volumen o del énfasis de sonido (consulte la página 18) no afectará al nivel de grabación.
Reproductor de discos compactos (CD) Utilización del visor Puede comprobar la información sobre el disco en el visor. DISPLAY Localización de un punto específico en una pista Es posible encontrar un punto específico en una pista rápidamente mientras se reproduce un CD. m M Comprobación del número total de pistas y del tiempo de reproducción Presione DISPLAY en modo de parada.
Reproducción repetida de las pistas Para cancelar la reproducción repetida Presione MODE hasta que “REP” desaparezca del visor. (Reproducción repetida) Dial de control u x MODE 1 Presione x. La indicación “Cd” aparece en el visor. 2 Realice lo siguiente. Reproductor de discos compactos (CD) Puede reproducir las pistas repetidamente en los modos de reproducción normal, aleatoria o programada (consulte la página 14).
Reproducción de pistas en orden aleatorio Creación de su propio programa (Reproducción aleatoria) (Reproducción programada) Es posible reproducir las pistas en orden aleatorio. Puede crear un programa compuesto por un máximo de 20 pistas de un CD en el orden que desee reproducirlas. u x MODE ENTER Dial de control u MODE 1 Presione x. “Cd” aparece en el visor. 2 Presione MODE hasta que aparezca “SHUF” en el visor. 1 Presione x. La indicación “Cd” aparece en el visor.
Para cancelar la reproducción programada Presione MODE hasta que “PGM” desaparezca del visor. Para cambiar el programa actual Presione x una vez si el CD está parado y dos veces si está reproduciéndose. El programa actual se borrará. A continuación, cree un nuevo programa siguiendo el procedimiento de programación. Sugerencias • Es posible volver a reproducir el mismo programa, ya que éste queda almacenado hasta que abra el compartimiento de discos compactos. • Puede grabar su propio programa.
Radio Memorización de emisoras de radiodifusión Es posible almacenar emisoras de radio en la memoria del reproductor. Es posible memorizar hasta 30 emisoras de radio (CFDE90), 20 para FM y 10 para AM en cualquier orden o 40 emisoras de radio (CFD-E90L), 20 para FM y 10 para MW y LW respectivamente en cualquier orden. RADIO BAND AUTO PRESET 16ES Dial de control ENTER 1 Presione RADIO•BAND•AUTO PRESET para seleccionar la banda.
Sintonía de emisoras memorizadas Una vez memorizadas las emisoras, utilice el dial de control del reproductor o PRESET +, – del mando a distancia para sintonizar las emisoras que desee. Dial de control 1 Presione RADIO•BAND•AUTO PRESET para seleccionar la banda. 2 Gire el dial de control para sintonizar la emisora memorizada. Radio RADIO BAND AUTO PRESET En el mando a distancia 1 Presione BAND hasta que el visor muestre la banda que desee.
Énfasis de sonido Selección del énfasis de audio (MEGA BASS) Puede ajustar el énfasis de audio del sonido que esté escuchando. MEGA BASS Refuerzo de los graves Presione MEGA BASS. “MEGA BASS” aparece en el visor. Para recuperar el sonido normal, vuelva a presionar el botón.
Temporizador 3 Ajuste del reloj El visor mostrará la indicación “– –:– –” hasta que ajuste el reloj. CLOCK/SLEEP/TIMER ENTER Dial de control Presione ENTER. El reloj se pone en funcionamiento a partir de 00 segundos. Sugerencia Sistema de visualización de la hora: CFD-E90: Sistema de 12 horas CFD-E90L: Sistema de 24 horas Temporizador Antes de poner el reloj en hora, conecte la fuente de alimentación (consulte la página 23).
Activación automática de la unidad Puede programar la hora de activación de la unidad para despertarse con música o radio. Asegúrese de haber ajustado el reloj (Consulte “Ajuste del reloj” en la página 19). CLOCK/SLEEP/TIMER STANDBY ENTER Dial de control Antes de comenzar, compruebe que la indicación (reloj) no está iluminada en el visor. Si lo está, presione STANDBY. 1 Prepare la fuente musical que desee reproducir. Para reproducir la radio un CD 20ES Realice lo siguiente Sintonice una emisora.
Desactivación automática de la unidad Es posible ajustar el reproductor para que se desactive automáticamente transcurridos 10, 20, 30, 60, 90 y 120 minutos, de forma que pueda dormirse mientras escucha música. CLOCK/SLEEP/TIMER ENTER Dial de control Temporizador Para emplear el reproductor antes del inicio de una reproducción con temporizador Basta con encender el reproductor y emplearlo con normalidad.
Desactivación automática de la unidad (continuación) Para cancelar la función de desactivación automática Presione OPERATE (o POWER) para desactivar la alimentación. Nota Cuando reproduzca una cinta utilizando esta función: Si la duración de una cara de la cinta es superior al tiempo establecido, el reproductor no se detendrá hasta que la cinta llegue al final. Sugerencias • Es posible dormirse y despertarse con música diferente.
Preparativos Selección de la fuente de alimentación Puede utilizar la alimentación de CA o las pilas como fuente de alimentación. Preparativos 1 4 Compartimiento de las pilas AC IN 2 a una toma mural 1 Inserción de las pilas de respaldo Inserte cuatro pilas R6 (tamaño AA) (no suministradas) en el compartimiento de pilas. Estas pilas sirven para proteger los datos de la memoria. Sustitución de las pilas Retire las pilas como se ilustra.
Selección de la fuente de alimentación (continuación) 2 Conexión del cable de alimentación Inserte un extremo del cable de alimentación suministrado en la clavija AC IN situada en la parte posterior del reproductor, y el otro extremo en la toma mural. Cambio del intervalo de sintonización de AM/MW El intervalo de sintonización de AM/MW se presintoniza en fábrica a 9 kHz.
Conexión de componentes opcionales (sólo CFD-E90L) Tipo de toma del componente que vaya a conectarse Minienchufe óptico (grabadora de MD, etc.) Conector óptico de forma cuadrada (grabadora de MD, grabadora DAT, etc.) POC-15A 1 Abra la cubierta de las tomas MD LINK del reproductor y conecte la toma OPTICAL DIGITAL OUT (CD) con la toma de entrada digital de la grabadora de Minidisc u otro componente que utilice un cable de conexión digital (no suministrado).
Conexión de componentes opcionales (continuación) Escucha del televisor, videograbadora y reproductor/ grabadora de MD televisor, videograbadora, reproductor/ grabadora de MD, etc. a la toma de salida de línea Panel posterior de este reproductor Cable de conexión de audio* (no suministrado) a la toma LINE IN * Para grabadora de MD: un cable con un miniconector estéreo en ambos extremos.
Información complementaria Precauciones Seguridad • No desmonte el aparato, ya que el haz láser utilizado en la sección del reproductor de discos compactos es perjudicial para los ojos. Solicite asistencia técnica sólo a personal especializado. • Si cae algún objeto sólido o se vierte líquido sobre el reproductor, desenchúfelo y haga que lo revise personal especializado antes de volver a utilizarlo. • Los discos con formas no estándar (p.ej.
Precauciones (continuación) Notas sobre casetes • Rompa la lengüeta del casete de la cara A o B para evitar grabaciones accidentales. Si desea volver a utilizar la cinta para realizar grabaciones, cubra el orificio de la lengüeta rota con cinta adhesiva. Cara A Lengüeta de la cara B Lengüeta de la cara A • No se recomienda el uso de casetes de tiempo de reproducción superior a 90 minutos, excepto para grabación o reproducción continua y de larga duración.
Solución de problemas General La alimentación no se activa. • Conecte el cable de alimentación a la clavija AC IN y a una toma mural con firmeza. • Asegúrese de que ha insertado las pilas correctamente. • Sustituya todas las pilas por otras nuevas si están agotándose. • No es posible encender el reproductor con el mando a distancia al utilizar dicho reproductor con pilas. Ausencia de sonido. • Desenchufe los auriculares para recibir sonido a través de los altavoces.
Solución de problemas (continuación) La imagen del televisor no es estable. • Si escucha un programa en FM cerca del televisor con una antena interior, aleje el reproductor del televisor. Reproductor de cintas La cinta permanece inmóvil cuando presiona un botón de funcionamiento. • Cierre el compartimiento de la cinta con firmeza. El botón REC z no funciona. La cinta no se reproduce. • Asegúrese de que el casete está provisto de lengüeta de seguridad. La cinta no se borra por completo.
Mantenimiento Limpieza de la lente Si la lente se ensucia, pueden producirse pérdidas de sonido durante la reproducción del CD. Límpiela con un soplador disponible en establecimientos especializados. Limpieza de las los cabezales y la trayectoria de la cinta Para obtener una calidad de reproducción y grabación óptima, limpie los cabezales, el rodillo compresor y el eje de arrastre con una escobilla de limpieza ligeramente humedecida en un líquido limpiador o alcohol cada 10 horas de funcionamiento.
Especificaciones Sección del reproductor de discos compactos Sistema Sistema audiodigital de discos compactos Prodiedades del diodo láser Material: GaAlAs Longitud de onda: 780 nm Duración de emisión: Continua Salida de láser: Menos de 44,6 µW (Esta salida es el valor medido a una distancia de unos 200 mm de la superficie del objetivo del bloque fonocaptor óptico con una apertura de 7 mm.) Velocidad del eje 200 rev./min. (rpm) a 500 rev./min.
Índice alfabético A, B Ajuste del reloj 19 C Conexión del cable de alimentación de CA 23 de componentes opcionales 25 Creación de su propio programa 14 D Desmagnetización de los cabezales de cinta 31 E Emisoras de radio memorización 16 sintonía 17 Énfasis de audio 18 Escucha del TV, videograbadora y reproductor de MD 26 F Fuentes de alimentación 23 G, H, I, J, K Grabación en una cinta 10 L Limpieza cabezas y recorrido de cinta 31 exterior 31 Localización de una pista específica 12 M, N, O MEGA BASS 1
34ES
35ES
36ES Sony Corporation