4-244-987-11(1) Micro Hi-Fi Component System Operating Instructions Owner’s Record The model and serial numbers are located on the rear of the unit. Record the serial number in the space provided below. Refer to them whenever you call upon your Sony dealer regarding this product. Model No. ______________ Serial No.
This symbol is intended to alert the user to the presence of uninsulated “dangerous voltage” within the product’s enclosure that may be of sufficient magnitude to constitute a risk of electric shock to persons. WARNING To prevent fire or shock hazard, do not expose the unit to rain or moisture. To prevent fire, do not cover the ventilation of the apparatus with news papers, table-cloths, curtains, etc. And don’t place lighted candles on the apparatus.
Table of Contents How to use this manual........................... 2 Getting Started Hooking up the system............................ 4 Setting the clock...................................... 5 CD – Play Loading a disc ......................................... 6 Playing a disc .......................................... 6 — Normal Play/Shuffle Play Playing repeatedly................................... 7 — Repeat Play Creating your own program ....................
Getting Started Hooking up the system Perform the following procedures 1 to 3 to hook up your system using the supplied cords and accessories. AM loop antenna FM lead antenna Right speaker Left speaker 1 2 3 1 Connect the speakers. Connect the right and left speaker cords to the SPEAKER terminals as shown below. 2 Connect the FM and AM antennas. Set up the AM loop antenna, then connect it.
FM antenna (Type B) Setting the clock Extend the FM lead antenna horizontally 1 2 3 AM AM loop antenna 4 5 Note To prevent noise pickup, keep the antennas away from the system and other components. 6 Press CLOCK/TIMER SET. Press . or > repeatedly to set the hour. Press ENTER. Press . or > repeatedly to set the minute. Press ENTER. The clock starts working. 3 Connect the mains lead to mains.
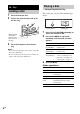
Playing a disc CD – Play — Normal Play/Shuffle Play Loading a disc 1 2 This system lets you play CD in different play modes. Press CD Z on the unit. Place a disc with the label side up on the disc tray. AUTO PRESET SHUFFLE PROGRAM REPEAT 1 STEREO TUNED DAILY REC SLEEP SYNC x Z Track number u Playing time M m . 1 When you play a 8 cm disc, place it on the inner circle of the tray. 3 2 Press CD Z again to close the disc tray.
Playing repeatedly — Repeat Play Press REPEAT repeatedly during playback until “REPEAT” or “REPEAT 1” appears. REPEAT: For all the tracks on the disc up to five times. REPEAT 1: For a single track only. To cancel Repeat Play Press REPEAT repeatedly until both “REPEAT” and “REPEAT 1” disappear. — Program Play You can make a program of up to 25 steps. You can synchro record the programmed tracks onto a cassette tape (page 12).
Tips • The program you made remains after Program Play finishes. To play the same program again, press CD NX. However, the program is cleared when you open the disc tray. • “– –.– –” appears when the total program time exceeds 100 minutes. Tuner Presetting radio stations You can preset up to 20 FM stations and 10 AM stations. You can then tune in any of those stations simply by selecting the corresponding preset number.
Tip Tips Press TUNING MODE to stop scanning. • The preset stations are retained for about half a day even if you disconnect the mains lead or if a power failure occurs. • To improve the reception, adjust the supplied antennas or connect an external antenna. Manual tuning preset You can manually tune in and store the radio frequency of the desired stations. 2 3 4 5 6 7 Press TUNER/BAND repeatedly to select “FM” or “AM”. Press TUNING MODE repeatedly until “AUTO” and “PRESET” disappear from the display.
Listening to the radio Using the Radio Data System (RDS) You can listen to a radio station either by selecting a preset station, or by manually tuning in the station. (European model only) Listening to a preset station What is the Radio Data System? — Preset Tuning Preset radio stations in the tuner’s memory first (see “Presetting radio stations” on page 8). 1 2 3 Press TUNER/BAND repeatedly to select “FM” or “AM”. Press TUNING MODE repeatedly until “PRESET” appears in the display.
Tape – Play Loading a tape 1 2 Playing a tape You can use TYPE I (normal) tape. 1 Press TAPE Z on the unit. Load a tape into the cassette holder. 2 Press DIRECTION on the unit repeatedly to select “g” to play one side of a tape, “h” to play both sides, or “j”* to play both sides repeatedly. * The tape deck stops automatically after repeating the sequence five times. 3 Press TAPE nN. Tape – Play With the side you want to play/record facing towards you.
Tape – Recording Recording your favorite CD tracks on a tape — CD-TAPE Synchro Recording You can record a whole CD on a tape. You can use TYPE I (normal) tape. Use buttons on the unit for the operation. 1 2 3 Load a recordable tape. Recording on a tape manually — Manual Recording You can record just the portions you like from a CD on a tape. You can also record a radio program. Use buttons on the unit for the operation. 1 2 Load a CD you want to record.
Sound Adjustment Timer Adjusting the sound Falling asleep to music You can adjust the bass and treble to enjoy more powerful sound. Generating a more dynamic sound (Dynamic Sound Generator) To cancel the DSG, press DSG again. You can set the system to turn off after a certain time, so that you can fall asleep to music. Press SLEEP.
Waking up to music — Daily Timer You can wake up to music at a preset time. Make sure you have set the clock (see “Setting the clock” on page 5). 1 Press VOL + or – to adjust the volume. Press CLOCK/TIMER SET. Press . or > repeatedly until “DAILY” appears, then press ENTER. “ON TIME” appears and the hour indication flashes. 5 Set the time to start playing. Press . or > repeatedly to set the hour, then press ENTER. The minute indication flashes. Press .
Timer recording radio programs To timer record, you must first preset the radio station (see “Presetting radio stations” on page 8) and set the clock (see “Setting the clock” on page 5). 1 2 3 Tune in the preset radio station (see “Listening to a preset station” on page 10). Press CLOCK/TIMER SET. Press . or > repeatedly until “REC” appears, then press ENTER.
Display Turning off the display Viewing information about the disc in the display — Power Saving Mode The clock display can be turned off to minimize the amount of power consumed during standby (Power Saving Mode). Press DISPLAY repeatedly while the system is off until the clock display disappears. To cancel Power Saving Mode Press DISPLAY while the system is off.
Optional Components Hooking up optional components To enhance your system, you can connect optional components. Refer to the operating instructions provided with each component.
Listening to audio from a connected component 1 2 Connect audio cords. See “Hooking up optional components” on page 17. Press FUNCTION repeatedly until “MD” or “VIDEO” appears. Start playing the connected component. Tip If you cannot select “VIDEO” by pressing FUNCTION repeatedly, turn off the system and then press ?/1 while holding down FUNCTION on the unit. The function will change from “MD” to “VIDEO”, and “VIDEO” will appear in the display. To change back to “MD”, repeat the same procedure.
Troubleshooting Problems and remedies Should you encounter a problem with your system, do the following: 1 Make sure the power cord and speaker cords are correctly and firmly connected. 2 Find your problem in the troubleshooting checklist below and take the indicated corrective action. If the problem persists after doing all of the above, consult your nearest Sony dealer. General “– –:– –” appears in the display. • A power interruption has occurred.
The sound skips. • Wipe the disc clean (page 22). • Replace the disc. • Try moving the system to a place without vibration (e.g., on top of a stable stand). • Try moving the speakers away from the system, or placing them on separate stands. When you listen to a track with bass sounds at high volume, the speaker vibration may cause the sound to skip. Play does not start from the first track. • Press PLAY MODE repeatedly until both “PROGRAM” and “SHUFFLE” disappear to return to Normal Play.
Messages One of the following messages may appear or flash in the display during operation. CD NO DISC There is no disc in the player. NO STEP All of the programmed tracks have been erased. OVER You have reached the end of the disc while pressing M during playback or pause. PUSHSTOP You pressed PLAY MODE during playback. PGM FULL You tried to program 25 or more tracks (steps). COMPLETE The preset operation ended normally.
On operation Additional Information Precautions On operating voltage Before operating the system, check that the operating voltage of your system is identical with the voltage of your local power supply. On safety • The unit is not disconnected from the AC power source (mains) as long as it is connected to the wall outlet, even if the unit itself has been turned off. • Unplug the system from the wall outlet (mains) if it is not to be used for an extended period of time.
Music discs encoded with copyright protection technologies This product is designed to playback discs that conform to the Compact Disc (CD) standard. Recently, various music discs encoded with copyright protection technologies are marketed by some record companies. Please be aware that among those discs, there are some that do not conform to the CD standard and may not be playable by this product.
General CD player section Laser Frequency response Wavelength Semiconductor laser (CD: λ=780 nm) Emission duration: continuous CD: 2 Hz – 20 kHz 780 – 790 nm Tape deck section Recording system Frequency response Wow and flutter 4-track 2-channel stereo 50 – 13,000 Hz (±3 dB), using Sony TYPE I cassettes ±0.15% W. Peak (IEC) 0.1% W. RMS (NAB) ±0.2% W.
List of button locations and reference pages How to use this page Use this page to find the location of buttons and other parts of the system that are mentioned in the text.
Remote control ALPHABETICAL ORDER BUTTON DESCRIPTIONS A–E F–Z CD ws (6) CLEAR w; (7) CLOCK/TIMER SELECT 2 (14) CLOCK/TIMER SET 3 (5, 14) DISPLAY 6 (10, 16) ENTER qd (5, 8, 14) EQ qh (13) EQ + qg (13) EQ – ql (13) FUNCTION wg (6, 11, 12, 18) PLAY MODE wa (6) REPEAT qs (7) SLEEP 1 (13) TAPE wf (11) TUNER/BAND wd (8) TUNER MEMORY 5 (8) TUNING MODE wa (8) TUNING +/– 9 (8) VOL +/– qk (14) ?/1 (power) 4 (5, 14) TAPE nN (play) 7 (11, 12) TAPE x (stop) 8 (11, 12) CD NX (play pause) 0 (6) CD x (stop) qa (6) .
Sony Corporation Printed in Hungary