WARNING To reduce the risk of fire, do not cover the ventilation opening of the apparatus with newspapers, tablecloths, curtains, etc. Do not place the naked flame sources such as lighted candles on the apparatus. To reduce the risk of fire or electric shock, do not expose this apparatus to dripping or splashing, and do not place objects filled with liquids, such as vases, on the apparatus. As the main plug is used to disconnect the unit from the mains, connect the unit to an easily accessible AC outlet.
Disposal of waste batteries (applicable in the European Union and other European countries with separate collection systems) This symbol on the battery or on the packaging indicates that the battery provided with this product shall not be treated as household waste. By ensuring these batteries are disposed of correctly, you will help prevent potentially negative consequences for the environment and human health which could otherwise be caused by inappropriate waste handling of the battery.
Table of Contents Guide to parts and controls.............. 5 Information on the display................ 9 Getting Started Hooking up the system securely...................................................10 Setting the clock.................................11 Basic Operations Playing a CD/MP3 disc......................12 Listening to the radio........................13 Playing a tape.......................................14 Recording onto a tape......................15 Listening to music of an USB device.
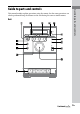
This manual mainly explains operations using the remote, but the same operations can also be performed using the buttons on the unit having the same or similar names.
Remote +/ (select folder) button (page 12, 16, 19) Press to select a folder. Sound buttons (page 18) Unit: DSGX button Remote: EQ button Press to select the sound effect. PUSH OPEN/CLOSE (page 12) Press to open or close the CD compartment. Remote sensor (page 22) / (power) button (page 11, 21, 25) Press to turn on the system. / (go back/go forward) button (page 12, 16, 19, 21) Press to select a track or file.
PHONES jack Press to start or pause playback. Connect the headphones. TUNER/BAND button (page 13) Press to select the TUNER function. Press to select FM or AM reception mode. AUDIO IN jack (page 17) Connect to an optional audio component. FUNCTION button (page 12, 14, 16, 17, 19) Press to select the function. Lights up when the system is turned off. (stop) button (page 12, 13, 16) Press to stop playback. (USB) port (page 16, 31) Connect to an optional USB device.
Battery compartment lid (page 11) CLEAR button (page 19) Press to delete a pre-programmed track or file. TUNER MEMORY button (page 20) Press to preset the radio station. PLAY MODE/TUNING MODE button (page 12, 13, 19, 20) Press to select the play mode of a CD or MP3 disc. Press to select the tuning mode. DISPLAY button (page 18) Press to change the information on the display. SLEEP button (page 21) Press to set the Sleep Timer.
Timer (page 21) Tuner reception mode (page 13) Tuner reception (page 13) Text information Play mode (page 12) Guide to parts and controls Information on the display Audio format Play/Pause DSGX (page 18) GB
Getting Started Hooking up the system securely Left speaker Right speaker Wall socket FM lead antenna (Extend it horizontally.
Antennas Speakers Insert only the stripped portion of the speaker cords into the SPEAKER jacks. Setting the clock Use buttons on the remote to set the clock. 1 2 Power Connect the power cord to a wall socket. If the plug does not fit the wall socket, detach the supplied plug adaptor (only for models equipped with an adaptor).
Basic Operations Playing a CD/MP3 disc 1 Select the CD function. Press CD (or FUNCTION repeatedly) . 2 Place a disc. Press PUSH OPEN/CLOSE on the unit, and place a disc with the label side up on the CD compartment. Other operations To Press Pause playback (or CD on the unit) . To resume play, press the button again. Stop playback . Select a folder +/ . on an MP3 disc Select a track / .
Notes on playing MP3 discs Listening to the radio 1 Select “FM” or “AM.” 2 Select the tuning mode. 3 Tune in the desired station. Press TUNING MODE repeatedly until “AUTO” appears. Press +/ (or TUNING +/ on the unit) . Scanning stops automatically when a station is tuned in, and then “TUNED” and “STEREO” (for stereo programs only) appear. When you tune in a station that provides RDS services, the station name appears on the display (European model only).
To tune in a station with a weak signal If “TUNED” does not appear and the scanning does not stop, press TUNING MODE repeatedly until “MANUAL” appears, and then press +/ (or TUNING +/ on the unit) repeatedly to tune in the desired station. Playing a tape Use buttons on the unit to play tape. 1 Select the TAPE function. 2 Insert a tape. 3 Start playback. To reduce static noise on a weak FM stereo station Press FUNCTION repeatedly to select “TAPE.
Recording onto a tape 1 Insert a recordable tape. 2 Prepare the recording source. 3 Start recording. Press , and insert the tape into the cassette holder with the side you want to record facing forward. If there is noise while recording from the tuner, reposition the appropriate antenna to reduce the noise. While recording, you cannot listen to other sources. Do not turn off the system during recording.
Listening to music of an USB device You can listen to music stored in the USB device. The audio format that can be played back by this system is MP3*. See “Playable USB devices with this system” (page 31) for a list of USB devices that can be connected to this system. * Files with copyright protection (Digital Rights Management) cannot be played by this system. Files downloaded from an online music store may not be played by this system. 1 2 Select the USB function. Press USB (or FUNCTION repeatedly) .
Note on Repeat Play All files on an USB device are repeated until you stop playback. Using optional audio components 1 Connect additional audio component to the AUDIO IN jack on the unit using an audio analog cord (not supplied). 2 Turn down the volume. 3 Select the AUDIO IN function. 4 5 Press VOLUME (or turn the VOLUME control on the unit) . Basic Operations The playback order for the system may differ from the playback order of the connected USB device.
Adjusting the sound Changing the display To add a sound effect To Change information on the display1) Check the clock when the system is off To Press Generate a DSGX on the unit. more dynamic sound (Dynamic Sound Generator X-tra) Set the sound EQ repeatedly. effect Press DISPLAY repeatedly when the system is on. DISPLAY when the system is off2). The clock is displayed for 8 seconds. For example, you can view CD/MP3 disc information, such as; track or file number during normal play.
Other Operations 4 “ . ” appears when the total program time exceeds 100 minutes for a CD, or when you select a CD track whose number is 21 or over, or when you select an MP3 file. Creating your own program (Program Play) 1 3 5 Press CD (or FUNCTION repeatedly) to select the CD function. Press PLAY MODE repeatedly until “PGM” appears while the system is stopped. Press / repeatedly until the desired track or file number appears.
5 Presetting radio stations You can preset your favorite radio stations and tune them in instantly by selecting the corresponding preset number. Use buttons on the remote to preset stations. 1 2 3 Tune in the desired station (see “Listening to the radio” (page 13)). Press TUNER MEMORY . Preset number Press +/ repeatedly to select your desired preset number. If another station is already assigned to the selected preset number, the station is replaced by the new stations. 4 20GB Press ENTER .
Using the Timers The system offers two timer functions. If you use the Play Timer with the Sleep Timer, the Sleep Timer has priority. Press SLEEP repeatedly. If you select “AUTO,” the system automatically turns off after the current disc, tape or USB device stops or in 100 minutes. If the tape deck is still playing or recording at the set time, the system turns off after the tape deck stops. Play Timer: You can wake up to CD, tuner or optional USB device at a preset time.
Others Troubleshooting 1 Make sure the power cord and speaker cords are correctly and firmly connected. 2 Find your problem in the checklist below, and take the indicated corrective action. If the issue persists, contact your nearest Sony dealer. If the STANDBY indicator flashes Immediately unplug the power cord, and check the following items.
Starting playback takes more time than usual. The following discs take a longer time to start playback. a disc recorded with a complicated tree structure. a disc recorded in multisession mode. a disc that has not been finalized (a disc to which data can be added). a disc that has many folders. Tape deck USB device Are you using a supported USB device? If you connect an unsupported USB device, the following problems may occur.
“READING” is displayed for an extended time, or it takes a long time before playback starts. The reading process can take a long time in the following cases. There are many folders or files on the USB device. The file structure is extremely complex. The memory capacity is excessive. The internal memory is fragmented. Thus, we recommend following these guidelines.
Tuner To reset the system to factory settings Severe hum or noise, or stations cannot be received. (“TUNED” or “STEREO” flashes on the display.) Connect the antenna properly. Find a location and an orientation that provide good reception, and then set up the antenna again. Keep the antennas away from the speaker cords, the power cord and the USB cable to avoid picking up noise. Turn off nearby electrical equipment. 1 Disconnect and reconnect the power cord, and then turn on the system.
Messages CD/MP3 player, Tuner COMPLETE: The preset operation ended normally. NO DISC: There is no disc in the system, or you have loaded a disc that cannot be played. NO STEP: All of the programmed tracks or files have been erased. OVER: You have reached the end of the disc while pressing during playback or pause. PUSH SELECT: You tried to set the clock or timer during timer operation. PUSH STOP: You pressed PLAY MODE during playback. READING: The system is reading information of the disc.
Display examples Display indicates 0 (zero) 2 (two) 5 (five) 6 (six) 8 (eight) A D G H K M O Q R S Z , @ Discs that this system CAN play Audio CD CD-R/CD-RW (audio data/MP3 files) Discs that this system CANNOT play CD-ROM CD-R/CD-RW other than those recorded in music CD format or MP3 format conforming to ISO9660 Level 1/Level 2, Joliet or multisession CD-R/CD-RW recorded in multisession that have not ended by “closing the session” CD-R/CD-RW of poor recording quality, CD-R/CD-RW that have scr
Notes on discs Before playing, wipe the disc with a cleaning cloth from the center out to the edge. Do not clean discs with solvents, such as benzine thinner, or commercially available cleaners or anti-static spray intended for vinyl LPs. Do not expose discs to direct sunlight or heat sources such as hot air ducts, nor leave it in a car parked in direct sunlight.
To prevent a tape from being accidentally recorded over Break off the cassette’s overwrite protection tab from side A or B as illustrated. Break off the cassette tab To later reuse the tape for recording, cover the broken tab with adhesive tape. Cleaning the tape heads Use dry- or wet-type cleaning cassette (available separately) after every 10 hours of use, before you start an important recording, or after playing an old tape.
CD player section System: Compact disc and digital audio system Laser Diode Properties Emission Duration: Continuous Laser Output*: Less than 44.6µW * This output is the value measurement at a distance of 200mm from the objective lens surface on the Optical Pick-up Block with 7mm aperture.
Playable USB devices with this system You can use the following Sony USB devices on this system. Other USB devices are not playable on this system. Verified Sony digital music player (as of March 2008) ® Check the websites below for the latest information about compatible devices. For customers in the U.S.A.: For customers in Canada: English French
Printed in China