3-095-518-61(1) Micro HI-FI Component System Operating Instructions CMT-HX5BT © 2007 Sony Corporation
WARNING To reduce the risk of fire or electric shock, do not expose this apparatus to rain or moisture. To reduce the risk of fire, do not cover the ventilation of the apparatus with newspapers, tablecloths, curtains, etc. And do not place lighted candles on the apparatus. To reduce the risk of fire or electric shock, do not place objects filled with liquids, such as vases, on the apparatus. Connect the unit to an easily accessible AC outlet.
Music discs encoded with copyright protection technologies This product is designed to playback discs that conform to the Compact Disc (CD) standard. Recently, various music discs encoded with copyright protection technologies are marketed by some record companies. Please be aware that among those discs, there are some that do not conform to the CD standard and may not be playable by this product. The Bluetooth word mark and logos are owned by the Bluetooth SIG, Inc.
Table of Contents Guide to parts and controls.............. 5 Information on the display................ 9 Getting Started Hooking up the system securely...................................................10 Setting the clock.................................12 Basic Operations Playing a CD/MP3 disc......................13 Listening to the radio........................14 Using the Bluetooth function.........15 Listening to music of an USB device......................................................
This manual mainly explains operations using the remote, but the same operations can also be performed using the buttons on the unit having the same or similar names.
Remote (RM-SCU35) Remote sensor (page 28) BLUETOOTH OPR button (page 17, 19, 20) Press to make a connection, disconnection, or pairing with a Bluetooth device. Unit: VOLUME control (page 13, 14, 17, 20, 21, 23) Remote: VOLUME +/ button (page 13, 14, 17, 20, 21, 23) Turn or press to adjust the volume. AUDIO IN jack (page 23) Connect to an optional audio component. / (power) button (page 12, 27, 31, 32) Press to turn on the system. PHONES jack Connect the headphones.
Playback buttons and function buttons Unit: BLUETOOTH (play/ pause) button (page 16, 17) Unit: /CANCEL (stop/cancel) button (page 13, 14, 16, 17, 19, 22) Remote: (stop) button (page 13, 14, 16, 17, 19, 22) Press to select the Bluetooth function. Press to start or pause playback of the music on the Bluetooth device (Bluetooth mobile phone, etc.). Unit: USB (play/pause) button (page 21) Press to select the USB function.
PLAY MODE/TUNING MODE button (page 13, 14, 22, 25, 26) CLEAR button (page 17, 19, 25) Press to select the play mode of a CD, MP3 disc or an optional USB device (Digital music player or USB storage media). Press to select the tuning mode. Sound buttons (page 23) Unit: DSGX button Remote: EQ button Press to select the sound effect. DISPLAY button (page 17, 24) Press to change the information on the display.
Play/Pause Audio format DSGX (page 23) Play mode (page 13, 22) Tuner reception mode (page 14) Tuner reception (page 14) Timer (page 27) USB MEMORY Text information Lights up when an optional USB device is connected.
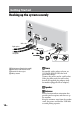
Getting Started Hooking up the system securely Wall socket Right speaker Left speaker FM lead antenna (Extend it horizontally.) White side for North American model Brown side for other regions AM loop antenna or Power For models with a voltage selector, set VOLTAGE SELECTOR to the local power line voltage. Connect the power cord to a wall socket. If the plug does not fit the wall socket, detach the supplied plug adaptor (only for models equipped with an adaptor).
When carrying this system 1 Remove a disc to protect the CD mechanism. function. 3 Hold down SEARCH on the unit, and press on the unit until “STANDBY” appears. 4 After “LOCK” appears, unplug the power cord. With normal use, the batteries should last for about six months. Do not mix an old battery with a new one or mix different types of batteries. If you do not use the remote for a long period of time, remove the batteries to avoid damage from battery leakage and corrosion.
Setting the clock Use buttons on the remote to set the clock. 1 2 3 4 Press / to turn on the system. Press CLOCK/TIMER SET . If the current mode appears on the display, press / repeatedly to select “CLOCK SET?” and then press ENTER . Press / repeatedly to set the hour, and then press ENTER . Use the same procedure to set the minutes. The clock settings are lost when you disconnect the power cord or if a power failure occurs. To display the clock when the system is off Press DISPLAY .
Basic Operations Playing a CD/MP3 disc 1 Select the CD function. 2 Place a disc. Press on the unit, and place a disc with the label side up on the disc tray. To close the disc tray, press on the unit again. Do not force the disc tray closed with your finger, as this may damage the unit. 3 4 Start playback. Press (or CD on the unit) . Adjust the volume. Press VOLUME +/ (or turn the VOLUME control on the unit) . To Press Pause playback (or CD on the unit) .
Notes on playing MP3 discs Do not save other types of files or unnecessary folders on a disc that has MP3 files. Folders that have no MP3 files are skipped. MP3 files are played back in the order that they are recorded onto the disc. The system can only play MP3 files that have a file extension of “.MP3”. If there are files on the disc that have the “.MP3” file extension, but that are not MP3 files, the unit may produce noise or may malfunction.
Using the Bluetooth function You can listen to music from your Bluetooth mobile phone or Bluetooth device over a wireless connection. Basic Operations This system supports Bluetooth A2DP and AVRCP profiles. For details on Bluetooth wireless technology, see “Bluetooth wireless technology” (page 36). Check the websites below for the latest information about compatible devices. For customers in the U.S.A.: For customers in Canada: English
Pairing this system with a Bluetooth device Pairing is an operation where Bluetooth devices register with each other beforehand. Use the procedure below to pair the system with your Bluetooth device. Once a pairing operation is performed, it does not need to be performed again. If pairing is already completed, proceed to “Playing music of a Bluetooth device” (page 17). 1 2 3 Place the Bluetooth device to be connected to this system within 1 meter of the system. Select the Bluetooth function.
To erase all the pairing registration information 3 Start playback. 4 Adjust the volume. 1 Press BLUETOOTH on the 2 Press CLEAR . “Delete?” appears. 3 Press ENTER . “Complete!” appears and all the pairing information is erased. Note In order to connect with a Bluetooth device after performing this operation, you must enter the passcode again. Playing music of a Bluetooth device You can operate a Bluetooth device by connecting the system and a Bluetooth device using AVRCP.
Notes on connections with Bluetooth devices If you cannot connect with a paired Bluetooth device, perform the pairing operation between the system and the Bluetooth device again. Depending on the type of Bluetooth device, you can adjust the volume using the controls of the Bluetooth device. When BLUETOOTH on the unit is pressed while connected to Bluetooth headphones, it may take some time until a connection is made to the system from another Bluetooth device.
Pairing this system with Bluetooth headphones 1 Select a function other than the Bluetooth function. Press FUNCTION repeatedly. 2 3 Place the Bluetooth headphones to be connected to this system within 1 meter of the system. Put the Bluetooth headphones in pairing mode. For details about the operations of the Bluetooth headphones, refer to the operation manual supplied with your Bluetooth headphones.
Playing music on this system You can operate this system from Bluetooth headphones by connecting the system and Bluetooth headphones using AVRCP. 1 Select a function other than the Bluetooth function. Press FUNCTION repeatedly. 2 Establish a connection with the Bluetooth headphones. Press and hold BLUETOOTH OPR on the unit for about 2 seconds until the BLUETOOTH indicator lights up, then release the button.
Listening to music of an USB device Rights Management) cannot be played by this system. 2 Select the USB function. Press USB . Connect an optional USB device (Digital music player or USB storage media) to the (USB) port as shown below. USB device (Digital music player or USB storage media) Basic Operations You can connect an optional USB device (Digital music player or USB storage media) to the (USB) port on the unit and listen to music stored in the USB device.
Other operation To Press Pause playback (or USB on the unit) . To resume play, press the button again. Stop playback . Select a folder +/ . / . SEARCH . Press / to select the desired folder, then press ENTER . Press / to select the desired file, then press ENTER . Find a point in Hold down / during playback, a file and release the button at the desired point. Select Repeat REPEAT repeatedly Play until “REP” or “REP1” appears.
Using optional audio components 1 Connect additional audio 2 Turn down the volume. 3 Select the AUDIO IN function. 4 5 Press VOLUME (or turn the VOLUME control on the unit) . Press AUDIO IN on the unit. Start playing the connected component. To add a sound effect To Generate a more dynamic sound (Dynamic Sound Generator X-tra) Set the sound effect Press DSGX on the unit. EQ repeatedly to select “BASS” or “TREBLE,” and then press +/ repeatedly to adjust the level.
Changing the display To Change information on the display1)2) Check the clock when the system is off 1) 2) 3) Press DISPLAY repeatedly when the system is on. DISPLAY when the system is off3). The clock is displayed for 8 seconds. For example, you can view CD/MP3 disc information or the USB device information, such as the track or file number or folder name during normal play, or the total playing time while the player is stopped.
Other Operations 4 CD “ . ” appears when the total program time exceeds 100 minutes for a CD, or when you select a CD track whose number is 21 or over, or when you select an MP3 file. Creating your own program (Program Play) 1 Select the desired function. USB Press USB to select the USB function. 2 3 Press PLAY MODE repeatedly until “PGM” appears while the system is stopped. Press / repeatedly until the desired track or file number appears.
Presetting radio stations You can preset your favorite radio stations and tune them in instantly by selecting the corresponding preset number. Use buttons on the remote to preset stations. 1 2 Tune in the desired station (see “Listening to the radio” (page 14)). Press TUNER MEMORY . Preset number 3 Press +/ repeatedly to select your desired preset number. If another station is already assigned to the selected preset number, the station is replaced by the new stations. 4 5 Press ENTER .
Using the Timers The system offers two timer functions. If you use the Play Timer with the Sleep Timer, the Sleep Timer has priority. 7 Play Timer: You can wake up to CD, tuner or optional USB device at a preset time. Use buttons on the remote to control the Play Timer. Make sure you have set the clock. 1 2 3 Prepare the sound source. Press / repeatedly until the desired sound source appears, and then press ENTER . The display shows the timer settings. Press / to turn off the system.
Others Troubleshooting 1 Make sure the power cord and speaker cords are correctly and firmly connected. 2 Find your problem in the checklist below, and take the indicated corrective action. If the issue persists, contact your nearest Sony dealer. If the STANDBY indicator flashes Immediately unplug the power cord, and check the following items.
Play does not start from the first track. Press PLAY MODE repeatedly until both “PGM” and “SHUF” disappear to return to normal play. Bluetooth device Pairing cannot be done. Move the Bluetooth device closer to the system. Pairing may not be possible if other Bluetooth devices are present around the system. In this case, turn off the other Bluetooth devices. Connection is not possible.
USB device Are you using a supported USB device? If you connect an unsupported USB device, the following problems may occur. See “Playable USB devices and Bluetooth devices” (page 38) for the supported device types. The USB device is not recognized. File or folder names are not displayed on this system. Playback is not possible. The sound skips. There is noise. “Over Current” appears. A problem has been detected with the level of electrical current from the (USB) port .
Erroneous display Send the music data to the USB device again, as the data stored in the USB device may have been corrupted. Play does not start. Turn off the system, then reconnect the USB device. Connect the USB device that this system can play. Press (or USB on the unit) to start play. Files cannot be played back. USB storage media formatted with file systems other than FAT16 or FAT32 are unsupported.
To improve tuner reception Turn off CD player power by using the CD power management function. By default, CD power is turned on. 1 Press FUNCTION repeatedly to select the CD function, and then turn off the system. 2 After “STANDBY” stops flashing, press / on the unit while holding down /CANCEL on the unit. “CD POWER OFF” appears. With CD player power turned off, disc access time is increased. To turn on CD player power, repeat the procedure until “CD POWER ON” appears.
PIN?: The system is asking for the passcode. For details, see “Using the Bluetooth function” (page 15). Please Wait: The system is readying for usage of a Bluetooth device. Precautions ATRAC AD: An ATRAC Audio Device is connected. Error: The USB device could not be recognized or an unknown device is connected. Invalid: You have made an invalid or currently prohibited operation. No Device: No USB device is connected or the connected USB device has been stopped.
On safety Completely disconnect the power cord (mains lead) from the wall socket (mains) if it is not going to be used for an extended period of time. When unplugging the unit, always grip the plug. Never pull the cord itself. Should any solid object or liquid get into the system, unplug the system, and have it checked by qualified personnel before operating it again. The AC power cord can be changed only by a qualified service facility.
1) Specifications Main unit (HCD-HX5/Compact Disc Receiver) Amplifier section Bluetooth section Communication system: Bluetooth Standard version 2.0 Output: Bluetooth Standard Power Class 2 Maximum communication range: Line of sight approx. 10 m1) Frequency band: 2.4 GHz band (2.4000 GHz 2.
Tuner section FM stereo, FM/AM superheterodyne tuner FM tuner section: Tuning range: 87.5 108.0 MHz (50 kHz step) Antenna: FM lead antenna Antenna terminals: 75 ohms unbalanced Intermediate frequency: 10.7 MHz AM tuner section: Tuning range: 531 1,602 kHz (with 9 kHz tuning interval) Antenna: AM loop antenna, external antenna terminal Intermediate frequency: 450 kHz Speaker (SS-CHX5) Speaker system: 2-way, 3-unit, bass-reflex type Speaker units: Woofer 10 cm × 2, cone type, Tweeter 2.
Effective communication range Effects on other devices Bluetooth devices should be used within approximately 10 meters (unobstructed distance) of each other. The effective communication range may become shorter under the following conditions.
Playable USB devices and Bluetooth devices USB devices You can play back the following Sony USB devices on this system. Other USB devices cannot be played back on this system.
Bluetooth devices Others You can check the websites below for the Bluetooth compatible devices. For customers in the U.S.A.: For customers in Canada: English French For customers in Europe: For customers in Latin America: For customers in Asia and Oceania:
Printed in China