3-095-507-11(1) Micro HI-FI Component System Operating Instructions Owner’s Record The model and serial numbers are located on the rear of the unit. Record these numbers in the space provided below. Refer to them whenever you call upon your Sony dealer regarding this product. Model No. ______________ Serial No.
WARNING To reduce the risk of fire or electric shock, do not expose this apparatus to rain or moisture. CAUTION The use of optical instruments with this product will increase eye hazard. Notice for the customers in the U.S.A This symbol is intended to alert the user to the presence of uninsulated “dangerous voltage” within the product’s enclosure that may be of sufficient magnitude to constitute a risk of electric shock to persons.
This equipment complies with FCC radiation exposure limits set forth for uncontrolled equipment and meets the FCC radio frequency (RF) Exposure Guidelines in Supplement C to OET65. This equipment has a very low RF energy level that is deemed to comply with FCC radio frequency (RF) Exposure Guidelines in Supplement C to OET65 without maximum permissive exposure evaluation (MPE).
Table of Contents Guide to parts and controls.............. 5 Information on the display................ 9 Getting Started Hooking up the system securely...................................................10 Setting the clock.................................11 Basic Operations Playing a CD/MP3 disc......................12 Listening to the radio........................13 Using the Bluetooth function.........14 Using optional audio components..........................................20 Adjusting the sound...
This manual mainly explains operations using the remote, but the same operations can also be performed using the buttons on the unit having the same or similar names.
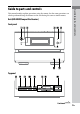
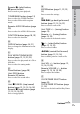
Remote (RM-SC31) BLUETOOTH indicator (page 18, 19) Lights up when the Bluetooth function is active. BLUETOOTH OPR button (page 16, 18, 19) Press to make a connection, disconnection, or pairing with a Bluetooth device. AUDIO IN jack (page 20) Connect to an optional audio component. PHONES jack Connect the headphones. / (power) button (page 11, 24, 27) Press to turn on the system. STANDBY indicator (page 21, 25) Lights up when the system is turned off.
Press to start or pause playback. TUNER/BAND button (page 13) ENTER button (page 11, 22, 23, 24) Press to enter the settings. Press to select the TUNER function. Press to select FM or AM reception mode. Remote: AUDIO IN button (page 20) Press to select a track or file. Press to select the AUDIO IN function. FUNCTION button (page 18, 19) Press to select the function. DISPLAY button (page 16, 21) Press to change the information on the display.
REPEAT/FM MODE button (page 12, 13) Press to listen to a disc, a single track or file repeatedly. Press to select the FM reception mode (monaural or stereo). Battery compartment lid (page 11) CLEAR button (page 16, 18, 22) Press to delete a pre-programmed track or file. Press to erase the pairing registration information of the Bluetooth device. TUNER MEMORY button (page 23) Press to preset the radio station. SLEEP button (page 24) Press to set the Sleep Timer.
Function Timer (page 24) Audio format Play mode (page 12) DSGX (page 20) Tuner reception mode (page 13) Tuner reception (page 13) Play/Pause Guide to parts and controls Information on the display Text information GB
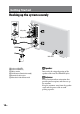
Getting Started Hooking up the system securely Left speaker Right speaker or Wall socket Speaker cord (Red/) Speaker cord (Black/) AM loop antenna FM lead antenna (Extend it horizontally.) Brown side for other regions White side for North American model Speakers Insert only the stripped portion of the speaker cords into the SPEAKER jacks. Antennas Find a location and an orientation that provide good reception, and then set up the antenna.
Power When carrying this system 1 Remove a disc to protect the CD mechanism. 2 Press CD to select the CD Setting the clock Use buttons on the remote to set the clock. 1 2 function. 3 Hold down TUNER/BAND and DSGX on the unit, and press on the unit until “STANDBY” appears. 4 After “LOCK” appears, unplug the 3 power cord.
Basic Operations Playing a CD/MP3 disc 1 Select the CD function. Press CD . 2 Place a disc. Press on the unit, and place a disc with the label side up on the disc tray. To close the disc tray, press on the unit again. Do not force the disc tray closed with your finger, as this may damage the unit. 3 4 12GB Start playback. Press (or CD on the unit) . Adjust the volume. Press VOLUME +/ (or VOL +/ on the unit) . Other operation To Press Pause playback (or CD on the unit) .
Notes on Repeat Play All tracks or files on a disc are played repeatedly up to five times. “REP1” indicates that a single track or file is repeated until you stop it. Notes on playing MP3 discs Notes on playing multisession discs If the disc begins with a CD-DA (or MP3) session, it is recognized as a CD-DA (or MP3) disc, and other sessions are not played back. A disc with a mixed CD format is recognized as a CD-DA (audio) disc. Press TUNER/BAND repeatedly. 2 Select the tuning mode.
Using the Bluetooth function This system supports Bluetooth A2DP and AVRCP profiles. For details on Bluetooth wireless technology, see “Bluetooth wireless technology” (page 32). Check the websites below for the latest information about compatible devices. For customers in the U.S.A.: For customers in Canada: English French For customers in Europe:
Pairing this system with a Bluetooth device 1 2 3 Place the Bluetooth device to be connected to this system within 1 meter of the system. Select the Bluetooth function. Press BLUETOOTH on the unit. Operate the Bluetooth device and perform the pairing operation. For details about the operations of the Bluetooth device, refer to the operation manual supplied with your Bluetooth device.
To erase all the pairing registration information 3 Start playback. 4 Adjust the volume. 1 Press BLUETOOTH on the unit. When the system is connected with a Bluetooth device (when the Bluetooth device name or other information appears in the system display), press and hold BLUETOOTH OPR on the unit for about 2 seconds to put the system in Bluetooth standby mode. 2 Press CLEAR . “DELETE?” appears. 3 Press ENTER . “COMPLETE” appears and all the pairing information is erased.
Notes on connections with Bluetooth devices Listening to music on this system using Bluetooth headphones You can listen to music played on this system using your Bluetooth headphones over a wireless connection. Basic Operations If you cannot connect with a paired Bluetooth device, perform the pairing operation between the system and the Bluetooth device again. Depending on the type of Bluetooth device, you can adjust the volume using the controls of the Bluetooth device.
Pairing this system with Bluetooth headphones Pairing is an operation where Bluetooth devices register with each other beforehand. Use the procedure below to pair the system with your Bluetooth headphones. Once a pairing operation is performed, it does not need to be performed again. If pairing is already completed, proceed to “Playing music on this system” (page 19). 1 Select a function other than the Bluetooth function. Press FUNCTION repeatedly.
Playing music on this system You can operate this system from Bluetooth headphones by connecting the system and Bluetooth headphones using AVRCP. 1 Press FUNCTION repeatedly. 2 Establish a connection with the Bluetooth headphones. Press and hold BLUETOOTH OPR on the unit for about 2 seconds until the BLUETOOTH indicator lights up, then release the button.
Using optional audio components 1 Connect additional audio component to the AUDIO IN jack on the unit using an audio analog cord (not supplied). 2 Turn down the volume. 3 Select the AUDIO IN function. 4 5 20GB Press VOLUME (or VOL on the unit) . Press AUDIO IN . Start playing the connected component. Adjust the volume. Press VOLUME +/ (or VOL +/ on the unit) .
Changing the display 1) 2) 3) Press DISPLAY repeatedly when the system is on. DISPLAY when the system is off3). The clock is displayed for 8 seconds. For example, you can view CD/MP3 disc information, such as the track or file number or folder name during normal play, or the total playing time while the player is stopped. When the system and a Bluetooth device are connected using the Bluetooth function, you can view the Bluetooth device address.
Other Operations 4 “ . ” appears when the total program time exceeds 100 minutes for a CD, or when you select a CD track whose number is 21 or over, or when you select an MP3 file. Creating your own program (Program Play) 1 2 3 Press CD to select the CD function. Press PLAY MODE repeatedly until “PGM” appears while the system is stopped. Press / repeatedly until the desired track or file number appears.
6 Presetting radio stations You can preset your favorite radio stations and tune them in instantly by selecting the corresponding preset number. Use buttons on the remote to preset stations. 2 Tune in the desired station (see “Listening to the radio” (page 13)). Press TUNER MEMORY . Other Operations 1 To call up a preset radio station, press TUNING MODE repeatedly until “PRESET” appears, and then press +/ repeatedly to select the desired preset number.
Using the Timers The system offers two timer functions. If you use the Play Timer with the Sleep Timer, the Sleep Timer has priority. Sleep Timer: You can fall asleep to music. This function works even if the clock is not set. Press SLEEP repeatedly. 5 6 7 If you select “AUTO,” the system automatically turns off after the current disc stops or in 100 minutes. Play Timer: You can wake up to CD or tuner at a preset time. Use buttons on the remote to control the Play Timer.
Others Troubleshooting 1 Make sure the power cord and speaker cords are correctly and firmly connected. 2 Find your problem in the checklist If the STANDBY indicator flashes Immediately unplug the power cord, and check the following items.
Starting playback takes more time than usual. The following discs take a longer time to start playback. a disc recorded with a complicated tree structure. a disc recorded in multisession mode. a disc that has not been finalized (a disc to which data can be added). a disc that has many folders. Bluetooth device Pairing cannot be done. Move the Bluetooth device closer to the system. Pairing may not be possible if other Bluetooth devices are present around the system.
Keep the antennas away from the speaker cords and the power cord to avoid picking up noise. Connect a commercially available external antenna. Consult your nearest Sony dealer if the supplied AM antenna has come off the plastic stand. Turn off nearby electrical equipment. To change the AM tuning interval 1 Tune in any AM station, and then turn off the system. If the system still does not operate properly, reset the system to factory settings.
Messages CD/MP3 player, Tuner CD OVER: You have reached the end of the disc while pressing during playback or pause. COMPLETE: The preset operation ended normally. INVALID: You pressed an invalid button. LOCKED: The disc tray does not open. Contact your nearest Sony dealer. NO DISC: There is no disc in the system, or you have loaded a disc that cannot be played. NO STEP: All of the programmed tracks or files have been erased. PUSH SELECT: You tried to set the clock or timer during timer operation.
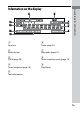
Display examples Display indicates 2 (two) 5 (five) 6 (six) 8 (eight) 0 (zero) A D G H K M O Q R S Z | ” $ % , .
On safety Completely disconnect the power cord (mains lead) from the wall socket (mains) if it is not going to be used for an extended period of time. When unplugging the unit, always grip the plug. Never pull the cord itself. Should any solid object or liquid get into the system, unplug the system, and have it checked by qualified personnel before operating it again. The AC power cord can be changed only by a qualified service facility.
Specifications Main unit (HCD-BX5BT/Compact Disc Receiver) AUDIO POWER SPECIFICATIONS POWER OUTPUT AND TOTAL HARMONIC DISTORTION: With 6 ohm loads, both channels driven, from 120 10,000Hz; rated 12 watts per channel minimum RMS power, with no more than 10% total harmonic distortion from 250 milliwatts to rated output.
General Power requirements: 120 V AC, 60 Hz Power consumption: 40 watts Dimensions (w/h/d) (excl. speakers): Approx. 200 × 132 × 298 mm Mass (excl. speakers): 3.5 kg Supplied accessories: Remote Commander (RM-SC31) (1), R6 (Size AA) batteries (2), AM loop antenna (1), FM lead antenna (1) Design and specifications are subject to change without notice. Standby power consumption: 0.5 W Halogenated flame retardants are not used in the certain printed wiring boards.
Effective communication range Effects of other devices Bluetooth devices and wireless LAN (IEEE 802.11b/g) use the same frequency band (2.4 GHz). When using your Bluetooth device near a device with wireless LAN capability, electromagnetic interference may occur. This could result in lower data transfer rates, noise, or inability to connect.
Playable Bluetooth devices You can check the websites below for the Bluetooth compatible devices. For customers in the U.S.A.: For customers in Canada: English French For customers in Europe: For customers in Latin America: For customers in Asia and Oceania:
Others 35GB
Printed in China