I For assistance and information call toll free I-800-BUY-AIWA (United States and Puerto Rico) 87-MA7-905-01 970124AWY-P9 dlrlEiiE DIGITAL AUDIO
7 WARNING Condensation when: TO REDUCE THE RISK OF FIRE OR ELECTRIC SHOCK, DO NOT EXPOSE THIS APPLIANCE TO RAIN OR MOISTURE. — Moisture - The unit is moved - The heating - The unit is cooled “CAUTION:TO DO NOT REMOVE SERVICE Explanation of Graphical THE COVER RISK OF (OR BACK). 2 TO QUALIFIED Polarization PERSONNEL.
TABLE OF CONTENTS Maintenance Clean the Instructions.
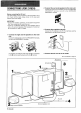
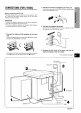
CONNECTIONS (FOR Z-R524) 2 Connect the SPEAKERS Before connecting the AC cord The rated voltage of your unit shown AC. Check matches that the rated surround Connect the right surround SPEAKERS R terminal, speakers to the main unit. speaker cord to the SURROUND and left to the SURROUND L terminal. on the rear panel is 120 V voltage shown on the rear panel your local voltage. IMPORTANT ● Connect ● first. Then connect the AC cord in the end.
CONNECTIONS (FOR Z-R525) .— i3efore connecting the AC cord The rated voltage of ycur unit shown AC. Check matches that the rated voltage 2 Connect the stereo turntable to the Connect the red plug to the PHONO plug to the PHONO~N L jack. main unit. IN R jack, and the white on the rear panel is 120 V shown on the rear panel your local voltage. IMPORTANT ● Connect the speakers, first.
CONNECTING the AM antenna on a surface To stand AN OUTDOOR ANTENNA Fix the claw to the slot. For better FM reception, use of an outdoor antenna is recommended. Connect the outdoor antenna to the FM 75 Q terminal. To position the antennas FM feeder antenna: Extend this antenna horizontally in a T-shape and fix its ends to the wall. AM loop antenna: Position to find the best direction.
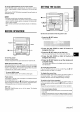
To use the FUNCTION The FUNCTION button buttcm (TAPE, TUNER/BAND, on the remote substitutes PHONO, VIDEO/AUX, SETTING THE CLOCK control for the function buttons CD) on the main unit Each time the FUNCTION selected button is pressed, the next function is f’.. - ----.} cyclically.
GRAPHIC EQUALIZER SIMPLE AUDIO ADJUSTMENT ,.-——, C2C2C2 ,C2ao GEQ T-BASS C2Cl T-BASS ‘clam 00 ma SHIFT K2QC2 aaal VOLUME VOLUME 1! /~ .\, i VOLUME CONTROL Turn the VOLUME increase SHIFT EQUALIZER ‘~-– ‘“’ >.. . ...-., \ PHONES ELECTRONIC GRAPHIC control the volume The volume on the main unit, and counterclockwise level is shown be set between This unit provides the following five different equalization curves.
PRESETTING STATIONS The unit can store a total of 32 preset stations. –-~–=z is stored, preset MONO TUNER a preset number number is assigned to tune into When a station to the station. a preset station Use the directly. BAND *PRESET SHIFT 0-9,+1 o 1 BAND 2 2 .............J ■ CLEAR Press the lWNER/BAND button repeatedly select the desired band, FM or AM. To select a bared with the remote control Press the BANID button while pressing the SHIFT Press the H a station.
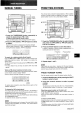
/ PLAYING DISCS BASIC OPERATIONS Load discs, DISC DIRECT PLAY DISC DIRECT PLAY DISC CHANGE RANDOMI REPEAT AOPEN/ CLOSE EDITI CHECK To play all discs in the disc compartment, - button. All discs are played press the once. Elapsed playing time I 0-9,+1 o CD b SHIFT II ■ Number *,W of track being played To play one disc only, press one of the DISC DIRECT PLAY buttons.
To check the remaining During time play, press the EDIT/CHECK SHIFT button on the remote remaining until all tracks finish the play time display, button while pressing the PROGRAMMED PLAY control. The amount of time playing is displayed. To restore repeat the above again. Up to 30 tracks discs. can be programmed from any of the inserted m ● When loading an 8-cm (3-inch) the inner circle be damaged ● ● ● ● disc, make sure to put it onto of the tray precisely.
BASIC RECORDING BASIC OPERATIONS This section external explains how to record from the tuner, CD player, or equipment. 1 (deck 2) (deck 1) .... 3 ----+4,----.11 : 3 ............. +,~~ 1 2 3 Usable tapes Use Type I (normal), for playback. Type II (high/CrOz) or Type IV (metal) tapes Preparation 1 Press the TAPE button. 2 Press the W4 button to open the cassette holder and insert a tape with exposed side downwards. Push the cassette holder to close it.
RECORDING FROM TAPE TO TAPE About ● cassette To prevent tapes accidental erasure, break off the plastic tabs on the cassette tape after recording other pointed tool. Side A , or
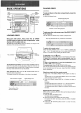
6 Press the ● button on deck 1 to start recording on the first side. Al EDIT RECORDING The Al edit function enables CD recording without worrying about tape length and track length. When a CD is inserted, the unit automatically calculates track lengths. If necessary, the order of tracks is rearranged so that no track is cut short. (Al: Artificial intelligence) CD play and recording of edited tracks for the first side start simultaneously.
6 ‘PROGRAMMED EDIT RECORDING Repeat step 5 for the rest of the tracks for side A. A track whose playing time is longer than the remaining cannot The programmed checking edit function the remaining enables time on each CD recording while Programmed Total number of programmed tracks side of the tape as the tracks I tracks are programmed. 5 4 Remain~ng 7 5 3,5,7, 8,9 1 time of side A 3,7,8,9 2 time be programmed.
MICROPHONE VOCAL FADER/MULTIPLEX MIXING FUNCTIONS This unit can use discs or tapes as Karaoke sources. Press the VOCAL FADER/MULTIPLEX button repeatedly to select the vocal fader or multiplex function. Use the vocal fader function for ordinary discs or tapes. Use the multiplex function for multi audio discs or tapes. Each time the VOCAL FADER/MULTIPLEX button is pressed, one of these functions is selected cyclically.
KARAOKE PROGRAMS To skip a track Press the - button. The skipped track is cleared from the program. To clear all the reservations Press the * 2 2 PE- 1 1,2 W 4 button repeatedly until “K - POO is displayed. Press it once more to cancel the Karaoke returns programs. The display to that of CD play. m ●“If” the reserved track number does not exist on the selected disc or there is no disc on the reserved disc tray, the unit stops playing and the display flashes.
4 Within 4 seconds, select the duration for the timer-activated period with the M DOWN or ➤Fl UP button. SETTING THE TIMER 1 The duration 2,4 1,2 3 1,2 6 2,4 “7”-J--”l-j:-------! -:. M / for the timer-activated 5 and 240 minutes ● in 5-minute period can be set between steps. If this step is not completed within 4 seconds, repeat from step 1. 5 Prepare the source. To listen to CD, load the disc(s) to be played. To listen to tape playback, insert a tape into the deck.
SETTING THE SLEEP TIMER BASIC OPERATION L ——-l ● 1 3 ! Caoa 10 000 .&). 00 em Oow 000 ‘..__. - —2 ./ 1 \o ,, ..___ .~ ‘\,, / I I / ‘i The unit can be turned off automatically 2,4 at a specified time. Use the remote control. 1 Pressi the SLEEP button while pressing the SHIFT button. Preparation ● ● Connect the supplied stereo turntable to the main unit. (See page 4) Set the EQUALIZER AMP. selector on the turntable to ON position.
CONNECTING EQUIPMENT SUPER WOOFER q JACK OPTIONAL Connect an optional to the jack. SURROUND CD DIGITAL OUT (OPTICAL) Connect jacks. IN to the SURROUND speaker SPEAKERS to the R jack, and the left positioning Place the surround VIDEO/AUX speakers the right d JACKS to the L jack. Standard PHONO IN sub woofer with a built-in amplifier SPEAKERS the surround Connect speaker powered the Operating speakers Instructions behind the listening of the surround area. Refer to speakers.
CARE AND MAINTENANCE Care of discs When a disc becomes dirty, wipe the disc from the center out ● with a cleaning cloth, 13ccasional care and maintenance of the unit and the software are needed to optimize the performance of your unit. To clean the cabinet Use a soft and dry cloth. If the surfaces are extremely Imoistened mild with dirty, detergent use solution. solvents, such as alcohol, benzine damage the finish of the unit.
SPECIFICATIONS General Power requirements Power consumption Dimensions of main unit (W XHXD) Weight of main unit Main unit CX-ZR525 FM tuner section Tuning range Usable sensitivity (IHF) Antenna terminals AM tuner section Tuning range Usable sensitivity Antenna Amplifier section Power output* 87.
“rROUBLESHOOTING If the unit fails Instructions, to perform GUIDE as described check the following PARTS INDEX in these Operating guide. Instructions about each part on the main unit or remote are indicated on the pages ~a~ghabetical GENERAL Irhere is no sound. * Is the AC cord connected properly? ● Is there a bad connection? (-+ page 3, 4) ● There may be a short circuit in the speaker + ● Disconnect the connections. Was an incorrect AC function cord, then Pages terminals.
7 ADVERTENCIA PARA REDUCIR EL RIESGO DE INCENDIO DESCARGA ELECTRICA, NO EXPONGA APARATO A LA LLUVIA O LA HUMEDAD. o ES- E h 1A ~ A ● 8 RISK OF ELECTRIC SHOCK DO NOT OPEN A ● Condensation — Puede condensarse humedad en el objetivo de recogida del disco compacto en Ios siguientes cases: - Cuando mueva la unidad de un sitio fr[o a otro caliente. - Acabe de encenderse la calefaccion. - Utilice la unidad en una habitation con gran humedad. - La unidad se enfrie por el aire acondicionado.
Iwantenimriento Limpie la unidad solo como se recomienda en Ias Manual de instrucciones. INDICE DE CONTENIDO Dahos aue reauieren reparaciones repare Iiaga que un tecnico cualificado PROCEDIMIENTOS esta unidad en Ios siguientes cases: - El cable de alimentacion o el adaptador de enchufe de CA se han daiiado. - Han entrado objetos o Iiquido en el interior de la unidad. - La unidad se ha expuesto a la Iluvia o el agua. - La unidad parece funcionar incorrectamente.
CONEXIONES (PARA Z-R524) 2 Conecte Antes de conectar el cable de CA El voltaje nominal de la unidad, 120 V CA. Compruebe trasero concuerda en el panel trasero, nominal con la tension altavoces a la unidad de sonido periferico principal. Conecte el cable del altavoz terminal SURROUND derecho SPEAKERS periferico al R, y el del izquierdo de sonido al terminal SURROUND SPEAKERS L. mostrado sila tension Ios Surround mostrada es en el panel de su Iocalidad.
CONEXIONES (PARA Z-R525) 2 Conecte el plato giradiscos estereo a la unidad principal. Conecte el enchufe rojo a la toma PHONO a la toma PHONO IN L, IN R, y el blanco Antes de conectar e[ cable de CA El voliaje nominal de la unidad, mostrado en el panel trasero, 120V CA. Compruebe sila tension nominal mostrada trasero concuerda con la tension de su Iocalidad. es en el panel IMPOIRTANTE ● Conecte ● en primer Iugar. Conecte el cable de CA al final. No [hay diferencias entre Ios altavoces.
CONEXION Para fijar la antena de AM a una superficie: Inserte el gancho en la ranura. Para mejorar antena DE UNA ANTENA EXTERIOR la recepcion de FM, se recomienda utilizar una exterior. Conecte la antena exterior al terminal FM 75 Q. Para situar Ias antenas Antena unipolar de FM: Extienda esta antena extremes a la pared. horizontalmente en forma de T y fije sus Cuadro de antena de AM: Coloquela para obtener la mejor recepcion.
Para utilizar el boton FUNCTION en el mando a dktancia El boton unidad FUNCTION principal sustituye a Ios botones (TAPE, TUNER/BAND, de funcion PHONO, en la AJUSTE DEL RELOJ VIDEO/AUX, CD), Cada vez que presione c(clicamente la siguiente el boton funcion. FUNCTION, se seleccionar (( .. . . . ..J II II aaci EEm El mando a distancia siguientes cases: - El recorrido entre puede el mando clentro del visor est solar directs.
AJUSTE SENCILLO ECUALIZADOR DE AUDIO GRAFICO T-BASS ELECTRONIC GRAPHIC EQUALIZER PHONES VOLUME CONTROL DEL VOLUMEN Esta unidad proporciona tres curvas de ecualizacion distintas, que son Ias siguientes. Gire el control VOLUME de la unidad principal en el sentido de Ias aauias del reloi nara aumentar el volumen. ,. v en el .U-,----.,, sentido contrario para reducirlo. El visor muestra el nivel de volumen nivel puede ajustarse durante 4 segundos.
SINTONIZACION MANUAL PRESINTONIZACION EMISORAS DE BAND La unidad puede almacenar hasta 32 emisoras presintonizadas. Al almacenarse una emisora, se Ie asigna un ntimero prefijado. Utilice el numero prefijado para recibir directamente una emisora presintonizada. SHIFT -PRESET MONO TUNER 1’ 0-9,+1 o 1 2. BAND 2 SHIFT ■ CLEAR 1 Presione varias veces el boton TUNERIBAND para seleccionar la banda de radio que alesee, FM O AM.
I FUNClONES REPRODUCTION BASICAS Cargue DISC DIRECT PLAY DISC PLAY Ios discos. Para reproducer todos Ios discos compartimiento, presione e! boton >. Todos Ios discos DISC CHANGE RANDOW REPEAT AOPEN/ CLOSE EDITI CHECK DE DISCOS se reproduce Tiempo en el una vez. de reproduction transcurrido 0-9,+10 CD b SHIFT II ■ 44, Ntimero W de tema que se reproduce Para reproducer botones el boton CD, y despues A OPEN/CLOSE para abrir discos.
Pra cornprobar el tiempo restante Durante la reproduction, pulse el boton EDIT/CHECK mientras pulsa SHIFT en el mando a distancia. Aparecera el tiempo restante para la finalization de la reproduction de todos Ios temas. Para recuperar la indication de tiempo de reproduction, vuelva a realizar el procedimiento descrito. REPRODUCTION Es posible programar insertados.
FUNClONES GRABACION BASICAS BASICA En esta seccion se describe como grabar desde el sintonizador, reproductor de CD o equipo externo. I- 2 (platina 2) (platina 1) ., .... 3 -----++,----.11 II 2 3 1 ............. 2 +,~~ 3 Cintas de cassette que puede utilizar Emplee cintas Type I (normal), Type II (position Type IV (metal) para la reproduction. aita/cromo) o Procedimientos ● 1 Presione el boton TAPE.
GRABAC1ON DE CINTA A CINTA Acerca de Ias cintas de cassette ● Para impedir borrarlas accidental mente, romps [as Ienguetas de pkktico de la cinta de cassette despues de u otra herramienta en grabada utilizando un destornillador punta. Lado A , ~:a<;! 1 q 5 4 Ranura de deteccion de cintas Type 11 ,> Preparatives Bobine Ias cintas hasta Ios puntos donde vaya a iniciar la reproduction y la grabacion, ● Observe que la grabacion se realiza solo en una cara de la cinta.
GRABACION ● de la platina 1 para comenzar en el primer Iado. 6 Presione el boton DE EDICION Al la grabacion La funcion de edition Al permite grabar discos compactos sin necesidad de preocuparse de la duration de la cinta de cassette o de Ios temas. Al insertar un disco compacto, la unidad calcula automaticamente la duration de Ios temas. Si es necesario, se reaiusta el orden de 10s temas Dara We no se interrumPa la gra~acion de ninguno de ellos.
GRABAC1ON DE EDICION PROGRAMADA 6 Repita el paso 5 para el resto de Ios temas para el Iado A. No se puede programar un tema con un tiempo de reproduction mas Iargo que el tiempo Ntimero La funcion de edition un disco compacto prograrnada mientras permite se comprueba en cada Iado de la cinta de cassette la grabacion el tiempo al programar temas desde restante. Temas total de program~dos restante Ios temas.
FUNCIONES MULTIPLEX MEZCLAS CON MICROFONO DE ATENUACION VOCAL/ Es posible utilizar con esta unidad discos o cintas como fuentes de Karaoke. Pulse el boton VOCAL FADEWMULTIPLEX varias veces para seleccionar la funcion multiplex o de atenuacion vocal. KARAOKE VOCAL FADER/ MULTIPLEX Emplee la funcion de atenuacion vocal para discos o cintas estandar. Emplee la funcion multiplex para discos o cintas de audio multiple.
PROGRAMASDEKARAOKE Para omitir un terna Pulse el boton ➤F. La cancion saltada se borrara del programa. Para eliminar todas Ias reservas Pulse el boton - varias veces hasta que aparezca “K - POW. 2 2 1“ W 1,2■- Vuelva Karaoke. 4 a pulsarlo una vez para cancelar Ios programas El visor volvera a mostrar la indication de de reproduction de CD. m ● Antes o ciurante maximo actual.
4 En menos de 4 seuundos seleccione activado con del temporizador 1+ DOWN O ~ UP AJUSTE DEL TEMPORIZADOR ——— 6 el periodo el boton 1 iti El periodo del temporizador activado puede entre 5 y 240 minutes, en pasos de 5 minutes. 2,4 3 1,2 1,2 2,4 6 La unidad se puede encender a una hors determinada Ios dfas utilizando el temporizador incorporado. “ Si este paso no se realiza en menos de 4 segundos, repetir el procedimiento desde el paso 1.
AJUSTE DEL TEMPORIZADOR PARA APAGAR LA UhllDAD FUNClONES BASICAS -1 ● ‘3 1- 2 1 2,4 La unidad puede apagarse automaticamente a una hors especificada. Preparatives Utilice et mando 1 Plresione a distancia. el boiton presionado el boton ● SLEEP mientras mantiene SHIFT. ● Conecte principal Ajuste el plato giradiscos estereo (consulte la pagina 4).
TOMA SUPER WOOFER d CONEXION DE EWIPOS OPCIONALES Conecte a la toma un altavoz con amplificador incorporado. optional TOMAS SURROUND SPEAKERS Conecte Ios altavoces SURROUND CD DIGITAL OUT (OPTICAL) SPEAKERS. R, y el izquierdo Colocacion de sonido Conecte PHONO IN Ias instrucciones de funcionamiento Ios cables estandar TOMAS VIDEO/AUX AUDICION DE FUENTES EXTERNAS ~ Utilice un cable con adaptadores de audio (reproductor televisor, etc.) Conecte el adaptador la toma L. con esta unidad.
CUIIDADO Y MANTENIMIENTO Es necesario realizar de la unidad y sus partes en ocasiones el cuidado para optimizar Cuidado de Ios discos compactos ● Cuando se ensucie un disco, fuera con un paho Iimpiador. Ifmpielo desde el centro hacia y mantenimiento el rendimiento de la misma. Para Iimpiar la carcasa Utilice un pafio suave y seco.
General Alimentacion electrica ESPECIFICACIONES Unidad minci~al Sintonizador CX-ZR525 Intervalo 87,5 MHz a 108 MHz 16,2 dBf 75 ohmios (no balanceada) Sistema de altavoces SX-ZR525 3 v(as, reflejo degraves Graves: 220 mm tipo conico Agudos: 60 mm tipo conico Super tweeter: 20 mm tipo ceramico 6 ohmios 89 dBIWlm 260 x 444 x 275 mm 4,6 kg Tipo de carcasa Altavoces de AM de sintonizacion Detectabilidad Antena 9,2 kg de FM Intervalo de sintonizacion Detectabilidad util (IHF) Terminals de antena Sin
GUIA DE SOLUCION PROBLEMAS DE INDICE DE PARTES Las instrucciones Si esta unidad no funciona de la forma explicada Instrucciones, compruebe la siguiente gufa. en estas sobre cada una de Ias partes principal o del mando a distancia indicadas a continuation. se explican de la unidad en Ias paginas (En orden alfabetico) GENERAL No se emite sonido.
7 AVERTISSEMENT POUR REDUIRE LES RISQUES D’INCENDIE OU D’ELECTROCUTION, N’EXPOSEZ PAS CET APPAREIL A LA PLUIE OU A L’HUMIDITE. , A ● RISK OF ELECTRIC SHOCK DO NOT OPEN “CAUTION:TO REDUCE ELECTRIC DO NOT REMOVE REFER COVER SERVICING SERVICE des symboles THE ● (OR BACK). PARTS A ● INSIDE. PERSONNEL.
Entrerien Nettoyez I’appareil uniquement conformement recommendations faites clans Ie mode d’emploi.
CONNEXIONS Avant de raccorder [POUR LE Z-R524) 2 Raccordez I’appareil Ies haut-parleurs principal. d’effet spatial a Raccordez Ie fil du haut-parleur d’effet spatial droit a la borne SURROUND SPEAKERS Ret Ie fil du haut-parleur gauche a la borne SURROUND SPEAKERS L. Ie cordon d’alimentation La tension nominale de votre appareil indiquee a I’arriere du parmeau arriere s’eleve a 120 V CA.
CONNEXIONS (POUR LE Z-R525) 2 Raccordez principal. Raccordez blanche Ie tourne-disque stereo a I’appakreil la fiche rouge a la prise PHONO a la prise PHONO IN R et la fiche IN L. Avant de raccorder Ie cordon d’alimentation La tension nominale de votre appareil indiquee panneau arriere s’eleve a 120 V CA. Assurez-vous nominale indiquee a I’arriere de I’appareil a I’arriere du que la tension correspond a la tension ● O # locale.
— . . . . .. . .. . Fixez I’attache x.-. RACCORDEMENT EXTERIEURE Awl sur une surlace Pour tawe temr ramenne a la rainure. Pour une meilleure reception exterieure est recommandee. Branchez I’antenne exterieure D’UNE ANTENNE FM, l’utilisation d’une antenne a la borne FM 75 Q. Pour positioner Ies antennes Antenne coaxiale FM: Deployez cette antenne ses extremities au mur. Antenne-cadre Positionnez-la horizontalement en forme de T et fixez AM: clans la meilleure direction.
Pour utiliser la touche FUNCTION de la telecommande La touche FUNCTION TUNER/BAND, remplace Ies touches PHONO, VIDEO/AUX, Chaque fois que vous fonction suivante deux cassettes appuyez sent CD) de I’appareil sur la touche est selectionnee sent introduites deux Iecteurs FUNCTION. de fonction (TAPE, REGLAGE DE L’HORLOGE principal. FUNCTION, la selon Ie cycle decrit.
I EGALISEUR REGLAGE AUDIO SIMPLE GRAPHKIUE . .4, T-BASS T-BASS SHIFT VOLUME PHONES VOLUME COMMANDE DU VOLUME Cet appareil offre Ies cinq differences courbes d’egalisation suivantes: Tournez la commande VOLUME de I’appareil principal clans Ie sens des aiguilles d’une montre pour augmenter Ie volume et clans Ie sens contraire pour Ie diminuer. Le niveau du volume appara!t sur I’ecran d’affichage pendant 4 secondes. II peut &re regle entre O et MAX (31).
WNTONISATION MANUELLE PRESELECTION DES STATIONS Cet appareil peut memoriser un maximum de 32 emetteurs. Lorsqu’un emetteur est memorise, un numero de preelection est attribue a cet emetteur. Utilisez Ie numero de preelection pour passer directement a I’emetteur memorise. MONO TUNER BAND *PRESET 1 SHIFT 2 u \\. ___.. .; ■ CLEAR \ 1 7 Appuyez plusieurs fois sur la touche TUNER/ 13AND pour selectionner la gamme d’onde desir6e: FM ou AM. 2 , I , ,L~--W.—[, // Au .
I OPERATIONS LECTURE DES DISQUES DE BASE Chargez nice DISC DIRECT PLAY RANDOMI REPEAT Ies disques. Pour reproduire tous Ies disques du compartment a disques, appuyez sur la touche E. Tous Ies disques sent reproduits une seule fois. Duree de lecture ecoulee EDITI CHECK 0-9,+10 SHIFT Numero de la plage Iue Pour ne reproduire qu’un seul disque, appuyez sur I’une des touches DISC DIRECT PLAY.
Pour verifier la duree restante En tours de lecture, appuyez sur la touche EDIT/CHECK tout en appuyant sur la touche SHIFT de la telecommande. Le temps restant jusqu’a la fin de la lecture de toutes Ies plages s’affiche. Pour revenir a I’affichage du temps de lecture, repetez ce qui precede. LECTURE PROGRAMMED Vous pouvez programmer inseres. jusqu’a 30 plages surtous Ies disques m E● Lclrsque vous exactement chargez un disque clans Ie cercle interieur de 8 cm, deposez-le du plateau.
OPERATIONS ENREGISTREMENT DE BASE DE BASE Cette partie vous explique la fayon d’enregistrer a partir syntoniseur, du Iecteur CD ou d’un appareil externe. du 1 2 (platine 2) (platine 1) ... 3 ----+, ---”II .... 2 II 2 3 +,- 1 3 Cassettes utilisables Utilisez des cassettes de Type I (normal) ou de Type II(high/ Cr02) pour lecture. sur la touche TAPE. 7 Appuyez 2 Appuyez sur compartment avec la bande Repoussez Ie refermer.
EINREGISTREMENT A CASSETTE DE CASSETTE A propos des cassettes ● Pour eviter tout effacement accidental, brisez [es Ianguettes en plastique de la cassette a I’aide d’un tournevisou d’un objet pointuau terme de I’enregistrement. Face A ,
ENREGISTREMENT MONTAGE Al 6 Appuyez sur la touche ● de la platine 1 pour entamer I’enregistrement sur la premiere face. PAR La fonction de montage Al permet d’effectuer un enregistrement CD saris se soucier de la Iongueur de la bande et de la duree de la plage musicale. Lorsqu’un CD est insere, I’appareil calcule automatiquement la duree des plages. Si necessaire, I’ordre des plages est reorganise pour eviter d’interrompre une plage rnu{icale.
ENREGISTREMENT PROGRAMME DE MONTAGE 6 Repetez face A. I’etape 5 pour Ies autres plages de la Une plage dent la duree de lecture est superieure residuel Nombre La fxtction de montage CD tout en verifiant cassette Iarsque programme Ie temps Ies plages permet restant plages un enregistrement sur chaque face au temps ne peut pas &re programmed. Plages total de programmers programmers de la sent programmers.
Appuyez plusieurs fois sur la touche VOCAL FADER/ MIXAGE MICROPHONE MULTIPLEX pour selectionner fonction multiplex. vocal ou la Utilisez la fonction d’attenuateur vocal pour Ies disques et cassettes ordinaires. Utilisez la fonction multiplex pour des disques ou cassettes multiaudio. Chaque fois que vous appuyez sur la touche VOCAL FADER/ MULTIPLEX, I’une de ces fonctions est selectionnee cycliquement.
IWOGRAMMESKARAOKE Pour arr~ter la lecture Appuyez sur reprendre la lecture. ❑ . Appuyez la touche P de nouveau pour Pour sauter une plage Appuyez 2 2 w 1 1,2 sur la touche plusieurs Avart et pendant la lecture de CD, vous pouvez reserver un maximum de 15 plages a reproduire apres la plage en tours. 7 est effacee du fois sur la touche - ce que une nouvelle fois pour annuler Ies programmed karaoke. ‘[K - POO” apparaisse. a celui de la lecture CD.
REGLAGE DU PROGRAMMATEUR 4 Dans Ies 4 secondes, selectionnez la duree de la periode deactivation du programmateur en appuyant sur la touche DOWN OU WI UP. 1 3 1,2! 2,4 1,2 2,4 7’ 6 Le pragrammateur integre permet a I’appareil route chaque jour a une heure specifiee. de se mettre La duree de la p6riode deactivation du programmateur peut @tre reglee entre 5 et 240 minutes par sauts de 5 minutes. ● Si cette etape n’est pas effectuee clans Ies 4 secondes, repetez I’etape 1. 5 Preparez la source.
REGLAGE DU PROGRAMMATEUR D’EXTINCTION OPERATIONS DE BASE ;Ocxm IC3CX2 1 !C3cio ;C3 ‘al am -km= —2 :Clcacl aocx L..._.-./ \o \,, / II /, ,,’ Cet appareil Utilisez i, peut se mettre hors tension a une heure specifiee. la telecommande. 1 Appuyez sur la touche SLEEP tout en appuyant sur la touche SHIFT.
RACCORDEMENT D’UN EIQUIPEMENT OPTIONNEL PRISE SUPER WOOFER d Branchez-y un haut-parleur amplificateur d’extr~mes PRISES SURROUND Branchez-y parleur CD DIGITAL OUT (OPTICAL) graves optionnel avec integre. Ies haut-parleurs SPEAKERS d’effet spatial. droit a la prise R et Ie haut-parleur d Raccordez gauche Ie haut- a la prise L. Positionnement standard Placez Ies haut-parleurs d’effet spatial derriere la zone d’ecoute. Reportez-vous au mode d’emploi des haut-parleurs d’effet spatial.
—. SOIN ET ENTRETIEN —— Des soins et un entretien sent Orgimes optimales Soin des disques ● occasionnels indispensables de I’appareil pour assurer Lorsqu’undisque est encrasse, frottez Ie disque du centre vers I’exterieur au moyen d’un chiffon de nettoyage. et de ses des performances de votre appareil. Pow’ nettoyer Ie boitier Utilisez un chiffon sec et doux. Si la surface est extrem6ment sale, utilisez un chiffon doux Ieg
Generalities SPECIFICATIONS Armareil m’inci~al CX-ZR525 Syntoniseur FM Plage de syntonisation Sensibility utile (IHF) Bomes d’antenne Syntoniseur AM Plage de syntonisation Sensibility Antenne utile 87,5 MHz a 108 MHz 16,2 dBf 75 ohms (asynchrone) Systeme de haut-parleur 530 kHz a 1710 kHz (saut de 10 kHz) 531 kHz a 1602 kHz (saut de 9 kHz) 350 pV/m Antenne-cadre 100 W+100W(50Hz-20kHz, THD inferieur a 1 %, 6 ohms) ‘saris raccordement aux haut-parleurs 9,2 kg SX-ZR525 3 voies, bass reflex Grave: C6
GUIDE DE DEPANNAGE INDEX DES COMPOSANTS Si I’appareil ne fonctionne plus conformement de ce mode d’emploi, verifier Ie guide suivant. aux description GEN15RALITES II n’y a pas de son. ● ● ● Le cordon d’alimentation connexions ● est-il bien connecte? II a une mauvaise connexion? (+ page 3, 4) II se peut qu’il y ait un court-circuit aux bornes de haut-parlbur. -+ Debranchez Ie cordon d’alimentation, puis retablissez Ies de haut-parleur.
C?I// ~0// fr(?l?1-80&Buy-A/~A Printed in Malaysia (United States and Puerto Rico) AIWA CO.,LTD.