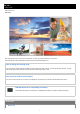
Help Guide Digital Still Camera DSC-RX0 Use this manual if you encounter any problems, or have any questions about your product. This Help Guide is also available as a PDF, which can be downloaded here. How to change the shooting mode You can set the shooting mode according to the images you want to shoot, such as still images, movies, or highframe-rate (super-slow-motion) movies, and the functions you want to use.
Checking the camera and the supplied items Identifying parts List of icons on the screen Preparing the camera Charging the battery pack Inserting the battery pack into the camera Charging the battery pack while it is inserted in the camera Charging by connecting to a computer Battery life and the number of images that can be recorded using a battery pack Supplying power from a wall outlet (wall socket) Removing the battery pack Inserting a memory card (sold separately) Inserting a memory card Removing the
Memory recall (Camera Settings1/Camera Settings2) Intelligent Auto (movie) Shooting super-slow-motion movies (High Frame Rate) Shooting images underwater Using shooting functions Switching the screen display (Shooting) Selecting still image size/image quality Image Size (still image) Aspect Ratio (still image) Quality (still image) Adjusting the focus Focus Mode Focus Area Lock-on AF AF Area Auto Clear Focus-lock Preset Focus NEAR Mode in PF Manual Focus MF Assist Focus Magnif.
AEL w/ shutter (still image) Zebra Selecting a drive mode (Continuous shooting/Self-timer) Drive Mode Cont. Shooting Spd Priority Cont. Self-timer Self-timer(Cont) Cont. Bracket Single Bracket WB bracket DRO Bracket Settings for bracket shooting Indicator during bracket shooting Selecting the ISO sensitivity ISO ISO AUTO Min. SS Multi Frame NR Correcting the brightness or contrast D-Range Opt.
Record Setting (movie) Dual Video REC Marker Display (movie) Marker Settings (movie) Mon. Off dur REC (movie) REC Lamp Audio Recording Audio Rec Level Audio Level Display Wind Noise Reduct. Auto Slow Shut. (movie) MOVIE Button Picture Profile Adjusting the settings for super-slow-motion shooting (HFR Settings) Selecting the exposure mode for super-slow-motion shooting (Exposure Mode) Customizing the shooting functions for convenient use Memory (Camera Settings1/Camera Settings2) Function Menu Set.
Grid Line Auto Review Live View Display Release w/o Card Viewing Viewing still images Playing back images Playback zoom Image Index Switching the screen display (during playback) Playing back movies Playing back movies Delete Specify Printing Using viewing functions View Mode Slide Show Rotate Enlarge Initial Pos. Protect 4K Still Image PB Viewing images on a TV Viewing images on an HD TV Viewing images on a “BRAVIA” Sync-compatible TV Changing settings Monitor Brightness Gamma Disp.
Auto Pwr OFF Temp. Flip NTSC/PAL Selector Demo Mode TC/UB Settings HDMI Settings: HDMI Resolution HDMI Settings: 24p/60p Output (movie) (Only for 1080 60i compatible models) HDMI Settings: HDMI Info. Display HDMI Settings: TC Output (movie) HDMI Settings: REC Control (movie) HDMI Settings: CTRL FOR HDMI HDMI 4K Output (movie) USB Connection USB LUN Setting USB Power Supply PC Remote Settings: Still Img. Save Dest.
Setting Reset Using Wi-Fi/Bluetooth functions PlayMemories Mobile Controlling this product using a Smartphone Controlling the camera from a smartphone via Wi-Fi (Single connection) (Android) Controlling the camera from a smartphone via Wi-Fi (Single connection) (iPhone/iPad) Controlling multiple cameras from a smartphone via Wi-Fi (Multiple connections) Turning the camera on/off using a smartphone Turning the camera on/off from a smartphone using the Bluetooth function Transferring images to a Smartphone
Installing PlayMemories Home Software for Mac computers Image Data Converter Installing Image Data Converter Accessing Image Data Converter Guide Remote Camera Control Installing Remote Camera Control Accessing the Help of Remote Camera Control Connecting this product and a computer Connecting the product to a computer Importing images to the computer Disconnecting the product from the computer Creating a movie disc Selecting a disc to be created Creating Blu-ray Discs from high-definition image quality m
Other information ZEISS lens AVCHD format License Trademarks Troubleshooting If you have problems Troubleshooting Messages Self-diagnosis display Warning messages 4-698-613-11(1) Copyright 2017 Sony Corporation 10
Help Guide Digital Still Camera DSC-RX0 Checking the camera and the supplied items The number in parentheses indicates the number of pieces. Camera (1) NP-BJ1 Rechargeable battery pack (1) Micro USB Cable (1) AC Adaptor (1) Power cord (mains lead) (1)* (supplied in some countries/regions) * Multiple power cords may be supplied with your camera. Use the appropriate one that matches your country/region.
Help Guide Digital Still Camera DSC-RX0 Identifying parts When the covers are open 1. Recording lamp 2. Lens 3.
Do not cover this part during movie recording. Doing so may cause noise or lower the volume. 4. Lens protector You can replace this part with an optional accessory (sold separately). 5. Hook for strap To avoid dropping the camera, attach the wrist strap and place your hand through the strap when performing hand-held shooting. 6. 7. 8. 9. 10. 11. 12. 13. 14. 15. 16. 17. 18. 19. 20. 21.
To reattach the memory card/connector cover, insert it into the camera. Memory card protector Attach the memory card protector when you use the camera with an HDMI cable, micro USB cable, or external microphone connected. The memory card protector prevents memory card access errors when the memory card is accidentally loosened due to vibration or shock, etc. To remove the memory card protector, pull it out while pressing the holding parts on the top and the bottom of the protector.
Help Guide Digital Still Camera DSC-RX0 List of icons on the screen The displayed contents and their positions shown below are just a guideline, and may differ from the actual display. Because the monitor of this camera is small, some characters and icons may be difficult to see. For shooting For playback 1.
Image quality of still images Frame rate of movies Record setting of movies Remaining battery Remaining battery warning / USB power supply Bluetooth connection Connected to smartphone to control the camera/Not connected to smartphone (Single/Multi (Group Owner)/Multi (Client)) Airplane Mode Overlay icon No audio recording of movies Wind Noise Reduct.
Recording timing Gamma Disp. Assist Writing data/Number of images left to write 2. Drive Mode Metering Mode Focus Mode 7500K A5 G5 White Balance Focus Area DRO/Auto HDR +3 +3 +3 Creative Style /Contrast, Saturation, Sharpness Picture Effect ― Picture Profile Zebra 3.
Metered Manual ±0.
Help Guide Digital Still Camera DSC-RX0 Inserting the battery pack into the camera Explains how to insert the battery pack into the camera. 1 Open the battery cover. 2 Insert the battery pack while pressing the battery lock lever (A) with the tip of the battery until the battery locks into place. 3 Close the cover. Note When closing the cover, make sure that the yellow mark under the slide lock is hidden and the cover is tightly closed.
Help Guide Digital Still Camera DSC-RX0 Charging the battery pack while it is inserted in the camera When using the camera for the first time, be sure to charge the battery pack. The charged battery pack will discharge little by little, even if you do not use it. To avoid missing a shooting opportunity, charge the battery pack before shooting. 1 Turn the power off.
Note If the charge lamp flashes when the battery pack is not fully charged, remove the battery pack or disconnect the USB cable from the camera and then re-insert it to recharge. If the charge lamp on the camera flashes when the AC Adaptor is connected to the wall outlet (wall socket), this indicates that charging is temporarily stopped because the temperature is outside the recommended range. When the temperature gets back within the appropriate range, the charging resumes.
Help Guide Digital Still Camera DSC-RX0 Charging by connecting to a computer The battery pack can be charged by connecting the camera to a computer using a micro USB cable. 1 Turn off the product, and connect to the USB terminal of the computer. Note Note the following points when charging via a computer: If the product is connected to a laptop computer that is not connected to a power source, the laptop battery level decreases.
Help Guide Digital Still Camera DSC-RX0 Battery life and the number of images that can be recorded using a battery pack Battery life Number of images Shooting (still images) ― Approx. 240 Actual shooting (movies) Approx. 35 min. ― Continuous shooting (movies) Approx. 60 min. ― Note The above battery life and number of images applies when the battery pack has been fully charged. The battery life and number of images may decrease depending on the conditions of use.
Help Guide Digital Still Camera DSC-RX0 Supplying power from a wall outlet (wall socket) By using the supplied AC adaptor, you can shoot and playback images while the power is supplied from a wall outlet (wall socket). 1 Connect the camera to the wall outlet (wall socket) with a micro USB cable (supplied) and an AC adaptor (supplied). Note Before you shoot or play back images with power supplied from a wall outlet (wall socket), insert a charged battery pack into the camera.
Help Guide Digital Still Camera DSC-RX0 Removing the battery pack Explains how to remove the battery pack. 1 Make sure that the access lamp is not lit, and turn off the camera. 2 Open the battery cover. 3 Slide the battery lock lever (A) and remove the battery pack. Be careful not to drop the battery pack.
Help Guide Digital Still Camera DSC-RX0 Inserting a memory card Explains how to insert a memory card. 1 Open the memory card/connector cover. 2 Insert the memory card. For microSD/microSDHC/microSDXC cards: Insert a memory card with the card facing as illustrated in Figure (A). For Memory Stick Micro media: Insert a memory card with the card facing as illustrated in Figure (B).
3 Close the cover. Hint When you use a memory card with this product for the first time, it is recommended that you format the card using the product for stable performance of the memory card. Note When closing the cover, make sure that the yellow mark under the slide lock is hidden and the cover is tightly closed. If foreign matter such as grains of sand is caught inside the cover, it may damage the sealing gasket and cause water penetration.
Help Guide Digital Still Camera DSC-RX0 Removing the memory card Explains how to remove the memory card. 1 Open the memory card/connector cover. 2 Make sure that the access lamp (A) is not lit. 3 Push in on the memory card once to remove it.
Help Guide Digital Still Camera DSC-RX0 Usable memory cards You can use the following types of memory cards with this camera. The can be used for shooting still images or movies.
Help Guide Digital Still Camera DSC-RX0 Setting language, date and time When you turn on the camera for the first time or after you have initialized the functions, the setting screen for language, date and time will appear. 1 Turn on the camera. The language setting screen will appear and then setting screen for date and time will appear. 2 Select your language, and then press the 3 When the message [Set Area/Date/Time.
Help Guide Digital Still Camera DSC-RX0 Using the up/down/left/right buttons and the Enter button You can select setting items by pressing the up/down/left/right buttons. Your selection is determined when you press the (Enter) button. : Up button : Down button : Left button : Right button : Enter button DISP (Display Setting) is assigned to the up button. Each time you press the DISP button, the displayed content changes. (Playback) is assigned to the down button in shooting mode.
Help Guide Digital Still Camera DSC-RX0 Using MENU items In this section, you learn how to change settings related to all camera operations and execute camera functions including shooting, playback, and operation methods. 1 Press MENU button to display the MENU items. 2 Select the desired MENU item using the up/down/left/right buttons, and then press the (Enter) button. The display may move directly from step 1 to step 3 depending on the [Tile Menu] setting.
4 Select the desired setting value, and press the (Enter) button to confirm.
Help Guide Digital Still Camera DSC-RX0 Using the Fn (Function) button You can register frequently used functions to the Fn (Function) button and recall them while shooting. Up to 12 frequently used functions can be registered to the Fn (Function) button. 1 Press the Fn (Function) button in shooting mode. 2 Select a function to register by pressing the up/down/left/right buttons, and then press the button.
Help Guide Digital Still Camera DSC-RX0 Shooting still images Shoots still images. (Camera Settings1) → [Shoot Mode] → [Intelligent Auto]. 1 MENU → 2 Point the camera to the subject. 3 Press the SHUTTER/MOVIE button halfway down to focus. When the image is in focus, a beep sounds and the focus indicator ( ) lights up. The shortest shooting distance is approximately 50 cm (1.7 ft) (from the lens). 4 Press the SHUTTER/MOVIE button fully down. Focus indicator lights: Image is in the focus.
When the product cannot focus automatically, the focus indicator flashes and the beep does not sound. Either recompose the shot or change the focus setting. Focusing may be difficult in the following situations: It is dark and the subject is distant. The contrast of the subject is poor. The subject is seen through glass. The subject is moving quickly. There is reflective light or shiny surfaces. There is a flashing light. The subject is backlit. The subjects in the focus area have different focal distances.
Help Guide Digital Still Camera DSC-RX0 Shooting movies Shoots movies. (Camera Settings1) → [Shoot Mode] → 1 MENU → 2 Press the SHUTTER/MOVIE button to start recording. (Intelligent Auto). You can set the focus method for shooting movies to either [Preset Focus] or [Manual Focus]. 3 Press the SHUTTER/MOVIE button again to stop recording. Hint You can assign the start/stop movie recording function to a preferred key. Select MENU → Key(Shoot.)] → set [MOVIE] to the preferred key.
Sound from camera operations is recorded during movie recording. The sound of the SHUTTER/MOVIE button operating may be recorded when movie recording is finished. Recording may stop to protect the camera depending on the ambient temperature. Sound will not be recorded if you select MENU → (Camera Settings2) → [Audio Recording] → [Off]. Related Topic Intelligent Auto (movie) Preset Focus Manual Focus File Format (movie) MOVIE Button Recordable time of movies Custom Key(Shoot.
Help Guide Digital Still Camera DSC-RX0 Selecting a shooting mode Set the shooting mode according to the subject you want to shoot and the functions you want to use. 1 MENU → (Camera Settings1) → [Shoot Mode] → desired mode. You can also change the shooting mode by pressing the left button in the default settings. Menu item details (Intelligent Auto): Shoots with automatic scene recognition. (Superior Auto): Shoots with automatic scene recognition.
Help Guide Digital Still Camera DSC-RX0 Intelligent Auto (still image) The camera shoots with automatic scene recognition. 1 MENU → 2 Point the camera to the subject. (Camera Settings1) → [Shoot Mode] → [Intelligent Auto]. When the camera recognized the scene, the icon for the recognized scene appears on the screen. 3 Press the SHUTTER/MOVIE button halfway down to focus, and then press the SHUTTER/MOVIE button fully down to take the picture.
Help Guide Digital Still Camera DSC-RX0 Superior Auto (still image) The camera shoots with automatic scene recognition. This mode takes clear images of dark or backlit scenes. For low-lit or backlit scenes, if necessary the camera may shoot multiple images and create a composite image, etc., to record higher quality images than in Intelligent Auto mode. (Camera Settings1) → [Shoot Mode] → [Superior Auto]. 1 MENU → 2 Point the camera to the subject.
Help Guide Digital Still Camera DSC-RX0 About Scene Recognition Scene Recognition operates in [Intelligent Auto] mode and [Superior Auto] mode. This function allows the product to automatically recognize the shooting conditions and shoot the image.
Help Guide Digital Still Camera DSC-RX0 The advantages of automatic shooting This camera is equipped with the following three automatic shooting modes: [Intelligent Auto], [Superior Auto], and [Program Auto]. (Intelligent Auto): Allows you to shoot with automatic scene recognition. (Superior Auto): Allows you to shoot with automatic scene recognition. This mode takes clear images of dark or backlit scenes.
Help Guide Digital Still Camera DSC-RX0 Program Auto (still image/movie) Allows you to shoot with the exposure (shutter speed) adjusted automatically. You can set shooting functions such as [ISO]. 1 MENU → 2 Set the shooting functions to your desired settings. 3 Press the SHUTTER/MOVIE button to shoot the image. (Camera Settings1) → [Shoot Mode] → [Program Auto] or [ Program Auto]. Press the SHUTTER/MOVIE button again to stop recording during movie shooting.
Help Guide Digital Still Camera DSC-RX0 Manual Exposure (still image/movie) You can shoot with the desired exposure setting by adjusting the shutter speed. The shutter speed can be changed while recording movies. 1 MENU → (Camera Settings1) → [Shoot Mode] → [Manual Exposure] or [ 2 MENU → (Camera Settings1) → [Shutter Speed]. 3 Use the left/right buttons to select the setting value and press the Manual Exposure]. (Enter) button.
4-698-613-11(1) Copyright 2017 Sony Corporation 46
Help Guide Digital Still Camera DSC-RX0 Memory recall (Camera Settings1/Camera Settings2) Allows you to shoot an image after recalling frequently used modes or camera settings registered to [ Memory] in advance. / (Camera Settings1) → [Shoot Mode] → [Memory recall]. 1 MENU → 2 Press the left/right buttons to select the desired number, and then press the You can also recall registered modes by selecting MENU → (Enter) button. (Camera Settings1) → [ / Recall].
Help Guide Digital Still Camera DSC-RX0 Intelligent Auto (movie) You can shoot movies with automatic camera settings. 1 MENU → 2 Press the SHUTTER/MOVIE button to start recording. 3 Press the SHUTTER/MOVIE button again to stop recording. (Camera Settings1) → [Shoot Mode] → (Intelligent Auto).
Help Guide Digital Still Camera DSC-RX0 Shooting super-slow-motion movies (High Frame Rate) By shooting with a higher frame rate than the recording format, you can record a smooth super-slow-motion movie. 1 MENU→ (Camera Settings1) → [Shoot Mode] → [High Frame Rate] → desired exposure mode. The shooting setting screen will be displayed. 2 MENU → Setting], [ 3 Point the camera at the subject and adjust settings such as the focus.
Note Sound will not be recorded. The movie will be recorded in XAVC S HD format. It may take time for recording to finish after you press the SHUTTER/MOVIE button. Wait until the display switches to the shooting standby screen to start shooting again.
Help Guide Digital Still Camera DSC-RX0 Shooting images underwater You can also use this camera underwater. In underwater shooting, the brightness and the white balance are different from what they would be under ordinary shooting conditions. It is recommended that you shoot images with the settings below when you shoot images underwater using this camera alone or with the housing (sold separately).
Help Guide Digital Still Camera DSC-RX0 Switching the screen display (Shooting) You can change the display contents on the screen. 1 Press the DISP (Display Setting) button. Each time you press the DISP button, the screen display changes. Display All Info. No Disp. Info. Histogram Hint To hide the grid lines displayed during shooting, select MENU → To hide the marker displayed during movie recording, select MENU → Related Topic 52 (Camera Settings2) → [Grid Line] → [Off].
Grid Line Marker Display (movie) 4-698-613-11(1) Copyright 2017 Sony Corporation 53
Help Guide Digital Still Camera DSC-RX0 Image Size (still image) The larger the image size, the more detail will be reproduced when the image is printed on large-format paper. The smaller the image size, the more images can be recorded. 1 (Camera Settings1) → [ MENU → Image Size] → desired setting. Menu item details When [ Aspect Ratio] is set to [3:2] L: 15M: 4800×3200 pixels M: 7.7M: 3408×2272 pixels S: 3.8M: 2400×1600 pixels When [ Aspect Ratio] is set to [4:3] L: 14M: 4272×3200 pixels M: 6.
Help Guide Digital Still Camera DSC-RX0 Aspect Ratio (still image) Sets the aspect ratio of still images. 1 MENU → (Camera Settings1) → [ Aspect Ratio] → desired setting. Menu item details 3:2: Suitable for standard prints. 4:3: For shooting in a size suitable for viewing on a computer. 16:9: For viewing on a high-definition TV. 1:1: For shooting in composition as a medium format camera.
Help Guide Digital Still Camera DSC-RX0 Quality (still image) Selects the compression format of still images. 1 MENU → (Camera Settings1) → [ Quality] → desired setting. Menu item details RAW: File format: RAW (records in the compressed RAW format) Digital processing is not performed on this file format. Select this format to process images on a computer for professional purposes. The image size is fixed to the maximum size. The image size is not displayed on the screen.
Help Guide Digital Still Camera DSC-RX0 Focus Mode Selects the method to suit your purpose (still images or movies). 1 MENU → (Camera Settings1) → [Focus Mode] → desired setting. Menu item details (Single-shot AF): Press the SHUTTER/MOVIE button halfway down to focus automatically. While the SHUTTER/MOVIE button is pressed halfway down, the focus is locked. This focus mode is available only during still image shooting.
Help Guide Digital Still Camera DSC-RX0 Focus Area Selects the focusing area. Use this function when it is difficult to get the proper focus in auto focus mode. 1 MENU → (Camera Settings1) → [Focus Area] → desired setting. Menu item details Wide: Focuses automatically on a subject in all ranges of the image. When you press the SHUTTER/MOVIE button halfway down, a green frame is displayed around the area that is in focus. Center: Focuses automatically on a subject in the center of the image.
Help Guide Digital Still Camera DSC-RX0 Lock-on AF When you press the (Enter) button, the camera detects the subject positioned in the center of the screen and continues to track the subject. (Camera Settings1) → [ button Lock-on AF] → [On]. 1 MENU → 2 Align the target frame (A) over the subject and press the Press the (Enter) button again to stop tracking. (Enter) button. If the camera loses track of the subject, it can detect when the subject reappears on the monitor and resume tracking.
Help Guide Digital Still Camera DSC-RX0 AF Area Auto Clear Sets whether the focus area should be displayed all the time or should disappear automatically shortly after focus is achieved. 1 MENU → (Camera Settings1) → [AF Area Auto Clear] → desired setting. Menu item details On: The focus area disappears automatically shortly after focus is achieved. Off: The focus area is displayed all the time.
Help Guide Digital Still Camera DSC-RX0 Focus-lock Shoots images with the focus locked on the desired subject in auto focus mode. 1 MENU → 2 Place the subject within the AF area and press the SHUTTER/MOVIE button halfway down. (Camera Settings1) → [Focus Mode] → [Single-shot AF]. The focus is locked. 3 Keep pressing the SHUTTER/MOVIE button halfway down, and place the subject back in the original position to re-compose the shot. 4 Press the SHUTTER/MOVIE button down fully to take the picture.
Help Guide Digital Still Camera DSC-RX0 Preset Focus The focus is locked so that a satisfying resolution can be achieved in a wide front-to-back range. You can shoot movies without additional focusing operations. 1 MENU → (Camera Settings1) → [Focus Mode] → [Preset Focus]. The camera will focus on subjects approximately 1 m (3.3 ft.) or more away from the camera. When shooting subjects at close distances of approximately 50 cm to 1 m (1.7 ft. to 3.3 ft.) from the camera, set [NEAR Mode in PF] to [On].
Help Guide Digital Still Camera DSC-RX0 NEAR Mode in PF Sets the NEAR mode when [Focus Mode] is set to [Preset Focus]. 1 MENU → (Camera Settings1) → [NEAR Mode in PF] → desired setting. Menu item details Off: Use this mode to shoot subjects approximately 1 m (3.3 ft.) or more away from the camera. This mode is suitable for regular movie shooting. On: Use this mode to shoot subjects approximately 50 cm to 1 m (1.7 ft. to 3.3 ft.) away from the camera. This mode is suitable for close-up shooting.
Help Guide Digital Still Camera DSC-RX0 Manual Focus If you are shooting still images and it is difficult to get the proper focus in autofocus mode, you can adjust the focus manually. When shooting movies, use this mode in situations such as recording movies while outputting 4K images to an external device, etc. You can make fine adjustments to the focus while monitoring the subject on an external monitor. 1 MENU → (Camera Settings1) → [Focus Mode] → [Manual Focus].
Related Topic MF Assist Peaking Level 4-698-613-11(1) Copyright 2017 Sony Corporation 65
Help Guide Digital Still Camera DSC-RX0 MF Assist Enlarges the image on the screen automatically to make manual focusing easier. This works in Manual Focus shooting. (Camera Settings1) → [MF Assist] → [On]. 1 MENU → 2 Select MENU → (Camera Settings1) → [Set Focus] and then adjust the focus using the up/down/left/right buttons. Hint You can set how long the image is to be shown magnified by selecting MENU → Time]. Note You cannot change the magnification scale.
Help Guide Digital Still Camera DSC-RX0 Focus Magnif. Time Set the duration for which an image is to be magnified using the [MF Assist]. 1 MENU → (Camera Settings1) → [Focus Magnif. Time] → desired setting. Menu item details 2 Sec: Magnifies the images for 2 seconds. 5 Sec: Magnifies the images for 5 seconds. No Limit: Magnifies the images until you press the SHUTTER/MOVIE button.
Help Guide Digital Still Camera DSC-RX0 Peaking Level Enhances the outline of in-focus ranges using a specific color in Manual Focus shooting. This function allows you to confirm the focus easily. The setting applies to both still images and movies. 1 MENU → (Camera Settings1) → [Peaking Level] → desired setting. Menu item details High: Sets the peaking level to high. Mid: Sets the peaking level to middle. Low: Sets the peaking level to low. Off: Does not use the peaking function.
Help Guide Digital Still Camera DSC-RX0 Peaking Color Sets the color used for the peaking function in Manual Focus shooting. The setting applies to both still images and movies. 1 MENU → (Camera Settings1) → [Peaking Color] → desired setting. Menu item details Red: Enhances outlines in red. Yellow: Enhances outlines in yellow. White: Enhances outlines in white.
Help Guide Digital Still Camera DSC-RX0 AF/MF control You can easily switch the focusing mode from auto to manual or vice versa while shooting still images. 1 MENU → (Camera Settings2) → [Custom Key(Shoot.)] → button to be assigned → [AF/MF Control Hold] or [AF/MF Ctrl Toggle]. 2 Press the button to which the [AF/MF Control Hold] or [AF/MF Ctrl Toggle] function has been assigned while shooting still images. The focusing mode will temporarily switch from auto to manual or vice versa.
Help Guide Digital Still Camera DSC-RX0 Eye AF The camera focuses on the subject's eyes while you keep the button pressed. (Camera Settings2) → [Custom Key(Shoot.)] → [ Button] → assign the [Eye AF] function. 1 MENU → 2 Point the camera at a person's face, and press the 3 Press the SHUTTER/MOVIE button fully down to shoot an image while holding down the (Enter) button. (Enter) button. Hint When the camera focuses on the eyes, a detection frame is displayed over the eyes.
Help Guide Digital Still Camera DSC-RX0 Shutter Speed Sets the shutter speed in the manual exposure mode. 1 MENU → (Camera Settings1) → [Shutter Speed] → desired setting. Menu item details 1/4 - 1/32000 The shutter speed can be set within a range of 1/4 second to 1/12800 second when shooting movies.
Help Guide Digital Still Camera DSC-RX0 Exposure Comp. Based on the exposure value set by auto exposure, you can make the entire image brighter or darker if you adjust [Exposure Comp.] to the plus side or minus side, respectively (exposure compensation). Normally, exposure is set automatically (auto exposure). 1 MENU → (Camera Settings1) → [Exposure Comp.] → desired setting. You can adjust the exposure compensation value within the range of –3.0 EV to +3.0 EV.
Help Guide Digital Still Camera DSC-RX0 Metering Mode Selects the metering mode that sets which part of the screen to measure for determining the exposure. 1 MENU → (Camera Settings1) → [Metering Mode] → desired setting. Menu item details Multi: Measures light on each area after dividing the total area into multiple areas and determines the proper exposure of the entire screen (Multi-pattern metering).
Help Guide Digital Still Camera DSC-RX0 AE lock When the contrast between the subject and background is high, such as when shooting a backlit subject or a subject near a window, meter the light at a spot where the subject appears to have the appropriate brightness and lock the exposure before shooting. To reduce the brightness of the subject, meter the light at a spot brighter than the subject and lock the exposure of the entire screen.
Help Guide Digital Still Camera DSC-RX0 AEL w/ shutter (still image) Sets whether to fix the exposure when you press the SHUTTER/MOVIE button halfway down. This function is useful when you want to adjust focus and exposure separately. 1 MENU → (Camera Settings1) → [ AEL w/ shutter] → desired setting. Menu item details Auto: Fixes the exposure after adjusting the focus automatically when you press the SHUTTER/MOVIE button halfway down when [Focus Mode] is set to [Single-shot AF].
Help Guide Digital Still Camera DSC-RX0 Zebra The zebra pattern will appear over part of an image if the brightness level of that part meets the IRE level that you set. Use this zebra pattern as a guide to adjust the brightness. 1 MENU → (Camera Settings2) → [Zebra] → desired setting. Menu item details Off: Does not display the zebra pattern. 70/75/80/85/90/95/100/100+/Custom1/Custom2: Adjusts the brightness level.
Help Guide Digital Still Camera DSC-RX0 Drive Mode You can set the drive mode, such as continuous or self-timer shooting. 1 MENU → (Camera Settings1) → [Drive Mode] → desired setting. Menu item details Single Shooting: Shoots one still image. Normal shooting mode. Cont. Shooting: Shoots images continuously while you press and hold down the SHUTTER/MOVIE button. Spd Priority Cont.: Shoots images continuously at high speed while you press and hold down the SHUTTER/MOVIE button.
4-698-613-11(1) Copyright 2017 Sony Corporation 79
Help Guide Digital Still Camera DSC-RX0 Cont. Shooting Shoots images continuously while you press and hold down the SHUTTER/MOVIE button. 1 MENU→ (Camera Settings1) → [Drive Mode] → [Cont. Shooting]. Note Continuous shooting is unavailable in the following situations: [Picture Effect] is set to [Soft Focus], [HDR Painting], [Rich-tone Mono.], [Miniature], [Watercolor], or [Illustration]. [DRO/Auto HDR] is set to [Auto HDR]. [ISO] is set to [Multi Frame NR].
Help Guide Digital Still Camera DSC-RX0 Spd Priority Cont. The product continues to shoot as long as the SHUTTER/MOVIE button is pressed. You can continuously shoot at a rate faster than that of [Cont. Shooting]. 1 MENU→ (Camera Settings1) → [Drive Mode] → [Spd Priority Cont.]. Note Between continuous shooting frames, an image of each frame is immediately displayed. Continuous shooting is unavailable in the following situations: [Picture Effect] is set to [Soft Focus], [HDR Painting], [Rich-tone Mono.
Help Guide Digital Still Camera DSC-RX0 Self-timer Shoots an image using the self-timer after a designated number of seconds have elapsed since the SHUTTER/MOVIE button was pressed. (Camera Settings1) → [Drive Mode] → [Self-timer]. 1 MENU → 2 Select the desired mode using the right/left button. Menu item details Self-timer: 10 Sec: Sets the 10-second delay self-timer. When you press the SHUTTER/MOVIE button, a beep sounds and the shutter operates after 10 seconds.
Help Guide Digital Still Camera DSC-RX0 Self-timer(Cont) Shoots a designated number of images using the self-timer after a designated number of seconds have elapsed since the SHUTTER/MOVIE button was pressed. You can choose the best from multiple shots. (Camera Settings1) → [Drive Mode] → [Self-timer(Cont)]. 1 MENU → 2 Select the desired mode using the right/left button. Menu item details Self-timer(Cont.): 10 Sec. 3 Img.
Help Guide Digital Still Camera DSC-RX0 Cont. Bracket Shoots multiple images while automatically shifting the exposure from base to darker and then to lighter. Press and hold down the SHUTTER/MOVIE button until the bracket recording is completed. You can select an image that suits your intention, after recording. (Camera Settings1) → [Drive Mode] → [Cont. Bracket]. 1 MENU→ 2 Select the desired mode using the right/left button. Menu item details Cont. Bracket: 0.
Related Topic Settings for bracket shooting Indicator during bracket shooting 4-698-613-11(1) Copyright 2017 Sony Corporation 85
Help Guide Digital Still Camera DSC-RX0 Single Bracket Shoots multiple images while automatically shifting the exposure from base to darker and then to lighter. Press the SHUTTER/MOVIE button for each image. You can select an image that suits your purpose after recording. (Camera Settings1) → [Drive Mode] → [Single Bracket]. 1 MENU → 2 Select the desired mode using the right/left button. Menu item details Single Bracket: 0.
Related Topic Settings for bracket shooting Indicator during bracket shooting 4-698-613-11(1) Copyright 2017 Sony Corporation 87
Help Guide Digital Still Camera DSC-RX0 WB bracket Shoots three images, each with different color tones according to the selected settings of white balance, color temperature and color filter. (Camera Settings1) → [Drive Mode] → [WB bracket]. 1 MENU → 2 Select the desired mode using the right/left button. Menu item details White Balance Bracket: Lo: Records a series of three images with small changes in the white balance.
Help Guide Digital Still Camera DSC-RX0 DRO Bracket You can record a total of three images, each at a different degree of D-Range Optimizer value. (Camera Settings1) → [Drive Mode] → [DRO Bracket]. 1 MENU → 2 Select the desired mode using the right/left button. Menu item details DRO Bracket: Lo: Records a series of three images with small changes in the D-Range Optimizer value. DRO Bracket: Hi: Records a series of three images with large changes in the D-Range Optimizer value.
Help Guide Digital Still Camera DSC-RX0 Settings for bracket shooting You can set the self-timer in bracket shooting mode, and the shooting order for exposure bracketing and white balance bracketing. 1 MENU → (Camera Settings1) → [Drive Mode] → select bracket shooting mode. 2 MENU → (Camera Settings1) → [Bracket Settings] → desired setting. Menu item details Selftimer during Brkt: Sets whether to use the self-timer during bracket shooting.
Help Guide Digital Still Camera DSC-RX0 Indicator during bracket shooting A bracket indicator is displayed on the monitor during bracket shooting. Examples of the bracket indicator The bracket indicator is displayed as follows in ambient light* bracketing with the bracket range set to 0.3 EV and the number of shots set to 3. * Ambient light: A generic term for non-flash light including natural light, electric bulb and fluorescent lighting.
Help Guide Digital Still Camera DSC-RX0 ISO Sensitivity to light is expressed by the ISO number (recommended exposure index). The larger the number, the higher the sensitivity. 1 MENU → (Camera Settings1) → [ISO] → desired setting. Menu item details Multi Frame NR: Combines continuous shots to create an image with less noise. Select the desired ISO number from [ISO AUTO] or ISO 200 – 25600. ISO AUTO: Sets the ISO sensitivity automatically. ISO 80 – ISO 12800: Sets the ISO sensitivity manually.
Help Guide Digital Still Camera DSC-RX0 ISO AUTO Min. SS If you select [ISO AUTO] or [ISO AUTO] under [Multi Frame NR] when the shooting mode is P (Program Auto), you can set the shutter speed at which the ISO sensitivity starts changing. This function is effective for shooting moving subjects. You can minimize subject blurring while also preventing camera shake. 1 MENU → (Camera Settings1) → [ISO AUTO Min. SS] → desired setting.
Help Guide Digital Still Camera DSC-RX0 Multi Frame NR The product automatically shoots multiple images continuously, combines them, reduces the noise, and records them as one image. The image recorded is one combined image. (Camera Settings1) → [ISO] → [Multi Frame NR]. 1 MENU → 2 Press the right button to display the setting screen, then select a desired value using the up/down button. Note When [ Quality] is set to [RAW] or [RAW & JPEG], this function cannot be used. [D-Range Opt.
Help Guide Digital Still Camera DSC-RX0 D-Range Opt. (DRO) By dividing the image into small areas, the product analyzes the contrast of light and shadow between the subject and the background, and creates an image with the optimal brightness and gradation. (Camera Settings1) → [DRO/Auto HDR] → [D-Range Opt.]. 1 MENU → 2 Select the desired setting using the left/right button. Menu item details D-Range Optimizer: Auto: Corrects the brightness automatically.
Help Guide Digital Still Camera DSC-RX0 Auto HDR Widens the range (gradation) so that you can record from bright parts to dark parts with correct brightness (HDR: High Dynamic Range). One image with proper exposure and one overlaid image are recorded. (Camera Settings1) → [DRO/Auto HDR] → [Auto HDR]. 1 MENU → 2 Select the desired setting using the left/right button. Menu item details Auto HDR: Exposure Diff. Auto: Sets the exposure difference automatically. Auto HDR: Exposure Diff. 1.
Help Guide Digital Still Camera DSC-RX0 White Balance Adjusts the color tones according to the ambient light conditions. Use this feature when the color tones of the image did not come out as you expected, or when you want to change the color tones on purpose for photographic expression. 1 MENU → (Camera Settings1) → [White Balance] → desired setting. Menu item details Auto: The product automatically detects the light source and adjusts the color tones.
Related Topic Capturing a basic white color in [Custom Setup] mode 4-698-613-11(1) Copyright 2017 Sony Corporation 98
Help Guide Digital Still Camera DSC-RX0 Capturing a basic white color in [Custom Setup] mode In a scene where the ambient light consists of multiple types of light sources, it is recommended to use the custom white balance in order to accurately reproduce the whiteness. (Camera Settings1) → [White Balance] → [Custom Setup]. 1 MENU → 2 Hold the product so that the white area fully covers the circle located in the center of the screen, and then press the (Enter) button.
Help Guide Digital Still Camera DSC-RX0 Picture Effect Select the desired effect filter to achieve more impressive and artistic images. 1 MENU → (Camera Settings1) → [Picture Effect] → desired setting. Menu item details Off: Disables the [Picture Effect] function. Pop Color: Creates a vivid look by emphasizing color tones. Posterization: Creates a high contrast, abstract look by heavily emphasizing primary colors, or in black and white.
You cannot check the following effects on the shooting screen, because the product processes the image after the shot. Also, you cannot shoot another image until image processing is finished. You cannot use these effects with movies. [Soft Focus] [HDR Painting] [Rich-tone Mono.] [Miniature] [Watercolor] [Illustration] In the case of [HDR Painting] and [Rich-tone Mono.], the shutter is released three times for one shot.
Help Guide Digital Still Camera DSC-RX0 Creative Style Allows you to select the desired image processing. You can adjust the exposure (shutter speed) as desired with [Creative Style]. 1 MENU → (Camera Settings1) → [Creative Style] → desired setting. Menu item details Standard: For shooting various scenes with rich gradation and beautiful colors.
The higher the value selected, the more the difference of light and shadow is accentuated, and the bigger the effect on the image. Saturation: The higher the value selected, the more vivid the color. When a lower value is selected, the color of the image is restrained and subdued. Sharpness: Adjusts the sharpness. The higher the value selected, the more the contours are accentuated, and the lower the value selected, the more the contours are softened.
Help Guide Digital Still Camera DSC-RX0 Movie recording formats The following movie recording formats are available with this camera. What is XAVC S? Records high-definition movies by converting them to MP4 movies using the MPEG-4 AVC/H.264 codec. MPEG-4 AVC/H.264 is capable of compressing images at higher efficiency. You can record high-quality images while reducing the amount of data. XAVC S/AVCHD recording format XAVC S HD: Bit-rate: Approx.
Help Guide Digital Still Camera DSC-RX0 File Format (movie) Selects the movie file format. 1 MENU → (Camera Settings2) → [ File Format] → desired setting. Menu item details XAVC S HD: Records high-definition movies in XAVC S HD. This format supports a higher bit rate.
Help Guide Digital Still Camera DSC-RX0 Record Setting (movie) Selects the image size, frame rate, and image quality for movie recording. The higher the bit-rate, the higher the image quality. 1 MENU → (Camera Settings2) → [ Record Setting] → desired setting. Menu item details When [ File Format] is set to [XAVC S HD] Records high-definition movies by converting them into the MP4 file format using the MPEG-4 AVC/H.264 codec. 60p 50M/50p 50M: Records the movies in 1920 × 1080 (60p/50p).
Records the movies in 1920 × 1080 (24p/25p). This produces a cinema-like atmosphere. Bit-rate: 24 Mbps (Max.) 24p 17M(FH): 25p 17M(FH) Records the movies in 1920 × 1080 (24p/25p). This produces a cinema-like atmosphere. Bit-rate: Approx. 17 Mbps (Avg.
Help Guide Digital Still Camera DSC-RX0 Dual Video REC Allows you to simultaneously record an XAVC S movie and an MP4 movie, or an AVCHD movie and an MP4 movie. 1 MENU → (Camera Settings2) → [Dual Video REC] → desired setting. Menu item details On: An XAVC S movie and an MP4 movie, or an AVCHD movie and an MP4 movie, are recorded simultaneously. Off: The [Dual Video REC] function is not used.
Help Guide Digital Still Camera DSC-RX0 Marker Display (movie) Sets whether or not to display markers set using [ 1 MENU → (Camera Settings2) → [ Marker Settings] on the monitor while shooting movies. Marker Display] → desired setting. Menu item details On: Markers are displayed. The markers are not recorded. Off: No marker is displayed. Note The markers are displayed when in movie mode or when shooting movies. The markers are displayed on the monitor. (You cannot output the markers.
Help Guide Digital Still Camera DSC-RX0 Marker Settings (movie) Sets the markers to be displayed while shooting movies. 1 MENU → (Camera Settings2) → [ Marker Settings] → desired setting. Menu item details Center: Sets whether or not to display the center marker in the center of the shooting screen. Off / On Aspect: Sets the aspect marker display. Off / 4:3 / 13:9 / 14:9 / 15:9 / 1.66:1 / 1.85:1 / 2.35:1 Safety Zone: Sets the safety zone display.
Help Guide Digital Still Camera DSC-RX0 Mon. Off dur REC (movie) Sets whether to turn off the monitor automatically after approximately one minute without any operations by the user when recording movies. 1 MENU → (Camera Settings2) → [ Mon. Off dur REC] → desired setting. Menu item details On: The monitor turns off automatically. Off: The monitor does not turn off automatically. To keep the monitor turned on, select [Off].
Help Guide Digital Still Camera DSC-RX0 REC Lamp You can turn off the recording lamp when recording movies so that light from the lamp will not be reflected on the subject. 1 MENU → (Camera Settings2) → [REC Lamp] → desired setting. Menu item details All On: Both of the recording lamps on the front side and the rear side turn on. Only Rear Lamp On: Only the recording lamp on the rear side turns on. All Off: Neither of the recording lamps turn on.
Help Guide Digital Still Camera DSC-RX0 Audio Recording Sets whether to record sounds when shooting movies. 1 MENU → (Camera Settings2) → [Audio Recording] → desired setting. Menu item details On: Records sound (stereo). Off: Does not record sound. Note Sounds from camera operations during shooting will also be recorded when [On] is selected.
Help Guide Digital Still Camera DSC-RX0 Audio Rec Level You can adjust the audio recording level while checking the level meter. 1 MENU → (Camera Settings2) → [Audio Rec Level] → desired setting. Menu item details +: Turns up the audio recording level. −: Turns down the audio recording level. Reset: Resets the audio recording level to the default setting. Hint When you record audio movies with loud volumes, set [Audio Rec Level] to a lower sound level.
Help Guide Digital Still Camera DSC-RX0 Audio Level Display Sets whether to display the audio level on the screen. 1 MENU → (Camera Settings2) → [Audio Level Display] → desired setting. Menu item details On: Displays the audio level. Off: Does not display the audio level. Note The audio level is not displayed in the following situations: When [Audio Recording] is set to [Off]. When DISP (Display Setting) is set to [No Disp. Info.].
Help Guide Digital Still Camera DSC-RX0 Wind Noise Reduct. Sets whether or not to reduce wind noise by cutting the low-range sound of the input audio from the built-in microphone. 1 MENU → (Camera Settings2) → [Wind Noise Reduct.] → desired setting. Menu item details On: Reduces wind noise. Off: Does not reduce wind noise. Note Setting this item to [On] where wind is not blowing sufficiently hard may cause normal sound to be recorded with too low volume.
Help Guide Digital Still Camera DSC-RX0 Auto Slow Shut. (movie) Sets whether or not to adjust the shutter speed automatically when recording movies if the subject is dark. 1 MENU → (Camera Settings2) → [ Auto Slow Shut.] → desired setting. Menu item details On: Uses [ Auto Slow Shut.]. The shutter speed automatically slows when recording in dark locations. You can reduce noise in the movie by using a slow shutter speed when recording in dark locations. Off: Does not use [ Auto Slow Shut.].
Help Guide Digital Still Camera DSC-RX0 MOVIE Button Sets whether to activate the [MOVIE] function whenever the (Enter) button is pressed, or whenever the left button is pressed after [MOVIE] has been assigned to it using [Custom Key(Shoot.)]. 1 MENU → (Camera Settings2) → [MOVIE Button] → desired setting. Menu item details Always: Starts movie recording when you press the button in any mode. Movie Mode Only: Only starts movie recording when you press the button in movie mode.
Help Guide Digital Still Camera DSC-RX0 Picture Profile Allows you to change the settings for the color, gradation, etc. For details on “Picture Profile,” refer to http://helpguide.sony.net/di/pp/v1/en/index.html. Customizing the picture profile You can customize the picture quality by adjusting picture profile items such as [Gamma] and [Detail]. When setting these parameters, connect the camera to a TV or monitor, and adjust them while observing the picture on the screen.
Cine1: Softens the contrast in dark parts and emphasizes gradation in bright parts to produce a relaxed color movie. (equivalent to HG4609G33) Cine2: Similar to [Cine1] but optimized for editing with up to 100% video signal. (equivalent to HG4600G30) ITU709: Gamma curve that corresponds to ITU709. ITU709(800%): Gamma curve for confirming scenes on the assumption of shooting using [S-Log2]. S-Log2: Gamma curve for [S-Log2].
[C] -7 (light cyan) to +7 (deep cyan) [M] -7 (light magenta) to +7 (deep magenta) [Y] -7 (light yellow) to +7 (deep yellow) Detail Sets items for [Detail]. Level: Sets the [Detail] level. (-7 to +7) Adjust: The following parameters can be selected manually. Mode: Selects auto/manual setting. (Auto (automatic optimization) / Manual (The details are set manually.)) V/H Balance: Sets the vertical (V) and horizontal (H) balance of DETAIL.
Help Guide Digital Still Camera DSC-RX0 Adjusting the settings for super-slow-motion shooting (HFR Settings) Sets the High Frame Rate shooting settings. 1 MENU → (Camera Settings2) → [ HFR Settings] → desired setting. Menu item details Record Setting: Selects the frame rate of the movie from [60p 50M]/[50p 50M], [30p 50M]/[25p 50M], and [24p 50M]*. * Only when [NTSC/PAL Selector] is set to NTSC.
Buffering (temporarily capturing a movie on the camera) starts once the shooting standby screen is displayed. When the captured data fills the buffering capacity, old data is overwritten sequentially. When you press the SHUTTER/MOVIE button, the camera starts to record a movie of the maximum recordable duration calculated retroactively from that point on the memory card. To redo shooting You can cancel recording by selecting [Cancel] on the screen.
4-698-613-11(1) Copyright 2017 Sony Corporation 124
Help Guide Digital Still Camera DSC-RX0 Selecting the exposure mode for super-slow-motion shooting (Exposure Mode) You can select the exposure mode for HFR shooting based on the subject and effect you want. 1 MENU → (Camera Settings2) → [ Exposure Mode] → desired settings.
Help Guide Digital Still Camera DSC-RX0 Memory (Camera Settings1/Camera Settings2) Allows you to register up to 3 often-used modes or product settings to the product and up to 4 (M1 through M4) to the memory card. You can recall the settings by selecting [Memory recall] in [Shoot Mode]. 1 Set the product to the setting you want to register. 2 MENU → (Camera Settings1) → [ / Memory] → desired number. Items that can be registered You can register various shooting settings.
Help Guide Digital Still Camera DSC-RX0 Function Menu Set. You can assign the functions to be called up when you press the Fn (Function) button. 1 MENU → (Camera Settings2) → [Function Menu Set.] → set a function to the desired location. The functions that can be assigned are displayed on the setup item selection screen.
Help Guide Digital Still Camera DSC-RX0 Custom Key(Shoot.) Assigning functions to the various keys speeds up operations by allowing you to execute the assigned functions simply by pressing the appropriate key when the shooting screen is displayed. MENU → 1 (Camera Settings2) → [Custom Key(Shoot.)] → set a function to the desired key. The functions that can be assigned vary for each button. Functions that can be assigned using [Custom Key(Shoot.
Related Topic Function of the Enter button Function of the Left button 4-698-613-11(1) Copyright 2017 Sony Corporation 129
Help Guide Digital Still Camera DSC-RX0 Function of the Enter button Once you have assigned a function to the (Enter) button, you can execute that function by simply pressing the (Enter) button when the shooting screen is displayed. 1 MENU → (Camera Settings2) → [Custom Key(Shoot.)] → [ Button] → desired setting. The functions that can be assigned are displayed on the setup item selection screen. Related Topic Custom Key(Shoot.
Help Guide Digital Still Camera DSC-RX0 Function of the Left button Once you have assigned a function to the left button, you can execute that function by simply pressing the left button when the shooting screen is displayed. 1 MENU → (Camera Settings2) → [Custom Key(Shoot.)] → [Left Button] → desired setting. The functions that can be assigned are displayed on the setup item selection screen. Related Topic Custom Key(Shoot.
Help Guide Digital Still Camera DSC-RX0 Face Detection Detects the faces of your subjects and adjusts the focus, exposure settings and performs image processing automatically. 1 MENU → (Camera Settings1) → [Face Detection] → desired setting. Menu item details Off: Does not use the Face Detection function. On (Regist. Faces): Detects the registered face with higher priority using [Face Registration]. On: Detects a face without giving higher priority to the registered face.
Help Guide Digital Still Camera DSC-RX0 Face Registration (New Registration) If you register faces in advance, the product can detect the registered face as a priority when [Face Detection] is set to [On (Regist. Faces)]. 1 MENU → 2 Align the guide frame with the face to be registered, and press the SHUTTER/MOVIE button. 3 When a confirmation message appears, select [Enter]. (Camera Settings1) → [Face Registration] → [New Registration]. Note Up to eight faces can be registered.
Help Guide Digital Still Camera DSC-RX0 Face Registration (Order Exchanging) When multiple faces are registered to be given priority, the face registered first will be given priority. You can change the priority order. 1 MENU → 2 Select a face to change the order of priority. 3 Select the destination. (Camera Settings1) → [Face Registration] → [Order Exchanging].
Help Guide Digital Still Camera DSC-RX0 Face Registration (Delete) Deletes a registered face. 1 MENU → (Camera Settings1) → [Face Registration] → [Delete]. If you select [Delete All], you can delete all registered faces. Note Even if you execute [Delete], the data for registered face will remain in the product. To delete the data for registered faces from the product, select [Delete All].
Help Guide Digital Still Camera DSC-RX0 High ISO NR (still image) When shooting with high ISO sensitivity, the product reduces noise that becomes more noticeable when the product sensitivity is high. A message may be displayed during noise reduction processing and you cannot shoot another image until the message disappears. 1 MENU → (Camera Settings1) → [ High ISO NR] → desired setting. Menu item details Normal: Activates high ISO noise reduction normally.
Help Guide Digital Still Camera DSC-RX0 Audio signals Selects whether the product produces a sound or not. 1 MENU → (Camera Settings2) → [Audio signals] → desired setting. Menu item details On: Sounds are produced for example when the focus is achieved by pressing the SHUTTER/MOVIE button halfway down. Shutter: Only the shutter sound is produced. Off: No operational signaling or shutter sounds are produced.
Help Guide Digital Still Camera DSC-RX0 Write Date (still image) Sets whether to record a shooting date on the still image. 1 MENU → (Camera Settings2) → [ Write Date] → desired setting. Menu item details On: Records a shooting date. Off: Does not record a shooting date. Note If you shoot images with the date once, you cannot delete the date from the images later. The dates are doubly printed if you set the PCs or printers to print dates when printing the images.
Help Guide Digital Still Camera DSC-RX0 Color Space (still image) The way colors are represented using combinations of numbers or the range of color reproduction is called “color space.” You can change the color space depending on the purpose of the image. 1 MENU → (Camera Settings1) → [ Color Space] → desired setting. Menu item details sRGB: This is the standard color space of the digital camera. Use [sRGB] in normal shooting, such as when you intend to print out the images without any modification.
Help Guide Digital Still Camera DSC-RX0 Grid Line Sets whether the grid line is displayed or not. The grid line will help you to adjust the composition of images. 1 MENU → (Camera Settings2) → [Grid Line] → desired setting. Menu item details Rule of 3rds Grid: Place main subjects close to one of the grid lines that divide the image into thirds for a well-balanced composition. Square Grid: Square grids make it easier to confirm the horizontal level of your composition.
Help Guide Digital Still Camera DSC-RX0 Auto Review You can check the recorded image on the screen right after the shooting. You can also set the display time for Auto Review. 1 MENU → (Camera Settings2) → [Auto Review] → desired setting. Menu item details 10 Sec/5 Sec/2 Sec: Displays the recorded image on the screen right after shooting for the selected duration of time. If you press the (Enter) button during Auto Review, you can check the image on a magnified scale.
Help Guide Digital Still Camera DSC-RX0 Live View Display Sets whether or not to show images altered with effects of the exposure compensation, white balance, [Creative Style], or [Picture Effect] on the screen. 1 MENU → (Camera Settings2) → [Live View Display] → desired setting. Menu item details Setting Effect ON: Displays Live View in conditions close to what your picture will look like as a result of applying all your settings.
Help Guide Digital Still Camera DSC-RX0 Release w/o Card Sets whether the shutter can be released when no memory card has been inserted. 1 MENU → (Camera Settings2) → [Release w/o Card] → desired setting. Menu item details Enable: Releases the shutter even if no memory card has been inserted. Disable: Does not release the shutter when no memory card has been inserted. Note When no memory card has been inserted, the images shot will not be saved. The default setting is [Enable].
Help Guide Digital Still Camera DSC-RX0 Playing back images Plays back the recorded images. (Playback) button to switch to the playback mode. 1 Press the 2 Select the image with the left/right button. To return to shooting images Select MENU → (Playback) → [Shoot./PB Selector] to return to the shooting mode. You can also go back to the shooting mode by pressing the SHUTTER/MOVIE button halfway down. Hint The product creates an image database file on a memory card to record and play back images.
Help Guide Digital Still Camera DSC-RX0 Playback zoom Enlarges the image being played back. (Playback) button to switch to the playback mode. 1 Press the 2 Display the image you want to enlarge, and select MENU → (Playback) → [ Enlarge Image]. On the single-image playback screen, you can enlarge the image by pressing the (Enter) button. 3 Select the portion you want to enlarge by pressing the up/down/left/right buttons. 4 Press the MENU button or the (Enter) button to end playback zooming.
Help Guide Digital Still Camera DSC-RX0 Image Index You can display multiple images at the same time in playback mode. 1 Press the (Playback) button to switch to the playback mode. 2 MENU → (Playback) → [Image Index] → desired setting. Menu item details 9 Images/25 Images To return to single-image playback Select the desired image and press the (Enter) button. To display a desired image quickly Select the bar on the left of the image index screen, and then press the up/down button.
Help Guide Digital Still Camera DSC-RX0 Switching the screen display (during playback) Switches the screen display. 1 Press the 2 Press the DISP (Display Setting) button. (Playback) button to switch to the playback mode. The screen display switches in the order “Display Info. → Histogram → No Disp. Info. → Display Info.” each time you press the DISP button. The DISP (Display Setting) settings are applied for the Auto Review display.
Help Guide Digital Still Camera DSC-RX0 Playing back movies Plays back the recorded movies. (playback) button to switch to playback mode. 1 Press the 2 Select a movie to play back using the left/right buttons. 3 To play back movies, press the (Enter) button. To return to shooting images Select MENU → (Playback) → [Shoot./PB Selector] to return to the shooting mode. You can also go back to the shooting mode by pressing the SHUTTER/MOVIE button halfway down.
Help Guide Digital Still Camera DSC-RX0 Delete You can delete multiple selected images. 1 Press the 2 MENU → (Playback) button to switch to the playback mode. (Playback) → [Delete] → desired setting. Menu item details Multiple Img.: Deletes the selected images. (1) Select the images to be deleted, then press the (Enter) button. The mark is displayed in the check box. To cancel the selection, press the (Enter) button again to remove the mark. (2) To delete other images, repeat step (1).
Help Guide Digital Still Camera DSC-RX0 Specify Printing You can specify in advance on the memory card which still images you want to print out later. The icon will appear on the specified images. DPOF refers to “Digital Print Order Format.” 1 Press the (Playback) button to switch to the playback mode. 2 MENU → (Playback) → [Specify Printing] → desired setting. (print order) Menu item details Multiple Img.: Selects images to order printing. (1) Select an image and press the (Enter) button.
Help Guide Digital Still Camera DSC-RX0 View Mode Sets the View Mode (image display method). 1 Press the (Playback) button to switch to the playback mode. 2 MENU → (Playback) → [View Mode] → desired setting. Menu item details Date View: Displays the images by date. Folder View(Still): Displays only still images. Folder View(MP4): Displays only MP4-format movies. AVCHD View: Displays only AVCHD-format movies. XAVC S HD View: Displays only XAVC S HD-format movies.
Help Guide Digital Still Camera DSC-RX0 Slide Show Automatically plays back images continuously. 1 Press the 2 MENU → 3 Select [Enter]. (Playback) button to switch to the playback mode. (Playback) → [Slide Show] → desired setting. Menu item details Repeat: Select [On], in which images are played back in a continuous loop, or [Off], in which the product exits the slideshow when all the images are played back once.
Help Guide Digital Still Camera DSC-RX0 Rotate Rotates a recorded still image. 1 Press the (Playback) button to switch to the playback mode. 2 MENU → (Playback) → [Rotate]. 3 Press the (Enter) button. The image is rotated counter-clockwise. The image rotates as you press the (Enter) button. If you rotate the image once, the image remains rotated even after the product is turned off. Note Images shot vertically using this camera are recorded as horizontally shot images.
Help Guide Digital Still Camera DSC-RX0 Enlarge Initial Pos. Sets the initial position when enlarging an image in playback. 1 MENU→ (Playback)→[ Enlarge Initial Pos.]→desired setting. Menu item details Focused Position: Enlarges the image from the point of focus during shooting. Center: Enlarges the image from the center of the screen.
Help Guide Digital Still Camera DSC-RX0 Protect Protects recorded images against accidental erasure. The 1 Press the 2 MENU → mark is displayed on protected images. (Playback) button to switch to the playback mode. (Playback) → [Protect] → desired setting. Menu item details Multiple Img.: Applies or cancels the protection of the selected multiple images. (1) Select the image to be protected, then press the (Enter) button. The mark is displayed in the check box.
Help Guide Digital Still Camera DSC-RX0 4K Still Image PB Outputs still images in 4K resolution to an HDMI-connected TV that supports 4K. 1 Turn off this product and the TV. 2 Connect the HDMI micro terminal of this product to the HDMI jack of the TV using an HDMI cable (sold separately). 3 Turn on the TV and switch the input. 4 Turn on this product. 5 MENU → (Playback) → [4K Still Image PB] → [OK]. Note This menu is only available with 4K-compatible TVs.
Help Guide Digital Still Camera DSC-RX0 Viewing images on an HD TV To view images stored on this product using a TV, an HDMI cable (sold separately) and an HD TV equipped with an HDMI jack are required. 1 Turn off both this product and the TV. 2 Connect the HDMI micro terminal of this product to the HDMI jack of the TV using an HDMI cable (sold separately). 3 Turn on the TV and switch the input. 4 Turn on this product. Images shot with the product appear on the TV screen.
Do not connect this product and another device using the output terminals of both. Doing so may cause a malfunction. Some devices may not work properly when connected to this product. For example, they may not output video or audio. Use an HDMI cable with the HDMI logo or a genuine Sony cable. Use an HDMI cable that is compatible with the HDMI micro terminal of the product and the HDMI jack of the TV. When [ TC Output] is set to [On], the image may not be output properly to the TV or recording device.
Help Guide Digital Still Camera DSC-RX0 Viewing images on a “BRAVIA” Sync-compatible TV By connecting this product to a TV that supports “BRAVIA” Sync using an HDMI cable (sold separately), you can operate this product's playback functions with the TV remote control. 1 Turn off both this product and the TV. 2 Connect the HDMI micro terminal of the product to the HDMI jack of the TV using an HDMI cable (sold separately). 3 Turn on the TV and switch the input. 4 Turn on this product.
4-698-613-11(1) Copyright 2017 Sony Corporation 160
Help Guide Digital Still Camera DSC-RX0 Monitor Brightness You can adjust the brightness of the screen. 1 MENU → (Setup) → [Monitor Brightness] → desired setting. Menu item details Manual: Adjusts the brightness within the range of –2 to +2. Sunny Weather: Sets the brightness appropriately for shooting outdoors. Note The [Sunny Weather] setting is too bright for shooting indoors. Set [Monitor Brightness] to [Manual] for indoor shooting.
Help Guide Digital Still Camera DSC-RX0 Gamma Disp. Assist Movies with S-Log gamma are assumed to be processed after shooting in order to make use of the wide dynamic range. They are therefore displayed in low contrast during shooting and may be difficult to monitor. However, using [Gamma Disp. Assist], contrast equivalent to that of normal gamma can be reproduced. In addition, [Gamma Disp. Assist] can also be applied when playing back movies on the camera’s monitor. 1 MENU → (Setup) → [Gamma Disp.
Help Guide Digital Still Camera DSC-RX0 Volume Settings Sets the sound volume for movie playback. 1 MENU → (Setup) → [Volume Settings] → desired setting. Adjusting the volume during playback Press the down button while playing back movies to display the operation panel, then adjust the volume. You can adjust the volume while listening to the actual sound.
Help Guide Digital Still Camera DSC-RX0 Tile Menu Selects whether to always display the first screen of the menu when you press the MENU button. 1 MENU → (Setup) → [Tile Menu] → desired setting. Menu item details On: Always displays the first screen of the menu (Tile Menu). Off: Deactivates the Tile Menu display.
Help Guide Digital Still Camera DSC-RX0 Pwr Save Start Time You can set the time by which the power goes off automatically. 1 MENU → (Setup) → [Pwr Save Start Time] → desired setting. Menu item details 30 Min/5 Min/2 Min/1 Min Note The power save function is not activated when power is being supplied via USB, when playing back slideshows, when recording movies, or when connected to a computer or TV.
Help Guide Digital Still Camera DSC-RX0 Auto Pwr OFF Temp. Sets the temperature of the camera at which the camera turns off automatically during shooting. When it is set to [High], you can continue shooting even when the temperature of the camera gets hotter than normal. 1 MENU → (Setup) → [Auto Pwr OFF Temp.] → desired setting. Menu item details Standard: Sets the standard temperature for the camera to turn off. High: Sets the temperature at which the camera turns off to higher than [Standard].
Help Guide Digital Still Camera DSC-RX0 Flip Sets whether or not to record images upside down. Use the flip function when the camera is placed upside down. 1 MENU → (Setup) → [Flip] → desired setting. Menu item details On: Records images upside down. Audio is also recorded with the left and right sides reversed. Off: Does not record images upside down. Records images and sound as usual.
Help Guide Digital Still Camera DSC-RX0 NTSC/PAL Selector Plays back movies recorded with the product on a NTSC/PAL system TV. 1 MENU → (Setup) → [NTSC/PAL Selector] → [Enter] Note If you insert a memory card that has previously been formatted with a different video system, a message telling you that you must reformat the card will appear. If you want to record using another system, re-format the memory card or use another memory card.
Help Guide Digital Still Camera DSC-RX0 Demo Mode The [Demo Mode] function displays the movies recorded on the memory card automatically (demonstration), when the camera has not been operated for a certain time. Normally select [Off]. 1 MENU → (Setup) → [Demo Mode] → desired setting. Menu item details On: The movie playback demonstration starts automatically if the product is not operated for about one minute. Only protected AVCHD movies are played back.
Help Guide Digital Still Camera DSC-RX0 TC/UB Settings The time code (TC) and the user bit (UB) information can be recorded as data attached to movies. 1 MENU → (Setup) → [TC/UB Settings] → setting value you want to change. Menu item details TC Preset: Sets the time code. TC Reset: Resets the time code. UB Preset: Sets the user bit. UB Reset: Resets the user bit. TC Format: Sets the recording method for the time code. (Only when [NTSC/PAL Selector] is set to NTSC.
DF: Records the time code in Drop Frame*2 format. NDF: Records the time code in Non-Drop Frame format. *1 *2 Only when [NTSC/PAL Selector] is set to NTSC. The time code is based on 30 frames per second. However, a gap between the actual time and the time code will occur during extended periods of recording as the frame frequency of the NTSC image signal is approximately 29.97 frames per second. Drop frame corrects this gap to make the time code and actual time equal.
Help Guide Digital Still Camera DSC-RX0 HDMI Settings: HDMI Resolution When you connect the product to a High Definition (HD) TV with HDMI terminals using an HDMI cable (sold separately), you can select HDMI Resolution to output images to the TV. 1 MENU → (Setup) → [HDMI Settings] → [HDMI Resolution] → desired setting. Menu item details Auto: The product automatically recognizes an HD TV and sets the output resolution. 1080p: Outputs signals in HD picture quality (1080p).
Help Guide Digital Still Camera DSC-RX0 HDMI Settings: 24p/60p Output (movie) (Only for 1080 60i compatible models) Set 1080/24p or 1080/60p as the HDMI output format when [ Record Setting] is set to [24p 24M(FX)], [24p 17M(FH)], or [24p 50M], or when [ Record Setting] is set to [24p 50M] under [ HFR Settings]. 1 MENU → (Setup) → [HDMI Settings] → [HDMI Resolution] → [1080p]. 2 MENU → (Setup) → [HDMI Settings] → [ 24p/60p Output] → desired setting. Menu item details 60p: Movies are output as 60p.
Help Guide Digital Still Camera DSC-RX0 HDMI Settings: HDMI Info. Display Selects whether to display the shooting information when this product and the TV are connected using an HDMI cable (sold separately). 1 MENU → (Setup) → [HDMI Settings] → [HDMI Info. Display] → desired setting. Menu item details On: Displays the shooting information on the TV. The recorded image and the shooting information are displayed on the TV, while nothing is displayed on the camera’s monitor.
Help Guide Digital Still Camera DSC-RX0 HDMI Settings: TC Output (movie) Sets whether or not to layer the TC (time code) information on the output signal via the HDMI terminal when outputting the signal to other professional-use devices. This function layers the time code information on the HDMI output signal. The product sends the time code information as digital data, not as an image displayed on the screen. The connected device can then refer to the digital data to recognize the time data.
Help Guide Digital Still Camera DSC-RX0 HDMI Settings: REC Control (movie) If you connect the camera to an external recorder/player, you can remotely command the recorder/player to start/stop recording using the camera. 1 MENU → (Setup) → [HDMI Settings] → [ REC Control] → desired setting. Menu item details On: The camera can send a recording command to an external recorder/player. The camera is sending a recording command to an external recorder/player.
Help Guide Digital Still Camera DSC-RX0 HDMI Settings: CTRL FOR HDMI When connecting this product to a “BRAVIA” Sync-compatible TV using an HDMI cable (sold separately), you can operate this product by aiming the TV remote control at the TV. 1 MENU → (Setup) → [HDMI Settings] → [CTRL FOR HDMI] → desired setting. Menu item details On: You can operate this product with a TV’s remote control. Off: You cannot operate this product with a TV’s remote control.
Help Guide Digital Still Camera DSC-RX0 HDMI 4K Output (movie) Sets the HDMI output when connecting to recorders that support 4K. 1 MENU → 2 Connect the camera and the device to be connected via an HDMI cable. 3 MENU→ 4 Record the movie output from the camera using the external recording/playback device. (Camera Settings1) → [Shoot Mode] → desired movie recording mode. (Setup) → [ HDMI 4K Output] → desired setting. Menu item details Off: 4K video is not output.
Help Guide Digital Still Camera DSC-RX0 USB Connection Selects the appropriate USB connection method for each computer or USB device connected to this product. 1 MENU → (Setup) → [USB Connection] → desired setting. Menu item details Auto: Establishes a Mass Storage or MTP connection automatically, depending on the computer or other USB devices to be connected. Windows 7, Windows 8.1 or Windows 10 computers are connected in MTP, and their unique functions are enabled for use.
Help Guide Digital Still Camera DSC-RX0 USB LUN Setting Enhances compatibility by limiting of USB connection functions. 1 MENU → (Setup) → [USB LUN Setting] → desired setting. Menu item details Multi: Normally, use [Multi]. Single: Set [USB LUN Setting] to [Single] only if you cannot make a connection.
Help Guide Digital Still Camera DSC-RX0 USB Power Supply Sets whether to supply power via the micro USB cable when the product is connected to a computer or an USB device. 1 MENU → (Setup) → [USB Power Supply] → desired setting. Menu item details On: Power is supplied to the product via a micro USB cable when the product is connected to a computer, etc. Off: Power is not supplied to the product via a micro USB cable when the product is connected to a computer, etc.
Help Guide Digital Still Camera DSC-RX0 PC Remote Settings: Still Img. Save Dest. Sets whether to save still images stored in both the camera and the computer during PC Remote shooting. This setting is useful when you want to check recorded images on the camera without leaving the camera. * PC Remote: Uses "Remote Camera Control" to control this product from the computer, including such functions as shooting and storing images on the computer. 1 MENU → (Setup) → [PC Remote Settings] → [Still Img.
Help Guide Digital Still Camera DSC-RX0 PC Remote Settings: RAW+J PC Save Img Selects the file type for images to be transferred to the computer in PC Remote shooting. When shooting still images using PC Remote, the application on the computer does not display the image until the image has been completely transferred. When performing RAW+JPEG shooting, you can accelerate the display processing speed by transferring only JPEG images instead of transferring both RAW and JPEG images.
Help Guide Digital Still Camera DSC-RX0 Language Selects the language to be used in the menu items, warnings and messages. 1 MENU → (Setup) → [ Language] → desired language.
Help Guide Digital Still Camera DSC-RX0 Date/Time Setup Sets the date and time again. 1 MENU → (Setup) → [Date/Time Setup] → desired setting. Menu item details Daylight Savings: Selects Daylight Savings [On]/[Off]. Date/Time: Sets the date and time. Date Format: Selects the date and time display format.
Help Guide Digital Still Camera DSC-RX0 Area Setting Sets the area where you are using the product. 1 MENU → (Setup) → [Area Setting] → desired area.
Help Guide Digital Still Camera DSC-RX0 Copyright Info You can write copyright information onto the still images. 1 MENU → (Setup) → [Copyright Info] → desired setting. 2 When you select [Set Photographer] or [Set Copyright], a keyboard appears on the screen. Enter your desired name. Menu item details Write Copyright Info: Sets whether to write copyright information. ([On]/[Off]) If you select [On], an icon will appear on the shooting screen. Set Photographer: Sets the photographer name.
5. Move cursor Moves the cursor in the input box to the right or left. 6. Delete Deletes the character preceding the cursor. 7. Switches the next character to a capital or lowercase letter. 8. Enters a space. To cancel input, select [Cancel]. Note You can only enter alphanumeric characters and symbols for [Set Photographer] and [Set Copyright]. You can enter up to 46 letters. A icon appears during the playback of images with copyright information.
Help Guide Digital Still Camera DSC-RX0 Format Formats (initializes) the memory card. When you use a memory card with this product for the first time, it is recommended that you format the card using the product for stable performance of the memory card. Note that formatting permanently erases all data on the memory card, and is unrecoverable. Save valuable data on a computer, etc. 1 MENU → (Setup) → [Format].
Help Guide Digital Still Camera DSC-RX0 File Number Selects how to assign file numbers to recorded still images and MP4 movies recorded with [ [MP4]. 1 MENU → File Format] set to (Setup) → [File Number] → desired setting. Menu item details Series: The product will assign numbers to files sequentially up to “9000” without resetting. Reset: The product resets numbers when a file is recorded in a new folder and assigns numbers to files starting with “0001.
Help Guide Digital Still Camera DSC-RX0 Set File Name You can specify the first three characters of the file name for images you shoot. 1 MENU → 2 Select the entry field for the file name to display a keyboard on the screen, and then enter three characters of your choice. (Setup) → [Set File Name]. Note Only capital letters, numbers, and underscores can be entered. However, an underscore cannot be used as the first character.
Help Guide Digital Still Camera DSC-RX0 Select REC Folder You can change the folder on the memory card where still images and MP4 movies recorded with [ to [MP4] are to be recorded. 1 MENU → (Setup) → [Select REC Folder] → desired folder. Note You cannot select the folder when [Folder Name] is set to [Date Form].
Help Guide Digital Still Camera DSC-RX0 New Folder Creates a new folder on the memory card for recording still images and MP4 movies recorded with [ File Format] set to [MP4]. A new folder is created with a folder number one greater than the largest folder number currently used. Images are recorded in the newly created folder. A folder for still images and a folder for MP4 movies that have the same number are created at the same time. 1 MENU → (Setup) → [New Folder].
Help Guide Digital Still Camera DSC-RX0 Folder Name Still images are recorded in a folder that is automatically created inside the DCIM folder on the memory card. You can change the way folder names are assigned. 1 MENU → (Setup) → [Folder Name] → desired setting. Menu item details Standard Form: The folder name form is as follows: folder number + MSDCF. Example: 100MSDCF Date Form: The folder name form is as follows: folder number + Y (the last digit)/MM/DD.
Help Guide Digital Still Camera DSC-RX0 Recover Image DB If image files were processed on a computer, problems may occur in the image database file. In such cases, the images on the memory card will not be played back on this product. If these problems happen, repair the file using [Recover Image DB]. 1 MENU → (Setup) → [Recover Image DB] → [Enter]. Note Use a sufficiently charged battery pack. Low battery power during repairing can cause damage to data.
Help Guide Digital Still Camera DSC-RX0 Display Media Info. Displays the recordable time of movies and the number of recordable still images for the inserted memory card. 1 MENU → (Setup) → [Display Media Info.].
Help Guide Digital Still Camera DSC-RX0 Version Displays the version of this product’s software. 1 MENU → (Setup) → [Version].
Help Guide Digital Still Camera DSC-RX0 Setting Reset Resets the product to the default settings. Even if you perform [Setting Reset], the recorded images are retained. 1 MENU → (Setup) → [Setting Reset] → desired setting. Menu item details Camera Settings Reset: Initializes the main shooting settings to the default settings. Initialize: Initializes all the settings to the default settings. Note Be sure not to eject the battery pack while resetting.
Help Guide Digital Still Camera DSC-RX0 PlayMemories Mobile Using the smartphone application PlayMemories Mobile, you can shoot an image while controlling the camera using a smartphone or transfer the images recorded on the camera to the smartphone. Download and install the application PlayMemories Mobile from your smartphone’s application store. If PlayMemories Mobile is already installed on your smartphone, be sure to update it to the latest version.
Help Guide Digital Still Camera DSC-RX0 Controlling the camera from a smartphone via Wi-Fi (Single connection) (Android) By connecting a smartphone with the camera via Wi-Fi, you can shoot images while checking the composition or settings on the screen of the smartphone. 1 Install PlayMemories Mobile to your smartphone. If PlayMemories Mobile has already been installed, update it to the latest version. 2 MENU → (Network) → [Ctrl w/ Smartphone] and set as follows.
6 Scan the QR Code on the monitor of the camera using the smartphone. Once the QR Code has been scanned, the message [Connect with the camera?] will be displayed on the smartphone screen. 7 Select [OK] on the smartphone screen. The smartphone will connect to the product. 8 Check the composition of the image on the smartphone’s screen, and then press the shutter button (A) on the smartphone to shoot image. You can set [Self-Timer] or configure the settings to save images to the smartphone (B).
4. Input the password that is displayed on the camera. The smartphone is connected to the camera. Hint Once the QR Code has been read, the camera’s SSID (DIRECT-xxxx) and password are registered to the smartphone. This enables you to easily connect the smartphone to the product via Wi-Fi at a later date by selecting the SSID. Note This product shares the connection information for [Ctrl w/ Smartphone] with a device that has permission to connect.
4-698-613-11(1) Copyright 2017 Sony Corporation 203
Help Guide Digital Still Camera DSC-RX0 Controlling the camera from a smartphone via Wi-Fi (Single connection) (iPhone/iPad) By connecting an iPhone or iPad with the camera via Wi-Fi, you can shoot images while checking the composition or settings on the screen of the iPhone or iPad. 1 Install PlayMemories Mobile to your iPhone or iPad. If PlayMemories Mobile has already been installed, update it to the latest version. 2 MENU → (Network) → [Ctrl w/ Smartphone] and set as follows.
6 Scan the QR Code on the monitor of the camera using the iPhone or iPad. 7 Install the profile (setting information) by following the instructions shown on the iPhone or iPad screen and select [OK]. The profile will be installed to the iPhone or iPad. If you have activated the passcode lock function for your iPhone or iPad, you will need to enter the passcode. Enter the passcode that you set for your iPhone or iPad. 8 Check the SSID displayed on the monitor of the camera.
11 Return to the “Home” screen of the iPhone or iPad and launch PlayMemories Mobile. 12 Check the composition of the image on the iPhone or iPad screen, and then press the shutter button (A) on the iPhone or iPad to shoot an image. You can set [Self-Timer] or configure the settings to save images to the iPhone or iPad (B). If you cannot establish a connection using the QR Code Connect the camera and the iPhone or iPad using the SSID and password. 1.
The iPhone or iPad is connected to the camera. 4. Confirm that your iPhone or iPad was connected to the “SSID” shown on the camera. 5. Set the camera to shooting mode. 6. Return to the “Home” screen of the iPhone or iPad and launch PlayMemories Mobile. Hint Once the QR Code has been read, the camera’s SSID (DIRECT-xxxx) and password are registered to the iPhone or iPad. This enables you to easily connect the iPhone or iPad to the product via Wi-Fi at a later date by selecting the SSID.
Depending on future version upgrades, the operational procedures or screen displays are subject to change without notice.
Help Guide Digital Still Camera DSC-RX0 Controlling multiple cameras from a smartphone via Wi-Fi (Multiple connections) With PlayMemories Mobile, you can use a smartphone to control multiple cameras. You can control up to five cameras simultaneously. With multiple connections, one of the cameras is set as the “group owner” and connected to the smartphone via Wi-Fi. Each of the other cameras is set as a “client” and connected to the group owner via Wi-Fi.
Once the camera is connected as the group owner, camera. 3 is displayed in white on the shooting screen of the On a camera that you want to connect as a client, select MENU → set as follows. (Network) → [Ctrl w/ Smartphone] and [Ctrl w/ Smartphone]: [On] [ Connection Type]: [Multi (Client)] If the camera has been connected as a client before, the camera will connect to the previous group owner automatically.
The communication distance depends on the communication environment and devices to be connected. Wi-Fi connections are not available under water. Live view images may not be displayed smoothly on the screen of the smartphone depending on the surrounding radio wave condition or smartphone performance. When [Ctrl w/ Smartphone] is set to [On], the camera’s battery is drained more quickly. Set it to [Off] when you are not using the [Ctrl w/ Smartphone] function.
Help Guide Digital Still Camera DSC-RX0 Turning the camera on/off from a smartphone using the Bluetooth function You can turn the camera on or off by operating a smartphone connected to the camera via the Bluetooth function. You can connect multiple cameras to a smartphone simultaneously. Unlike with multiple connections via Wi-Fi, multiple cameras are connected to the smartphone directly. Supported smartphones Android smartphones: Android 5.0 or later and compatible with Bluetooth 4.
8. Select [OK] on the Bluetooth connection completion screen on the camera. The camera will return to [Bluetooth Settings] screen. Turning the camera on/off from a smartphone Once Step 8 under “Bluetooth connection (Pairing)” is complete, you can turn the camera on or off from the smartphone by following the steps below. 1. Launch PlayMemories Mobile on your smartphone and select [Camera Remote Power ON/OFF]. 2. Select the (power) mark to the right of “DSC-RX0” in the list on the smartphone.
Help Guide Digital Still Camera DSC-RX0 Send to Smartphone You can transfer still images/movies to a smartphone and view them. The application PlayMemories Mobile must be installed on your smartphone. (Network) → [Send to Smartphone] → desired setting. 1 MENU → 2 Connect the smartphone to the camera using the SSID and password displayed on the monitor of the camera. The setting method for connecting the smartphone and the product varies depending on the smartphone.
MENU → (Network) → [SSID/PW Reset]. After resetting the connection information, you must register the smartphone again. When [Airplane Mode] is set to [On], you cannot connect this product and the smartphone. Set [Airplane Mode] to [Off].
Help Guide Digital Still Camera DSC-RX0 Send to Computer You can transfer images stored in the product to a computer connected to a wireless access point or wireless broadband router and easily make backup copies using this operation. Before starting this operation, install PlayMemories Home on your computer and register the access point on the product. 1 Start your computer. 2 MENU → (Network) → [Send to Computer].
Help Guide Digital Still Camera DSC-RX0 View on TV You can view images on a network-enabled TV by transferring them from the product without connecting the product and TV with a cable. For some TVs, you may need to perform operations on the TV. For details, refer to the operating instructions supplied with the TV. 1 MENU → 2 When you want to play back images using slideshow, press (Wireless) → [View on TV] → desired device to be connected. (Enter) button.
Related Topic Wi-Fi Settings: WPS Push Wi-Fi Settings: Access Point Set.
Help Guide Digital Still Camera DSC-RX0 Ctrl w/ Smartphone By connecting the camera to a smartphone using Wi-Fi, you can control the camera and shoot images using the smartphone, and you can transfer images shot with the camera to the smartphone. 1 MENU→ (Network) → [Ctrl w/ Smartphone] → desired setting. Menu item details Ctrl w/ Smartphone: Sets whether to connect the camera and a smartphone using Wi-Fi.
Help Guide Digital Still Camera DSC-RX0 Airplane Mode When you board an airplane, etc., you can temporarily disable all the wireless-related functions including Wi-Fi. 1 MENU → (Network) → [Airplane Mode] → desired setting. If you set [Airplane Mode] to [On], an airplane mark will be displayed on the screen.
Help Guide Digital Still Camera DSC-RX0 Wi-Fi Settings: WPS Push If your access point has the Wi-Fi Protected Setup (WPS) button, you can register the access point to this product easily by pushing the Wi-Fi Protected Setup (WPS) button. 1 MENU → 2 Press the WPS button on the access point you want to register. (Network) → [Wi-Fi Settings] → [WPS Push].
Help Guide Digital Still Camera DSC-RX0 Wi-Fi Settings: Access Point Set. You can register your access point manually. Before starting the procedure, check the SSID name of the access point, security system, and password. The password may be preset in some devices. For details, see the access point operating instructions, or consult the access point administrator. 1 MENU → 2 Select the access point you want to register. (Network) → [Wi-Fi Settings] → [Access Point Set.].
1. Input box The characters you entered are displayed. 2. Switch character types Each time you press symbols. (Enter) button, the character type will switch between alphabet letters, numerals and 3. Keyboard Each time you press order.
Wi-Fi Settings: WPS Push 4-698-613-11(1) Copyright 2017 Sony Corporation 224
Help Guide Digital Still Camera DSC-RX0 Wi-Fi Settings: Disp MAC Address Displays the MAC address of this product. 1 MENU → (Network) → [Wi-Fi Settings] → [Disp MAC Address].
Help Guide Digital Still Camera DSC-RX0 Wi-Fi Settings: SSID/PW Reset This product shares the connection information for [Send to Smartphone] and [Ctrl w/ Smartphone] with a device that has permission to connect. If you want to change the device that is permitted to connect, reset the connection information. 1 MENU → (Network) → [Wi-Fi Settings] → [SSID/PW Reset] → [OK].
Help Guide Digital Still Camera DSC-RX0 Bluetooth Settings Controls the settings for connecting the camera to a smartphone via a Bluetooth connection. You need to pair the camera and smartphone before using the function to turn the camera on/off from a smartphone. For details on the pairing procedure, refer to “Turning the camera on/off from a smartphone using the Bluetooth function.” 1 MENU → (Network) → [Bluetooth Settings] → desired setting.
Help Guide Digital Still Camera DSC-RX0 Remote Power Set. Sets the function to turn the camera on/off from a smartphone connected via the Bluetooth function. 1 MENU → (Network) → [ Remote Power Set.] → desired setting. Menu item details Off: Deactivates the function to turn the camera on/off from a smartphone via the Bluetooth function. On: Activates the function to turn the camera on/off from a smartphone via the Bluetooth function.
Help Guide Digital Still Camera DSC-RX0 Edit Device Name You can change the device name under Wi-Fi Direct. 1 MENU → 2 Select the input box, then input the device name → [OK]. (Network) → [Edit Device Name]. For input method, refer to “How to use the keyboard.” Related Topic Wi-Fi Settings: WPS Push Wi-Fi Settings: Access Point Set.
Help Guide Digital Still Camera DSC-RX0 Reset Network Set. Resets all the network settings to default settings. 1 MENU → (Network) → [Reset Network Set.] → [Enter].
Help Guide Digital Still Camera DSC-RX0 Recommended computer environment You can confirm the operating computer environment of the software from the following URL: http://www.sony.
Help Guide Digital Still Camera DSC-RX0 PlayMemories Home With PlayMemories Home, you can do the following: You can import images shot with this product to your computer. You can play back the images imported to your computer. You can share your images using PlayMemories Online. You can edit movies such as by cutting or merging. You can add various effects such as BGM and subtitles to movies. You can change the playback speed of movies and slow-motion movies.
Help Guide Digital Still Camera DSC-RX0 Installing PlayMemories Home 1 Using your computer's Internet browser, go to the URL below and download PlayMemories Home by following the on-screen instructions. http://www.sony.net/pm/ An internet connection is required. For detailed instructions, visit the PlayMemories Home support page. http://www.sony.co.jp/pmh-se/ 2 Connect the product to your computer using the micro USB cable (supplied), then turn the product on.
Help Guide Digital Still Camera DSC-RX0 Software for Mac computers For details on software for Mac computers, access the following URL: http://www.sony.co.jp/imsoft/Mac/ Note The software that can be used varies depending on the region.
Help Guide Digital Still Camera DSC-RX0 Image Data Converter With Image Data Converter, you can do the following: You can play back and edit images recorded in RAW format with various corrections, such as tone curve and sharpness. You can adjust images with white balance, exposure, and [Creative Style], etc. You can save the still images displayed and edited on a computer. You can either save the still image as RAW format or save it in the general file format.
Help Guide Digital Still Camera DSC-RX0 Installing Image Data Converter 1 Download and install the software by accessing the following URL. Windows: http://www.sony.co.jp/imsoft/Win/ Mac: http://www.sony.co.jp/imsoft/Mac/ Note Log on as Administrator.
Help Guide Digital Still Camera DSC-RX0 Accessing Image Data Converter Guide Windows: [Start] → [All Programs] → [Image Data Converter] → [Help] → [Image Data Converter]. For Windows 8, start [Image Data Converter], and select [Help] from the menu bar → [Image Data Converter Guide]. Mac: Finder → [Applications] → [Image Data Converter] → [Image Data Converter], and select [Help] from the menu bar → [Image Data Converter Guide].
Help Guide Digital Still Camera DSC-RX0 Remote Camera Control When using Remote Camera Control, the following operations are available on your computer. Changing this product’s settings and shooting. Recording images directly to the computer. Performing interval timer shooting. Use these functions after selecting MENU → use Remote Camera Control, refer to the Help. (Setup) → [USB Connection] → [PC Remote].
Help Guide Digital Still Camera DSC-RX0 Installing Remote Camera Control Download and install the software by accessing the following URL: Windows: http://www.sony.co.jp/imsoft/Win/ Mac: http://www.sony.co.
Help Guide Digital Still Camera DSC-RX0 Accessing the Help of Remote Camera Control Windows: [Start] → [All Programs] → [Remote Camera Control] → [Remote Camera Control Help]. For Windows 8, start [Remote Camera Control], and right-click the title bar to select [Remote Camera Control Help]. Mac: Finder → [Applications] → [Remote Camera Control], and select [Help] from the menu bar → [Remote Camera Control Help].
Help Guide Digital Still Camera DSC-RX0 Connecting the product to a computer 1 Insert a sufficiently charged battery pack into the product. 2 Turn on the product and the computer. 3 Check that [USB Connection] under 4 Connect the product and your computer using the micro USB cable (supplied) (A) . (Setup) is set to [Mass Storage]. If you connect the product to your computer using the micro USB cable when [USB Power Supply] is set to [On], power is supplied from your computer.
Help Guide Digital Still Camera DSC-RX0 Importing images to the computer PlayMemories Home allows you to easily import images. For details on PlayMemories Home functions, see the Help of PlayMemories Home. Importing images to the computer without using PlayMemories Home (For Windows) When the AutoPlay Wizard appears after making a USB connection between this product and a computer, click [Open folder to view files] → [OK] → [DCIM] or [MP_ROOT]. Then copy the desired images to the computer.
Help Guide Digital Still Camera DSC-RX0 Disconnecting the product from the computer Disconnects the USB connection between this product and the computer. Perform the procedures from step 1 to 2 below before performing the following operations: Disconnecting the USB cable. Removing a memory card. Turning off the product. 1 Click 2 Click the displayed message. (Safely remove USB Mass Storage Device) on the taskbar.
Help Guide Digital Still Camera DSC-RX0 Selecting a disc to be created You can create a disc that can be played back on other devices from a movie recorded on this camera. What devices can play back the disc depends on the disc type. Select a disc type suitable for the playback devices you will be using. Depending on the movie type, the movie format may be converted when creating a disc.
Help Guide Digital Still Camera DSC-RX0 Creating Blu-ray Discs from high-definition image quality movies You can create Blu-ray Discs that can be played back on Blu-ray Disc playback devices (such as Sony Blu-ray Disc players or the PlayStation 3, etc.). A. How to create using a computer With a Windows computer, you can copy movies imported to the computer and create Blu-ray Discs using PlayMemories Home. Your computer must be able to create Blu-ray Discs.
Help Guide Digital Still Camera DSC-RX0 Creating DVD discs (AVCHD recording discs) from high-definition image quality movies You can create DVD discs (AVCHD recording discs) that can be played back on AVCHD-compatible playback devices (such as Sony Blu-ray Disc players or the PlayStation 3, etc.). A. How to create using a computer With a Windows computer, you can copy movies imported to the computer and create DVD discs (AVCHD recording discs) using PlayMemories Home.
Help Guide Digital Still Camera DSC-RX0 Creating DVD discs from standard image quality movies You can create DVD discs that can be played back on ordinary DVD playback devices (DVD players, computers that can play back DVD discs, etc.). A. How to create using a computer With a Windows computer, you can copy movies imported to the computer and create DVD disc using PlayMemories Home. Your computer must be able to create DVD discs.
Help Guide Digital Still Camera DSC-RX0 Precautions Backing up memory cards Data may be corrupted in the following cases. Be sure to back up the data for protection. When the memory card is removed, the USB cable is disconnected, or the product is turned off in the middle of a read or write operation. When the memory card is used in locations subject to static electricity or electrical noise.
If the same part of your skin touches the camera for a long period of time while using the camera, even if the camera does not feel hot to you, it may cause symptoms of a low-temperature burn such as redness or blistering. Pay special attention in the following situations and use a tripod, etc. When using the camera in a high-temperature environment When someone with poor circulation or impaired skin sensation uses the camera When using the camera with the [Auto Pwr OFF Temp.
Do not use the camera in areas where strong radio waves or radiation is being emitted. Recording and playback may not function correctly. Notes on discarding or transferring this product to others When discarding or transferring this product to others, make sure to perform the following operation to protect private information. Perform [Setting Reset] to reset all the settings.
Help Guide Digital Still Camera DSC-RX0 On the internal rechargeable battery This camera has an internal rechargeable battery for maintaining the date and time and other settings regardless of whether the power is on or off, or whether the battery pack is charged or discharged. This rechargeable battery is continually charged as long as you are using the product. However, if you use the product for only short periods, it gradually discharges.
Help Guide Digital Still Camera DSC-RX0 Notes on the battery pack Charging the battery pack Charge the battery pack (supplied) before using the product for the first time. The charged battery pack will discharge little by little even if you do not use it. Charge the battery pack each time before you use the product so that you do not miss any opportunities to shoot images. You can charge the battery pack even if it is not completely discharged. You can use a partially charged battery pack.
The correct remaining battery indicator may not be displayed under some operating or environmental conditions. If you do not operate the product for a certain period of time while the power is on, the product turns off automatically (Auto power-off function). If the remaining battery time does not appear on the screen, press the DISP (Display Setting) button to display it.
Help Guide Digital Still Camera DSC-RX0 Charging the battery pack The supplied AC Adaptor is dedicated to this product. Do not connect with other electronic devices. Doing so may cause a malfunction. Make sure to use a genuine Sony AC Adaptor. If the product's charge lamp flashes while charging, remove the battery pack being charged, and then insert the same battery pack firmly back into the product.
Help Guide Digital Still Camera DSC-RX0 Notes on memory card If you repeatedly shoot and delete images for a long time, fragmentation of data in a file in the memory card may occur, and movie recording may be interrupted in the middle of shooting. If this happens, save your images to a computer or other storage location, then execute [Format]. Memory card formatted with a computer is not guaranteed to operate with the product.
Help Guide Digital Still Camera DSC-RX0 On cleaning Cleaning the glass cover of the lens Wipe the glass cover of the lens with a soft cloth to remove fingerprints, dust, etc. Cleaning the product surface Clean the product surface with a soft cloth slightly moistened with water, then wipe the surface with a dry cloth. To prevent damage to the finish or casing: Do not expose the product to chemical products such as thinner, benzine, alcohol, disposable cloths, insect repellent, sunscreen or insecticide.
Help Guide Digital Still Camera DSC-RX0 Number of still images The table below shows the approximate number of images that can be recorded on a memory card formatted with this camera. The number of still images may vary depending on the shooting conditions and the memory card.
Help Guide Digital Still Camera DSC-RX0 Recordable time of movies The table below shows the approximate maximum recording times which can be recorded on the memory card that is formatted with this product. These numbers are the total times of all movie files on the memory card. The recordable time may vary depending on the shooting conditions and the memory card. The values when [ File Format] is set to [XAVC S HD] and [AVCHD] are based on shooting with [Dual Video REC] set to [Off].
camera starts recording until the camera stops recording. XAVC S HD (60p 50M/50p 50M) [Auto Pwr OFF Temp.]: [Standard] Ambient temperature [Ctrl w/ Smartphone]: [Off] [Ctrl w/ Smartphone]: [On] 20°C (68°F) Approx. 45 min. Approx. 20 min. 30°C (86°F) Approx. 25 min. Approx. 15 min. 40°C (104°F) Approx. 25 min. Approx. 15 min. XAVC S HD (60p 50M/50p 50M) [Auto Pwr OFF Temp.]: [High] Ambient temperature [Ctrl w/ Smartphone]: [Off] [Ctrl w/ Smartphone]: [On] 20°C (68°F) Approx. 60 min. Approx.
Help Guide Digital Still Camera DSC-RX0 Using the AC Adaptor/battery charger abroad You can use the battery charger (sold separately) and the AC Adaptor (supplied) in any country or region where the power supply is within 100 V to 240 V AC and 50 Hz/60 Hz. Depending on the country/region, a converting plug adaptor may be needed to connect to a wall outlet (wall socket). Note Do not use an electronic voltage transformer as doing so may cause a malfunction.
Help Guide Digital Still Camera DSC-RX0 On TV color systems To view movies shot using this product on a television, the product and television must use the same color television system. Check the TV color system for the country or region where you are using the product. NTSC system: Bahama Islands, Bolivia, Canada, Central America, Chile, Colombia, Ecuador, Jamaica, Japan, Korea, Mexico, Peru, Surinam, Taiwan, the Philippines, the U.S.A., Venezuela, etc.
Help Guide Digital Still Camera DSC-RX0 ZEISS lens The camera is equipped with a ZEISS lens which is capable of reproducing sharp images with excellent contrast. The lens for the camera has been produced under a quality assurance system certified by ZEISS in accordance with the quality standards of ZEISS in Germany.
Help Guide Digital Still Camera DSC-RX0 AVCHD format The AVCHD format was developed for high-definition digital video cameras when recording an HD (High-Definition) signal using high-efficiency compression coding technology. The MPEG-4 AVC/H.264 format is used to compress video data, and the Dolby Digital or Linear PCM system is used to compress audio data. The MPEG-4 AVC/H.264 format is capable of compressing images at higher efficiency than that of the conventional image compressing format.
Help Guide Digital Still Camera DSC-RX0 License Notes on the License This product comes with software that are used based on licensing agreements with the owners of that software. Based on requests by the owners of copyright of these software applications, we have an obligation to inform you of the following. Please read the following sections. Licenses (in English) are recorded in the internal memory of your product.
Help Guide Digital Still Camera DSC-RX0 Trademarks Memory Stick and are trademarks or registered trademarks of Sony Corporation. XAVC S and are registered trademarks of Sony Corporation. Blu-ray Disc™ and Blu-ray™ are trademarks of the Blu-ray Disc Association. AVCHD Progressive and AVCHD Progressive logotype are trademarks of Panasonic Corporation and Sony Corporation. Dolby, Dolby Audio and double-D symbol are trademarks of Dolby Laboratories.
Help Guide Digital Still Camera DSC-RX0 Troubleshooting If you experience trouble with the product, try the following solutions. 1 Remove the battery pack, wait for about one minute, re-insert the battery pack, then turn on the power. If a message such as “C/E:□□:□□” appears on the screen, refer to the self-diagnosis display. 2 Initialize the settings. 3 Consult your dealer or local authorized service facility.
Help Guide Digital Still Camera DSC-RX0 Self-diagnosis display If a code starting with a letter of the alphabet appears, the self-diagnosis function on this product is working. The last two digits (indicated by □□) will differ depending on the state of this product. If you cannot solve the problem even after trying the following corrective actions a few times, this product may need repair. Contact your Sony dealer or local authorized Sony service facility.
Help Guide Digital Still Camera DSC-RX0 Warning messages Set Area/Date/Time. Set the area, date and time. If you have not used the product for a long time, charge the internal rechargeable backup battery. Unable to use memory card. Format? The memory card was formatted on a computer and the file format was modified. Select [Enter], and then format the memory card. You can use the memory card again, however, all previous data in the memory card is erased. It may take some time to complete the format.
You have been recording images for a long time, the product temperature has risen. Recording is unavailable in this movie format. Set [ File Format] to [MP4]. The number of images exceeds that for which date management in a database file by the product is possible. Unable to register to the database file. Import all the images to a computer and recover the memory card. Image DataBase File error There is something wrong in the Image Database File. Select [Setup] → [Recover Image DB].