4-593-797-11(1) Digital Still Camera Instruction Manual “Help Guide” (Web manual) Refer to “Help Guide” for in-depth instructions on the many functions of the camera. http://rd1.sony.
English Learning more about the camera (“Help Guide”) “Help Guide” is an on-line manual. You can read the “Help Guide” on your computer or smartphone. Refer to it for in-depth instructions on the many functions of the camera. URL: http://rd1.sony.net/help/dsc/1630/h_zz/ Viewing the Guide This camera is equipped with a built-in instruction guide. Fn (Function) MENU C/ (Delete) In-Camera Guide The camera displays explanations for MENU/Fn (Function) items and the setting values.
Owner’s Record Record the model and serial number (which are located on the product) in the space provided below. Refer to these numbers whenever you call your Sony dealer regarding this product. Model No. DSCSerial No. _____________________ WARNING To reduce fire or shock hazard, do not expose the unit to rain or moisture. CAUTION [ Battery pack If the battery pack is mishandled, the battery pack can burst, cause a fire or even chemical burns. Observe the following cautions. • Do not disassemble.
For more information regarding recycling of rechargeable batteries, call toll free 1-800-822-8837, or visit http:// www.call2recycle.org/ Caution: Do not handle damaged or leaking Lithium-Ion batteries. [ For supplied accessories This device complies with Part 15 of the FCC Rules. Operation is subject to the following two conditions: (1) This device may not cause harmful interference, and (2) this device must accept any interference received, including interference that may cause undesired operation.
[ Note: This equipment has been tested and found to comply with the limits for a Class B digital device, pursuant to Part 15 of the FCC Rules. These limits are designed to provide reasonable protection against harmful interference in a residential installation. This equipment generates, uses, and can radiate radio frequency energy and, if not installed and used in accordance with the instructions, may cause harmful interference to radio communications.
GB 6 [ Disposal of waste batteries and electrical and electronic equipment (applicable in the European Union and other European countries with separate collection systems) For more detailed information about recycling of this product or battery, please contact your local Civic Office, your household waste disposal service or the shop where you purchased the product or battery.
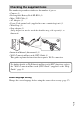
Checking the supplied items The number in parentheses indicates the number of pieces. • Camera (1) • Rechargeable Battery Pack NP-BX1 (1) • Micro USB Cable (1) • AC Adaptor (1) • Power Cord (mains lead) (supplied in some countries/regions) (1) • Wrist Strap (1) • Strap adapter (2) (Strap adapters are used to attach the shoulder strap (sold separately), as illustrated.
Identifying parts A B C D ON/OFF (Power) button Power/Charge lamp Shutter button Mode dial (Auto Mode)/ (Program Auto)/ (Aperture Priority)/ (Shutter Priority)/ (Manual Exposure)/ (Memory recall)/ (Movie)/ (High Frame Rate)/ (Sweep Panorama)/ (Scene Selection) E For shooting: W/T (zoom) lever For viewing: (Index) lever/ Playback zoom lever F Self-timer lamp/AF illuminator G Flash • Do not cover the flash with your finger. • When using the flash, slide the (Flash pop-up) switch.
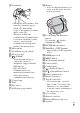
I Viewfinder R Monitor • You can adjust the monitor to an easily viewable angle and shoot from any position. • When using the viewfinder, slide down the viewfinder pop-up switch (1), then pull the eyepiece out from the viewfinder until it clicks (2). • When you look into the viewfinder, the viewfinder mode is activated, and when you take your face away from the viewfinder, the viewing mode returns to the monitor mode.
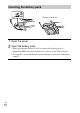
Inserting the battery pack Battery lock lever 1 Open the cover. the battery pack. 2 Insert • While pressing the battery lock lever, insert the battery pack as illustrated. Make sure that the battery lock lever locks after insertion. • Closing the cover with the battery inserted incorrectly may damage the camera.
Charging the battery pack Power/Charge lamp Lit (green): Power ON Lit (orange): Charging Off: Charging finished Flashing (orange): Charging error or charging paused temporarily because the camera is not within the proper temperature range the camera to the AC Adaptor (supplied), 1 Connect using the micro USB cable (supplied). the AC Adaptor to the wall outlet (wall socket). 2 Connect The power/charge lamp lights orange, and charging starts. • Turn off the camera while charging the battery.
Notes • If the power/charge lamp on the camera flashes when the AC Adaptor is connected to the wall outlet (wall socket), this indicates that charging is temporarily stopped because the temperature is outside the recommended range. When the temperature gets back within the appropriate range, the charging resumes. We recommend charging the battery pack in an ambient temperature of between 10°C to 30°C (50ºF to 86ºF).
x Charging by connecting to a computer The battery pack can be charged by connecting the camera to a computer using a micro USB cable. Connect the camera to the computer with the camera turned off. To a USB jack Notes • If the camera is connected to a laptop computer that is not connected to a power source, the laptop battery level decreases. Do not charge for an extended period of time.
x Battery life and number of images that can be recorded and played back Battery life Number of images Shooting (still images) Monitor — Approx. 220 images Viewfinder — Approx. 210 images Typical movie shooting Monitor Approx. 35 min. — Viewfinder Approx. 35 min. — Continuous movie shooting Monitor Approx. 65 min. — Viewfinder Approx. 65 min. — Approx. 200 min. Approx.
x Supplying power You can use the AC Adaptor (supplied) to supply power during shooting or playing back images, reducing battery pack consumption. Notes • The camera will not activate if there is no remaining battery. Insert a sufficiently charged battery pack into the camera. • If you use the camera while power is being supplied from a wall outlet (wall socket), make sure that the icon ( ) displays on the monitor.
x Memory cards that can be used Memory card Memory Stick PRO Duo For still images For movies MP4 AVCHD (Mark2 only) (Mark2 only) Memory Stick PRO-HG Duo™ Memory Stick Micro™ (M2) XAVC S — *1 (Mark2 only) (Mark2 only) — SD memory card *2 *2 SDHC memory card *2 *2 *3 SDXC memory card *2 *2 *3 microSD memory card *2 *2 microSDHC memory card *2 *2 *3 microSDXC memory card *2 *2 *3 — — *1 Movies cannot be recorded in 100 Mbps or more.
Notes • Never remove the memory card/battery pack when the access lamp (page 9) is lit. This may cause damage to data in the memory card. Setting the language and the clock Power/Charge lamp (green) ON/OFF (Power) Control wheel Select items: v/V/b/B Set the numeric value of date and time: v/V/ / Set: z the ON/OFF (Power) button. 1 Press Language setting screen is displayed when you turn on the camera for the first time. • It may take time for the power to turn on and allow operation.
[Daylight Savings], [Date/Time] and [Date Format], 5 Set then press z. • When setting [Date/Time], midnight is 12:00 AM, and noon is 12:00 PM. 6 Check that [Enter] is selected, then press z. Shooting still images/movies Shutter button W/T (zoom) lever Mode dial W: zoom out T: zoom in : Auto Mode : Movie MOVIE Shooting still images the shutter button halfway down to focus. 1 Press When the image is in focus, a beep sounds and the z indicator lights.
Notes • When using the zoom function while shooting a movie, the sound of the camera operating will be recorded. Sound from the camera tends to be recorded particularly when [Zoom Speed] is set to [Fast] and when [Zoom Func. on Ring] is set to [Quick]. The sound of the MOVIE button operating may also be recorded when movie recording is finished.
x Returning to shooting images Press the shutter button halfway down. Notes • If you try to play back images right after continuous shooting, the monitor may display an icon indicating that data is being written/the number of images left to write. During writing, some functions are not available. Introduction of other functions Control ring MENU Fn (Function) Control wheel x Control wheel GB 20 DISP (Display Contents): Allows you to change the screen display.
x Fn (Function) button Allows you to register 12 functions and recall those functions when shooting. 1 Press the Fn (Function) button. 2 Select the desired function by pressing v/V/b/B on the control wheel. 3 Select the setting value by turning the control wheel or the control ring. x Control ring Your favorite functions can be assigned to the control ring. When shooting, established settings can be changed just by turning the control ring.
Red Eye Reduction Reduces the red-eye phenomenon when using flash. Focus Mode Selects the focus method. Focus Area Selects the area of focus. AF Illuminator Sets the AF illuminator, which provides light for a dark scene to aid focusing. AF drive speed Switches focusing speed when using autofocus in movie mode. AF Track Sens Sets the AF tracking sensitivity in movie mode. Exposure Comp. Compensates for the brightness of the entire image. ISO Sets the ISO sensitivity. ISO AUTO Min.
Smile/Face Detect. Selects to detect faces and adjust various settings automatically. Sets to automatically release the shutter when a smile is detected. Auto Dual Rec Sets the shutter to release automatically when an impressive composition including a person is detected during movie shooting. Soft Skin Effect Sets the Soft Skin Effect and the effect level. Auto Obj.
(Custom Settings) Zebra MF Assist Focus Magnif. Time Initial Focus Mag. Grid Line GB Displays an enlarged image when focusing manually. Sets the length of time the image will be shown in an enlarged form. Sets the initial magnification when an enlarged image is displayed using [Focus Magnifier]. Sets a grid line display to enable alignment to a structural outline. Marker Display Sets whether to display the marker on the monitor or viewfinder when recording movies.
Zoom Speed Sets the zooming speed when you operate the zoom lever. Zoom Setting Sets whether to use the Clear Image Zoom and Digital Zoom when zooming. FINDER/MONITOR Sets the method for switching between the viewfinder and monitor. Release w/o Card Sets whether to release the shutter when a memory card is not inserted. AEL w/ shutter Sets whether to perform AEL when the shutter button is half pressed. This is useful when you want to adjust the focus and exposure separately.
Wheel Lock Sets whether to disable the control wheel temporarily by using the Fn button when shooting. You can disable/enable the control wheel by pressing and holding down the Fn button. (Wireless) Send to Smartphone Transfers images to display on a smartphone. Send to Computer Backs up images by transferring them to a computer connected to a network. View on TV You can view images on a network-enabled TV. One-touch(NFC) Assigns an application to One-touch (NFC).
View Mode Sets the way in which images are grouped for playback. Image Index Displays multiple images at the same time. Display Rotation Sets the playback direction of the recording image. Slide Show Shows a slide show. Rotate Rotates the image. Enlarge Image Enlarges the playback images. Enlarge Init. Mag. Sets the initial magnification when enlarging an image during playback. Enlarge Initial Pos. Sets the initial position when enlarging an image during playback.
Tile Menu Sets whether to display the tile menu every time you press the MENU button. Mode Dial Guide Turns the mode dial guide (the explanation of each shooting mode) on or off. Delete confirm. Sets whether Delete or Cancel is preselected in the Delete confirmation screen. Display Quality Sets the display quality. Pwr Save Start Time Sets the length of time until the camera turns off automatically. Function for VF close Sets whether to turn the power off when the viewfinder is closed.
File Number Sets the method used to assign file numbers to still images and movies. Set File Name Changes the first 3 characters of the file name for still images. Select REC Folder Changes the selected folder for storing still images and movies (MP4). New Folder Creates a new folder for storing still images and movies (MP4). Folder Name Sets the folder format for still images. Recover Image DB Recovers the image database file and enables recording and playback. Display Media Info.
Using software Installing the following software to your computer will make your camera experience more convenient. • PlayMemories Home: Imports images to your computer and lets you use them in different ways (page 31). • Image Data Converter: Displays RAW images and processes them. • Remote Camera Control: Controls a camera connected to your computer via a USB cable. You can download and install this software to your computer from the following URLs.
Importing images to your computer and using them (PlayMemories Home) The software PlayMemories Home allows you to import still images and movies to your computer and use them. PlayMemories Home is required for importing XAVC S movies and AVCHD movies to your computer. http://www.sony.
Adding functions to the camera You can add the desired functions to your camera by connecting to the application download website (PlayMemories Camera Apps™) via the Internet. http://www.sony.net/pmca/ • After installing an application, you can call up the application by touching an NFC-enabled Android smartphone to the N mark on the camera, using the [One-touch(NFC)] function.
File Format XAVC S 4K XAVC S HD AVCHD MP4 Record Setting Recordable time (h (hour), m (minute)) 8 GB 32 GB 64 GB 30p 100M/25p 100M 9m 35 m 1 h 15 m 30p 60M/25p 60M 24p 100M*/ – 15 m 1h 2h5m 24p 60M*/ – 9m 15 m 35 m 1h 1 h 15 m 2h5m 60p 50M/50p 50M 30p 50M/25p 50M 15 m 15 m 1 h 15 m 1 h 15 m 2 h 35 m 2 h 35 m 24p 50M*/ – 120p 100M/100p 100M 120p 60M/100p 60M 15 m 9m 15 m 1 h 15 m 35 m 1h 2 h 35 m 1 h 15 m 2h5m 60i 24M(FX)/50i 24M(FX) 40 m 3h 6h 60i 17M(FH)/50i 17M(FH) 55 m 4
Notes on using the camera Functions built into this camera • This camera is compatible with 1080 60p or 50p-format movies. Unlike standard recording modes up to now, which record in an interlacing method, this camera records using a progressive method. This increases the resolution, and provides a smoother, more realistic image. Movies recorded in 1080 60p/1080 50p format can be played back only on 1080 60p/1080 50p-supported devices. • This camera is compatible with 4K 30p/4K 25p/4K 24p recording.
On carrying • Do not sit down in a chair or other place with the camera in the back pocket of your trousers or skirt, as this may cause malfunction or damage the camera. ZEISS lens The camera is equipped with a ZEISS lens which is capable of reproducing sharp images with excellent contrast. The lens for the camera has been produced under a quality assurance system certified by ZEISS in accordance with the quality standards of ZEISS in Germany.
On the overheat protection Depending on the camera and battery temperature, you may be unable to record movies or the power may turn off automatically to protect the camera. A message will be displayed on the screen before the power turns off or you can no longer record movies. In this case, leave the power off and wait until the camera and battery temperature goes down.
Notes on security when using wireless LAN products • Always make sure that you are using a secure wireless LAN to avoid hacking, access by malicious third parties, or other vulnerabilities. • It is important that you set the security settings when using a wireless LAN. • If a security problem arises because no security precautions are in place or due to any inevitable circumstances when using a wireless LAN, Sony bears no responsibility for the loss or damage.
Specifications Camera [System] Image device: 13.2 mm × 8.8 mm (1.0 type) CMOS sensor Effective pixel number of camera: Approx. 20.1 Megapixels Total pixel number of camera: Approx. 21.0 Megapixels Lens: ZEISS Vario-Sonnar T 2.9× zoom lens f = 8.8 mm – 25.7 mm (24 mm – 70 mm (35 mm film equivalent)) F1.8 (W) – F2.8 (T) While shooting movies (HD 16:9): 25.
[Monitor] [Wireless LAN] LCD monitor: 7.5 cm (3.0 type) TFT drive Total number of dots: 1 228 800 dots Supported standard: IEEE 802.11 b/g/n Frequency: 2.4 GHz Supported security protocols: WEP/ WPA-PSK/WPA2-PSK Configuration method: Wi-Fi Protected Setup™ (WPS) / manual Access method: Infrastructure Mode NFC: NFC Forum Type 3 Tag compliant [Power, general] Power: Rechargeable battery pack, 3.6 V AC Adaptor, 5 V Power consumption: Approx. 2.6 W (during shooting with the monitor) Approx. 3.
Trademarks GB 40 • Memory Stick and are trademarks or registered trademarks of Sony Corporation. • XAVC S and are registered trademarks of Sony Corporation. • “AVCHD Progressive” and “AVCHD Progressive” logotype are trademarks of Panasonic Corporation and Sony Corporation. • Dolby and the double-D symbol are trademarks of Dolby Laboratories.
On GNU GPL/LGPL applied software The software that is eligible for the following GNU General Public License (hereinafter referred to as “GPL”) or GNU Lesser General Public License (hereinafter referred to as “LGPL”) are included in the product. This informs you that you have a right to have access to, modify, and redistribute source code for these software programs under the conditions of the supplied GPL/ LGPL. Source code is provided on the web. Use the following URL to download it. http://oss.sony.
GB 42
GB 43
© 2016 Sony Corporation Printed in China