
User manual

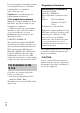
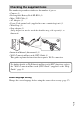

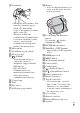
Table Of Contents
- Learning more about the camera (“Help Guide”)
- Viewing the Guide
- Checking the supplied items
- Identifying parts
- Inserting the battery pack
- Charging the battery pack
- Inserting a memory card (sold separately)
- Setting the language and the clock
- Shooting still images/movies
- Viewing images
- Introduction of other functions
- Using software
- Importing images to your computer and using them (PlayMemories Home)
- Adding functions to the camera
- Number of still images and recordable time of movies
- Notes on using the camera
- Notes on High Frame Rate shooting
- Specifications

GB
9
I Viewfinder
• When using the viewfinder, slide
down the viewfinder pop-up
switch (1), then pull the
eyepiece out from the viewfinder
until it clicks (2).
• When you look into the
viewfinder, the viewfinder mode
is activated, and when you take
your face away from the
viewfinder, the viewing mode
returns to the monitor mode.
J Microphone
K Viewfinder pop-up switch
L Hook for strap
M (N Mark)
• Touch the mark when you
connect the camera to a
smartphone equipped with the
NFC function.
• NFC (Near Field
Communication) is an
international standard of the
short-range wireless
communication technology.
N Control ring
O Lens
P Eye sensor
Q (Flash pop-up) switch
R Monitor
• You can adjust the monitor to an
easily viewable angle and shoot
from any position.
S For shooting: Fn (Function)
button
For viewing: (Send to
Smartphone) button
T MOVIE (Movie) button
U Multi/Micro USB Terminal
• Supports Micro USB compatible
device.
V HDMI micro jack
W MENU button
X Wi-Fi antenna (built-in)
Y Control wheel
wh Center button
wj (Playback) button
wk C/ (Custom/Delete) button
wl Battery insertion slot
e; Battery lock lever
ea Tripod socket hole
• Use a tripod with a screw less
than 5.5 mm (7/32 inches) long.
Otherwise, you cannot firmly
secure the camera, and damage to
the camera may occur.
es Access lamp
ed Memory card slot
ef Battery/Memory card cover
eg Speaker