2-683-474-12(1) DVD Home Theatre System Operating Instructions DAV-DZ10 ©2006 Sony Corporation
Installing 3 WARNING To reduce the risk of fire or electric shock, do not expose this apparatus to rain or moisture. Do not install the appliance in a confined space, such as a bookcase or built-in cabinet. To prevent fire, do not cover the ventilation of the apparatus with news papers, table-cloths, curtains, etc. And don’t place lighted candles on the apparatus. To prevent fire or shock hazard, do not place objects filled with liquids, such as vases, on the apparatus.
Welcome! Thank you for purchasing Sony DVD Home Theatre System. Before operating this system, please read this manual thoroughly and retain it for future reference.
Table of Contents Welcome!................................................ 3 About This Manual ................................. 6 This System Can Play the Following Discs ................................................. 6 Guide to the Control Menu Display........ 9 Getting Started Unpacking ............................................. 12 Inserting Batteries into the Remote....... 12 Hookup Overview................................. 13 Step 1: Speaker System Hookup...........
Additional Information Precautions ............................................ 70 Notes about the Discs............................ 71 Troubleshooting .................................... 71 Self-diagnosis Function ........................ 74 (When letters/numbers appear in the display) Specifications ........................................ 75 Glossary ................................................ 76 Language Code List .............................. 78 Index to Parts and Controls...................
About This Manual • The instructions in this manual describe the controls on the remote. You can also use the controls on the system if they have the same or similar names as those on the remote. • The Control Menu items may be different depending on the area. • “DVD” may be used as a general term for DVD VIDEOs, DVD+RWs/DVD+Rs, and DVD-RWs/DVD-Rs. • Measurements are expressed in feet (ft) for North American models. • The following symbols are used in this manual.
Example of discs that the system cannot play The system cannot play the following discs: • CD-ROMs/CD-Rs/CD-RWs other than those recorded in the formats listed on page 6 • CD-ROMs recorded in PHOTO CD format • Data part of CD-Extras • DVD Audios • Super Audio CD • DVD-RAMs Also, the system cannot play the following discs: • A DVD VIDEO with a different region code (page 7, 77). • A disc that has a non-standard shape (e.g., card, heart). • A disc with paper or stickers on it.
If you try to play any other DVD VIDEO, the message [Playback prohibited by area limitations.] will appear on the TV screen. Depending on the DVD VIDEO, no region code indication may be given even though playing the DVD VIDEO is prohibited by area restrictions. Note on playback operations of DVDs and VIDEO CDs Some playback operations of DVDs and VIDEO CDs may be intentionally set by software producers.
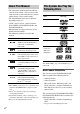
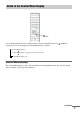
Guide to the Control Menu Display DISPLAY Use the Control Menu to select a function and to view related information. Press repeatedly to turn on or change the Control Menu display as follows: DISPLAY , Control Menu display 1 m Control Menu display 2 (appears for certain discs only) m Control Menu display off Control Menu display The Control Menu display 1 and 2 will show different items depending on the disc type. For details about each item, see the pages in parentheses.
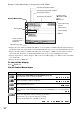
Example: Control Menu display 1 when playing a DVD VIDEO. Currently playing title number*1 Currently playing chapter number*2 Total number of titles*1 Total number of chapters*2 Control Menu items 12 18 T Selected item Function name of selected Control Menu item (27) (34) 1:32:55 DVD VIDEO Playback status (N Playback, X Pause, x Stop, etc.
[PROGRAM] (page 25) Selects the track to play in the order you want. [SHUFFLE] (page 27) Plays the track in random order. [REPEAT] (page 27) Plays the entire disc (all titles/all tracks/all albums) repeatedly or one title/chapter/track/ album repeatedly. [A/V SYNC] (page 38) Adjusts the delay between the picture and sound. [PARENTAL CONTROL] (page 52) Sets to prohibit playback on this system.
Getting Started Unpacking Check that you have the following items: • Speakers (5) • Subwoofer (1) • AM loop antenna (aerial) (1) • FM wire antenna (aerial) (1) • Speaker cords (6) • Remote Commander (remote) (1) • Size AA (R6) batteries (2) • Operating Instructions Inserting Batteries into the Remote You can control the system using the supplied remote. Insert two Size AA (R6) batteries by matching the 3 and # ends on the batteries to the markings inside the compartment.
Hookup Overview “Step 1: Speaker System Hookup” (page 14) “Step 2: Antenna (Aerial) Hookup” (page 18) “Step 3: TV Hookup” (page 19) Getting Started Perform all connections and settings by following Steps 1 to 6.
Step 1: Speaker System Hookup Connect the supplied speaker system using the supplied speaker cords by matching the colors of the jacks to those of the cords. Do not connect any speakers other than those supplied with this system. To obtain the best possible surround sound, specify the speaker parameters (distance, level, etc.) on page 67. Required cords Speaker cords The connector and the color tube of the speaker cords are the same color as the label of the jacks to be connected.
Connecting the speakers Getting Started Front speaker (L) Front speaker (R) Color label Center speaker Color label EURO AV AM FRONT R FRONT L SUR R SUR L CENTER WOOFER COAXIAL SPEAKER Surround speaker (R) OUTPUT(TO TV) FM 75 Subwoofer Surround speaker (L) Note • Do not set the speakers in an inclined position.
• Do not use any type of abrasive pad, scouring powder, or solvent such as alcohol or benzine. To connect the speaker cords Connect the speaker cords after bending the bare wire at the end of the insulation. This prevents the speaker insulation from being inserted in the speaker terminal. Note • Do not catch the speaker cord insulation in the SPEAKER jack. Avoiding short-circuiting the speakers Short-circuiting of the speakers may damage the system.
2 Fasten the screws to the wall. The screws should protrude 5 to 7 mm (7/32 to 9/32 inch). Getting Started 5 to 7 mm (7/32 to 9/32 inch) 3 Hang the speakers on the screws. 4.6 mm (3/16 inch) Hole on the back of the speaker 10 mm (13/32 inch) Note • Use screws that are suitable for the wall material and strength. As a plaster board wall is especially fragile, attach the screws securely to a beam and fasten them to the wall.
Step 2: Antenna (Aerial) Hookup Connect the supplied AM/FM antennas (aerials) for listening to the radio. AM loop antenna (aerial) FM wire antenna (aerial) Note • To prevent noise pickup, keep the AM loop antenna (aerial) away from the system and other components. • Be sure to fully extend the FM wire antenna (aerial). • After connecting the FM wire antenna (aerial), keep it as horizontal as possible.
Step 3: TV Hookup Connecting the video cords Getting Started First, perform the video connection, and then audio connection. With your TV’s audio output connected to this system, you can listen to TV sound through the system speakers. Sends a played back DVD image to a TV.
Step 4: Connecting the AC Power Cord (Mains Lead) Step 5: Turning off the Demonstration Before connecting the AC power cord (mains lead) of this system to a wall outlet (mains), connect the speakers to the system (page 14). Install this system so that the power cord can be unplugged from the wall socket immediately in the event of trouble. "/1 AMP MENU "/1 X/x/c ENTER "/1 After connecting the AC power cord (mains lead), the demonstration appears in the front panel display.
Follow the steps below to make the minimum number of basic adjustments for using the system. To skip an adjustment, press >. To return to the previous adjustment, press .. LANGUAGE SETUP OSD: MENU: AUDIO: SUBTITLE: 5 ENGLISH ENGLISH FRENCH SPANISH PORTUGUESE Press X/x to select a language. Getting Started Step 6: Performing the Quick Setup The system displays the menu and subtitles in the selected language. "/1 Note • The selectable language is different depending on the area. 6 Press ENTER.
9 Press X/x to select the output method for video signals. SPEAKER SETUP SIZE: DISTANCE: LEVEL(FRONT): LEVEL(SURROUND): OFF TEST TONE: FRONT: CENTER: SURROUND: • [VIDEO]: outputs video signals. • [RGB]: outputs RGB signals. Note • If your TV does not accept RGB signals, no picture appears on the TV screen even if you select [RGB]. Refer to the instructions supplied with your TV. Note 10 Press ENTER. The Setup Display for selecting the speaker distance appears.
Speaker Setup If color irregularity is observed again... Positioning the speakers If howling occurs For the best possible surround sound, all the speakers other than the subwoofer should be the same distance from the listening position (A). However, this system allows you to place the center speaker up to 1.6 meters (5 ft) closer (B) and the surround speakers up to 5.0 meters (16 ft) closer (C) to the listening position. The front speakers can be placed from 1.0 to 7.
5 Load a disc. Place one disc on the tray, and then press A. Playing Discs Playing Discs FUNCTION "/1 When you play an 8 cm disc, place it on the inner circle of the tray. Be careful that the disc is not skewed on the inner circle of the tray. A H Note Disc tray • Do not forcibly press the disc tray closed with your finger, as this may cause malfunction. • Do not place more than one disc on the tray. Adjust the volume 6 FUNCTION The system starts playback (continuous play).
Press Stop play and remove the disc A Replay the previous scene*1 (instant replay) during playback. Briefly fast forward the current scene*2 (instant advance) during playback. Go to the next or previous album*3 ALBUM + or – during playback. *1 DVD VIDEOs/DVD-RWs/DVD-Rs only. The button can be used except for DivX video files (except for the United Kingdom models). *2 DVD VIDEOs/DVD-RWs/DVD-Rs/DVD+RWs only. The button can be used except for DivX video files (except for the United Kingdom models).
1 Press DISPLAY. Selected track The Control Menu appears. 2 ALL CLEAR 1. TRACK 2. TRACK 3. TRACK 4. TRACK 5. TRACK 6. TRACK 7. TRACK The options for [PROGRAM] appear. 6 (14) T 2:50 OFF OFF SET ON PLAY CD Press X/x to select [SET press ENTER. ALL CLEAR 1. TRACK 2. TRACK – – 3. TRACK – – 4. TRACK – – 5. TRACK – – 6. TRACK – – 7. TRACK – – Tracks recorded on a disc 4 0:00:00 T –– 01 02 03 04 05 06 Total time of the programmed tracks To program other tracks, repeat steps 4 to 5.
Playing in random order (Shuffle Play) (VIDEO CD, CD only) Playing repeatedly (Repeat Play) You can play all of the titles, tracks or albums on a disc or a single title, chapter, track, or album repeatedly. You can use a combination of Shuffle or Program Play modes. 1 1 Press DISPLAY during playback. The Control Menu appears. 2 Press X/x to select then press ENTER. 6 (14) 2:50 [SHUFFLE], 2 PLAY CD Press X/x to select the item to be shuffled.
x When playing a DATA CD or DATA DVD • [OFF]: does not play repeatedly. • [DISC]: repeats all of the albums on the disc. • [ALBUM]: repeats the current album. • [TRACK] (MP3 audio tracks only): repeats the current track. • [FILE] (DivX video files only): repeats the current file.* * Except for the United Kingdom models. 4 Press ENTER. The item is selected. To return to normal play, press CLEAR, or select [OFF] in Step 3.
Selecting [ORIGINAL] or [PLAY LIST] on a DVD-RW Playing VIDEO CDs with PBC Functions (Ver.2.0) (PBC Playback) With PBC (Playback Control) functions, you can enjoy simple interactive operations, search functions, and other such operations. PBC playback allows you to play VIDEO CDs interactively by following the menu on the TV screen.
Note • Depending on the VIDEO CD, [Press ENTER] in Step 3 may appear as [Press SELECT] in the instructions supplied with the disc. In this case, press H. About MP3 Audio Tracks and JPEG Image Files Tip • To play without using PBC, press ./> or the number buttons while the system is stopped to select a track, then press H or ENTER. The system starts continuous play. You cannot play still pictures such as a menu. To return to PBC playback, press x twice, then press H.
currently selected album take priority over the next album in the same tree. (Example: C contains D so 4 is played before 5.) Note When you press MENU and the list of album names appears (page 32), the album names are arranged in the following order: A t B t C t D t F t G. Albums that do not contain tracks (or files) (such as album E) do not appear in the list. • The system will play any data with the extension “.MP3,” “.JPG,” or “.JPEG” even if they are not in MP3 or JPEG format.
The list of tracks contained in the album appears. Playing DATA CDs with MP3 Audio Tracks and JPEG Image Files MY FAVOURITE SONG 1(256) WALTZ FOR DEBBY MY ROMANCE MILES TONES MY FUNNY VALENTINE AUTUM LEAVES ALL BLUES S O M E D A Y M Y P R I N C E W ... PICTURE NAVI MENU Press X/x to select a track and press ENTER. The selected track starts playing. You can turn the track list off by pressing MENU. Pressing MENU again will display the album list. To stop playback Press x.
To rotate a JPEG image 3( 30) When a JPEG image file is displayed on the screen, you can rotate the image by 90 degrees. Press X/x while viewing an image. Each time you press X, the image rotates counterclockwise by 90 degrees. Example of when you press X once: Rotating direction 2 Press X/x to select an album. Playing Discs ROCK BEST HIT KARAOKE MY FAVOURITE SONG R&B JAZZ CLASSIC SALSA OF CUBA BOSSA NOVA x When selecting an album Press H to start playing the selected album.
• [AUTO]: plays both the JPEG image files and MP3 audio tracks in the same album as a slide show. • [AUDIO (MP3)]: plays only MP3 audio tracks continuously. • [IMAGE (JPEG)]: plays only JPEG image files as a slide show. Playing Audio Tracks and Images as a Slide Show with Sound You can play a slide show with sound by first placing both MP3 and JPEG files in the same album on a DATA CD. When you play back the DATA CD, select [AUTO] mode as explained below. 5 Press MENU.
2 Press X/x to select [INTERVAL], then press ENTER. 3 ( 12) 4) 1( 10/23/2004 The options for [INTERVAL] appear. 3 3 Press ENTER. The selected setting takes effect. Press X/x to select the setting you want. The default setting is underlined. • [MODE1]: The image sweeps in from top to bottom. • [MODE2]: The image stretches out from left to right of the screen. • [MODE3]: The image stretches out from the center of the screen. • [MODE4]: The images randomly cycle through the effects.
Enjoying DivX® Videos (Except for the United Kingdom models) However, this system only plays DATA CDs whose logical format is ISO 9660 Level 1/Level 2 or Joliet, and DATA DVDs of Universal Disk Format (UDF). You can also play DATA CDs recorded in Multi Session (page 30), although DATA DVDs recorded in Multi Session are not playable. Refer to the instructions supplied with the disc drives and the recording software (not supplied) for details on the recording format.
• Depending on the DivX video file, the picture may pause or be unclear. In which case, it is recommended that you create the file at a lower bit rate. If the sound is still noisy, MP3 is the recommended audio format. Note, however, this system does not conform to WMA (Windows Media Audio) format. • Because of the compression technology used for DivX video files, it may take some time after you press H for the picture to appear. 1 HAWAII 2004 VENUS 2 Press MENU. A list of albums on the disc appears.
Adjusting the Delay Between the Picture and Sound (A/V SYNC) When the sound does not match the pictures on the screen, you can adjust the delay between the picture and sound. Searching for a Particular Point on a Disc (Scan, Slow-motion Play, Freeze Frame) You can quickly locate a particular point on a disc by monitoring the picture or playing back slowly. X/x ENTER DISPLAY 1 / Press DISPLAY in stop mode. SLOW m/M The Control Menu appears.
Playback direction × 2B t 1M t 2M t 3M * Except for the United Kingdom models. Opposite direction × 2b t 1m t 2m t 3m Playing Discs 3M (DVD VIDEO/DVD-RW/DivX video*/VIDEO CD only) × 2B (DVD VIDEO/CD only) Note • You cannot search for a still picture on a DVD-RW in VR mode. • For DATA CDs, this function works only for DivX video files (except for the United Kingdom models). 3m (DVD VIDEO/DVD-RW/DivX video*/VIDEO CD only) × 2b (DVD VIDEO only) * Except for the United Kingdom models.
[INDEX] Searching for a Title/ Chapter/Track/Scene, etc. x When playing a VIDEO CD/Super VCD with PBC Playback [SCENE] x When playing a CD [TRACK] x When playing a DATA CD (MP3 audio) You can search a DVD by title or chapter, and you can search a VIDEO CD/CD/DATA CD/ DATA DVD by track, index, or scene. As titles and tracks are assigned unique numbers on the disc, you can select the desired one by entering its number. Or, you can search for a scene using the time code.
4 Press X/x or the number buttons to select the title, chapter, track, index, scene, etc., number you want to search for. Searching by Scene (Picture Navigation) If you make a mistake 5 You can divide the screen into 9 subscreens and find the desired scene quickly. Press ENTER. The system starts playback from the selected number.
4 1 2 3 4 5 6 7 8 9 Viewing Information About the Disc Press C/X/x/c to select a title, chapter, or track, and press ENTER. Playback starts from the selected scene. DISPLAY To return to normal play during setting Press O RETURN or DISPLAY. Note • Depending on the disc, you may not be able to select some items.
When playing a DVD VIDEO or DVD-RW t Playing time and number of the current When playing a VIDEO CD (without PBC functions) or CD t Playing time of the current track title r Remaining time of the current track r Playing time of the disc r Remaining time of the disc r Disc name r Track and index* r The display returns to the top image after 2 seconds.
Press DISPLAY. Each time you press DISPLAY, the display changes as shown in the charts. x When playing a VIDEO CD (without PBC functions) or CD • T **:** Playing time of the current track • T–**:** Remaining time of the current track • D **:** Playing time of the current disc • D–**:** Remaining time of the current disc t Station name*1 r Frequency*2 *1 This is displayed if you have entered a name for a preset station (page 59). *2 Returns to the original display when several seconds has elapsed.
files*1 on a DATA CD/DATA DVD, you can display the name of the album/track/file, and the audio bit rate (the amount of data per second of the current audio) on your TV screen. T 17:30 Playing Discs Bit rate*2 Tip • Date information is [DD/MM/YYYY]. DD: Day MM: Month YYYY: Year 128k JAZZ RIVER SIDE Album name Track/file name *1 Except for the United Kingdom models. *2 Appears when: – playing an MP3 audio track on DATA CDs.
x When playing a DVD VIDEO Sound Adjustments Changing the Sound When playing a DVD VIDEO or DATA CD/ DATA DVD (DivX video files*) recorded in multiple audio formats (PCM, Dolby Digital, MPEG audio, or DTS), you can change the audio format. If the DVD VIDEO is recorded with multilingual tracks, you can also change the language. With VIDEO CDs, CDs, or DATA CDs, you can select the sound from the right or left channel and listen to the sound of the selected channel through both the right and left speakers.
x When playing a DATA CD (DivX video) or DATA DVD (DivX video) (except for the United Kingdom models) Example: MP3 audio 1: MP3 128k Bit rate Note • While playing a Super VCD on which the audio track 2 is not recorded, no sound will come out when you select [2:STEREO], [2:1/L], or [2:2/R]. Checking the audio signal format (DVD, DivX video* only) * Except for the United Kingdom models. If you press AUDIO repeatedly during playback, the format of the current audio signal (PCM, Dolby Digital, DTS, etc.
Enjoying Surround Sound by Using Sound Field Sound field Display 2 CHANNEL STEREO 2CH STEREO Automatic outputting of the original sound x AUTO FORMAT DIRECT AUTO You can take advantage of surround sound simply by selecting one of system’s preprogrammed sound fields. They bring the exciting and powerful sound of movie theaters into your home.
Enjoying virtual surround speakers Tip • When you select “MULTI ST.,” “LINK” lights up in the front panel display. x VIRTUAL MULTI DIMENSION [BEHIND] L Selecting a sound field for music x ROCK, POP, JAZZ, CLASSIC The each mode provided sound to suit the source. Enjoying the sound at low volume R x NIGHT You can enjoy sound effects or dialog, as you would in a movie theater, even at low volume. It is useful for watching movies at night.
Using the Sound Effect DSGX Reinforcing bass frequencies You can reinforce bass frequencies. Press DSGX. Bass frequencies are effectively reinforced. To turn off the sound effect Press DSGX again. Note • Depending on the input stream, the DSGX function may not be effective.
Using Various Additional Functions Displaying the Subtitles Changing the Angles If various angles (multi-angles) for a scene are recorded on a DVD VIDEO, you can change the viewing angle. SUBTITLE ANGLE Press ANGLE during playback. Press SUBTITLE during playback. Each time you press ANGLE, the angle changes. Each time you press SUBTITLE, the subtitle language changes. Note • Depending on the DVD VIDEO, you may not be able to change the angle even if multi-angles are recorded on the DVD VIDEO.
3 Locking Discs (CUSTOM PARENTAL CONTROL, PARENTAL CONTROL) You can set 2 kinds of playback restrictions for the desired disc. • Custom Parental Control You can set playback restrictions so that the system will not play inappropriate discs. • Parental Control Playback of some DVD VIDEOs can be limited according to a predetermined level such as the age of the users. Scenes may be blocked or replaced with different scenes. The same password is used for both Custom Parental Control and Parental Control.
To turn off the Custom Parental Control function 2 1 Follow steps 1 through 3 of “Preventing Press X/x to select [PARENTAL CONTROL], then press ENTER. The options for [PARENTAL CONTROL] appear. playback of specific discs [CUSTOM PARENTAL CONTROL].” 2 Press X/x to select [OFF t], then press 12(27) 18(34) T 1:32:55 ENTER. DVD VIDEO 3 Enter your 4-digit password using the number buttons, then press ENTER.
4 Enter or re-enter your 4-digit password using the number buttons, then press ENTER. 8 Press X/x to select the level you want, then press ENTER. Parental Control setting is complete. The display for setting the playback limitation level appears. PARENTAL CONTROL LEVEL: STANDARD: PARENTAL CONTROL LEVEL: STANDARD: 4: PG13 USA OFF USA The lower the value, the stricter the limitation. 5 Press X/x to select [STANDARD], then press ENTER.
6 Area Code Code number Standard Code number Argentina 2044 Malaysia 2363 Australia 2047 Mexico 2362 Austria 2046 Netherlands 2376 Belgium 2057 2390 Brazil 2070 New Zealand Canada 2079 Norway 2379 Chile 2090 Pakistan 2427 Philippines 2424 Portugal 2436 Russia 2489 China 2092 Denmark 2115 Finland 2165 France 2174 Germany 2109 India 2248 Indonesia 2238 Italy 2254 Japan 2276 Korea 2304 Singapore 2501 Spain 2149 Sweden 2499 Switzerland 2086 Thailand
Other Operations Controlling the TV with the Supplied Remote You can control your TV (SONY only) with the supplied remote. TV ?/1 TV/VIDEO Number buttons TV VOL +/– TV CH –/+ TV Controlling TVs with the remote To control the TV You can control the TV by using following buttons. By pressing You can TV [/1 Turn the TV on or off. TV/VIDEO Switch the TV’s input source between the TV and other input sources. TV VOL +/– while pressing the TV button Adjust the TV volume.
Using the THEATRE SYNC Function TV’s input source TV/VIDEO 0 No input source (Default) 1 VIDEO1 2 VIDEO2 3 VIDEO3 4 VIDEO4 5 VIDEO5 6 VIDEO6 7 VIDEO7 8 VIDEO8 9* COMPONENT 1 INPUT CLEAR* COMPONENT 2 INPUT ALBUM –* COMPONENT 3 INPUT ALBUM +* COMPONENT 4 INPUT THEATRE SYNC allows you to turn on your SONY TV and this system, changes the system mode to “DVD,” and then switches the TV’s input source you set with one button push.
Note • This function is only for SONY TVs. (This function may not work on some SONY TVs.) • If distance between TV and this system is too far, this function may not work. Install the system near the TV. • Keep the remote pointed in the direction of the TV and this system while entering the code. Enjoying the Radio TUNER MENU FUNCTION CLEAR C/X/x/c ENTER VOLUME +/– PRESET –/+ TUNING –/+ Presetting radio stations You can preset 20 FM stations, and 10 AM stations.
For automatic tuning, press and hold TUNING + or –. Press x when you stop the automatic tuning. 6 7 Press X/x to select the preset number you want. Press ENTER. The station is stored. Naming preset stations Repeat 1 to 7 to store other stations. To change the preset number Restart from Step 1. Listening to the radio Preset radio stations in the system’s memory first (see “Presetting radio stations” (page 58)). 1 Press FUNCTION repeatedly until “FM” or “AM” appears in the front panel display.
To erase the character, press C/c repeatedly until the character to be erased flashes, then press CLEAR. 7 Press ENTER. Using the Radio Data System (RDS) The station name is stored. What is the Radio Data System? The Radio Data System (RDS) is a broadcasting service that allows radio stations to send additional information along with the regular program signal. This tuner offers convenient RDS features, such as station name display. RDS is available only for FM stations.
Using the Sleep Timer You can set the system to turn off at a preset time, so you can fall asleep listening to music. You can preset the time in 10 minutes decrements. Changing the Brightness of the Front Panel Display The brightness of the front panel display can be set to either of 2 levels. AMP MENU SLEEP Other Operations X/x/c ENTER Press SLEEP.
Returning to the Default Settings You can return the system parameters, such as preset stations, to the default settings. "/1 1 2 A x Press "/1 to turn on the system. Press x, A, and "/1 on the system at the same time. “COLD RESET” appears in the front panel display and the default settings are returned.
3 Settings and Adjustments Press X/x to select [CUSTOM], then press ENTER. The Setup Display appears. Using the Setup Display By using the Setup Display, you can make various adjustments to items such as picture and sound. For an overall list of Setup Display items, see page 83. Displayed items differ depending on the country model.
SCREEN SETUP TV TYPE: SCREEN SAVER: BACKGROUND: LINE: 4:3 LETTER BOX ON JACKET PICTURE VIDEO Setting the Display or Sound Track Language [LANGUAGE SETUP] Selected setting To reset all of the [SETUP] settings 1 Select [RESET] in Step 3 and press ENTER. 2 Select [YES] using X/x. [LANGUAGE SETUP] allows you to set various languages for the on-screen display or sound track. Select [LANGUAGE SETUP] in the Setup Display. To use the display, see “Using the Setup Display” (page 63).
Settings for the Display [4:3 LETTER BOX] [SCREEN SETUP] Choose settings according to the TV to be connected. Select [SCREEN SETUP] in the Setup Display. To use the display, see “Using the Setup Display” (page 63). The default settings are underlined. SCREEN SETUP TV TYPE: SCREEN SAVER: BACKGROUND: LINE: 16:9 ON JACKET PICTURE VIDEO [4:3 PAN SCAN] [16:9] Note x [SCREEN SAVER] x [TV TYPE] Selects the aspect ratio of the connected TV (4:3 standard or wide).
x [LINE] Selects the output method for video signals from the EURO AV T OUTPUT (TO TV) jack on the rear panel of the system. [VIDEO] Outputs video signals. [RGB] Outputs RGB signals. Note • If your TV does not accept RGB signals, no picture appears on the TV screen even if you select [RGB]. Refer to the instructions supplied with your TV. Custom Settings [CUSTOM SETUP] Use this to set up playback related and other settings. Select [CUSTOM SETUP] in the Setup Display.
selects PCM, DTS, Dolby Digital sound, and MPEG audio tracks in this order. x [MULTI-DISC RESUME] (DVD VIDEO/ VIDEO CD only) Switches the Multi-disc Resume setting on or off. [ON] Stores the resume settings in memory for up to 40 discs. [OFF] Does not store the resume settings in memory. Playback restarts at the resume point only for the current disc in the system.
[FRONT] [YES] [CENTER] [YES]: Normally select this. [NONE]: Select this if no center speaker is used. [SURROUND] [BEHIND]: Select this if surround speakers are located in section B. [SIDE]: Select this if surround speakers are located in section A. [NONE]: Select this if no surround speaker is used. [SUBWOOFER] [YES] Note • When you select an item, the sound cuts off for a moment. x [DISTANCE] The default distance setting for the speakers in relation to the listening position is shown below.
To adjust the volume of all the speakers at one time Use the VOLUME control on the system, or press VOLUME +/– on the remote. 9 Press X/x repeatedly to select [TEST TONE], then press ENTER. 10 Press X/x repeatedly to select [OFF], then press ENTER. x [TEST TONE] Note The speakers will emit a test tone to adjust [LEVEL (FRONT)] and [LEVEL (SURROUND)]. • When you adjust the speaker settings, the sound cuts off for a moment. The test tone is not emitted from the speakers.
Additional Information Precautions • Do not use a commercially available cleaning disc or disc/lens cleaner (wet or spray type). These may cause apparatus to malfunction. On power sources On your TV’s color • AC power cord (mains lead) must be changed only at the qualified service shop. • If the speakers should cause the TV screen to have color irregularity, turn off the TV then turn it on after 15 to 30 minutes. If color irregularity should persist, place the speakers farther away from the set.
Notes about the Discs On handling discs • To keep the disc clean, handle the disc by its edge. Do not touch the surface. • Do not stick paper or tape on the disc. Troubleshooting If you experience any of the following difficulties while using the system, use this troubleshooting guide to help remedy the problem before requesting repairs. Should any problem persist, consult your nearest Sony dealer. Note that if service personnel changes some parts during repair, these parts may be retained.
Sound There is no sound. • The speaker cord is not connected securely. • Press MUTING on the remote if “MUTING ON” is displayed in the front panel display. • The system is in pause mode or in Slow-motion Play mode. Press H to return to normal play mode. • Fast forward or fast reverse is performed. Press H to return to normal play mode. • Check the speaker settings (page 67). The left and right sounds are unbalanced or reversed. • Check that the speakers and components are connected correctly and securely.
• The data is not formatted in MP3 even though it has the extension “.MP3.” • The data is not MPEG1 Audio Layer 3 data. • The system cannot play audio tracks in MP3PRO format. • The [MODE (MP3, JPEG)] setting has been set to [IMAGE (JPEG)] (page 34). • If you cannot change the [MODE (MP3, JPEG)] setting, re-load the disc or turn the system off, then on. • The DATA CD contains a DivX video file. (Except for the United Kingdom models.) • This system cannot play MP3 audio files recorded on DATA DVDs.
A disc cannot be ejected and “LOCKED” appears in the front panel display. • Contact your Sony dealer or local authorized Sony service facility. [Data error] appears on the TV screen when playing a DATA CD or DATA DVD. • The MP3 audio track/JPEG image file/DivX video file* you want to play is broken. • The data is not MPEG1 Audio Layer 3 data. • The JPEG image file format does not conform to DCF. • The JPEG image file has the extension “.JPG” or “.JPEG,” but is not in JPEG format.
Specifications Amplifier section Stereo mode (rated) 50 W + 50 W (3 ohms at 1 kHz, 1% THD) Surround mode (reference) RMS output power, 10 % THD Front: 67 W + 67 W (with SS-TS60) Center*: 67 W (with SS-CT54) Surround*: 67 W + 67 W (with SS-TS61) Subwoofer*: 65 W (with SS-WS34) * Depending on the sound field settings and the source, there may be no sound output.
Dolby Surround Pro Logic Glossary Album Section of a music piece or an image on a data CD containing MP3 audio tracks or JPEG files. Chapter Subdivision of a title on a DVD. A title is composed of several chapters. DivX® Digital video technology created by DivX, Inc. Videos encoded with DivX technology are among the highest quality with a relatively small file size. Dolby Digital This movie theater sound format for is more advanced than Dolby Surround Pro Logic.
and Video mode. DVD-RWs created in Video mode have the same format as a DVD VIDEO, while discs created in VR (Video Recording) mode allow the contents to be programmed or edited. DVD+RW A DVD+RW (plus RW) is a recordable and rewritable disc. DVD+RWs use a recording format that is comparable to the DVD VIDEO format. File Region Code This system is used to protect copyrights. A region number is allocated on each DVD system or DVD disc according to the sales region.
Language Code List The language spellings conform to the ISO 639: 1988 (E/F) standard.
Index to Parts and Controls For more information, refer to the pages indicated in parentheses. Front panel G .
Front panel display About the indications in the front panel display A Lights up during PBC playback. (VIDEO CD only) (29) B Lights up when the time information of a title or chapter appears in the front panel display. (DVD only) C Monaural/Stereo effect (Radio only) (59) D Lights up when 2 channel source is output from the surround speakers.
Rear panel EURO AV AM FRONT R FRONT L SUR R SUR L CENTER OUTPUT(TO TV) WOOFER COAXIAL SPEAKER FM 75 C AM terminal (18) B EURO AV T OUTPUT (TO TV) jacks (19) D FM 75Ω COAXIAL jack (18) Additional Information A SPEAKER jacks (14) continued 81GB
Remote J C/X/x/c/ENTER (20, 25, 48, 52, 61, 63) K O RETURN (29) L REPLAY, STEP (24) M . PRESET –, TV CH – (21, 24, 56, 59) N m/ SLOW, TUNING – (38, 58) O H (play) (24) The H button has a tactile dot.
DVD Setup Display List You can set the following items with the DVD Setup Display. The order of the displayed items may be different from the actual display. LANGUAGE SETUP SCREEN SETUP OSD (Select the language you want to use from the displayed language list.) TV TYPE MENU (Select the language you want to use from the displayed language list.) SCREEN SAVER (Select the language you want to use from the displayed language list.
AMP Menu List You can set the following items with AMP MENU on the remote.
Index Numerics 16:9 65 4:3 LETTER BOX 65 4:3 PAN SCAN 65 5.
Speaker System Hookup 14 SUBTITLE 51, 64 T TEST TONE 69 THEATRE SYNC 57 TIME/TEXT 41 TITLE 40 Title 77 TRACK 40 Track 77 TRACK SELECTION 66 Troubleshooting 71 TUNER MENU 58 TV Hookup 19 TV TYPE 65 U Usable discs 6 V VIDEO CD 77 86GB
Sony Corporation Printed in China