3-089-914-14 (1) Operating Insctructions [GB] Digital Video Camera Recorder Operating Instructions Before operating the unit, please read this manual thoroughly, and retain it for future reference.
Welcome! Congratulations on your purchase of this Sony Handycam. With your Handycam you can capture life’s precious moments with superior picture and sound quality. Your Handycam is loaded with advanced features, but at the same time it is very easy to use. You will soon be producing home video that you can enjoy for years to come. To avoid electrical shock, do not open the cabinet. Refer servicing to qualified personnel only.
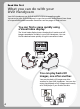
Read this first What you can do with your DVD Handycam Your DVD Handycam uses DVD-R and DVD-RW as a recording media. You can enjoy your DVD Handycam in ways that are new and different from those of a tape media-based camcorder. Read the next few pages to find out how. You can find a scene quickly using a Visual Index display. The Visual Index display shows thumbnails of movies and still images recorded on the disc in your DVD Handycam. You can find the desired scene quickly using this convenient index.
You can play back a disc recorded with your DVD Handycam on DVD players that can play back DVD-R/DVD-RW. Read this first You can play back a disc recorded with your DVD Handycam on your DVD player. You can edit and copy a disc easily by connecting your DVD Handycam to your computer. You can edit and copy a disc easily on your computer using the supplied ImageMixer Ver.1.5 for Sony DVD Handycam software. It also enables you to produce your own original DVD disc.
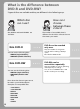
What is the difference between DVD-R and DVD-RW? 2 types of discs are available and they are different in the following ways. Which disc can I use? 8cm DVD-Rs and 8cm DVD-RWs are available. 8cm DVD-R You can use the following discs: • DMR30 (single-sided disc) • DMR60DS (double-sided disc) 8cm DVD-RW You can use the following discs: • DMW30 (single-sided disc) • DMW60DS (double-sided disc) Discs other than these 2 types cannot be used in your DVD Handycam.
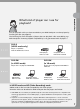
Read this first What kind of player can I use for playback? You can play back a disc you have recorded on your DVD Handycam on other players by finalizing the disc (see page 65). The following list shows examples of players that can play back a disc recorded by your DVD Handycam. However, playback compatibility is not guaranteed with all players.*1 DVD-R (VIDEO mode only) Players compatible with the DVD Video format.
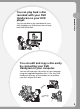
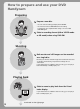
How to prepare and use your DVD Handycam Preparing Prepare a new disc. • You can start recording promptly with a DVD-R. • You need to format a DVD-RW before recording. Formatting is also required when using a once recorded DVD-RW again. Select a recording format (either VIDEO mode or VR mode) when using DVD-RW. Shooting Both movies and still images can be recorded on a single disc.
Editing Read this first You can make a copy of a disc you have recorded by connecting your DVD Handycam to your computer with the supplied software. For the recommended computer system environment, see page 91. You can produce an original DVD by editing your movies/still images on your computer. Finalizing Finalize the disc so that it becomes compatible with other DVD players.
Table of contents Read this first What you can do with your DVD Handycam ............................... 4 What is the difference between DVD-R and DVD-RW? .................... 6 How to prepare and use your DVD Handycam ......................................... 8 Getting Started Using this manual ................................. 12 Checking the supplied accessories ..... 14 Step 1 Preparing the power source ... 15 Installing/removing the battery pack ............................................
Using a disc in VR mode (DVD-RWs only) Viewing/duplicating discs/ editing the recordings on your computer (DCR-DVD101E/ DVD201E only) Connecting your camcorder to your computer – Introduction ............... 91 System requirements ..................... 91 Installing the USB driver ............... 92 Installing software .......................... 93 Connecting your camcorder to the computer ................................... 94 Consulting the on-line help ..........
— Getting Started — Using this manual The instructions in this manual are for the 3 models listed in the table below. Before you start reading this manual and operating your camcorder, check the model number by looking at the bottom of your camcorder. The DCR-DVD201E is the model used for illustration purposes. Otherwise, the model name is indicated in the illustrations. Any differences in operation are clearly indicated in the text, for example, “DCR-DVD201E only”.
Using this manual Camcorder care LCD display/viewfinder Getting Started The LCD display and the viewfinder are manufactured using extremely highprecision technology, so over 99.99 % of the pixels are operational for effective use. However, there may be some tiny black points and/or bright points (white, red, blue or green in color) that appear constantly on the LCD display and the viewfinder. These points are normal in the manufacturing process and do not affect the recording in any way.
Checking the supplied accessories Make sure that the following accessories are supplied with your camcorder. 1 2 4 5 6 8 9 0 1 Wireless Remote Commander (1) (page 142) 2 AC-L15A/L15B AC adaptor (1), Mains lead (1) (page 16) 3 7 5 Shoulder strap (1) 6 Lens cap (1) (page 28) 7 USB cable (Hi-SPEED USB compatible) (1) (page 92) 3 NP-FM50 rechargeable battery pack (1) (page 15) 8 DVD-R (DMR30) (1) 4 A/V connecting cable (1) 9 CD-ROM (SPVD-011 USB Driver) (1) DCR-DVD101E/DVD201E only.
Step 1 Preparing the power source Installing/removing the battery pack Getting Started To install the battery pack, slide it in and up in the direction of the arrow until it clicks. To remove the battery pack 1 Slide the battery pack in the direction of arrow while pressing the battery release button. 2 Slide the battery pack down.
Step 1 Preparing the power source Charging the installed battery pack Your camcorder operates only with the “InfoLITHIUM” battery pack (M series). See page 130 for more information on the “InfoLITHIUM” battery pack. Open the DC IN jack cover. POWER/CHG lamp With the v mark on the DC plug facing up 2 4 Mains lead AC adaptor 1 3 1 2 Make sure that the battery pack is installed on the camcorder. 3 4 Connect the mains lead to the AC adaptor.
Step 1 Preparing the power source Charging time (full charge)*1 Battery pack 150 NP-QM71/QM71D 260 NP-QM91/QM91D 360 Recording time with the viewfinder*2 Battery pack DVD91E Continuous DVD101E DVD201E DVD91E Typical*3 DVD101E DVD201E NP-FM50 (supplied) 135 135 115 65 65 55 NP-QM71/QM71D 325 325 285 160 160 140 NP-QM91/QM91D 490 490 430 245 245 215 Getting Started NP-FM50 (supplied) Recording time with the LCD display*2 LCD BACKLIGHT is set to ON Battery pack DVD91E Continu
Step 1 Preparing the power source Showing the remaining battery time – BATTERY INFO 1 2 Open the LCD screen. Press DISPLAY/BATT INFO. The remaining battery time appears for a while on the LCD display.
Step 2 Turning on the power Press the POWER button for a few seconds. Your camcorder turns on and the POWER/ CHG lamp lights up in green. When you turn on your camcorder for the first time, the CLOCK SET display appears. Getting Started POWER/CHG lamp POWER button To turn the power off Press the POWER button for a few seconds again. When the POWER/CHG lamp turns off, the power cuts off. To set the mode dial Rotate and set the mode dial to the operation you want to perform, such as shooting or playback.
Step 3 Adjusting the LCD screen and the viewfinder Adjusting the angle and the brightness of the LCD screen Adjust the brightness and the angle of the LCD screen properly in your sight. 2 180° 90° LCD BACKLIGHT button SETUP button 90° 1 1 2 Open the LCD screen. Adjust the direction of the LCD screen to the desired position. When you adjust the angle of the LCD screen, make sure if the LCD screen is opened up to a full 90 degrees.
Step 3 Adjusting the LCD screen and the viewfinder 4 Use the multi-selector to select [LCD BRIGHT]. LCD / VF SET LCD BRIGHT 5 Use the multi-selector to adjust the brightness of the LCD display. − : Get Darker + : Get Brighter The LCD screen brightness is adjusted. 6 Press SETUP. The SETUP display disappears from the LCD display. Getting Started [ SETUP ] : END Note [LCD B.L.] is set to [BRT NORMAL] when you close the LCD screen facing out.
Step 3 Adjusting the LCD screen and the viewfinder Adjusting the viewfinder When recording pictures with the LCD screen closed, check the picture with the viewfinder. Adjust the viewfinder lens to accommodate your eyesight so that the image in the viewfinder comes into sharp focus. 2 1 Viewfinder lens adjustment dial 1 2 Extend the viewfinder. Turn the viewfinder lens adjustment dial until you can see the characters in the viewfinder clearly.
Step 4 Setting the date and time Getting Started Set the date and time when you use your camcorder for the first time. Set the geographical area, then daylight savings time ([DST]), the year, the month, the day, the hour and the minute, in that order. If you do not set the date and time, the [CLOCK SET] display appears whenever you turn on your camcorder or change the mode dial.
Step 4 Setting the date and time CLOCK SET AREA 1 GMT Lisbon,London DST DATE Y M +0.0 OFF ON D : [ ENTER ] : NEXT ITEM 4 Use the multi-selector to set daylight savings time ([DST]) to [ON], if necessary. CLOCK SET AREA 1 GMT Lisbon, London DST DATE +0.0 OFF Y 2004 M 1 D 1 0 : 00 [ ENTER ] : NEXT ITEM 5 Use the multi-selector to set the year. CLOCK SET AREA 1 GMT Lisbon, London +0.
Step 4 Setting the date and time Simple setting of the clock using a time difference You can easily set the clock to the local time by setting the area. In the SETUP display use the multi-selector to select (OTHERS) then [AREA SET] .
Step 5 Preparing a disc for recording A new DVD-R or DVD-RW is required for recording. You cannot overwrite or delete data recorded on a DVD-R, but you can delete data and record again with a DVD-RW. The preparation procedure is different depending on the type of disc you use. Notes •When you insert or remove a disc, move the grip belt to the bottom of the camcorder so as not to obstruct the operation with your hand, etc.
Step 5 Preparing a disc for recording 5 Close the disc cover. Your camcorder starts recognizing the inserted disc. With a DVD-R, you can start recording immediately after [DISC ACCESS] disappears on the LCD display. The FORMAT display appears when you insert a DVD-RW. Proceed to step 6. FORMAT REC FORMAT EXECUTE VIDEO EST. PROCESS TIME : 7sec REC FORMAT : VIDEO 6 7 Use the multi-selector to select [REC FORMAT]. 8 9 Use the multi-selector to select [EXECUTE].
— Shooting movies/still images — Before shooting Note To shoot movies/still images correctly, note the following: – Hold your camcorder correctly. – Do not shock or vibrate your camcorder during shooting. – Do not scratch, put the fingerprint on, or get the disc dirty. To hold your camcorder To fasten the grip belt Hold your camcorder with your fingers inserted through the grip belt. Fasten the grip belt firmly following the illustration below.
Shooting movies Perform “Getting Started” from step 1 to 5 beforehand (page 15 to 27). The following operation is common with VIDEO mode and VR mode. 3 1 4 Recording lamp 2 7 Shooting movies/still images 6 5 1 Remove the lens cap by pressing both knobs on the sides of the cap. 2 3 Install the battery pack or connect the AC adaptor (page 15). 4 5 6 Set the mode dial to Open the LCD screen. The image is not displayed in the viewfinder when the LCD screen opens. (Movie).
Shooting movies 7 Press START/STOP (z). Your camcorder starts recording. [REC] appears on the LCD display. The camera recording lamp located on the front of your camcorder lights up. To stop recording, press START/STOP again. REC 0:00:01 -R VIDEO You can operate start/stop with the REC START/STOP button on the LCD screen. This is useful when you shoot movies from a low angle. After recording 1 2 3 4 Remove the disc (page 27). Turn the power off by pressing the POWER button for a few seconds again.
Shooting movies Indicators displayed in the recording mode These indicators are not recorded on discs. Remaining battery time (page 18) Recording mode (page 32) STBY/REC 40min REC 0:00:01 -R [30min] VIDEO Recording format (page 7) Remaining time This appears after you insert a disc for 8 seconds. 1 1 2004 11:23:45 Shooting movies/still images Counter Disc type (page 6) Date and time The date and time are displayed about 5 seconds after the power is turned on.
Shooting movies Selecting the recording mode Your camcorder records in the HQ (high quality) mode, SP (standard play) mode, and the LP (long play) mode. Your camcorder is set to SP mode as the default setting. 1 2 Set the mode dial to (Movie). Press SETUP. MANUAL SET PROGRAM AE P EFFECT D EFFECT WHT BAL AUTO SHTR [ SETUP ] : END 3 Use the multi-selector to select DISC SET REC MODE FORMAT FINALIZE UNFINALIZE DISC TITLE RETURN (DISC SET).
Shooting movies Using the zoom feature Move the power zoom lever a little for a slower zoom. Move it further for a faster zoom. Using the zoom sparingly results in better-looking recordings. W: For wide-angle (subject appears farther away) T : For telephoto (subject appears closer) Shooting movies/still images 1 cm* 80 cm * * The minimum distance required between your camcoder and the subject to get a sharp focus in that position of the lever.
Shooting movies Shooting with the subject checking the image – Mirror mode The picture on the LCD display is a mirror-image. However, the picture will be normal when recorded. 180° 90° Open and rotate the LCD screen 180 degrees as shown above. The indicator appears in the viewfinder and on the LCD display. When the mode dial is set to (Movie), Xz appears in the standby mode, and z appears in the recording mode. Some indicators appear mirror-reversed and others are not displayed.
Shooting still images Perform “Getting Started” from step 1 to 5 beforehand (page 15 to 27). The following operation is common with VIDEO mode and VR mode. You can record still images and movies on the same disc. 78 6 3 1 4 2 5 1 Remove the lens cap by pressing both knobs on the sides of the cap. 2 3 Install the battery pack or connect the AC adaptor (page 15). 4 5 6 Set the mode dial to Open the LCD screen. The image is not displayed in the viewfinder when the LCD screen opens. (Still).
Shooting still images 7 Press and hold PHOTO down lightly, then check out the image. When the AE/AF lock indicator (z) stops flashing and remains on, your camcorder is ready for shooting. The brightness of the image and focus are adjusted, are targeted for the middle of the image, and are set. Number of recorded images FINE 8 0 -R VIDEO Press PHOTO all the way down. [CAPTURE] appears after the shutter sounds. Recording is completed when the bar scroll indicator disappears.
Shooting still images Shooting movies/still images Notes •When the mode dial is set to (Still), the following functions do not work. – 16:9 Wide mode – Digital zoom – SteadyShot – Super NightShot plus – Color Slow Shutter – Fader – Picture effect – Digital effect – The Sports lesson feature of [PROGRAM AE] (The indicator flashes.) •When the ACCESS lamp lights on, data is being recorded on the disc. Take note of the following when data is being recorded, or the data and the disc may be damaged.
Shooting still images Selecting the still image quality and size To select the still image quality You can select the image quality from [FINE] or [STANDARD] for still image recording. The default setting is [FINE]. 1 2 3 Set the mode dial to (Still). Press SETUP. Use the multi-selector to select (CAMERA SET) . MANUAL SET PROGRAM AE FLASH MODE FLASH LVL WHT BAL [ SETUP ] : END 4 Use the multi-selector to select [QUALITY]. CAMERA SET SELFTIMER BURST QUALITY IMAGESIZE N. S.
Shooting still images To select the still image size (DCR-DVD201E only) You can select either of 2 image sizes, 1152 × 864 or 640 × 480. The default setting is 1152 × 864. Set the mode dial to (Still). Press SETUP. MANUAL SET PROGRAM AE FLASH MODE FLASH LVL WHT BAL [ SETUP ] : END 3 Use the multi-selector to select CAMERA SET SELFTIMER BURST QUALITY IMAGESIZE N. S. LIGHT RETURN (CAMERA SET). OFF Shooting movies/still images 1 2 [ SETUP ] : END 4 Use the multi-selector to select [IMAGESIZE].
Shooting still images Number of still images recordable on a disc Your camcorder compresses image data in JPEG format (extension .jpg). Default image data file name is as following: •100-0001: This file name appears on the LCD display of your camcorder. •DSC00001.jpg: This file name appears on the display of your personal computer. Number may vary depending on the settings of the image quality, the image size and the type of images you are shooting.
Shooting still images Shooting images continuously (BURST, DCR-DVD201E only) You can record still images continuously by setting [BURST]. EXP BRKTG (Exposure bracketing) Your camcorder automatically shoots 3 images at about 0.7 sec intervals at different exposures. 1 2 Set the mode dial to Shooting movies/still images NORMAL Your camcorder shoots up to 4 still images in 1152 × 864 size or 12 still images in 640 × 480 size at about 0.7 sec intervals. (Still). Press SETUP.
Shooting still images 4 Use the multi-selector to select [BURST]. CAMERA SET SELFTIMER BURST QUALITY IMAGESIZE N. S. LIGHT RETURN OFF NORMAL EXP BRKTG [ SETUP ] : END 5 Use the multi-selector to select [NORMAL] or [EXP BRKTG]. CAMERA SET SELFTIMER BURST QUALITY IMAGESIZE N. S. LIGHT RETURN NORMAL [ SETUP ] : END 6 Press SETUP. The SETUP display disappears from the LCD display. 7 Press PHOTO all the way down. Images are recorded continuously as the settings specified above.
Adjusting the exposure Adjusting the exposure for backlit subjects – BACK LIGHT When you shoot a subject with the light source behind the subject or a subject with a light background, use the backlight. Adjust the exposure manually in the following cases: – when you need a fine adjustment for subjects against the light. – when the subject is too bright against the background. – when recording dark pictures (e.g. night scenes). FAR 1 Set the mode dial to (Still). 2 Press BACK LIGHT. The .
Adjusting the exposure 3 Use the multi-selector to adjust the brightness shown as below. − : Get Darker + : Get Brighter To return to the automatic exposure Press EXPOSURE again. Notes •When you adjust the exposure manually, the following functions do not work: – Color Slow Shutter – BACK LIGHT •Your camcorder automatically returns to the automatic exposure setting: – if you change the PROGRAM AE effect. – if you slide the NIGHTSHOT PLUS switch to ON, while adjusting the exposure manually.
Shooting in the dark – NightShot plus, etc. SUPER NS PLUS/ COLOR SLOW S button Notes •Do not use the NightShot plus mode in bright places (e.g. outdoors in the daytime). This may cause your camcorder to malfunction. •If focusing is difficult with the autofocus mode when using NightShot plus, focus manually. •While recording using the NightShot Light, do not obstruct the Infrared rays (NightShot Light) emitter with your finger.
Shooting in the dark – NightShot plus, etc. Using the NightShot Light The picture will be clearer with the NightShot Light on. NightShot Light rays are infrared and so are invisible. The maximum shooting distance using the NightShot Light is about 3 m. To enable the NightShot Light, set (CAMERA SET) – [N.S.LIGHT] to [ON] in the SETUP display. The default setting is [ON]. Using Color Slow Shutter Color Slow Shutter enables you to record color images in a dark place.
Self-timer recording PHOTO button SETUP button 1 Set the mode dial to Steps 2 to 6. 2 Press PHOTO all the way down. Self-timer starts counting down with a beep. In the last 2 seconds of the countdown, the beep gets faster, then recording starts automatically 10 seconds after pressing PHOTO. (Still), then perform To cancel self-timer On shooting movies 1 2 3 Set the mode dial to 4 Use the multi-selector to select [SELFTIMER]. (Movie). Press SETUP. Use the multi-selector to select (CAMERA SET).
Shooting for the wide-screen TV – 16:9 Wide mode You can record a 16:9 Wide picture to watch on a 16:9 wide-screen TV (16:9WIDE). Black bands appear on the LCD display during recording in 16:9 Wide mode [a]. The picture during playback on a normal TV [b] or on a wide-screen TV [c] is compressed in the longwise direction. If you set the screen mode of the wide-screen TV to the full mode, you can watch pictures of normal images [d]. Refer to the operating instructions of your TV for further information.
Shooting for the wide-screen TV – 16:9 Wide mode Shooting movies/still images Notes •You cannot select [OLD MOVIE] (page 54) during recording in the 16:9 Wide mode. •When you select VIDEO mode, setting the recording mode to [LP] cancels the 16:9 Wide mode. •You cannot change a movie recorded in the 16:9 Wide mode to the normal aspect.
Adjusting the white balance manually Normally white balance is adjusted automatically. Adjust manually in the following cases: •When shooting in a place that the light condition changes often such as a party hall. •When shooting a night scene and a neon sign. 1 Set the mode dial to (Still). 2 3 Press SETUP. (Movie) or Use the multi-selector to select (MANUAL SET). MANUAL SET PROGRAM AE P EFFECT D EFFECT WHT BAL AUTO SHTR RETURN AUTO [ SETUP ] : END 4 Use the multi-selector to select [WHT BAL].
Shooting techniques to match your circumstances – PROGRAM AE SPOTLIGHT*1 This effect prevents people’s faces, for example, from appearing excessively white when shooting subjects lit by strong light. Set the mode dial to (Still). 2 3 Press SETUP. 4 Use the multi-selector to select [PROGRAM AE]. BEACH&SKI*1 This effect prevents people’s faces from appearing dark in strong light or reflected light, such as at a beach in midsummer or on a ski slope.
Focusing manually You can adjust the focus manually according to the recording conditions. Use this function in the following cases. – To record a subject behind a window covered with raindrops. – To record horizontal stripes. – To record a subject with little contrast between the subject and its background. – When you want to focus on a subject in the background. 1 Set the mode dial to (Still). 2 Press FOCUS. (Movie) or The 9 (manual focus) indicator appears.
Shooting with special effects Using fader (for movies only) You can fade in or out to give your movie a more professional appearance. REC FADER Set the mode dial to (Movie). When fading in In the standby mode, press the FADER button until the desired fader indicator appears. When fading out In the recording mode, press FADER. 0:00:00 -R VIDEO FADER OVERLAP* The indicator changes as follows: FADER t OVERLAP t WIPE no indicator (off) The last selected fader mode is indicated first.
Shooting with special effects Using special effects – Picture effect/Digital effect 3 Use the multi-selector to select (MANUAL SET). MANUAL SET PROGRAM AE P EFFECT D EFFECT WHT BAL AUTO SHTR RETURN You can digitally process movies to obtain special effects like those in films or on TV. AUTO Picture effect [ SETUP ] : END SEPIA: B&W: PASTEL: MOSAIC: The picture appears in sepia. The picture appears in monochrome (black-and-white). The picture appears like a pale pastel drawing.
Checking/Deleting the last scene Deleting the last scene (DVD-RWs only) EDIT button REVIEW button If the checked scene is unnecessary, you can delete it on the spot. 1 Press EDIT during the review. A deletion confirmation display appears. REVIEW REVIEW 0:00:28 -RW VIDEO DELETE? PLAY EXEC. RET. [ REVIEW ] : END Checking the last scene – Review You can check the last recorded scene quickly. 1 Set the mode dial to (Still). 2 Press REVIEW . The playback of the latest scene starts.
— Viewing the recordings — Playing a disc on your camcorder Choosing and viewing a recording – Visual Index The recorded scenes are displayed as a list in the Visual Index display. You can find the desired scene quickly using this convenient index. If you close the LCD screen, you can monitor the playback picture in the viewfinder. You can control playback using the Remote Commander supplied with your camcorder. Remove the insulation sheet to activate the Remote Commander (page 143).
Playing a disc on your camcorder 3 Select the (Movie) tab or the (Still) tab with the multi-selector according to the kind of scene you want to play back. The thumbnail list screen appears. 001 4 JAN 1 03 1/2 Use the multi-selector to select the desired scenes. When you select a movie, playback starts and continues until the last scene of the movie. When you select a still image, the image appears in full screen mode.
Playing a disc on your camcorder Various playback modes Movies The sound is muted in the various playback modes. To pause playback (view a still image) Press X during playback. To resume normal playback, press X again. To advance the scene Press > during playback. To return to the beginning of the scene Press . during playback. To play a previous scene Press . repeatedly during playback. To locate a scene while monitoring the picture Press and hold . or > during playback.
Playing a disc on your camcorder Displaying the indicators during playback – Display Press DISPLAY/BATT INFO on your camcorder, or press DISPLAY on your Remote Commander. The indicators switch on or off as you press the button. DISPLAY button Viewing the recordings DISPLAY/BATT INFO button To display date/time and various settings Your camcorder automatically records not only images on the disc but also the recording data (date/time and various settings when recorded) (Data code).
Playing a disc on your camcorder Various settings (movie) 40min 0002 0:00:08 Various settings (still image) 40min 100-0006 -R VIDEO 6/34 -R VIDEO [a] [g] [b] AUTO 100 AWB F1 . 8 0dB [c] 0EV 50 F1 .
Playing a disc on your camcorder Magnifying recorded images – PB ZOOM (Playback zoom) Zoom lever Viewing the recordings 1 In the playback, playback pause or review, move the power zoom lever. You can choose the magnification from approx. 1.1✕ to 5✕. W : Decreases the zoom ratio. T : Increases the zoom ratio. 2 Move the enlarged image in the desired direction with the multi-selector. To cancel PB ZOOM Press the button in the center of the multi-selector.
Playing a disc on your camcorder Playing still images automatically – Slide Show You can see the automatic playback of all the still images recorded on the disc. 1 2 Set the mode dial to (Play/Edit). Press SETUP. APPLI. SLIDE SHOW [ SETUP ] : END 3 Use the multi-selector to select APPLI. SLIDE SHOW RETURN (APPLI.). READY [ SETUP ] : END 4 Use the multi-selector to select [SLIDE SHOW].
Viewing recordings on TV Connect your camcorder to your TV with the A/V connecting cable supplied with your camcorder to watch playback pictures on the TV screen. You can operate the video control buttons in the same way as when you monitor playback pictures on the LCD display. When monitoring playback pictures on the TV screen, it is recommended that you power your camcorder from a wall socket using the AC adaptor (page 18). Refer to the operating instructions of your TV. Open the jack cover.
Viewing recordings on TV Tips •Connecting via an S video jack reproduces pictures more faithfully. When there is an S video jack on the device to be connected, connect the S video plug to that jack instead of using the yellow video plug. The audio will not be output when you connect via the S video plug alone. •To turn off the indicators on the TV, set [DISPLAY] to [V-OUT/LCD] in (OTHERS) in the SETUP display (page 116). Then press DISPLAY/BATT INFO on your camcorder.
— Finalizing a disc for other players — Finalizing a disc You have to finalize the disc before you can play a recorded disc on other players. Finalizing makes the recorded disc DVD-Video compatible, and you can play the disc on equipments such as DVD players. Note that you cannot record additional materials on finalized discs in VIDEO mode. But you can record on a disc again if you unfinalize the disc when you use DVD-RWs. Some players cannot play discs recorded in the VR mode.
Finalizing a disc 4 When still images are included on a disc recorded in VIDEO mode, use the multi-selector to select [PHOTOMOVIE], then select [CREATE]. Proceed to step 5 in VR mode. To play back still images on players such as DVD players, still images must be converted to a MPEG format. Converted still images are played back in sequence as a movie. The original still images remain as JPEG files.
Finalizing a disc Tips •You can also display the FINALIZE display by pressing SETUP and selecting (DISC SET) – [FINALIZE] with the multi-selector. •When the finalized disc is inserted in your camcorder, the disc format display on the upper-right corner is shown as below: – VIDEO mode: VIDEO – VR mode: VR •Still images converted to a movie are shown with . Finalizing a disc for other players Notes •A Photomovie created in this section is used to view still images on other players.
Finalizing a disc Changing the disc title By pressing the SETUP button, you can make a title on each disc. As the default, the date when the disc was first used is added as a disc title. To change a disc title on the finalize display, select [DISC TITLE] with the multi-selector and start from step 4 on this page. 1 Press SETUP.
Finalizing a disc 6 Use the multi-selector to select [SET]. The disc title is set and the display returns to the SETUP display. DISC SET REC MODE FORMAT FINALIZE UNFINALIZE DISC TITLE RETURN BEACH [ SETUP ] : END Press SETUP. The SETUP display disappears from the LCD display. To cancel editing the disc title In any step from 4 to 5, use the multi-selector to select [ESC]. Note When you change a disc title already set by other devices, the 21st and subsequent characters are deleted.
Finalizing a disc Playing back a disc on a DVD player, etc. To play back a disc recorded in VIDEO mode You can play back a finalized disc recorded in VIDEO mode on players that can play back DVD-Rs or DVD-RWs. When the disc is finalized in VIDEO mode, a menu display is provided similar to the Visual Index display. In menu display, 6 scenes are listed per page (200 pages in maximum). Select the scene to be played back in menu display on the DVD player.
Finalizing a disc Playing back a disc on a computer with a DVD drive installed The display and the operation may vary depending on the operating system of your computer. To play back movies 1 2 Turn on your computer. To play back still images 1 2 Turn on your computer. 3 Click [Start] t [My Computer]. Or, double-click the [My Computer] icon on the desktop. [My Computer] screen appears. Insert the finalized disc to the DVD drive of your computer.
Finalizing a disc Structures and file names of movies and still images Movies and still images are stored in the following folders on the disc. Movies: VIDEO_TS folder (on VIDEO mode) DVD_RTAV folder (on VR mode) Still images: DCIM\100MSDCF folder Windows XP display Still image folder Movie folder Notes •Use the DVD drive compatible with 8 cm discs. •A DVD playback application must have been installed on your computer. •When playing back movies from the disc, the movie and sound may pause.
Recording on a finalized disc – Unfinalizing (VIDEO mode DVD-RWs only) You can record on finalized DVD-RWs by unfinalizing them. This operation is valid in VIDEO mode only. You do not have to unfinalize a VR mode disc. Insert a finalized DVD-RW into your camcorder beforehand. 1 2 3 Press SETUP. Use the multi-selector to select (DISC SET). Use the multi-selector to select [UNFINALIZE]. READY EST. PROCESS TIME : 22sec RECORDED AREA : [ SETUP ] : END 4 Use the multi-selector to select [EXECUTE].
Recording again on a used disc – Formatting (DVD-RWs only) You can format recorded DVD-RWs and make them new discs. Note that formatting erases all the data recorded on the disc. Insert a recorded DVD-RW into your camcorder beforehand. 1 2 3 Press SETUP. Use the multi-selector to select (DISC SET). Use the multi-selector to select [FORMAT]. FORMAT REC FORMAT EXECUTE RETURN VIDEO ALL DATA TO BE DELETED EST.
Recording again on a used disc – Formatting (DVD-RWs only) 8 Press SETUP when [COMPLETED] appears on the LCD display. The FORMAT display disappears from the LCD display. The disc is formatted and you can record on the disc again. To cancel formatting Press SETUP in any step from 2 to 6. Tips •It takes about 10 seconds to format a DVD-RW in VIDEO mode, and about 40 seconds to format a DVD-RW in VR mode.
— Using a disc in VR mode (DVD-RWs only) — Selecting the playing order on your camcorder – Playlist You can edit the Playlist on your DVD-RWs recorded in VR mode. The Playlist is a list used to change the playback order of scenes to suit your own preference. The original scenes do not have any change even though you edit or delete the scenes in the Playlist. > (NEXT) button Multi-selector EDIT button .
Selecting the playing order on your camcorder – Playlist 4 Use the multi-selector to select [SEL.ITEM]. EDIT SEL. ITEM ERASE ADD MOVE DIVIDE RETURN 5 SELECT SELECT ALL Use the multi-selector to select [ADD]. 6 ALL SELECT SELECT Use the multi-selector to select [ SELECT] (movies) or [ SELECT] (still images). A thumbnail list of movies or still images on the disc appears. EDIT EXEC. 001 ADD RET. 1 1 04 1/1 18:00 Forwards the page. Using a disc in VR mode (DVD-RWs only) EDIT SEL.
Selecting the playing order on your camcorder – Playlist 9 Use the multi-selector to select [EXEC.]. The selected movies or still images are registered in the Playlist. When a still image is added to a Playlist, it is converted and registered as a new movie in the movie folder. It returns to the Playlist edit display when the registration is completed. To register all movies at the same time Select [ ALL] in step 6.
Selecting the playing order on your camcorder – Playlist Converting all the still images on a disc to a movie file – Photomovie All the still images in a disc are saved as a single movie when you make a Photomovie. Saving still images as a single movie allows you to register more scenes in the Playlist. Insert a DVD-RW with still images recorded into your camcorder. 1 2 Set the mode dial to (Play/Edit). Press EDIT. The display to select editing object appears.
Selecting the playing order on your camcorder – Playlist Erasing unnecessary scenes from the Playlist Erasing unnecessary scenes from the Playlist does not affect the actual recorded data on the disc. Insert a Playlist-registered DVD-RW into your camcorder. 1 2 Set the mode dial to (Play/Edit). Press EDIT. The display to select editing object appears. EDIT EDIT MOVIE EDIT STILL EDIT PLAYLIST [ EDIT ] : END 3 Use the multi-selector to select [EDIT PLAYLIST]. The Playlist edit display appears. EDIT SEL.
Selecting the playing order on your camcorder – Playlist 7 Use the multi-selector to select the scene to be erased. The selected scene is marked with . Repeat this step to erase multiple scenes. EDIT EXEC. 003 ERASE RET. 1 1 04 1/2 18:10 Pressing N starts playback of the selected scene. Press x to return to the display to select other scenes. Use the multi-selector to select [EXEC.]. The confirmation display appears. EDIT ERASE ERASE? EXEC. 9 RET. Use the multi-selector to select [EXEC.].
Selecting the playing order on your camcorder – Playlist Changing the order within the Playlist Insert a Playlist-registered DVD-RW into your camcorder. 1 2 Set the mode dial to (Play/Edit). Press EDIT. The display to select editing object appears. EDIT EDIT MOVIE EDIT STILL EDIT PLAYLIST [ EDIT ] : END 3 Use the multi-selector to select [EDIT PLAYLIST]. The Playlist edit display appears. EDIT SEL. ITEM RET. 1/2 4 Use the multi-selector to select [SEL. ITEM]. EDIT SEL.
Selecting the playing order on your camcorder – Playlist 6 Use the multi-selector to select the scene to be moved. The selected scene is marked with . Repeat this step if you want to move multiple scenes. EDIT EXEC. 001 MOVE RET. 1 1 04 1/2 18:00 Pressing N starts playback of the selected scene. Press x to return to the display to select other scenes. Use the multi-selector to select [EXEC.]. The move destination display appears. Move destination bar EDIT MOVE RET.
Selecting the playing order on your camcorder – Playlist Dividing a movie within the Playlist You can divide a movie into 2 scenes. Dividing movies into scenes within the Playlist does not affect the actual recorded data on the disc. Insert a Playlist-registered DVD-RW into your camcorder. Note You cannot divide a movie converted from still images. 1 2 Set the mode dial to (Play/Edit). Press EDIT. The display to select editing object appears.
Selecting the playing order on your camcorder – Playlist 6 Use the multi-selector to select the scene to be divided. The playback of the selected scene starts. 0:00:12 RET. DIVIDE EXEC. 2:40 [ 7 ] : RETURN [EDIT] : END Time in progress Total time of the selected scenes 0:02:05 RET. DIVIDE EXEC. 2:40 [ ] : RETURN [EDIT] : END After selecting u using the multi-selector, adjust the dividing point with more precision.
Selecting the playing order on your camcorder – Playlist Playing the Playlist Insert a Playlist-registered DVD-RW into your camcorder. 1 Set the mode dial to (Play/Edit). The Visual Index display appears. 001 2 1 1 04 1/2 18:00 Use the multi-selector to select (Playlist) tab. A thumbnail list of the scenes registered to the Playlist appears. Playlist tab 001 3 JA N 1 03 1/2 6 : 0 0 PM Press N. A playback of the Playlist starts.
Editing the original data Original data stand for the actual recorded movies and still images data on the disc. You can edit the original data of DVD-RW recorded in VR mode. Editing the original data affects the actual recorded data. Dividing a movie Note that this operation actually divides the original recorded data on the disc. Insert a movie recorded DVD-RW into your camcorder. 1 2 Set the mode dial to (Play/Edit). Press EDIT. The display to select editing object appears.
Editing the original data 6 Use the multi-selector to select the scene to be divided. The playback of the selected movie starts. DIVIDE EXEC. 0:00:12 RET. 2:40 [ 7 ] : RETURN [EDIT] : END Time in progress Total time of the selected scenes Press the center of the multi-selector at the point at which you want to divide the movie into scenes. The movie pauses. 0:02:05 RET. DIVIDE EXEC.
Editing the original data Deleting movies/still images Note that this operation actually deletes recorded data from the disc. Insert a recorded DVD-RW into your camcorder. Notes •When you delete movies, the movies registered to the Playlist are also deleted. •Deleting scenes may not provide enough space to record movies or still images additionally. Set the mode dial to (Play/Edit). Press EDIT. The display to select editing object appears.
Editing the original data 6 Use the multi-selector to select [SELECT]. A thumbnail list of the movies or still images recorded on the disc appears. EDIT EXEC. 001 7 DELETE RET. 1 1 04 1/2 18:00 Use the multi-selector to select a scene. The selected scene is marked with . Repeat this step to select multiple movies or still images. EDIT EXEC. 001 DELETE RET. 1 1 04 1/2 18:00 Pressing N starts playback of the selected scene. Press x to return to the display to select others.
— Viewing/duplicating discs/editing the recordings on your computer (DCR-DVD101E/DVD201E only) — Connecting your camcorder to your computer – Introduction Notes •Scenes may not be transferred correctly depending on your computer. If this happens, set [USB SPEED] to [FULL-SPEED] in (SETUP MENU) in the SETUP display. •Depending on your application software, the file size may increase when you open a still image file.
Connecting your camcorder to your computer – Introduction Installing the USB driver 3 Move the cursor to [USB Driver] and click. InstallShield Wizard program starts up. Start the following operation before connecting the USB cable to your computer. Install the USB driver to control your camcorder from your computer. If you are using Windows 2000 Professional or Windows XP Home Edition/Professional Log on as administrator. 1 2 Turn on your computer and allow Windows to load.
Connecting your camcorder to your computer – Introduction Installing software Follow the instructions given in the onscreen messages. When the [Setup Type] window appears, make sure that [PAL] is selected and continue the procedure. The [InstallShield Wizard Complete] dialog box appears. 4 Click [Finish]. The installation of ImageMixer is completed. The installation dialog box of WINASPI appears. 5 Click [OK], and follow the instructions given in the on-screen messages.
Connecting your camcorder to your computer – Introduction Connecting your camcorder to the computer Notes •Install the USB driver before connecting the camcorder to your computer. If you connect the camcorder to the computer first, you will not be able to install the USB driver correctly. •You can connect only one camcorder to every single computer. •Operations are not guaranteed if you connect your camcorder via a USB hub or to the USB port not equipped with your computer at default.
Connecting your camcorder to your computer – Introduction 7 Click [Finish]. The connection between your camcorder and the computer is completed. To confirm the USB driver installation 1 2 3 4 1 Connect the AC adaptor to your camcorder. 2 3 Set the mode dial to (Play/Edit). Turn the power on your camcorder by pressing the POWER button for a few seconds. 4 Connect the (USB) jack of the camcorder and the (USB) port of the computer using the USB cable supplied with your camcorder.
Connecting your camcorder to your computer – Introduction To confirm the USB driver installation 1 2 3 4 5 Click [Start] t [Settings] t [Control Panel]. Click [System]. [System Properties] window appears. Click [Hardware] tab. Click [Device Manager]. [Device Manager] window appears. Make sure that [SONY DDX-A1010 USB Device] appears in [DVD/CD-ROM drives], [Generic volume] in [Storage volumes], and [USB Mass Storage Device] in [Universal Serial Bus controllers] respectively.
Connecting your camcorder to your computer – Introduction To confirm the USB driver installation 1 2 3 4 To disconnect the USB cable 1 Move the cursor to the [Unplug or Eject Hardware] icon on the Task Tray and click to cancel the applicable drive. 2 After the [Safe to Remove Hardware] dialog box appears, disconnect the USB cable and turn off your camcorder. Notes •Be sure to turn off your camcorder after disconnecting the USB cable from your computer.
Connecting your camcorder to your computer – Introduction If you cannot install the USB driver The USB driver has been registered incorrectly as your camcorder was connected to your computer before the installation of the USB driver was completed. The incorrect data of the USB driver will be deleted when you re-install the driver correctly. Do the following steps to install the USB driver. 1 2 3 4 98 Disconnect your camcorder from the computer following “To disconnect the USB cable” (page 97).
Viewing scenes recorded on your computer You must install the USB driver and the ImageMixer software to view scenes recorded on a disc with your computer (page 92, 93). Double-click [ImageMixer Ver.1.5 for Sony DVD Handycam] icon on the Windows desktop. Or, click [Start] t [Programs] ([All Programs] in Windows XP) t [PIXELA] t [ImageMixer] t [PIXELA ImageMixer Ver.1.5 for Sony DVD Handycam] on your computer. The ImageMixer software starts and the title dialog box appears.
Viewing scenes recorded on your computer 9 Double-click the scene to view from the thumbnails. The selected scene is temporarily copied to your computer and is displayed in the preview window. To return to the thumbnails list, click below right of the window. To save the scene on your computer 1 Click the thumbnail of the scene to save. 2 Click . The selected scene is saved on your computer. To view the album 1 2 Click . Double-click the scene to view from the thumbnails.
Making a disc copy – Disc Duplicating Making a disc copy You can make a copy of a finalized disc. 1 Turn on your computer and allow Windows to load. 2 Connect the AC adaptor to your camcorder. 3 4 Set the mode dial to (Play/Edit). Turn the power on your camcorder by pressing the POWER button for a few seconds. Insert a recorded and finalized disc into your camcorder. 6 Connect the (USB) jack of the camcorder and the (USB) port of the computer using the USB cable supplied with your camcorder.
Editing and saving scenes Editing movies You can combine multiple scenes into a single scene. 1 2 Click on the title window. The window switches to the [Movie Editing Environment] and thumbnails appear. Drag and drop the thumbnails on the storyboard in the order you want to edit them. Thumbnail Saving the movie on your computer When the editing of the movie is completed, you can save the data on your computer. The following procedure shows an example of saving data in the [My Documents] folder.
Creating an original disc Album menu: Click to change the displayed album. You can edit the scenes registered to the album and make an original DVD. Making a menu Disc title A menu is required to play a disc recorded on your camcorder on a DVD player. 1 Title Click on the title window. The [Layout mode] window appears. 2 Click the tab and select a background. 3 Drag and drop thumbnails of the scenes to record on the disc, onto the background.
Creating an original disc 5 When you want to change the disc title shown on the menu, click the tab. Change the settings such as the name and the font. tab Editing the contents You can edit the contents by adding/deleting scenes, changing the order of scenes, and selecting an image used for the thumbnail. 1 Click the icon of the contents to edit, on the left of the window. then click The [Album mode] window appears.
Creating an original disc Recording on a disc When you have checked that all the contents are right, connect your camcorder to the computer with the USB cable, then insert a blank disc into your camcorder. 4 Click . The [DVD Video Output] window appears. 5 Click [OK]. Recording on the disc starts. When the operation is completed, a dialog box asking if you want to make an additional copy appears. 6 If you want to make an additional copy, click [OK]. The making of an additional copy starts.
— Connecting your camcorder to a TV and a VCR — Dubbing a disc to a tape You can dub movies recorded in a disc using a VCR connected to your camcorder, using your camcorder as a player. Connecting your camcorder to a VCR Connect your camcorder to the VCR using the A/V connecting cable supplied with your camcorder.
Dubbing a disc to a tape Dubbing to a tape Before operation •Set [DISPLAY] in (OTHERS) to [LCD] in the SETUP display (the default setting is [LCD]). •Press the following buttons to make the indicators disappear so that they will not be superimposed on the edited tape: – DISPLAY/BATT INFO – DISPLAY on the Remote Commander – DATA CODE on the Remote Commander Insert the recorded disc into your camcorder. 2 Prepare the VCR for recording. Insert a blank tape (or a tape you want to record over) into the VCR.
Dubbing a TV program or video tape onto a disc (DCR-DVD101E/DVD201E only) You can record a disc from another VCR or a TV program. Use your camcorder as a recorder. Connecting your camcorder to a TV or a VCR Connect your camcorder to the TV/VCR using the A/V connecting cable supplied with your camcorder. Black Yellow S VIDEO AUDIO Selecting the Video jack to be used on the TV or the VCR The supplied A/V connecting cable is equipped with an S video plug and a video plug.
Dubbing a TV program or video tape onto a disc (DCR-DVD101E/DVD201E only) Dubbing onto a disc 1 Prepare the TV/VCR. If you are recording a tape from the VCR, insert a recorded tape into the VCR. Set the mode dial to your camcorder. 3 Insert a blank disc (or a disc you want to record additionally) into your camcorder. The [FORMAT] display appears when you insert a new DVD-RW. Format the disc in VIDEO mode or in VR mode (page 7) following the instructions on the display.
— Customizing your camcorder — Changing the SETUP display You can change the default settings by selecting the options in the SETUP display with the multi-selector. Select the item in the following order: SETUP display t icon t menu item t option Menu items are displayed as the following icons. The displayed icons are different depending on the mode dial position. APPLI. MANUAL SET VIDEO SET PLAYER SET CAMERA SET LCD/VF SET DISC SET SETUP MENU OTHERS 3 Use the multi-selector to select the desired icon.
Changing the SETUP display Selecting the option of each item Menu items differ depending on the position of the mode dial. The display shows only the items that are currently in effect or that you can operate at the moment. z is the default setting. Icon/Item Meaning Option Mode dial MANUAL SET PROGRAM AE — To suit your specific shooting requirement (page 51). Movie Still P EFFECT — To add special effects like those in films or on TV to images (page 54).
Changing the SETUP display Icon/Item Option Meaning z OFF To disable self-timer. Mode dial CAMERA SET SELFTIMER ON D ZOOM 16:9WIDE To use self-timer (page 47). Still z OFF To deactivate the digital zoom. Only up to 10✕ optical zoom is performed. Movie 20 ✕ To activate the digital zoom. From 10✕ to 20✕ zoom is performed digitally (page 33). 120 ✕ To activate the digital zoom. From 10x to 120✕ zoom is performed digitally.
Changing the SETUP display Icon/Item Option Meaning Mode dial LCD/VF SET LCD BRIGHT — To adjust the brightness on the LCD screen with –/+. Darker LCD B.L. LCD COLOR z BRT NORMAL VF B.L. Brighter To set the brightness on the LCD screen to normal. BRIGHT To brighten the LCD screen. — To adjust the color on the LCD screen with –/+.
Changing the SETUP display Icon/Item Option Meaning Mode dial VIDEO SET (DCR-DVD101E/DVD201E) PLAYER SET (DCR-DVD91E) HiFi SOUND z STEREO To play back a stereo disc or dual sound track disc with main and sub sound. 1 To play back a stereo disc with the left sound or a dual sound track disc with main sound. 2 To play back a stereo disc with the right sound or a dual sound trackdisc with sub sound.
Changing the SETUP display Icon/Item Option Meaning Mode dial SETUP MENU CLOCK SET — A. SHUT OFF z 5 min NEVER LTR SIZE z NORMAL 2✕ USB SPEED*1 z AUTO FULL-SPEED To set the date or time (page 23). Movie Still Play/Edit To turn the power off automatically if no operation have taken place for 5 minutes when powered by the battery pack. Movie Still Play/Edit To remain the power on even if no operation last. To display selected menu items in normal size.
Changing the SETUP display Icon/Item Option Meaning Mode dial OTHERS DATA CODE z DATE/CAM (operation on the Remote Commander) DATE To change the display in the order of the date and time t the camera data t the display each time pressing DATA CODE (page 59). AREA SET To set your local area. Movie Still Play/Edit To cancel the use of daylight savings time. To use the daylight savings time.
Changing the SETUP display Icon/Item Option Meaning z AUTO To display the remaining capacity of the disc in the following cases for example: Mode dial OTHERS REMAIN • For 8 seconds after setting the power on and the (Movie) or (Still). mode dial to Movie Still Play/Edit • For 8 seconds after recognizing the inserted disc into your camcorder in (Movie) or (Still). • For 8 seconds when set the display to on by (Movie) or pressing DISPLAY/BATT INFO in (Still).
— Troubleshooting — Types of trouble and corrective action If you run into problems using your camcorder, use the following table to troubleshoot the problem. If the problem persists, disconnect the power source and contact your Sony dealer or local authorized Sony service facility. If "C:ss:ss" appears on the LCD display, the self-diagnosis display function is working. See page 125. About overall operations Symptom The power does not turn on.
Types of trouble and corrective action About the power source Symptom The battery pack is quickly discharged. The battery remaining time indicator does not indicate the correct time. The power goes off although the remaining battery time indicator indicates that the battery pack has enough power to operate. While charging the battery pack, POWER/CHG lamp does not light. While charging the battery pack, the POWER/CHG lamp flashes. Troubleshooting You cannot charge the battery pack.
Types of trouble and corrective action About the disc Symptom Remaining disc space indicator is not displayed. The disc cannot be ejected. The disc cannot be recorded additionally on other devices. Cause and/or Corrective Actions • The [ REMAIN] item is set to [AUTO] in (OTHERS) in the SETUP display. c Set it to [ON] to always display the remaining disc space indicator. (page 117) • The battery pack or the AC adaptor are not installed/ connected. c Install/connect the power source correctly.
Types of trouble and corrective action During recording Symptom Cause and/or Corrective Actions • The mode dial is set to (Play/Edit). c Set it to (Movie) or (Still). (page 29, 35) • The disc has run out of space. c Use a new disc or format the disc. (DVD-RW only, page 74) • The disc has been finalized. c Unfinalize the disc (DVD-RW only) or use a new disc.
Types of trouble and corrective action Symptom Cause and/or Corrective Actions • PROGRAM AE is set to [PORTRAIT] or [SPORTS] lesson under the fluorescent lamp, the sodium lamp and the mercury lamp. c Cancel PROGRAM AE. (page 51) The picture is recorded in incorrect • NIGHTSHOT PLUS switch is set to ON. c Set it to OFF. (page 45) or unnatural colors. • NIGHTSHOT PLUS switch is set to ON in a bright place. The picture appears too bright, c Set it to OFF.
Types of trouble and corrective action During playback of a disc on other players Symptom Cause and/or Corrective Actions Can not be played back or the disc • The disc may be dirty. can not be recognized. c Clean it with the supplied cleaning cloth. • The disc is not finalized. c Finalize it. (page 65) • You are tryng to play back a disc recorded in VR mode with an equipment which is not compatible with the VR mode. c You cannot playback the disc with this equipment. • The disc may be dirty.
Types of trouble and corrective action Others Symptom The disc title cannot be changed. Still images cannot be converted to a movie. The picture from a TV or VCR does not appear even when your camcorder is connected to output on the TV or VCR. The melody or beep sounds for 5 seconds. Scene can not be saved in the computer using the USB connection. 124 Cause and/or Corrective Actions • The disc has been finalized. c Unfinalize the disc (DVD-RW only). You cannot record a disc title on a finalized DVD-R.
Self-diagnosis display Your camcorder has a self-diagnosis display function. This function displays the current state of your camcorder as a 5-digit code (a combination of a letter and figures), on the LCD display or in the viewfinder. If a 5-digit code is displayed, check the following list of codes. The last 2 digits (indicated by ss) differ depending on the state of your camcorder. LCD display or viewfinder C:21:00 Self-diagnosis display • C:ss:ss You can service your camcorder yourself.
Warning indicators If indicators appear on the LCD display or in the viewfinder, check the following: See the page in parentheses “( )” for more information. 100-0001 Warning indicator referring to a file Slow flashing: •The file is corrupted. •The file is unreadable on your camcorder. C:21:00 Self-diagnosis display (page 125) Warning indicator referring to the disc Slow flashing: •A disc is not inserted.* •The remaining time for recording movies is less than 5 minutes.
Warning messages Message FOR “InfoLITHIUM” BATTERY ONLY E %*1 %CANNOT OPEN TRY LATER*1 *1 CANNOT OPEN TRY LATER*1 REC. DISABLE*1 SCENE NUMBER FULL*1 Z DISC FULL*1 PLAYBACK PROHIBITED*1 EDIT DISABLE*1 DISC IS ALREADY FINALIZED*1 FINALIZED DISC, USE ANOTHER DISC*1 NEED TO UNFINALIZE*1 CLOSE DISC COVER NO DISC CANNOT RECOVER DATA*1*2 NEED TO FORMAT DISC*1*2 • Install a charged battery pack. • The battery pack is completely dead, and cannot be recharged. c Replace it with a new battery pack.
Warning messages Message DISC PROTECTED*1 COPY INHIBIT*1 DISC ERROR*1 FORMAT ERROR*1 ACCESS ERROR*1 NOW CHARGING*1 Cause and/or Corrective Actions • A disc protected on another device cannot be edited. c Cancel the protection of the disc on the device used to protect the disc. • Copyright protected movies and sounds cannot be recorded on your camcorder. • The incompatible disc with your camcoder is inserted. • Your camcorder cannot recognize the disc because of malfunctions such as scratches.
— Additional information — About the disc Usable discs Care and storage of the discs You can use 8 cm DVD-R and 8 cm DVD-RW discs only. Use the discs with logo. or Note We recommend you to use the Sony discs which is confirmed compatibility with your camcorder. Refer to page 6 about the recommended discs. •Keep the disc clean, or the quality of the audio and video output is lessend. •Clean the disc with a supplied cleaning cloth. Wipe the disc from the center out.
About the “InfoLITHIUM” battery pack This unit is compatible with the “InfoLITHIUM” battery pack (M series). Your camcorder operates only with the “InfoLITHIUM” battery pack. “InfoLITHIUM” M series battery packs have the mark. TM SERIES What is the “InfoLITHIUM” battery pack? The “InfoLITHIUM” battery pack is a lithiumion battery pack that has functions for communicating information related to operating conditions between the battery pack and an AC adaptor/charger (optional).
Using your camcorder abroad You can use your camcorder with the AC adaptor supplied with it in any area with 100 V to 240 V AC, 50/60 Hz power standards. Your camcorder is a PAL system-based camcorder. If you want to view the playback picture on a TV, it must be a PAL systembased TV with the AUDIO/VIDEO input jack. The following lists show TV color systems used overseas.
Maintenance information and precautions Moisture condensation If your camcorder is brought directly from a cold place to a warm place, moisture may condense inside your camcorder, on the surface of the disc, or on the lens. This may cause a malfunction to your camcorder. If there is moisture inside your camcorder, the following indicator appears for 5 seconds. % flicker for 5 seconds m % If moisture condensation has occurred Turn off your camcorder, and leave it for about an hour.
Maintenance information and precautions •Near a AM receivers and video equipment. Noise may occur. •In sandy or dusty places Sand or dust may cause your camcorder to malfunction, and sometimes this malfunction cannot be repaired. •Avoid exposing the viewfinder and the LCD screen to direct sunlight The internal mechanisms of the viewfinder and the LCD display may be damaged. On the pickup lens •Do not touch the lens inside the disc cover.
Maintenance information and precautions AC adaptor •Unplug the unit from the wall socket when you are not using it for a long time. To disconnect the mains lead, pull it out by the plug. Never pull the mains lead itself. •Do not operate the unit with a damaged cord or if the unit has been dropped or damaged. •Do not bend the mains lead forcibly, or place a heavy object on it. This will damage the cord and may cause fire or electric shock.
Specifications Video camera recorder System * Manufactured under license from Dolby Laboratories. “Dolby” and the double-D symbol are trademarks of Dolby Laboratories. Input/Output connectors AUDIO/VIDEO input/output (DCR-DVD101E/DVD201E) AUDIO/VIDEO output (DCR-DVD91E) AV MINI JACK, input/output autoswitch (DCRDVD101E/DVD201E) Video : 1 Vp-p, 75 Ω (ohms), unbalanced Audio : 327 mV, (at output impedance of more than 47 kΩ (kilohms)) Output impedance of less than 2.
Specifications AC adaptor AC-L15A/L15B Power requirements 100 – 240 V AC, 50/60 Hz Current consumption 0.35 – 0.18 A Power consumption 18 W Output voltage DC OUT: 8.4 V, 1.5 A in the operating mode Operating temperature 0°C to 40°C Storage temperature –20°C to + 60°C Dimensions (approx.) 56 × 31 × 100 mm (w/h/d) excluding projecting parts Mass (approx.) 190 g excluding mains lead Rechargeable battery pack NP-FM50 Maximum output voltage DC 8.4 V Output voltage DC 7.2 V Capacity 8.
— Parts and controls/Index — Identifying parts and controls Camcorder 5 1 6 2 7 8 3 9 4 5 Viewfinder (page 22) 2 LCD BACKLIGHT button (page 20) 6 Eye cup 3 REC START/STOP button 7 START/STOP button (page 30) 4 USB jack (page 94, DCR-DVD101E/ DVD201E only) 8 Battery attachment (page 15) 9 Hooks for shoulder strap Note on the Carl Zeiss lens Your camcorder is equipped with a Carl Zeiss lens which can reproduce fine images.
Identifying parts and controls q; qa qs qh qj qd qf qg q; Mode dial (page 19) qh DC IN jack (page 16) qa POWER/CHG lamp (page 16) qj Lens cap (page 28) qs REMOTE jack Use to connect to optional accessories. qk Tripod receptacle Make sure that the length of the tripod screw is less than 5.5 mm. Otherwise, you cannot attach the tripod securely, and the screw may damage your camcorder.
Identifying parts and controls ql wh w; wj wk wa ws wd wf wg wl wf AUDIO/VIDEO jack (page 63) w; Shoe cover wg Microphone wa Lens wh DISPLAY/BATT INFO button (page 18) ws Remote sensor/Infrared ray emitter wj BACK LIGHT button (page 43) wd MIC (PLUG IN POWER) jack Connect an external microphone (optional). This jack also accepts a “plug-in-power” microphone. When an external microphone is connected, it is preferred for an audio input source.
Identifying parts and controls e; es ea ed ef eg eh ej e; Power zoom lever (page 33) ef NIGHTSHOT PLUS switch (page 45) ea PHOTO button (page 35) eg Disc cover OPEN switch (page 26) es SUPER NS PLUS/COLOR SLOW S button (page 45) eh Recording lamp (page 29) ej Grip belt (page 28) ed ACCESS lamp (page 26) Attaching the shoulder strap Attach the shoulder strap supplied with your camcorder to the hooks for the shoulder strap.
Identifying parts and controls ek rg el rh rj r; ra rs rk rl t; rd ta rf ts rg FADER button (page 53) el z REC buttons (page 109, DCRDVD101E/DVD201E only) rh FOCUS button (page 52) rj EXPOSURE button (page 43) r; Speaker rk SETUP button (page 110) ra > NEXT (next) button (page 58) rs .
Identifying parts and controls Remote Commander The buttons that have the same name on the Remote Commander as on your camcorder function identically to the buttons on your camcorder. 1 8 2 3 4 5 9 q; qa 6 qs 7 qd 1 DATA CODE button (page 59) 8 Transmitter 2 PHOTO button (page 35) 9 START/STOP button (page 30) 3 / (page 58) SCAN/SLOW buttons 4 .
Identifying parts and controls To prepare the Remote Commander Remove the insulation sheet as illustrated to activate the Remote Commander. To replace the button-type battery of the Remote Commander Insert CR2025 lithium battery by matching the + and – on the battery to the + and – terminals in the battery compartment. 1 2 3 CAUTION Danger of explosion if battery is incorrectly replaced. Replace only with the same or equivalent type recommended by the manufacturer.
Identifying parts and controls Operation indicators LCD display and viewfinder On shooting On playback wg wa ws N 0001 0:12:34 -R VIDEO wd wh wj wk wf 1 Recording mode (page 32, 114), Image size (page 39, 112) qh LCD BACK LIGHT OFF (page 21) 2 Remaining battery time (page 18) qj Remaining time (page 117), Recordable number of still images (page 40) 3 Zoom (page 33), Exposure (page 43) qk Self-timer (page 47) 4 FADER (page 53), 16:9WIDE (page 48), Effect (page 54) ql NightShot plus, Super Nig
Index A, B AC adaptor .............................. 16 Adjusting viewfinder ............. 22 A/V connecting cable ...... 14, 63 BACK LIGHT .......................... 43 BATTERY INFO ...................... 18 Battery pack ..................... 15, 130 BEACH & SKI ......................... 51 Beep ............................ 26, 47, 116 BURST ...................................... 41 B & W ....................................... 54 C, D E EXP BRKTG ............................. 41 EXPOSURE ...............
On trademarks • DVD-VIDEO, DVD-RW, and the DVD-R logo are trademarks. • InfoLITHIUM is a trademark of Sony Corporation. • PlayStation is a registered trademark of Sony Computer Entertainment Inc. • Microsoft and Windows are trademarks or registered trademarks of Microsoft Corporation in the United States and/or other countries. • Pentium is a trademark or a registered trademark of Intel Corporation. • Macintosh is a trademark or registered trademark of Apple Computer, Inc.
Parts and controls/Index 147
Printed on 100% recycled paper using VOC (Volatile Organic Compound)-free vegetable oil based ink.