
Operation Manual


10
DCR-HC17E/HC19E/HC21E/HC22E 2-586-501-11(1)
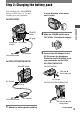
4 For DCR-HC22E:
Connect the mains lead to the
AC Adaptor and the wall socket.
Insert the camcorder into the
Handycam Station securely, all
the way to the bottom.
CHG (charge) lamp
The CHG (charge) lamp lights up and
charging starts.
• When inserting the camcorder into the
Handycam Station, close the DC IN jack
cover.
For DCR-HC17E/HC19E/HC21E:
Connect the mains lead to the AC
Adaptor and the wall socket.
CHG (charge) lamp
The CHG (charge) lamp lights up and
charging starts.
5 The CHG (charge) lamp turns off
when the battery is fully charged.
Disconnect the AC Adaptor from
the DC IN jack.
For DCR-HC22E:
Disconnect the AC Adaptor from the
DC IN jack holding both the Handycam
Station and the DC plug.
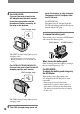
To remove the battery pack
Turn off the power, then press PUSH button
and remove the battery pack.
PUSH button POWER switch
When storing the battery pack
Fully discharge the battery before storing it
for an extended period (p. 79).
For DCR-HC22E:
To charge the battery pack using only
the AC Adaptor
Turn off the power, then connect the
AC Adaptor to the DC IN jack on your
camcorder.
• You can operate your camcorder
connected to a power source such as a
wall socket as shown in the illustration.
The battery pack will not lose its charge
in this case.