2-659-814-12(1) Digital Video Camera Recorder Operating Guide DCR-HC36E/HC44E/HC46E/ HC94E/HC96E Getting Started 8 Recording/ 24 Playback Using the Menu 40 Dubbing/Editing 67 Using a Computer 82 Troubleshooting 95 Additional Information 118 © 2006 Sony Corporation
E:\SONY\2659814111\01GB01REG_E.fm Read this first Before operating the unit, please read this manual thoroughly, and retain it for future reference. WARNING To reduce fire or shock hazard, do not expose the unit to rain or moisture. CAUTION Replace the battery with the specified type only. Otherwise, fire or injury may result. FOR CUSTOMERS IN THE UNITED KINGDOM NOTICE ON THE SUPPLIED AC ADAPTOR A moulded plug complying with BS1363 is fitted to this equipment for your safety and convenience.
Types of cassette you can use in your camcorder You can use mini DV cassettes marked with . Your camcorder is not compatible with the Cassette Memory function (p. 118). Using the camcorder • Do not hold the camcorder by the following parts. Types of “Memory Stick” you can use in your camcorder There are two sizes of “Memory Stick.” You can use “Memory Stick Duo” marked with or (p. 119). Viewfinder Battery pack “Memory Stick Duo” (This size can be used with your camcorder.
E:\SONY\2659814111\01GB01REG_E.fm Read this first (Continued) About menu items, LCD panel, viewfinder, and lens • A menu item that is grayed out is not available under the current recording or playback conditions. • The LCD screen and the viewfinder are manufactured using extremely highprecision technology, so over 99.99% of the pixels are operational for effective use.
E:\SONY\2659814111\01GB00BOOKTOC.fm Table of Contents Read this first ...........................................................................................2 Getting Started Step 1: Checking supplied items ..............................................................8 Step 2: Charging the battery pack ............................................................9 Step 3: Turning the power on and holding your camcorder firmly ..........14 Step 4: Adjusting the LCD panel and viewfinder ................
Indicators displayed during recording/playback ..................................... 32 Searching for the starting point .............................................................. 35 Searching for the last scene of the most recent recording (END SEARCH) .................................................................................. 35 Searching manually (EDIT SEARCH) ........................................................... 35 Reviewing the most recently recorded scenes (Rec review) ...............
E:\SONY\2659814111\01GB00BOOKTOC.fm Printing recorded images (PictBridge compliant printer) ........................78 Jacks to connect external devices ..........................................................80 Using a Computer Before referring to the “First Step Guide” on your computer ..................82 Installing the software and “First Step Guide” on a computer ................85 Viewing “First Step Guide” .....................................................................
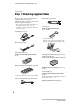
E:\SONY\2659814111\01GB02GET_E.fm Getting Started Step 1: Checking supplied items Make sure that you have following items supplied with your camcorder. The number in the parentheses indicates the number of that item supplied. • The cassette tape and “Memory Stick Duo” are not supplied. See page 3, 118, 119, for compatible cassettes and “Memory Stick Duo” for your camcorder. USB cable (1) (p. 78, 82) Lens cap (1) (DCR-HC36E/HC44E/HC46E) (p. 14, 24, 26) AC Adaptor (1) (p.
E:\SONY\2659814111\01GB02GET_E.fm Step 2: Charging the battery pack You can charge the “InfoLITHIUM” battery pack (P series) (p. 121) after attaching it to your camcorder. For DCR-HC44E/HC46E/HC94E/HC96E: 1 Align the terminals of the battery pack and your camcorder (1), then attach the battery pack and click it into place (2).
E:\SONY\2659814111\01GB02GET_E.fm Step2: Charging the battery pack (Continued) For DCR-HC36E: The CHG (charge) lamp lights up and charging starts. • When inserting the camcorder into the Handycam Station, close the DC IN jack cover. With the v mark facing to the LCD screen For DCR-HC36E: Connect the mains lead to the AC Adaptor and the wall socket. DC IN jack CHG (charge) lamp 4 For DCR-HC44E/HC46E/HC94E/ HC96E: Connect the mains lead to the AC Adaptor and the wall socket.
E:\SONY\2659814111\01GB02GET_E.fm POWER switch To remove the battery pack 1 Slide the POWER switch to OFF (CHG). Hold down the V BATT (battery) release lever with one hand. With the v mark facing to the LCD screen 2 Remove the battery in the direction of the arrow with the other hand.
E:\SONY\2659814111\01GB02GET_E.fm Step2: Charging the battery pack (Continued) DCR-HC36E Battery pack Continuous recording time Typical recording time* NP-FP30 (supplied) 85 105 40 50 NP-FP50 120 150 60 75 NP-FP70 255 310 125 155 NP-FP71 300 370 150 185 NP-FP90 455 550 225 275 • All times measured under the following conditions: Top: Recording with LCD screen. Bottom: Recording with viewfinder while the LCD panel closed.
E:\SONY\2659814111\01GB02GET_E.fm DCR-HC44E/HC46E Battery pack LCD panel opened* LCD panel closed NP-FP50 (supplied) 120 150 NP-FP70 255 310 NP-FP71 300 370 NP-FP90 455 550 DCR-HC94E/HC96E Battery pack LCD panel opened* LCD panel closed NP-FP50 (supplied) 115 140 NP-FP70 240 295 NP-FP71 290 350 NP-FP90 435 525 PRECAUTION • Even if your camcorder is turned off, AC power (mains) is still supplied to it while connected to the wall socket via the AC Adaptor.
E:\SONY\2659814111\01GB02GET_E.fm Step 3: Turning the power on and holding your camcorder firmly To record or play back, slide the POWER switch repeatedly to turn on the respective lamp. When using it for the first time, the [CLOCK SET] screen appears (p. 19). Lamps that light up CAMERA-TAPE: To record on a tape. CAMERA-MEMORY: To record on a “Memory Stick Duo.” PLAY/EDIT: To play or edit pictures. • After you have set the date and time ([CLOCK SET], p.
E:\SONY\2659814111\01GB02GET_E.fm To turn off the power Slide the POWER switch to OFF (CHG). For DCR-HC36E/HC44E/HC46E: Attach the lens cap after turning off the power. Getting Started • At the time of purchase, the power will be set to turn off automatically if you leave your camcorder without any operation attempted for approximately 5 minutes, to save battery power ([A.SHUT OFF], p. 64). • If warning messages appear on the screen, follow the instructions (p. 114).
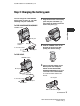
E:\SONY\2659814111\01GB02GET_E.fm Step 4: Adjusting the LCD panel and viewfinder The LCD panel The viewfinder Open the LCD panel 90 degrees to the camcorder (1), then rotate it to the best angle to record or play (2). DISP/BATT INFO You can view pictures using the viewfinder to avoid wearing down the battery, or when the picture seen on the LCD screen is poor. Viewfinder 180 degrees (max.) 2 1 90 degrees (max.
E:\SONY\2659814111\01GB02GET_E.fm Step 5: Using the touch panel You can play back recorded pictures (p. 27), or change the settings (p. 40) using the touch panel. Place your hand on the rear side of the LCD panel to support it. Then, touch the buttons displayed on the screen. DCR-HC36E/ HC44E/HC46E DCR-HC94E/ HC96E You can change the on-screen displays to show messages in a specified language. Select the screen language in [LANGUAGE] on the (TIME/ LANGU.) menu (p. 40, 65).
E:\SONY\2659814111\01GB02GET_E.fm Step 5: Using the touch panel (Continued) 3 Touch the area including the indicator that you want to check. DISP GUIDE END 1/2 FOCUS: MANUAL PROGRAM AE: SPOTLIGHT STEADYSHOT: OFF The meanings of the indicators in the area are listed on the screen. If you cannot find the indicator you want to check, touch / to toggle. When you touch , the screen returns to the area selecting display. To finish the operation Touch [END].
E:\SONY\2659814111\01GB02GET_E.fm Step 6: Setting the date and time Set the date and time when using this camcorder for the first time. If you do not set the date and time, the [CLOCK SET] screen appears every time you turn on your camcorder or change the POWER switch position. then touch , –:––:–– CLOCK SET DATE 2006 Y / . 1M 1D 0: 00 OK 4 Set [Y] (year) with touch / , then . You can set any year up to the year 2079.
E:\SONY\2659814111\01GB02GET_E.fm Step 7: Inserting a tape or a “Memory Stick Duo” Cassette tape 2 Insert a cassette with its window You can use mini DV (p. 118). cassettes only • The recordable time varies depending on [ REC MODE] (p. 61). facing outwards, then press . Push the center of the back of the cassette lightly. Window 1 Slide and hold the OPEN/ EJECT lever in the direction of the arrow and open the lid.
E:\SONY\2659814111\01GB02GET_E.fm DCR-HC36E/HC44E/HC46E: “Memory Stick Duo” Access lamp You can use only a “Memory Stick Duo” marked with or (p. 119). • The number and time of recordable pictures varies depending on the image quality or the image size. For details, see page 52. With the v mark facing to the LCD screen Getting Started 1 Open the LCD panel.
E:\SONY\2659814111\01GB02GET_E.fm Step 8: Selecting the aspect ratio (16:9 or 4:3) of the recording picture (DCR-HC44E/HC46E/ HC94E/HC96E) By recording in the 16:9 (wide) mode, you can enjoy wide-angle, high-quality pictures. • If you intend to view pictures on a wide TV, recording in the 16:9 (wide) mode is recommended. • When viewing pictures recorded in 16:9 aspect ratio with [TV TYPE] set to [4:3], pictures may appear rough depending on the subject (p. 39).
E:\SONY\2659814111\01GB02GET_E.
E:\SONY\2659814111\01GB03BAS_E.fm Recording/Playback Easy Recording/Playback (Easy Handycam) With this Easy Handycam operation, most of the camera settings are automatically optimally adjusted, which frees you from detailed adjustments. The screen font size increases for easy viewing. A DCR-HC36E/HC44E/HC46E: Remove the lens cap (p. 14). E DCR-HC36E/ HC44E/HC46E DCR-HC94E/ HC96E If the POWER switch is set to OFF (CHG), slide it while pressing the green button.
E:\SONY\2659814111\01GB03BAS_E.fm Playing back movies/still images Slide the POWER switch E to turn on the PLAY/EDIT lamp. Touch the buttons on the screen B as follows. Movies Still images Touch , then touch to start playback. Touch t / to select a picture. A C A B C MENU B A Tape playback B Previous/Next C Delete (p. 76) x To cancel Easy Handycam operation Press EASY A again. disappears from the screen.
E:\SONY\2659814111\01GB03BAS_E.fm Recording Lens cap (DCR-HC36E/HC44E/HC46E) Remove the lens cap by pressing both knobs on the sides of the cap. Lens cover (DCR-HC94E/HC96E) Opens in accordance with the setting of the POWER switch. PHOTO DCR-HC36E: POWER switch REC START/STOP A REC START/STOP B 1 Slide the POWER switch in the direction of the arrow repeatedly to turn on the respective lamp to select a recording medium. To record on a tape, light up the CAMERA-TAPE lamp.
E:\SONY\2659814111\01GB03BAS_E.fm Playback 1 Slide the POWER switch in the direction of the arrow repeatedly to turn on the PLAY/EDIT lamp. 2 Start playing back. Movies Still images A Touch . The most recently recorded image is displayed. to A C B C P-MENU B A Stop B Play/Pause toggles as you touch it • Playback automatically stops if pause is engaged for more than 3 minutes. C Rewind/Fast forward On a “Memory Stick Duo”: Touch t / to select a picture with , then touch .
E:\SONY\2659814111\01GB03BAS_E.fm Functions used for recording/playback, etc. Recording 2 To use zoom ..................... 2 5 1 Move the power zoom lever 2 slightly for a slower zoom. Move it further for a faster zoom. Wider range of view: (Wide angle) For DCR-HC36E: 6 3 Close view: (Telephoto) 5 4 For DCR-HC44E/HC46E: 6 3 5 4 For DCR-HC94E/HC96E: 6 5 4 • You cannot change the zoom speed with the zoom buttons 5 on the LCD frame.
E:\SONY\2659814111\01GB03BAS_E.fm To record in dark places (NightShot plus) (DCR-HC36E/HC44E/HC46E) ......................................... 3 Set the NIGHTSHOT PLUS switch 3 to ON. ( and [“NIGHTSHOT PLUS”] appear.) • The NightShot and Super NightShot function use infrared light. Therefore, do not cover the infrared port 1 with your fingers or other objects. Remove the conversion lens (optional) if it is attached. • Adjust the focus manually ([FOCUS], p. 47) when it is hard to focus automatically.
E:\SONY\2659814111\01GB03BAS_E.fm Functions used for recording/playback, etc. (Continued) To record in mirror mode ........... qh Open the LCD panel qh 90 degrees to the camcorder (1), then rotate it 180 degrees to the lens side (2). 9 q; 2 qs qa 1 For DCR-HC36E: qd qh 2 • A mirror-image of the subject appears on the LCD screen, but the picture will be normal when recorded. To use a tripod ....................... qj Attach the tripod (optional: the length of the screw must be less than 5.
E:\SONY\2659814111\01GB03BAS_E.fm Other part names and functions To cancel, touch [END]. • You cannot change the zoom speed with the zoom buttons 5 on the LCD frame. Recording/playback To check the remaining battery (Battery Info) ......................... qd Remaining battery (approx.) J Recording lamp (DCR-HC94E/HC96E) The recording lamp lights up in red during recording (p. 64). • The recording lamp flashes if the remaining tape or battery power is low.
E:\SONY\2659814111\01GB03BAS_E.fm Indicators displayed during recording/playback Recording movies Recording still images In the CAMERA-TAPE mode 1 2 3 4 5 8 1 90 60min 3.0M FINE qa 11 101 P-MENU 6 7 qs 7 A Remaining battery (approx.
E:\SONY\2659814111\01GB03BAS_E.fm ( ) is a reference page. The indicators during recording will not be recorded. Viewing movies Viewing still images On a tape 1 2 qd 4 5 1 qg 9 qh qj 3.
E:\SONY\2659814111\01GB03BAS_E.fm Indicators displayed during recording/playback (Continued) Indicators when you made changes ( ) is a reference page. Center Indicator Night Shot/NightShot plus (29) You can use the [DISP GUIDE] (p. 17) to check the function of each indicator that appears on the LCD screen. Super NightShot/Super NightShot plus (48) • Some of the indicators may not appear when you use [DISP GUIDE].
E:\SONY\2659814111\01GB03BAS_E.fm Searching for the starting point Make sure that the CAMERA-TAPE lamp lights up (p. 26). Searching for the last scene of the most recent recording (END SEARCH) [END SEARCH] will not work once you eject the cassette after you have recorded on the tape. Searching manually (EDIT SEARCH) You can search for the start point to start the next recording while viewing the pictures on the screen. The sound is not played back during the search. 1 Touch .
E:\SONY\2659814111\01GB03BAS_E.fm Remote Commander Remove the insulation sheet before using the Remote Commander. • Aim the Remote Commander towards the remote sensor to operate your camcorder (p. 31). • To change the battery, see page 126. Insulation sheet 6 1 7 q; 2 *2 Not available during Easy Handycam operation. 8 3 Searching quickly for a desired scene (Zero set memory) 1 During playback, press ZERO SET MEMORY 5 at a point you want to locate later on.
E:\SONY\2659814111\01GB03BAS_E.fm To cancel the operation 4 Press PLAY 4. Press STOP 4. Playback starts from the point designated “0:00:00” on the tape counter. • The Date search will not function correctly when there is a blank section between recorded sections on the tape. To cancel the operation Press ZERO SET MEMORY 5 again before rewinding. Recording/Playback • There may be a discrepancy of several seconds between the time code and the tape counter.
E:\SONY\2659814111\01GB03BAS_E.fm Playing the picture on a TV You can connect your camcorder to the input jack of a TV or a VCR using the A/V connecting cable (1) or the A/V connecting cable with S VIDEO (2). Connect your camcorder to the wall socket using the supplied AC Adaptor for this operation (p. 9). Refer also to the instruction manuals supplied with the devices to be connected. • For DCR-HC44E/HC46E/HC94E/HC96E: Do not insert/eject the cassette while your camcorder is on the Handycam Station.
E:\SONY\2659814111\01GB03BAS_E.fm A A/V connecting cable (supplied) For DCR-HC44E/HC46E/HC94E/HC96E: The Handycam Station and your camcorder are both equipped with A/V jacks (p. 80). Connect the A/V connecting cable either to the Handycam Station or to your camcorder, depending on your setup. • On some 4:3 TVs, the still image recorded in 4:3 aspect ratio may not appear in full screen. This is not a malfunction.
E:\SONY\2659814111\01GB04MEN_E.fm Using the Menu Using the menu items Follow the instructions below to use each of the menu items listed after this page. 1 Slide the POWER switch in the direction of the arrow repeatedly to turn on the respective lamp. CAMERA-TAPE lamp: settings on a tape CAMERA-MEMORY lamp: Duo” settings on a “Memory Stick PLAY/EDIT lamp: settings for viewing/editing 2 Touch the LCD screen to select the menu item. Unavailable items will be grayed out.
E:\SONY\2659814111\01GB04MEN_E.fm After finishing the settings, touch t If you decide not to change the setting, touch (close) to hide the menu screen. to return to the previous screen. x To use menu items during Easy Handycam operation is not displayed during Easy Handycam operation (p. 24). 60min EASY STBY MENU 1 Touch [MENU]. The menu index screen appears. 2 Select the desired menu. 3 Change your item setting. After finishing the settings, touch .
E:\SONY\2659814111\01GB04MEN_E.fm Menu items Available menu items (z) vary depending on which lamp is lit. During Easy Handycam operation, the following settings are automatically applied (p. 24). TAPE MEMORY PLAY/EDIT Easy Handycam CAMERA SET menu (p. 45) z z z z z z z z z z z z z z z z z z z z z z z z z z – z z z z z – – z – z z – – – – – – – – – – – – – – – – – – – – – – – – – STILL SET – z z MOVIE SET ALL ERASE FORMAT FILE NO.
E:\SONY\2659814111\01GB04MEN_E.fm TAPE MEMORY PLAY/EDIT Easy Handycam PICT.APPLI. menu (p. 55) FADER SLIDE SHOW D. EFFECT PICT. EFFECT FRAME REC*1 SMTH INT.REC*5 INT.REC-STL DEMO MODE PictBridge PRINT USB SELECT z – z z z z – z – – – – – – – – z – – – – z z z – – – – z z OFF – OFF OFF OFF – OFF ON – z – – – – – – z – – – – – – – z z z z z z z – – – – – – – EDIT/PLAY menu (p. 60) *1 *2 *3 *4 *5 *6 *7 *8 Using the Menu VAR.
E:\SONY\2659814111\01GB04MEN_E.fm Menu items (Continued) TAPE MEMORY PLAY/EDIT Easy Handycam STANDARD SET menu (p. 61) REC MODE AUDIO MODE VOLUME MULTI-SOUND AUDIO MIX z z – – – – – – – – z*6 z*4 z z z LCD/VF SET z z z A/V t DV OUT*4 VIDEO INPUT*4 TV TYPE*5 USB CAMERA DISP GUIDE GUIDEFRAME*1 DATA CODE REMAINING REMOTE CTRL REC LAMP*1 BEEP DISP OUTPUT MENU ROTATE A.
E:\SONY\2659814111\01GB04MEN_E.fm CAMERA SET menu Settings to adjust your camcorder to the recording conditions (EXPOSURE/WHITE BAL./STEADYSHOT, etc.) The default settings are marked with B. The indicators in parentheses appear when the items are selected. See page 40 for details on selecting menu items. PROGRAM AE BEACH&SKI*( ) Select to prevent people’s faces from appearing dark in strong light or reflected light, such as at a beach in midsummer or on a ski slope.
E:\SONY\2659814111\01GB04MEN_E.fm CAMERA SET menu (Continued) 1 Touch the point where you want to fix and adjust the exposure on the screen. appears. 2 Touch [END]. To return the setting to automatic exposure, touch [AUTO] t [END]. • If you set [SPOT METER], [EXPOSURE] is automatically set to [MANUAL]. • The setting returns to [AUTO] when you turn the power off for more than 12 hours. EXPOSURE You can fix the brightness of a picture manually.
E:\SONY\2659814111\01GB04MEN_E.fm camcorder outdoors from inside the house, or vice versa. • Set [WHITE BAL.] to [AUTO] or [ONE PUSH] under white or cool white fluorescent lamps. • The setting returns to [AUTO] when you turn the power off for more than 12 hours. SHARPNESS (DCR-HC94E/HC96E) You can adjust the sharpness of the image outline with / . appears when the sharpness is anything other than the default setting. Soften 2 Touch [END].
E:\SONY\2659814111\01GB04MEN_E.fm CAMERA SET menu (Continued) TELE MACRO This is useful to shoot small subjects, such as flowers or insects. You can blur out backgrounds and the subject stands out clearer. When you set [TELE MACRO] to [ON] ( ), the zoom (p. 28) moves to the top of the T (Telephoto) side automatically and allows for recording subjects at a close distance as follows: For DCR-HC36E: down to about 39 cm (15 3/8 in.). For DCR-HC44E/HC46E: down to about 35 cm (13 7/8 in.).
E:\SONY\2659814111\01GB04MEN_E.fm SUPER NS (Super NightShot) (DCR-HC94E/HC96E) The picture will be recorded at a maximum of 16 times the sensitivity of NightShot recording if you set [SUPER NS] to [ON] while the NIGHTSHOT switch (p. 29) is also set to ON. and [“SUPER NIGHTSHOT”] appear on the screen. To cancel the setting, set [SUPER NS] to [OFF] or set the NIGHTSHOT switch to OFF. When you set [COLOR SLOW S] to [ON], you can record an image brighter in color even in dark places.
E:\SONY\2659814111\01GB04MEN_E.fm CAMERA SET menu (Continued) To cancel [SELF-TIMER], touch [OFF]. 800 × • You can also set the self-timer with the REC START/STOP button or PHOTO button of the Remote Commander (p. 36). Up to 12 × zoom is performed optically, and after that, up to 800 × zoom is performed digitally.
E:\SONY\2659814111\01GB04MEN_E.fm MEMORY SET menu * Played in 4:3 mode. When you play a picture in the wide mode, it appears as you have seen on the LCD screen or in the viewfinder. 2 STEADYSHOT You can compensate for camera shake (the default setting is [ON]). Set [STEADYSHOT] to [OFF] ( ) when using a tripod (optional) or the conversion lens (optional), then the image becomes natural. PROGRES.REC (DCR-HC94E/HC96E) To cancel [PROGRES.REC], touch [OFF].
E:\SONY\2659814111\01GB04MEN_E.fm MEMORY SET menu (Continued) VGA (0.3M) ( and select an image recorded at the best exposure. • [BURST] can be set only when the POWER switch is set to CAMERA-MEMORY. • [BURST] cannot be set during Easy Handycam operation. • The maximum number of images will be recorded in the self-timer mode or when you are operating with the Remote Commander. • [EXP. BRKTG] will not function when there is space of less than 3 images remaining on the “Memory Stick Duo.
E:\SONY\2659814111\01GB04MEN_E.fm *2 DCR-HC44E/HC46E • All numbers measured at the following setting: Top: [FINE] is selected for image quality. Bottom: [STANDARD] is selected for image quality. • When using the “Memory Stick Duo” made by Sony Corporation. The number of recordable pictures varies depending on the recording environment. • For DCR-HC36E: When recording still images, the size is always fixed to VGA (640 × 480). In 16:9 aspect ratio (DCR-HC44E/HC46E/ HC94E/HC96E) 0.7M* (1152 × 648) 2 0.
E:\SONY\2659814111\01GB04MEN_E.fm MEMORY SET menu (Continued) MOVIE SET IMAGE SIZE x B 320 × 240 ( ) Records movies in high resolution. 160 × 112 ( ) Allows for more movie recording time.
E:\SONY\2659814111\01GB04MEN_E.fm PICT.APPLI. menu Special effects on pictures or additional functions on recording/playback (SLIDE SHOW/PICT. EFFECT/FRAME REC, etc.) NEW FOLDER You can create a new folder (102MSDCF to 999MSDCF) on a “Memory Stick Duo.” When 9,999 images are stored in the current folder, a new folder is automatically created for storing subsequent images. Touch [YES] t . The default settings are marked with B. The indicators in parentheses appear when the items are selected.
E:\SONY\2659814111\01GB04MEN_E.fm PICT.APPLI. menu (Continued) OVERLAP (fade in only) WIPE (fade in only) DOT FADER (fade in only) Using the viewfinder You can adjust [EXPOSURE] and [FADER] while using the viewfinder by having the LCD panel rotated 180 degrees and closed with the screen facing out. 1 Make sure that the CAMERA-TAPE or the CAMERA-MEMORY lamp lights up. 2 Close the LCD panel with the screen facing out. appears. 3 Touch . [Set LCD off?] appears on the screen. 4 Touch [YES].
E:\SONY\2659814111\01GB04MEN_E.fm LUMI. KEY (luminance key) Effect Items to adjust LUMI. KEY The color scheme of the area in the still image which is to be swapped with a movie. TRAIL The fade time of the incidental image. TRAIL SLOW SHUTTR*1 Shutter speed (1 is 1/25, 2 is 1/12, 3 is 1/6, 4 is 1/3). Records a picture so that an incidental image like a trail is left. OLD MOVIE*1 No adjustment necessary.
E:\SONY\2659814111\01GB04MEN_E.fm PICT.APPLI. menu (Continued) PICT. EFFECT (Picture effect) You can add special effects to a picture during recording or playback. appears. B OFF Does not use [PICT. EFFECT] setting. NEG.ART The color and brightness are reversed. SEPIA Pictures appear in sepia. B&W Pictures appear in black and white. SOLARIZE Pictures appear as an illustration with strong contrast. PASTEL* Pictures appear as a pale pastel drawing. MOSAIC* Pictures appear mosaic-patterned.
E:\SONY\2659814111\01GB04MEN_E.fm To interrupt, touch [REC STOP] in step 2. To resume, touch [REC START]. To cancel, touch [REC STOP], then [END] in step 2. DEMO MODE The default setting is [ON], allowing you to view the demonstration in about 10 minutes, after you have removed both a cassette and a “Memory Stick Duo” from your camcorder, and slide the POWER switch repeatedly to turn on the CAMERATAPE lamp. • The demonstration will be suspended in situations such as those described below.
E:\SONY\2659814111\01GB04MEN_E.fm EDIT/PLAY menu PICT.APPLI. menu (Continued) STREAM Select this to view movies on a tape on the computer or to import them to the computer. BURN VCD Select this to burn the picture recorded on the tape onto a CD-R. Refer to “First Step Guide” on the supplied CD-ROM for details (p. 89). • During Easy Handycam operation, [ STREAM] and [BURN VCD] cannot be set. Settings for editing or playing back in various modes (VAR.SPD PB/END SEARCH, etc.
E:\SONY\2659814111\01GB04MEN_E.fm STANDARD SET menu • You will not hear the recorded sound. You may see mosaic-like images of the previously played picture. REC CTRL (Movie recording control) (DCR-HC36E/HC46E/HC96E) See page 72. AUD DUB CTRL (Audio dubbing) See page 75. REC MOVIE (Recording control) BURN DVD When your camcorder is connected to a Sony VAIO series personal computer, you can easily burn the picture recorded on the tape on a DVD (Direct Access to “Click to DVD”) (p. 90).
E:\SONY\2659814111\01GB04MEN_E.fm STANDARD SET menu (Continued) B STEREO Plays back with main and sub sound (or stereo sound). x LCD COLOR You can adjust the color on the LCD screen with / . 1 Plays back with main sound (or the left channel sound). 2 Plays back with sub sound (or the right channel sound). • You can play back, but cannot record a dual sound track cassette on your camcorder. • The setting returns to [STEREO] when you turn the power off for more than 12 hours. High intensity x VF B.
E:\SONY\2659814111\01GB04MEN_E.fm A/V t DV OUT (DCR-HC96E) When you set [A/V t DV OUT] ( ) to [ON], you can convert analog signals to digital by connecting a digital device and an analog device to your camcorder. See page 93 for details. VIDEO INPUT (DCR-HC96E) Selects the video plug to connect when you input the picture from the other device via A/V connecting cable. B VIDEO Connects via video plug of the A/V connecting cable. Connects via S VIDEO plug of the A/V connecting cable with S VIDEO cable.
E:\SONY\2659814111\01GB04MEN_E.fm STANDARD SET menu (Continued) • During Easy Handycam operation, you can set [DATE/TIME] only. • For DCR-HC94E/HC96E: appears for a picture recorded using a flash. REMAINING B AUTO Displays the remaining tape indicator for about 8 seconds in situations such as those described below. • When you set the POWER switch to PLAY/ EDIT or CAMERA-TAPE with a cassette inserted. • When you touch (Play/Pause). ON Always displays the remaining tape indicator.
E:\SONY\2659814111\01GB04MEN_E.fm TIME/LANGU. menu Customizing Personal Menu (CLOCK SET/WORLD TIME/LANGUAGE) You can add desired menu items to any Personal Menu allocated to the lamp positions currently lit. This is convenient if you add frequently used menu items to Personal Menu. See page 40 for details on selecting menu items. CLOCK SET See page 19. WORLD TIME LANGUAGE You can add up to 28 menu items to each Personal Menu. Delete a less important menu item, if you want to add more.
E:\SONY\2659814111\01GB04MEN_E.fm Customizing Personal Menu (Continued) Deleting a menu item 1 Touch t [P-MENU SET UP] t [DELETE]. If the desired menu item is not displayed, touch / . 60min STBY Select button to delete. 1/3 0:00:00 MENU DISP GUIDE TELE MACRO EXPOSURE SPOT FOCUS FADER END 1 Touch t [P-MENU SET UP] t [SORT]. If the desired menu item is not displayed, touch / . 2 Touch the menu item you want to move. 2 Touch the menu item that you want to delete.
E:\SONY\2659814111\01GB05BAS_E.fm Dubbing/Editing Dubbing to VCR/DVD device, etc. You can copy the picture played back on your camcorder to other recording devices (VCR/ DVD device, etc.). You can connect your camcorder to a VCR/DVD device, etc., using the A/V connecting cable (1), the A/V connecting cable with S VIDEO (2), or the i.LINK cable (3). Connect your camcorder to the wall socket using the supplied AC Adaptor for this operation (p. 9).
E:\SONY\2659814111\01GB05BAS_E.fm Dubbing to VCR/DVD device, etc. (Continued) DCR-HC44E/HC46E/HC94E/HC96E: A/V or A/V OUT jack 1 AUDIO/VIDEO jacks (Yellow) A/V (White) (Red) VCR/DVD device, etc. To S VIDEO jack To i.LINK jack DV 2 To DV or (i.LINK) DV OUT Interface 3 : Signal flow A A/V connecting cable (supplied) For DCR-HC44E/HC46E/HC94E/HC96E: The Handycam Station and your camcorder are both equipped with A/V jacks (p. 80).
E:\SONY\2659814111\01GB05BAS_E.fm 1 Prepare your camcorder for playback. Insert the recorded cassette. For DCR-HC44E/HC46E/HC94E/ HC96E: Set [TV TYPE] according to the playback device (TV, etc.) (p. 39). 2 Prepare your VCR/DVD device for recording. • The following cannot be output via the DV Interface (i.LINK): – Indicators – Pictures edited using [PICT. EFFECT] (p. 58), [D. EFFECT] (p. 56) or PB zoom (p. 30). • When connected using an i.
Recording pictures from a TV or VCR device, etc. (DCR-HC36E/HC46E/HC96E) You can record pictures or TV programs from a TV or VCR device, etc., on a tape or a “Memory Stick Duo.” You can also record a scene as a still image on a “Memory Stick Duo.” Be sure to insert a cassette or a “Memory Stick Duo” for recording in your camcorder beforehand. You can connect your camcorder to a TV or VCR device, etc. or an i.
DCR-HC46E/HC96E: A/V jack (DCR-HC96E) 1 AUDIO/VIDEO jacks (Yellow) A/V (White) (Red) TV or VCR device, etc. To S VIDEO jack DV 2 3 AV device with i.LINK output jack To i.LINK jack : Signal flow A For DCR-HC96E: A/V connecting cable (supplied) The Handycam Station and your camcorder are both equipped with A/V jacks. Connect the A/V connecting cable either to the Handycam Station or to your camcorder, depending on your setup.
Recording pictures from a TV or VCR device, etc. (Continued) Recording movies 1 Connect your TV or VCR device to your camcorder as a playback device. Connect your camcorder to the output jacks of a TV or VCR device. 2 Insert a cassette into the VCR as a player. The picture played on the connected device appears on the LCD screen of your camcorder. 6 Touch [REC START] at the point you want to start recording. 7 Stop recording. When recording on a tape, touch (Stop) or [REC PAUSE].
E:\SONY\2659814111\01GB05BAS_E.fm Dubbing pictures from a tape to a “Memory Stick Duo” You can record movies or still images on a “Memory Stick Duo.” Make sure you have a recorded tape and a “Memory Stick Duo” inserted into your camcorder. • For DCR-HC94E/HC96E: The playback pictures edited using [DELAY MOTION] in [D. EFFECT] cannot be dubbed to a “Memory Stick Duo.” • For DCR-HC44E/HC46E/HC94E/HC96E: Do not insert/eject the cassette while your camcorder is on the Handycam Station.
E:\SONY\2659814111\01GB05BAS_E.fm Dubbing sound to a recorded tape You can add sound to a tape already recorded in the 12-bit mode (p. 61) without erasing the original sound. Connecting A Active Interface Shoe C Internal stereo microphone A/V connecting cable (supplied) A/V B A/V jack Do not connect the video plug (Yellow). (White) (Red) AUDIO OUT : Signal flow Audio device (such as CD/MD players) For DCR-HC96E: The Handycam Station and your camcorder are both equipped with A/V jacks.
E:\SONY\2659814111\01GB05BAS_E.fm 3 Touch t [MENU] t (EDIT/PLAY) t t [AUD DUB CTRL] t t [AUDIO DUB]. X appears. 60min AUD DUB CTRL 0:00:00:00 AUDIO DUB 4 Touch (Play) and start playing back the audio you want to record at the same time. appears while recording the new sound in stereo 2 (ST2) during the playback of the tape. 5 Touch (Stop) when you want to stop recording. To dub on other scenes, repeat step 2 to select scenes, then touch [AUDIO DUB].
E:\SONY\2659814111\01GB05BAS_E.fm Dubbing sound to a recorded tape (Continued) To check the recorded sound 1 Play back the tape on which you have recorded audio (p. 27). 2 Touch t [MENU] t (STANDARD SET) t t [AUDIO MIX] t . 60min Deleting recorded pictures from the “Memory Stick Duo” 1 Slide the POWER switch repeatedly to turn on the PLAY/ EDIT lamp. 0:00:00:00 AUDIO MIX ST1 ST2 2 Touch 60 min 60min 101–0001 0001 101 101–0002 . 3.
E:\SONY\2659814111\01GB05BAS_E.fm Marking images on the “Memory Stick Duo” with specific information (Print mark/Image protection) When you are using a “Memory Stick Duo” with the write-protect tab, make sure the write-protect tab on the “Memory Stick Duo” is not set to the write-protect position (p. 120).
E:\SONY\2659814111\01GB05BAS_E.fm Printing recorded images (PictBridge compliant printer) You can print out pictures using a PictBridge compliant printer without connecting the camcorder to a computer. Connect the AC Adaptor to obtain power from the wall socket. Insert the “Memory Stick Duo” containing still images into your camcorder and turn on the printer. Connecting your camcorder to the printer • You can also operate by selecting in the following orders: – Touch t [MENU] t (PICT.APPLI.
E:\SONY\2659814111\01GB05BAS_E.fm • • • • Dubbing/Editing • – Disconnect the mains lead. – Remove your camcorder from the Handycam Station (DCR-HC44E/HC46E/HC94E/ HC96E). – Disconnect the USB cable from your camcorder (DCR-HC36E) or the Handycam Station (DCR-HC44E/HC46E/HC94E/ HC96E) or the printer. – Remove the “Memory Stick Duo” from your camcorder. If the printer stops working, disconnect the USB cable, turn the printer off and on again and restart the operation from the beginning.
E:\SONY\2659814111\01GB05BAS_E.fm Jacks to connect external devices Camcorder Handycam Station (DCR-HC44E/HC46E/HC94E/HC96E) 7 3 1 6 5 4 A For DCR-HC94E/HC96E: Active Interface Shoe (p. 74) The Active Interface Shoe supplies power to optional accessories such as a video light, a flash, or a microphone. The accessory can be turned on or off as you operate the POWER switch on your camcorder. Refer to the operating instructions supplied with your accessory for details.
E:\SONY\2659814111\01GB05BAS_E.fm C For DCR-HC96E: A/V (audio/video) jack (p. 38, 67, 93) For DCR-HC36E/HC44E/HC46E/ HC94E: A/V (audio/video) OUT jack (p. 38, 67) • For DCR-HC44E/HC46E/HC94E/HC96E: The Handycam Station and your camcorder are both equipped with A/V jacks. D (USB) jack (p. 82) E For DCR-HC36E/HC46E/HC96E: DV Interface (i.LINK) (p. 67, 90) For DCR-HC44E/HC94E: DV OUT Interface (i.LINK) (p. 67, 90) F DC IN jack (p.
E:\SONY\2659814111\01GB06COM_E.fm Using a Computer Before referring to the “First Step Guide” on your computer When you install the Picture Package software on a Windows computer from the supplied CD-ROM, you can enjoy the following operations by connecting your camcorder to your computer. • Software and features available for Macintosh computers differ from those available for Windows computers. For details, refer to chapter 6 of “First Step Guide” on the supplied CD-ROM.
E:\SONY\2659814111\01GB06COM_E.fm Video Capturing Tool You can import the entire contents of a tape to a computer. • The CD-ROM (supplied) includes the following software: – USB Driver – Picture Package Ver.1.5.1 – ImageMixer VCD2 – “First Step Guide” About “First Step Guide” About the help function of the software The Help guide explains all software application functions. Refer to the Help guide for further detailed operations after reading the “First Step Guide” thoroughly.
E:\SONY\2659814111\01GB06COM_E.fm Before referring to the “First Step Guide” on your computer (Continued) Application: Windows Media Player (This must be installed to play back movies.) Others: USB port (This must be provided as standard), disc drive • If your computer has a Memory Stick slot, insert the “Memory Stick Duo” on which pictures are recorded into the Memory Stick Duo Adaptor (optional), then insert it into the Memory Stick slot on your computer to copy still images to the computer.
E:\SONY\2659814111\01GB06COM_E.fm Installing the software and “First Step Guide” on a computer You need to install the software etc., with the supplied CD-ROM on your computer before connecting your camcorder and your computer. Once installed, no further installation will be necessary. The software to be used varies depending on the computer’s operating system you are using.
E:\SONY\2659814111\01GB06COM_E.fm Installing the software and “First Step Guide” on a computer (Continued) 6 Click [Next]. 9 Click [Install] on the [Ready to Install the Program] screen. The installation of Picture Package starts. 7 Read [License Agreement], check [I accept the terms of the license agreement] if you agree, then click [Next]. 10Click [Next] to install the “First Step Guide.” Depending on the computer, this screen may not be displayed. In such a case, skip to step 11.
E:\SONY\2659814111\01GB06COM_E.fm 12If the [Installing Microsoft(R) DirectX(R)] screen is displayed, follow the steps below to install DirectX 9.0c. If not, skip to step 13. 13Make sure [Yes, I want to restart my computer now.] is checked, then click [Finish]. 1 Read the License Agreement, then click [Next]. 2 Click [Next]. The computer turns off once, then starts up again automatically (Restart).
E:\SONY\2659814111\01GB06COM_E.fm Installing the software and “First Step Guide” on a computer (Continued) Installing on a Macintosh computer 1 Confirm that your camcorder is not connected to the computer. 2 Turn on the computer. Close all applications running on the computer before installing the software. 9 When the user acceptance screen is displayed, enter your name and password. The installation of ImageMixer VCD2 starts.
E:\SONY\2659814111\01GB06COM_E.fm Viewing “First Step Guide” Displaying “First Step Guide” For inquires about this software Starting up on a Windows computer Pixela User Support Center Viewing with Microsoft Internet Explorer Ver.6.0 or later is recommended. Double-click the icon on the desktop. Pixela Home Page Picture Package: http://www.ppackage.com/ ImageMixer VCD2: http://www.ImageMixer.com/ – North America (Los Angeles) Telephone: (Toll-Free) +1-800-458-4029 +1-213-341-0163 – Europe (U.K.
E:\SONY\2659814111\01GB06COM_E.fm Creating a DVD (Direct Access to “Click to DVD”) You can create a DVD from a tape with a Sony VAIO series computer* preinstalled with “Click to DVD Ver.1.2” (Sony original software) or later via an i.LINK cable. The picture is automatically copied and written to a DVD. The following procedures describe how to create a DVD from a recorded tape. For details on system and operation requirements, and “Click to DVD,” visit the following URL: – Europe http://www.vaio-link.
E:\SONY\2659814111\01GB06COM_E.fm 3 Slide the POWER switch repeatedly to turn on the PLAY/ EDIT lamp. 4 Insert a recorded cassette into your camcorder. 5 Connect your camcorder (DCRHC36E) or the Handycam Station (DCR-HC44E/HC46E/HC94E/ HC96E) to a computer via an i.LINK cable (p. 90). 6 Touch t [MENU] t (EDIT/PLAY) t [BURN DVD] t . “Click to DVD” starts up and the onscreen instructions appear on your computer.
E:\SONY\2659814111\01GB06COM_E.fm Creating a DVD (Direct Access to “Click to DVD”) (Continued) • When [CONVERTING] or [WRITING] is displayed on the screen, capturing of pictures has already finished. Even if you disconnect the i.LINK cable or turn off the camcorder at this stage, DVD creation will continue on your computer. • If any of the following occurs, copying of the picture is canceled. A DVD containing the data up to the point the operation was canceled is created.
E:\SONY\2659814111\01GB06COM_E.fm Connecting an analog VCR to the computer via your camcorder (Signal convert function) (DCRHC96E) Using an i.LINK cable (3) and the A/V connecting cable (1) or the A/V connecting cable with S VIDEO (2), you can convert an analog signal output from an analog device such as a VCR to a digital signal and transfer it to a digital device, such as a computer, via your camcorder. Connect your camcorder to the wall socket using the supplied AC Adaptor for this operation (p. 9).
E:\SONY\2659814111\01GB06COM_E.fm Connecting an analog VCR to the computer via your camcorder (Signal convert function) (Continued) 2 Slide the POWER switch of your camcorder repeatedly to turn on the PLAY/EDIT lamp. 3 On the LCD screen, touch t [MENU] t (STANDARD SET) t [A/V t DV OUT] t [ON] t t . 4 Start playback on the analog video unit. 5 Start capturing procedures on your computer. Regarding operation, refer to the operating instructions supplied with the software or the on-line help.
E:\SONY\2659814111\01GB07TBS_E.fm Troubleshooting Troubleshooting If you run into any problems using your camcorder, use the following table to troubleshoot the problem. If the problem persists, disconnect the power source and contact your Sony dealer. Overall operations/Easy Handycam The power does not turn on. • Attach a charged battery pack to the camcorder (p. 9). • Use the AC Adaptor to connect to a wall socket (p. 9).
E:\SONY\2659814111\01GB07TBS_E.fm Troubleshooting (Continued) Batteries/Power sources The power abruptly turns off. • When approximately 5 minutes have elapsed while you do not operate your camcorder, the camcorder is automatically turned off (A.SHUT OFF). Change the setting of [A.SHUT OFF] (p. 64), or turn on the power again (p. 14), or use the AC Adaptor. • Charge the battery pack (p. 9). The CHG (charge) lamp does not light while the battery pack is being charged.
E:\SONY\2659814111\01GB07TBS_E.fm LCD screen/viewfinder A rippling effect appears on the LCD screen when you touch it. • This is not a malfunction. Do not press hard on the LCD screen. An unknown picture appears on the LCD screen or viewfinder. • The camcorder is in [DEMO MODE] (p. 59). Touch the LCD screen or insert a cassette or a “Memory Stick Duo” to cancel [DEMO MODE]. An unknown indicator appears on the screen. • A warning indicator or message appears on the screen (p. 113).
E:\SONY\2659814111\01GB07TBS_E.fm Troubleshooting (Continued) Dots in lines appear on the LCD screen. • This is not a malfunction. These dots are not recorded. Cassette tapes The cassette cannot be ejected from the compartment. • • • • Make sure the power source (battery pack or AC Adaptor) is connected correctly (p. 9). Remove the battery pack from the camcorder, then attach it again (p. 11). Attach a charged battery pack to the camcorder (p. 9).
E:\SONY\2659814111\01GB07TBS_E.fm You cannot format the “Memory Stick Duo.” • Release the lock on the write-protect tab of the “Memory Stick Duo” if there is one (p. 120). Image protection cannot be applied. • Release the lock on the write-protect tab of the “Memory Stick Duo” if there is one (p. 120). • Perform the operation again on the index screen (p. 77). You cannot mark pictures for print. • • • • Release the lock on the write-protect tab of the “Memory Stick Duo” if there is one (p. 120).
E:\SONY\2659814111\01GB07TBS_E.fm Troubleshooting (Continued) • In the following settings, still images cannot be recorded on a “Memory Stick Duo” during tape recording. – [PROGRES.REC] (DCR-HC94E/HC96E) – [SMTH INT.REC] (DCR-HC44E/HC46E/HC94E/HC96E) • For DCR-HC36E: You cannot record still images on the “Memory Stick Duo” using [WIDE SELECT] mode (p. 50). The recording angle differs depending on the POWER switch setting position (DCR-HC44E/HC46E/HC94E/HC96E).
E:\SONY\2659814111\01GB07TBS_E.fm [END SEARCH] does not work correctly. • There is a blank section between recorded sections of the tape. This is not a malfunction. Smooth interval recording stops/[Smooth interval rec discontinued due to error.] appears and recording stops (DCR-HC44E/HC46E/HC94E/HC96E). • The video head may be dirty. Use a cleaning cassette (optional). • Try again from the beginning. • Use a Sony mini DV cassette. Adjusting the image during recording Refer also to “Menu” (p. 104).
E:\SONY\2659814111\01GB07TBS_E.fm Troubleshooting (Continued) Tiny spots in white, red, blue, or green appear on the screen. • The spots appear when you are recording in [SLOW SHUTTR], [SUPER NSPLUS] (DCRHC36E/HC44E/HC46E), [SUPER NS] (DCR-HC94E/HC96E), or [COLOR SLOW S]. This is not a malfunction. The color of the picture is not correctly displayed. • Deactivate the NightShot plus (DCR-HC36E/HC44E/HC46E)/NightShot (DCR-HC94E/ HC96E) function (p. 29).
E:\SONY\2659814111\01GB07TBS_E.fm Image data stored on a “Memory Stick Duo” cannot be played back. • Image data cannot be played back if you have modified file or folder names, or have edited the data on a computer (In this case, the file name flashes). This is not a malfunction (p. 121). • Pictures recorded on other devices may not be played back. This is not a malfunction (p. 121). Horizontal lines appear on the picture. The displayed pictures are not clear or do not appear.
E:\SONY\2659814111\01GB07TBS_E.fm Troubleshooting (Continued) • There is a blank section in the beginning or between recorded sections of the tape. This is not a malfunction. Remote Commander The supplied Remote Commander does not function. • Set [REMOTE CTRL] to [ON] (p. 64). • Remove any obstructions between the Remote Commander and the remote sensor.
E:\SONY\2659814111\01GB07TBS_E.fm • If you set [PROGRAM AE], [SPOT METER] is automatically set to [AUTO]. You cannot use [EXPOSURE]. • You cannot use [EXPOSURE] together with: – NightShot plus (DCR-HC36E/HC44E/HC46E) – [SUPER NSPLUS] (DCR-HC36E/HC44E/HC46E) – NightShot (DCR-HC94E/HC96E) – [SUPER NS] (DCR-HC94E/HC96E) – [COLOR SLOW S] – [CINEMA EFECT] of [D. EFFECT] (DCR-HC94E/HC96E) • If you set [PROGRAM AE], [EXPOSURE] is automatically set to [AUTO]. You cannot use [WHITE BAL.].
E:\SONY\2659814111\01GB07TBS_E.fm Troubleshooting (Continued) [COLOR SLOW S] does not operate correctly. • [COLOR SLOW S] may not operate correctly in total darkness. Use NightShot plus or [SUPER NSPLUS] (DCR-HC36E/HC44E/HC46E)/NightShot or [SUPER NS] (DCRHC94E/HC96E). • You cannot use [COLOR SLOW S] together with: – [FADER] – [D. EFFECT] – [PROGRAM AE] – [EXPOSURE] – [SPOT METER] You cannot use [PROGRES.REC] (DCR-HC94E/HC96E). • You cannot use [PROGRES.REC] with [CINEMA EFECT] of [D. EFFECT].
E:\SONY\2659814111\01GB07TBS_E.fm Dubbing/Editing/Connecting to other devices Pictures output from the camcorder do not appear on the screen of the connected device (DCR-HC44E/HC46E/HC94E/HC96E). • When attaching the camcorder to the Handycam Station, close the DC IN jack cover on the camcorder, and then fully insert the camcorder into the Handycam Station in the correct way securely (p. 10). Pictures from connected devices are not displayed on the LCD screen or the viewfinder (DCR-HC96E).
E:\SONY\2659814111\01GB07TBS_E.fm Troubleshooting (Continued) Movies cannot be dubbed from a tape to a “Memory Stick Duo.” • You cannot record or a distorted picture may be recorded in the following situations: – The tape has a blank section. – The tape has been used repeatedly for recording. – The input signal has been interrupted or cut. You cannot input pictures using the A/V connecting cable (DCR-HC96E). • You cannot input pictures while [DISP OUTPUT] is set to [V-OUT/PANEL] (p. 64).
E:\SONY\2659814111\01GB07TBS_E.fm You cannot view the video recorded on a tape on a Macintosh computer. • When you connect your camcorder to a Macintosh computer using the USB cable, you cannot copy pictures recorded on a tape to the computer. To copy recordings from a tape, connect your camcorder to the computer with an i.LINK cable and use the standard software in the OS. You cannot view the video and still images recorded on a “Memory Stick Duo” on the computer.
E:\SONY\2659814111\01GB07TBS_E.fm Troubleshooting (Continued) 6 Turn off the power of your camcorder, disconnect the USB cable, then restart the computer. 7 Place the supplied CD-ROM in the disc drive of your computer. 8 Follow the steps below and try to install the USB driver again. 1 Double-click [My Computer]. 2 Right-click [PICTUREPACKAGE] (Disc drive)*. * Drive names (such as (E:)) may vary depending on the computer. 3 Click [Open]. 4 Double-click [Driver]. 5 Double-click [Setup.exe].
E:\SONY\2659814111\01GB07TBS_E.fm 3 Right-click [My Computer], then click [Properties]. The [System Properties] screen appears. 4 Click the [Hardware] tab t [Device Manager] t [View] t [Devices by type]. 5 If the devices below are already installed, right-click them, then click [Uninstall] to delete them.
E:\SONY\2659814111\01GB07TBS_E.fm Troubleshooting (Continued) The movie is not smooth during USB Streaming. • Change the settings as described in the following procedures: 1 Select [Start] t [Programs] ([All Programs] for Windows XP) t [Picture Package] t [Handycam Tools] t [USB Streaming Tool]. 2 Adjust the slider in the (-) direction on [Select video quality]. 3 Follow the on-screen instructions, click [Next], then click [Done]. Picture Package does not function correctly.
E:\SONY\2659814111\01GB08TBS2_E.fm Warning indicators and messages Self-diagnosis display/Warning indicators E:61:ss / E:62:ss / E:91:ss • Contact your Sony dealer or local authorized Sony service facility. Inform them of the 5-digit code, which starts from “E.” If indicators appear on the LCD screen or in the viewfinder, check the following. Some symptoms you can fix by yourself.
E:\SONY\2659814111\01GB08TBS2_E.fm Warning indicators and messages (Continued) Q (Warning indicators pertaining to the tape) Slow flashing: • There is less than 5 minutes remaining on the tape. • No cassette is inserted.* • The write-protect tab on the cassette is set to lock (p. 119).* Fast flashing: • The tape has run out.* Z (Eject cassette warning)* (Warning indicator pertaining to camera-shake warning) • The amount of lights is not sufficient, so camera-shake easily occurs.
E:\SONY\2659814111\01GB08TBS2_E.fm x Moisture condensation %Z Moisture condensation. Eject the cassette (p. 124) % Moisture condensation. Turn off for 1H. (p. 124) x Cassette/Tape Q Insert a cassette. (p. 20) This Memory Stick is not formatted correctly. • Check the format, then format the “Memory Stick Duo” as necessary (p. 54, 119). Cannot record. The Memory Stick is full. • Delete unnecessary images (p. 76). - The Memory Stick is locked. Check the tab. (p. 120) Z Reinsert the cassette. (p.
E:\SONY\2659814111\01GB08TBS2_E.fm Warning indicators and messages (Continued) x PictBridge compliant printer Cannot add audio. Disconnect the i.LINK cable. (p. 74) Check the connected device. • Switch off the printer and switch it on again, then disconnect the USB cable and reconnect it. Connect the camcorder to a PictBridge compatible printer. • Switch off the printer and switch it on again, then disconnect the USB cable and reconnect it. Error. Cancel the task. • Check the printer.
E:\SONY\2659814111\01GB08TBS2_E.fm HDV recorded tape. Cannot add audio. • Your camcorder does not allow you to add audio on a section of a tape recorded in HDV format (p. 74). Disconnect one AV cable. (DCRHC44E/HC46E/HC94E/HC96E) • A/V connecting cables are connected to both the camcorder and the Handycam Station. Disconnect one of them. • When the A/V connecting cable is connected only to your camcorder, your camcorder is not attached to the Handycam Station correctly.
Additional Information Using your camcorder abroad Power supply You can use your camcorder in any country/region using the AC Adaptor supplied with your camcorder within the AC 100 V to 240 V, 50/60 Hz range. On TV color systems Your camcorder is PAL system, so its picture can only be viewed on a PAL system TV with an AUDIO/VIDEO input jack.
E:\SONY\2659814111\01GB09ADD_E.fm About the “Memory Stick” x To prevent accidental erasure Slide the write-protect tab on the cassette to set it to SAVE. REC: The cassette can be recorded. SAVE: The cassette cannot be recorded (write-protected). REC SAVE x When labeling the cassette Be sure to place the label only on the locations shown in the following illustration so as not to cause a malfunction of your camcorder. Do not put a label along this border.
E:\SONY\2659814111\01GB09ADD_E.fm About the “Memory Stick” (Continued) • File names of movies: – MOV00001: This file name appears on the screen on your camcorder. – MOV00001.MPG: This file name appears on the display of a computer. • A “Memory Stick Duo” formatted by a computer (Windows OS/Mac OS) does not have guaranteed compatibility with your camcorder. • Data read/write speed may vary depending on the combination of the “Memory Stick” and “Memory Stick” compliant product you use.
E:\SONY\2659814111\01GB09ADD_E.fm On image data compatibility • Image data files recorded on a “Memory Stick Duo” by your camcorder conform to the “Design rule for Camera File system” universal standard established by the JEITA (Japan Electronics and Information Technology Industries Association). • On your camcorder, you cannot play back still images recorded on other devices (DCRTRV900E or DSC-D700/D770) that do not conform to the universal standard. (These models are not sold in some regions.
E:\SONY\2659814111\01GB09ADD_E.fm About the “InfoLITHIUM” battery pack (Continued) • Frequent use of the LCD screen or a frequent playback, fast forward or rewind operation wears out the battery pack faster. We recommend using a large capacity battery pack: NP-FP70/FP71/FP90 (optional). • Be sure to set the POWER switch to OFF (CHG) when not recording or playing back on your camcorder. The battery pack is also consumed when your camcorder is in recording standby or playback pause.
E:\SONY\2659814111\01GB09ADD_E.fm About i.LINK The DV Interface on this unit is an i.LINKcompliant DV Interface. This section describes the i.LINK standard and its features. is also indicated near the i.LINK interface on some devices. The baud rate may differ from the indicated value when the unit is connected to a device with a different maximum baud rate. What is i.LINK? i.LINK is a digital serial interface for transferring digital video, digital audio, and other data to other i.
E:\SONY\2659814111\01GB09ADD_E.fm Maintenance and precautions On use and care • Do not use or store the camcorder and accessories in the following locations. – Anywhere extremely hot or cold. Never leave them exposed to temperatures above 60 °C (140 °F), such as under direct sunlight, near heaters or in a car parked in the sun. They may malfunction or become deformed. – Near strong magnetic fields or mechanical vibration. The camcorder may malfunction. – Near strong radio waves or radiation.
E:\SONY\2659814111\01GB09ADD_E.fm x Note on moisture condensation Moisture may condense when you bring your camcorder from a cold place into a warm place (or vice versa) or when you use your camcorder in a humid place as shown below. • When you bring your camcorder from a ski slope into a place warmed up by a heating device. • When you bring your camcorder from an air conditioned car or room into a hot place outside. • When you use your camcorder after a squall or a shower.
E:\SONY\2659814111\01GB09ADD_E.fm Maintenance and precautions (Continued) On charging the pre-installed rechargeable battery CALIBRATION 1/3 Touch the "x" CANCEL 4 Touch the “×” displayed on the screen with the corner of the “Memory Stick Duo” or the like. The position of the “×” changes. To cancel [CALIBRATION], touch [CANCEL] in step 4. If you did not press the right spot, start from step 4 again. • You cannot calibrate the LCD screen if it is rotated.
E:\SONY\2659814111\01GB09ADD_E.fm Specifications System Battery may explode if mistreated. Do not recharge, disassemble or dispose of in fire. Video recording system 2 rotary heads, Helical scanning system Still image recording system Exif Ver. 2.2*1 Audio recording system Rotary heads, PCM system Quantization: 12 bits (Fs 32 kHz, stereo 1, stereo 2), 16 bits (Fs 48 kHz, stereo) Video signal PAL color, CCIR standards Usable cassette Mini DV cassette with the mark printed Tape speed SP: Approx. 18.
E:\SONY\2659814111\01GB09ADD_E.fm Specifications (Continued) DCR-HC94E/HC96E: 5.9 mm (1/3 type) CCD (Charge Coupled Device) Gross: Approx. 3 310 000 pixels Effective (still): 3 050 000 pixels Effective (movie): 2 050 000 pixels Lens DCR-HC36E: Carl Zeiss Vario-Tessar 20 × (Optical), 800 × (Digital) DCR-HC44E/HC46E: Carl Zeiss Vario-Tessar 12 × (Optical), 800 × (Digital) DCR-HC94E/HC96E: Carl Zeiss Vario-Sonnar T 10 × (Optical), 120 × (Digital) Focal length DCR-HC36E: f=2.3 ~ 46 mm (3/32 ~ 1 13/16 in.
E:\SONY\2659814111\01GB09ADD_E.fm Input/Output connectors LCD screen Picture DCR-HC36E: 6.2 cm (2.5 type) DCR-HC44E/HC46E/HC94E/HC96E: 6.9 cm (2.7 type, aspect ratio 16:9) Total dot number 123 200 (560 × 220) General Power requirements DC 7.2 V (battery pack) DC 8.4 V (AC Adaptor) Average power consumption DCR-HC36E: During camera recording using the viewfinder 1.9 W During camera recording using the LCD 2.3 W DCR-HC44E/HC46E: During camera recording using the viewfinder 2.
E:\SONY\2659814111\01GB09ADD_E.fm Specifications (Continued) DCR-HC44E/HC46E: 380 g (13 oz) main unit only, 445 g (15 oz) including the NP-FP50 rechargeable battery pack and DVM60 cassette DCR-HC94E/HC96E: 460 g (1 lb) main unit only, 525 g (1 lb 2 oz) including the NP-FP50 rechargeable battery pack and DVM60 cassette Supplied accessories See page 8.
E:\SONY\2659814111\01GB09ADD_E.fm Dimensions (approx.) 56 × 31 × 100 mm (2 1/4 × 1 1/4 × 4 in.) (w/h/d) excluding the projecting parts Mass (approx.) 190 g (6.7 oz) excluding the mains lead Type Lithium ion Design and specifications are subject to change without notice. * See the label on the AC Adaptor for other specifications. Rechargeable battery pack NP-FP30 (DCR-HC36E) Additional Information Maximum output voltage DC 8.4 V Output voltage DC 7.2 V Capacity 3.6 Wh (500 mAh) Dimensions (approx.) 31.
E:\SONY\2659814111\01GB09ADD_E.
E:\SONY\2659814111\01GB00BOOKIX.fm Index Numeric/Symbol 12BIT....................................61 16:9 WIDE............................50 16BIT....................................61 21-pin adaptor.......................39 4:3 .........................................50 Memory Stick................59 STREAM.......................60 Remaining battery......... 31 DC IN jack..............................9 BEACH&SKI....................... 45 DC plug ..................................9 BEEP...............
E:\SONY\2659814111\01GB00BOOKIX.fm Index (Continued) FLASH LEVEL............48, 101 INDOOR.............................. 46 Maintenance .......................124 FLASH SET .........................48 “InfoLITHIUM” battery pack ........................................... 121 MEMORY SET menu ..........51 Initialize (Reset)................... 31 “Memory Stick Duo” ...........20 FOCUS .........................47, 101 Install ................................... 85 FORMAT ......................
E:\SONY\2659814111\01GB00BOOKIX.fm N NEG.ART .............................58 NEW FOLDER.....................55 NightShot..............................29 NightShot plus ......................29 NIGHTSHOT PLUS switch ........................................29, 48 NIGHTSHOT switch ......29, 49 PICT.APPLI. menu (Picture Application menu)................ 55 REDEYE REDUC................48 PictBridge............................. 78 Remaining battery ................32 PictBridge PRINT ................
STANDARD ........................52 Transmitter........................... 36 STANDARD SET menu ......61 Tripod................................... 30 STEADYSHOT............51, 101 TV ........................................ 38 STEREO ...............................62 TV color systems ............... 118 STILL ...................................57 TV TYPE ............................. 39 Still image W Wall socket ............................. 9 Warning indicators .............113 Warning messages.