4-170-095-12(1) Table of contents DCR-SR58E/SR68E/SR78E/ SR88E/SX33E/SX34E/SX43E/ SX44E/SX53E/SX63E 9 Getting started 12 Recording/Playback 21 Making good use of your camcorder 37 Saving images with an external device 46 Customizing your camcorder 54 Additional information 72 Quick reference 93 Digital Video Camera Recorder “Handycam” Handbook 2010 Sony Corporation
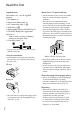
Read this first Supplied items Menu items, LCD panel, and lens The numbers in ( ) are the supplied quantity. AC Adaptor (1) Power cord (Mains lead) (1) A/V connecting cable (1) USB cable (1) Rechargeable battery pack NP-FV30 (1) CD-ROM “Handycam” Application Software (1) “PMB” (software, including “PMB Help”) Handbook (PDF) “Handycam” “Operating Guide” (1) See page 19 for the memory card you can use with this camcorder.
Before starting to record, test the recording function to make sure that the image and sound are recorded without any problems. Compensation for the contents of recordings cannot be provided, even if recording or playback is not possible due to a malfunction of the camcorder, storage media, etc. TV color systems differ depending on the country/region. To view your recordings on a TV, you need a PAL system-based TV. Television programs, films, video tapes, and other materials may be copyrighted.
About images, illustrations, and screen displays of this manual The example images used in this manual for illustration purposes are captured using a digital still camera, and therefore may appear different from images and screen indicators that actually appear on your camcorder. And, the illustrations of your camcorder and its screen indication are exaggerated or simplified for understandability.
Note on using the camcorder at high altitudes (DCR-SR58E/SR68E/SR78E/ SR88E) Do not turn on the camcorder in a low-pressure area, where the altitude is more than 5,000 meters (16,000 feet). Doing so may damage the internal hard disk drive of your camcorder.
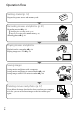
Operation flow Getting started (p. 12) Prepare the power source and memory card. Recording movies and photos (p. 21) Recording movies p. 23 Changing the recording mode (p. 26) Expected recording time (MEDIA INFO, p. 68) Shooting photos p. 24 Playing movies and photos Playback on the camcorder p. 28 Playing images on a TV p. 34 Saving images Saving movies and photos with a computer Saving movies and photos in external media p. 46 Saving images with a DVD writer/recorder p.
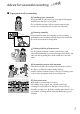
Advice for successful recording To get good results in recording Stabilizing your camcorder When you hold the camcorder, keep your upper body upright, and hold your arms close to your body. The SteadyShot function is effective against camera-shake, however, it is essential that you not move the camcorder. Zooming smoothly Zoom in and out slowly and smoothly. And, use zooming sparingly. Excessive zooming will make movies that may make the viewer feel tired when viewing them.
Useful recording techniques Flowers in close-up Recording in a dimly-lit room Capturing fireworks, or a sunset in all its splendor Checking your golf swing PORTRAIT (59) TELE MACRO (62) FIREWORKS (59) SUNRISE&SUNSET (59) Focusing on the child on the left side of the screen SPOT FOCUS (61) SPOT MTR/FCS (61) GB VIDEO LIGHT (27) SPORTS (59)
Table of contents Read this first.. . . . . . . . . . . . . . . . . . . . . . . . . . . . . . . . . . . . . . . . . . . . . . . . . . . . . . . . . . . . . . . . . . . . . . . . . . . . . . . . . . . . . . . . . 2 Notes on use.. . . . . . . . . . . . . . . . . . . . . . . . . . . . . . . . . . . . . . . . . . . . . . . . . . . . . . . . . . . . . . . . . . . . . . . . . . . . . . . . . 4 Operation flow.. . . . . . . . . . . . . . . . . . . . . . . . . . . . . . . . . . . . . . . . . . . . . . . . . . . . .
Making good use of your camcorder Deleting movies and photos.. . . . . . . . . . . . . . . . . . . . . . . . . . . . . . . . . . . . . . . . . . . . . . . . . . . . . . . . . . . . . . . . . . . . Protecting recorded movies and photos (Protect).. . . . . . . . . . . . . . . . . . . . . . . . . . . . . . . . . . . . . . . . . Dividing a movie.. . . . . . . . . . . . . . . . . . . . . . . . . . . . . . . . . . . . . . . . . . . . . . . . . . . . . . . . . . . . . . . . . . . . . . . . . . . . . . . . . .
Additional information 72 77 81 81 82 82 84 86 86 87 88 Table of contents Troubleshooting.. . . . . . . . . . . . . . . . . . . . . . . . . . . . . . . . . . . . . . . . . . . . . . . . . . . . . . . . . . . . . . . . . . . . . . . . . . . . . . . Self-diagnosis display/Warning indicators. . . . . . . . . . . . . . . . . . . . . . . . . . . . . . . . . . . . . . . . . . . Recording time of movies/number of recordable photos.. . . . . . . . . . . . . . . . . . . . . . . . . . . . . . . .
Getting started Step 1: Charging the battery pack DCR-SR58E/SR68E/SR78E/SR88E DC IN jack Battery pack Power cord (Mains lead) DC plug AC Adaptor To the wall outlet (wall socket) CHG (charge) lamp DCR-SX33E/SX34E/SX43E/SX44E/SX53E/SX63E CHG (charge) lamp Battery pack DC IN jack DC plug AC Adaptor GB 12 Power cord (Mains lead) To the wall outlet (wall socket)
You can charge the “InfoLITHIUM” battery pack (V series) after attaching it to your camcorder. Notes You cannot attach any “InfoLITHIUM” battery pack other than the V series to your camcorder. 1 2 3 Turn off your camcorder by closing the LCD screen. Attach the battery pack by sliding it in the direction of the arrow until it clicks. 4 Getting started Connect the AC Adaptor and the power cord (mains lead) to your camcorder and the wall outlet (wall socket).
To remove the battery pack Close the LCD screen. Slide the BATT (battery) release lever () and remove the battery pack (). DCR-SR58E/SR68E/SR78E/SR88E DCR-SX33E/SX34E/SX43E/SX44E/SX53E/SX63E To use a wall outlet (wall socket) as a power source Make the same connections as “Step 1: Charging the battery pack.” Even if the battery pack is attached, the battery pack is not discharged.
Notes on the AC Adaptor Use the nearby wall outlet (wall socket) when using the AC Adaptor. Disconnect the AC Adaptor from the wall outlet (wall socket) immediately if any malfunction occurs while using your camcorder. Do not use the AC Adaptor placed in a narrow space, such as between a wall and furniture. Do not short-circuit the DC plug of the AC Adaptor or battery terminal with any metallic objects. This may cause a malfunction.
Step 2: Turning the power on, and setting the date and time 1 Open the LCD screen of your camcorder. Your camcorder turns on. To turn on your camcorder when the LCD screen is open, press POWER. POWER button MODE lamp 2 Select the desired geographical area with / , then touch [NEXT]. Touch the button on the LCD screen. 3 To set the date and time again, touch (MENU) [Show others] [CLOCK/ LANG] [GENERAL SET] category) [CLOCK SET].
Notes The date and time do not appear during recording, but they are automatically recorded on the recording (MENU) media, and can be displayed during playback. To display the date and time, touch [PLAYBACK] category) [DATA CODE] [DATE/ [Show others] [PLAYBACK SET] (under . TIME] You can turn off the operation beeps by touching (MENU) [Show others] [SOUND/DISP [GENERAL SET] category) [BEEP] [OFF] .
Step 3: Preparing the recording media The recording media that can be used differs depending on your camcorder. The following icons are displayed on the screen of your camcorder. DCR-SX33E/SX43E: Memory card DCR-SX34E/SX44E/SX53E/SX63E: DCR-SR58E/SR68E/SR78E/SR88E: * Internal memory Memory card * Internal hard disk Memory card * In the default setting, both movies and photos are recorded on this recording media. You can perform recording, playback and editing operations on the selected medium.
Touch the desired recording media. Touch [YES] . The recording medium is changed. To check the recording media settings When recording in movie recording mode or photo recording mode, the recording media icon is displayed in the top right corner of the screen. Recording media icon Getting started The icon displayed on the LCD screen varies depending on the camcorder you use.
Only “Memory Stick Duo” media that is about a half the size of the standard “Memory Stick” media, and standard-sized SD memory cards can be used. Do not attach a label, etc., to a memory card or memory card adaptor. Doing so may cause a malfunction. Open the cover, orient the memory card’s notched corner as shown in the illustration, and insert into the memory card slot until it clicks. Close the cover after inserting the memory card.
Recording/Playback Recording In the default setting, movies are recorded on the following recording media. DCR-SX33E/SX43E: Memory card DCR-SX34E/SX44E/SX53E/SX63E: Internal memory DCR-SR58E/SR68E/SR78E/SR88E: Internal hard disk Tips See page 18 on changing the recording media (DCR-SR58E/SR68E/SR78E/SR88E/SX34E/SX44E/SX53E/SX63E). To open the lens cover Slide the LENS COVER switch to open.
DCR-SX33E/SX34E/SX43E/SX44E/SX53E/SX63E 2 Open the LCD screen of your camcorder. Your camcorder turns on. To turn on your camcorder when the LCD screen is already open, press POWER (p. 16). You can switch recording modes by pressing MODE. Press MODE to light up the desired recording mode lamp.
Recording movies Press START/STOP to start recording. You can start recording also by touching in the bottom left of the LCD screen. DCR-SR58E/SR68E/ SR78E/SR88E DCR-SX33E/SX34E/SX43E/ SX44E/SX53E/SX63E START/STOP button Recording/Playback [STBY] [REC] To stop recording, press START/STOP again. You can stop recording also by touching in the bottom left of LCD screen.
The following states will be indicated if data is still being written onto the recording media after recording has finished. During this time, do not apply shock or vibration to the camcorder, or remove the battery or AC Adaptor. Access lamp (p. 20) is lit or flashing The media icon in the upper right of the LCD screen is flashing Tips When a face is detected, a white frame appears and the image quality around the face is optimized automatically ([FACE DETECTION], p. 63).
Press MODE to turn on the (Photo) lamp. The LCD screen display switches for photo recording mode, and the screen aspect ratio becomes 4:3. Press PHOTO lightly to adjust the focus, then press it fully. You can record photos also by touching DCR-SR58E/SR68E/ SR78E/SR88E on the LCD screen. DCR-SX33E/SX34E/SX43E/ SX44E/SX53E/SX63E Recording/Playback Flashes Lights up When disappears, the photo is recorded. Tips See page 82 on the recordable number of photos.
Useful functions for recording movies and photos Zooming You can magnify images up to 60 times the original size with the power zoom lever. You can magnify images also with the / on the LCD screen. Tips You can set [ DIGITAL ZOOM] (p. 64) if you want to zoom to a greater level. Selecting the recording mode You can select a recording mode to record movies from 3 levels. The recording time of the media may change, depending on the recording mode. In the default setting, [ REC MODE] is set to [SP].
Tips You can select the [REC MODE] for each recording media separately (DCR-SR58E/ SR68E/SR78E/SR88E/SX34E/SX44E/SX53E/ SX63E). Adjusting the exposure for backlit subjects Using the VIDEO LIGHT You can use the VIDEO LIGHT according to the recording conditions. It is recommended that you use the VIDEO LIGHT at a distance of about 30 cm to 150 cm (11 7/8 in. to 59 1/8 in.) from the subject. To adjust the exposure for backlit subjects, press (backlight) to display .
Playback on the camcorder In the default setting, movies and photos that are recorded on the following recording media are played. DCR-SX33E/SX43E: Memory card DCR-SX34E/SX44E/SX53E/SX63E: Internal memory DCR-SR58E/SR68E/SR78E/SR88E: Internal hard disk Tips See page 18 on changing the recording media (DCR-SR58E/SR68E/SR78E/SR88E/SX34E/SX44E/SX53E/SX63E). 1 2 Open the LCD screen of your camcorder. Your camcorder turns on.
To MENU screen Displays the screen to select the index type ([DATE INDEX]/[ FILM ROLL]/ [ FACE]) (p. 31, 31, 32). / : Displays movies recorded on the previous/next date.* / : Displays the previous/next movie. Returns to the recording screen. * is displayed when is touched. You can scroll the display by touching and dragging or . appears with the movie or photo that was most recently played or recorded.
Viewing photos Your camcorder displays the selected photo. Previous To the VISUAL INDEX screen Tips When viewing photos recorded on a memory card, To start/stop slide show Next OPTION GB 30 (playback folder) appears on the screen.
Useful functions for playing movies and photos Searching for desired images by date (Date Index) You can search for desired images by date efficiently. Notes You cannot use the Date Index function for photos on the memory card. Press (VIEW IMAGES). The VISUAL INDEX screen appears. [DATE INDEX]. Returns to the VISUAL INDEX screen Searching for desired scene by pinpoint (Film Roll Index) Movies can be divided by a set time and the first scene of each division is displayed on the INDEX screen.
Tips You can also display the Film Roll Index by (MENU) [Show others] touching [PLAYBACK] [VIEW IMAGES] (under category) [ FILM ROLL]. Searching for desired scene by face (Face Index) The face images detected during movie recording are displayed on the INDEX screen. You can play back the movie from the selected face image. Press (VIEW IMAGES). The VISUAL INDEX screen appears. Touch [ FACE]. Notes Faces may not be detected depending on recording conditions.
Touch the screen at the point you want to display in the center of the displayed frame. Tips You can set continuous slide show playback (OPTION) tab by selecting [SLIDE SHOW SET] while playing photos. The default setting is [ON] (continuous playback). The point where you touched on the screen is moved to the center of the display frame. To cancel, touch Recording/Playback Adjust the magnification with W (Wide angle)/T (Telephoto). .
Playing images on a TV Connect your camcorder to the input jack of a TV or VCR using the A/V connecting cable or an A/V connecting cable with S VIDEO . Connect your camcorder to the wall outlet (wall socket) using the supplied AC Adaptor for this operation (p. 15). Refer also to the instruction manuals supplied with the devices to be connected. A/V connecting cable (supplied) Connecting to another device via the A/V Remote Connector using an A/V connecting cable.
Connect your camcorder to a TV with the A/V connecting cable (, supplied) or an A/V connecting cable with S VIDEO (, sold separately). Connect your camcorder to the input jack of the TV. Play back movies and photos on your camcorder (p. 28). To set the aspect ratio according to the connected TV (16:9/4:3) Touch (MENU) [Show others] [OUTPUT SETTINGS] (under [GENERAL .
Tips (MENU) [Show To check information (counter, etc.) on the screen of the monitor, touch [GENERAL SET] category) [DISP OUTPUT] others] [OUTPUT SETTINGS] (under .
Making good use of your camcorder Deleting movies and photos You can free media space by deleting movies and photos from recording media. Notes You cannot restore images once they are deleted. Save important movies and photos in advance. Do not remove the battery pack or the AC Adaptor from your camcorder while deleting the images. It may damage the recording media. Do not eject memory card while deleting images from the memory card. You cannot delete protected movies and photos.
Touch / to select the recording date of the desired movies/photos, then . touch Touch the image down on the LCD screen to to confirm the image. Touch return to the previous screen. Touch [YES] GB 38 .
Protecting recorded movies and photos (Protect) Protect movies and photos to avoid deleting them by mistake. Tips You can protect movies and photos on the OPTION MENU. playback screen from 1 Touch (MENU) [Show others] [PROTECT] (under [EDIT] category). To protect all the movies and photos recorded on the same day at one time Note You cannot select [ PRT. by date] for the recorded data on the memory card. In step 2, touch [ PROTECT] [ PRT. by date].
Dividing a movie 1 Touch (MENU) [Show others] [ DIVIDE] (under [EDIT] category). 2 3 Touch the movie to be divided. The selected movie starts playback. Touch at the point where you want to divide the movie into scenes. The movie pauses. Play and pause . toggles as you press Adjusts the dividing point with more precision after you selected the dividing point with . Returns to the beginning of the selected movie 4 Touch [YES] .
Capturing a photo from a movie (DCRSR58E/SR68E/SR78E/ SR88E/SX34E/SX43E/ SX44E/SX53E/SX63E) 4 Touch 1 Touch (MENU) [Show others] [PHOTO CAPTURE] (under [EDIT] category). 2 3 The [PHOTO CAPTURE] screen appears. Touch the movie to be captured. The selected movie starts playback. Touch at the point where you want to capture. Adjust the capturing point with more precision after you selected the point with .
Dubbing/copying movies and photos from the internal recording media to memory card (DCR-SR58E/SR68E/ SR78E/SR88E/SX34E/ SX44E/SX53E/SX63E) Dubbing movies You can dub movies recorded on the internal recording media of your camcorder to memory card. Insert memory card into your camcorder before the operation. Notes When you record a movie on the memory card for the first time, create the image database file (MENU) [Show others] by touching [MANAGE [REPAIR IMG.DB F.
Touch the type of copying. Touch [YES] . [COPY by select]: To copy selected photos [COPY by date]: To copy all photos of a specified date Select the photo to be copied. [COPY by select]: Touch the photo to be copied, and mark with . You can select multiple photos. Tips To check the dubbed movies after dubbing is finished, select [MEMORY CARD] on [MOVIE MEDIA SET] and play them back (p. 18).
Using the Playlist of movies The Playlist is a list showing thumbnails of the movies that you have selected. The original movies are not changed even if you edit or erase the movies added to the Playlist. Creating the Playlist (MENU) [Show Touch others] [PLAYLIST EDIT] (under [EDIT] category). Touch [ ADD]. Touch the movie to be added to the Playlist. Touch / to select the recording date of the desired movie, then touch .
Touch the movie you want to play back. Select the movie to be moved. The Playlist is played back from the selected movie to the end, then the screen returns to the Playlist screen. The selected movie is marked with . To erase unnecessary movies from the Playlist Touch . Select the destination with / . Destination bar Touch . [YES] Making good use of your camcorder Touch (MENU) [Show others] [PLAYLIST EDIT] (under [EDIT] category). Touch [ ERASE].
Saving images with an external device Saving images in external media (DIRECT COPY) 1 You can save movies and photos on external media (USB storage device), such as an external hard disk drive. You can also play back images on the camcorder or another playback device. 2 Notes For this operation, you need the USB Adaptor Cable VMC-UAM1 (sold separately). The USB Adaptor Cable VMC-UAM1 may not be available in some countries/regions. You cannot use the following devices as an external media.
DCR-SX33E/SX43E: Movies and photos that have not yet been saved on to external media can be saved. 6 This screen will appear only when there are newly recorded images. After the operation is completed, touch on the camcorder screen. Notes The number of scenes you can save on the external media are as follows. Movies: 9,999 Photos: 9,999 frames × 899 folders The number of scenes may be smaller depending on the type of images recorded. Touch [Play without copying.] in step 5 above.
Creating a disc with a DVD writer, recorder Notes The Date Index of photos cannot be displayed. If your camcorder does not recognize the external media, try the following operations. Reconnect the USB Adaptor Cable to your camcorder If the external media has the AC power cable, connect it to the wall outlet (wall socket) To finish the external media connection Touch on the VISUAL INDEX screen of the external media. Disconnect the USB Adaptor Cable.
Insert an unused disc into the DVD writer, and close the disc tray. The [DISC BURN] screen appears on the camcorder screen. Press writer. (DISC BURN) on the DVD Movies recorded on the internal recording media that have not been saved on any discs will be recorded onto the disc (DCR-SR58E/SR68E/ SR78E/SR88E/SX34E/SX44E/SX53E/ SX63E). Movies that have not been saved on any discs will be recorded onto the disc (DCR-SX33E/SX43E). [END] [EJECT Touch DISC] on the camcorder screen.
To play back a disc on the DVD writer Play the created disc to make sure dubbing was performed correctly before deleting the movies on your camcorder. If [Failed.] or [DISC BURN failed.] appears on the screen, insert another disc into the DVD writer and perform the DISC BURN operation again. Tips If the total memory size of movies to be burnt by the DISC BURN operation exceeds that of the disc, disc creation stops when the limit is reached. The last movie on the disc may be cut off.
Turn on your camcorder, and connect a DVD writer, etc. to the (USB) jack of your camcorder with the USB cable (supplied). After the operation is completed, touch [END] [YES] on the camcorder screen. Disconnect the USB cable. The [USB SELECT] screen appears on the camcorder screen. Saving images with an external device If the [USB SELECT] screen does not (MENU) [Show appear, touch others] [USB CONNECT] (under [OTHERS] category).
Creating a disc with a recorder, etc. You can dub images played back on your camcorder on a disc or video cassette, by connecting your camcorder to a disc recorder, a Sony DVD writer, etc., other than DVDirect Express, with the A/V connecting cable. Connect the device in either way of or . Refer also to the instruction manuals supplied with the devices to be connected. Notes Connect your camcorder to the wall outlet (wall socket) using the supplied AC Adaptor for this operation (p. 14).
Connect your camcorder to the recording device (a disc recorder, etc.) with the A/V connecting cable (supplied) or an A/V connecting cable with S VIDEO (sold separately). Connect your camcorder to the input jacks of the recording device. Start playback on your camcorder, and record it on the recording device. Refer to the instruction manuals supplied with your recording device for details. When dubbing is finished, stop the recording device, and then your camcorder.
Customizing your camcorder Using menus Using the menus, you can perform useful functions and change various settings. If you make good use of menu operations, you can enjoy using your camcorder. The camcorder has various menu items under each of eight menu categories. MANUAL SETTINGS (Items to adjust for scene condition) p. 59 SHOOTING SET (Items for customized shooting) p. 63 PHOTO SETTINGS (Items for recording photos) p. 65 PLAYBACK (Items for playback) p. 66 EDIT (Items for editing) p.
Notes You may not be able to set some menu items, depending on the recording or playback conditions. Grayed out menu items or settings are not available. Tips Depending on the menu items being changed, your camcorder switches between playback mode and recording mode (movie/photo). Using MY MENU You can use the menu items more easily by registering the menu items you use most often on MY MENU. You can register 6 menu items on each MY MENU of the MOVIE, PHOTO, and PLAYBACK.
Using the OPTION MENU The OPTION MENU appears just like the pop-up window that appears when you right-click is displayed at bottom-right of the screen, you can use the mouse on a computer. When , and the menu items you can change in the context the OPTION MENU. You touch appear. Menu item Tab Touch (OPTION). Touch the desired tab the item to change the setting. . After completing the setting, touch Notes Grayed out menu items or settings are not available.
Menu lists (MANUAL SETTINGS) category SCENE SELECTION FADER WHITE BAL.
(GENERAL SET) category SOUND/DISP SET VOLUME 69 LCD BRIGHT 69 LCD BL LEVEL 69 LCD COLOR 70 DISPLAY SET 70 OUTPUT SETTINGS TV TYPE 34 DISP OUTPUT 70 CLOCK/ LANG CLOCK SET AREA SET SUMMERTIME LANGUAGE SET POWER SETTINGS A.
MANUAL SETTINGS (Items to adjust for scene condition) PORTRAIT (Soft portrait) ( ) Brings out the subject such as people or flowers while creating a soft background. See “Using menus” (p. 54) on the operation. The default settings are marked with . SPOTLIGHT**( ) SCENE SELECTION Prevents people’s faces from appearing excessively white when subjects are lit by strong light. You can record images effectively in various situations.
WHITE FADER INDOOR () Fades in/out with the white effect. Out The white balance is appropriately adjusted for the following recording conditions: Indoors At party scenes or studios where the lighting conditions change quickly Under video lamps in a studio, or under sodium lamps or incandescent-like color lamps In BLACK FADER Fades in/out with the black effect. Out In ONE PUSH ( To cancel the fader before starting the operation, touch [OFF].
from inside the house, or vice versa, you need to redo the [ONE PUSH] procedure to readjust the white balance. SPOT MTR/FCS (Spot meter/ focus) You can adjust the brightness and focus for the selected subject simultaneously. This function enables you to use [SPOT METER] (p. 61) and [SPOT FOCUS] (p. 61) at the same time. Touch the subject in the frame of which you want to adjust the brightness and focus. To adjust the brightness and focus automatically, touch [AUTO].
FOCUS You can adjust the focus manually. You can select this function also when you want to focus on a certain subject intentionally. TELE MACRO This is useful to shoot small subjects, such as flowers or insects. You can blur out backgrounds and the subject stands out clearer. OFF Cancels TELE MACRO. (TELE MACRO is also canceled when you move the zoom lever to the W side.) Touch (nearby subject)/ (distant subject) to adjust the focus. To adjust the focus automatically, touch [AUTO].
SHOOTING SET (Items for customized shooting) See “Using menus” (p. 54) on the operation. The default settings are marked with . REC MODE (Recording mode) See page 26. GUIDEFRAME OFF ( AUTO SLW SHUTTR (Auto Slow Shutter) When recording in dark places, the shutter speed is automatically reduced to 1/25 second. OFF The Auto Slow Shutter function is not used. You can display the frame and check that the subject is horizontal or vertical. The frame is not recorded.
recorded in Face Index. To play back from the Face Index, see page 32. AUDIO REC SET BLT-IN ZOOM MIC (Built-in zoom microphone) You can record a movie with vivid sound appropriate to the zoom position. OFF The microphone does not record sound following zooming in or out. The right side of the bar shows the digital zooming factor. The zooming zone appears when you select the zooming level. OFF Up to 60× zoom is performed optically.
PHOTO SETTINGS (Items for recording photos) See “Using menus” (p. 54) on the operation. The default settings are marked with . SELF-TIMER Press PHOTO to start the count down. A photo is recorded after about 10 seconds. RESET Assigns file numbers in sequence, following the largest file number existing on the recording medium. When the memory card is replaced with another one, the file number is assigned for each memory card. OFF Cancels the self-timer. ON ( ) Starts the self-timer recording.
PLAYBACK (Items for playback) See “Using menus” (p. 54) on the operation. DATE/TIME VISUAL INDEX See page 28. VIEW IMAGES DATE INDEX See page 31. Date Time CAMERA DATA Movie FILM ROLL See page 31. FACE See page 32. PLAYLIST See page 44. Photo PLAYBACK SET DATA CODE During playback, your camcorder displays the information (Date/time, Camera data) recorded automatically at the time of recording. OFF Data code is not displayed. DATE/TIME Displays the date and time.
EDIT OTHERS (Items for editing) (Items for other settings) See “Using menus” (p. 54) on the operation. See “Using menus” (p. 54) on the operation. The default settings are marked with . DELETE See page 37. PROTECT See page 39. DIVIDE USB CONNECT See page 50. BATTERY INFO You can check the estimated remaining capacity of the battery. See page 40. PHOTO CAPTURE (DCR-SR58E/ SR68E/SR78E/SR88E/SX34E/ SX43E/SX44E/SX53E/SX63E) See page 41. To close the battery information screen Touch .
MANAGE MEDIA (Items for recording media) See “Using menus” (p. 54) on the operation. MEDIA SETTINGS (DCR-SR58E/ SR68E/SR78E/SR88E/SX34E/ SX44E/SX53E/SX63E) See page 18. MEDIA INFO You can check the remaining recordable time for each recording mode of the recording media for movies and the approximate free and used media space of the recording media. To turn off the display Touch .
GENERAL SET (Other setup items) While deleting data, do not apply any vibrations or shocks to your camcorder. Confirm the actual time required to delete data on the LCD screen. If you stop performing [EMPTY] while [Executing…] appears, be sure to complete the operation by performing [MEDIA FORMAT] or [EMPTY] when you use the camcorder next time. REPAIR IMG.DB F. See page 76, 78. See “Using menus” (p. 54) on the operation. The default settings are marked with .
to the camcorder body, the setting becomes [NORMAL] automatically. Tips This adjustment does not affect the recorded images in any way. DISP OUTPUT (Display output) You can set where the screen displays are to be output. LCD PANEL Shows displays such as the time code on the LCD screen. LCD COLOR You can adjust the color of the LCD screen / . by touching Tips This adjustment does not affect the recorded images in any way.
POWER SETTINGS ON The demonstration appears. A.SHUT OFF (Auto shut off ) OFF You can set your camcorder to turn off automatically when you do not operate your camcorder for more than about 5 minutes. The demonstration does not appear. 5min The camcorder turns off automatically. NEVER The camcorder does not turn off automatically. Notes When you connect your camcorder to a wall outlet (wall socket), [A.SHUT OFF] is automatically set to [NEVER].
Additional information Troubleshooting If you run into any problems using your camcorder, follow the steps below. Check the list (p. 72 to 80), and inspect your camcorder. Disconnect the power source, attach the power source again after about 1 minute, and turn the camcorder on. Press RESET (p. 94, 95) using a pointed object, and turn the camcorder on. If you press RESET, all settings, including the clock setting, are reset. Contact your Sony dealer or local authorized Sony service facility.
[SPOT MTR/FCS] METER] [SPOT FOCUS] [EXPOSURE] [FOCUS] [BLT-IN ZOOM MIC] [MICREF LEVEL] [DROP SENSOR] (DCR-SR58E/SR68E/SR78E/SR88E) Backlight The following menu items return to the default settings when you switch between movie recording and photo recording and playback modes. [ FADER] [TELE MACRO] [ SELF-TIMER] [SPOT The CHG (charge) lamp flashes while the battery pack is being charged. The remaining battery time indicator does not indicate the correct time.
The buttons on the touch panel do not work correctly or do not work at all. Adjust the touch panel ([CALIBRATION]) (p. 90). The buttons on the touch panel quickly disappear. Set [DISPLAY SET] to [ON] (p. 70). Dots in lines appear on the LCD screen. This is not a malfunction. These dots are not recorded. Memory card Operations using the memory card cannot be performed. If you use the memory card formatted on a computer, format it again on your camcorder (p. 68).
The camcorder stops operating. The temperature of your camcorder is extremely high. Turn off your camcorder and leave it for a while in a cool place. The temperature of your camcorder is extremely low. Turn off your camcorder and take it to a warm place. Leave the camcorder there for a while, then turn on the camcorder. If you keep applying vibration on the camcorder, recording may stop.
the access lamp is turned off after recording. This may damage your image data and is displayed. A movie cannot be divided. is indicated on an image on the VISUAL INDEX screen. The image data base file may be damaged. Check the data base file by touching (MENU) [Show others] [REPAIR IMG.DB F.] (under [MANAGE MEDIA] category) the recording medium (DCRSR58E/SR68E/SR78E/SR88E/SX34E/SX44E/ SX53E/SX63E). If it still appears, delete the image with (p. 37).
Connecting to a Computer “PMB” cannot be installed. Check the computer environment or installation procedure required to install “PMB.” “PMB” does not work correctly. Quit “PMB” and restart your computer. The camcorder is not recognized by the computer. Disconnect devices from the USB jack of the computer other than the keyboard, mouse, and your camcorder.
(Battery level warning) Slow flashing The battery pack is nearly used up. Depending on the operating environment or battery conditions, may flash, even if there are about 20 minutes remaining. (Warning indicator pertaining to battery pack temperature) The battery pack temperature is high. Change the battery pack or place it in a cool place. (High temperature warning) Slow flashing The temperature of your camcorder is getting higher.
(Warning indicator pertaining to photo recording) The recording media is full. Tips You may hear a melody when some warning indicators appear on the screen. Description of warning messages If messages appear on the screen, follow the instructions. Inconsistencies found in Image Database File. Do you want to repair the Image Database File? The Image Database File is damaged. Do you want to repair the Image Database File? Buffer overflow Recording media Internal memory format error.
Still picture folder is full. Cannot record still pictures. You cannot create folders exceeding 999MSDCF. You cannot create or delete created folders using your camcorder. Format the memory card (p. 68), or delete folders using your computer. This memory card may not be able to record or play movies. Use a memory card recommended for your camcorder (p. 19). This memory card may not be able to record or play images correctly. Use a memory card recommended for your camcorder (p. 19).
Recording time of movies/number of recordable photos Playing time Expected time of recording and playback with each battery pack Approximate time available when you use a fully charged battery pack.
moving and complex images are recorded at a higher bit-rate, and this reduces the overall recording time.
VGA(0.3M) 4GB 8GB 16GB 32GB 23000 47000 95000 185000 The indicated number of recordable photos on a memory card is based on the maximum image size of your camcorder. The actual number of recordable photos is displayed on the LCD screen during recording (p. 93). The maximum number of recordable photos on a memory card may vary depending on the recording conditions. Tips You can also use memory card with a capacity of under 512 MB for recording photos.
Using your camcorder abroad Power supply You can use your camcorder in any countries/regions using the AC Adaptor supplied with your camcorder within the AC 100 V to 240 V, 50 Hz/60 Hz range. On TV color systems Your camcorder is a PAL-system-based camcorder. If you want to view the playback image on a TV, it must be a PAL-systembased TV with an AUDIO/VIDEO input jack.
Setting to the local time You can easily set the clock to the local time by setting a time difference when using your (MENU) [Show others] [CLOCK/ LANG] (under camcorder abroad. Touch [GENERAL SET] category) [AREA SET] and [SUMMERTIME] (p. 70).
Maintenance and precautions About the memory card Memory card formatted by a computer (Windows OS/Mac OS) does not have guaranteed compatibility with your camcorder. Data read/write speed may vary depending on the combination of the memory card and memory card compliant product you use.
This product cannot record or play data that uses “MagicGate” technology. “MagicGate” is a copyright protection technology that records and transfers the contents in an encrypted format. This product is compatible with “Memory Stick Micro” media (“M2”). “M2” is the abbreviation for the “Memory Stick Micro” media. Notes on using the “Memory Stick Micro” media To use “Memory Stick Micro” media with your camcorder, you need a Duo-sized M2 adaptor.
About the remaining battery time indicator When the power goes off even though the remaining battery time indicator indicates that the battery pack has enough power to operate, charge the battery pack fully again. Remaining battery time will be indicated correctly. Note, however, that the battery indication will not be restored if it is used in high temperatures for a long time, or if left in a fully charged state, or when the battery pack is frequently used.
Avoid rough handling, disassembling, modifying, physical shock, or impact such as hammering, dropping or stepping on the product. Be particularly careful of the lens. Keep the LCD screen closed when you are not using your camcorder. Do not wrap your camcorder with a towel, for example, and operate it. Doing so might cause heat to build up inside. When disconnecting the power cord (mains lead), pull it by the plug and not the cord.
On adjustment of the touch panel (CALIBRATION) The buttons on the touch panel may not work correctly. If this happens, follow the procedure below. It is recommended that you connect your camcorder to the wall outlet (wall socket) using the supplied AC Adaptor during the operation. (MENU) [Show others] [GENERAL [OTHER SETTINGS] (under SET] category) [CALIBRATION].
Note on disposal/transfer (DCR-SR58E/SR68E/SR78E/SR88E/ SX34E/SX44E/SX53E/SX63E) Even if you perform [ DELETE ALL], [ DELETE ALL] or [MEDIA FORMAT] (p. 68) or formatting the media of the camcorder, you may not delete data from the media completely. When you transfer the camcorder, it is recommended that you perform [EMPTY] (p. 68) to prevent the recovery of your data. Also, when you dispose of the camcorder, it is recommended that you destroy the actual body of the camcorder.
Notes on the License ANY USE OF THIS PRODUCT OTHER THAN CONSUMER PERSONAL USE IN ANY MANNER THAT COMPLIES WITH THE MPEG-2 STANDARD FOR ENCODING VIDEO INFORMATION FOR PACKAGED MEDIA IS EXPRESSLY PROHIBITED WITHOUT A LICENSE UNDER APPLICABLE PATENTS IN THE MPEG-2 PATENT PORTFOLIO, WHICH LICENSE IS AVAILABLE FROM MPEG LA, L.L.C., 250 STEELE STREET, SUITE 300, DENVER, COLORADO 80206.
Quick reference Screen indicators Upper left Center Upper right Indicator Meaning FADER (59) Drop sensor off (71) 9999 9999 9999 Bottom Upper left Indicator Meaning 100/112 MENU button (54) Self-timer recording (65) MICREF LEVEL low (64) WIDE SELECT (64) Bottom Indicator BLT-IN ZOOM MIC (64) 60 min Remaining battery Recording folder of memory card VIDEO LIGHT (27) Meaning Recording status (23) Photo size (65) Slide show set (33) Warning (77) Playback mode (29) OPTION button (56) VIE
Parts and controls Figures in ( ) are reference pages. DCR-SR58E/SR68E/SR78E/SR88E LCD screen/Touch panel (27, 54) If you rotate the LCD panel 180 degrees, you can close the LCD panel with the LCD screen facing out. This is convenient during playback operations.
DCR-SX33E/SX34E/SX43E/SX44E/ SX53E/SX63E DCR-SR58E/SR68E/SR78E/SR88E (VIEW IMAGES) button (28) (DISC BURN) button (see Operating Guide) POWER button (16) RESET button Press RESET using a pointed object. Press RESET to initialize all the settings including the clock setting. (Backlight) button (27) MODE button (22) (movie)/ (photo) lamp (22) LIGHT button (27) Press to light up the LIGHT.
DCR-SX33E/SX34E/SX43E/SX44E/ SX53E/SX63E Power zoom lever (26, 32) PHOTO button (25) Battery pack (12) CHG (charge) lamp (12) START/STOP button (23) Grip belt (21) DC IN jack (12) Memory card slot (19) BATT (battery) release lever (14) A/V Remote Connector (34) Tripod receptacle Attach a tripod (sold separately) to the tripod receptacle using a tripod screw (sold separately: the length of the screw must be less than 5.5 mm (7/32 in.)).
Index Symbols 16:9................................................35 4:3..................................................35 A A.SHUT OFF...............................71 A/V connecting cable...........34, 52 Abroad..........................................84 Altitude...........................................5 AREA SET....................................70 AUDIO REC SET........................64 AUTO SLW SHUTTR................63 B Backlight.......................................27 BATTERY INFO..........
PLAYBACK SET..........................66 Playlist...........................................44 PLAYLIST EDIT..........................67 PORTRAIT...................................59 Power on.......................................16 POWER ON BY LCD.................71 POWER SETTINGS...................71 Precautions...................................86 PROTECT....................................39 R Rec & zoom buttons on LCD.....23 REC MODE..................................26 Recording.......................
Additional information on this product and answers to frequently asked questions can be found at our Customer Support Website. http://www.sony.