Digital Video Camera Recorder IL_ Operating Instructions Before operating the unit, please and retain it for future reference. Owner's The model read this manual 5elia/ thoroughly, Record and serial numbers are located serial number in the space provided whenever you call upon }our Sony Mode[ Casset{e No DCR-TRV on Model No. the bottom. Record the belm_. Refer to these numbers dealer regarding this product. _iial No ACNo.
Welcome Congratulations Handycam, Handycam on your purchase ! of this SOny Digital Handycam camcorder. With your Digital you can capture life's precious moments with superior picture and sound quality. Your Digital is loaded with advanced features, but at the same time it is very easy to use. You wiLl soon be producing home videothatyou can enjoy foryears to come. For customers CAUTION :To prevent fire or shock hazard, do not expose the unit to rain or ,moisture. in the U.S.A.
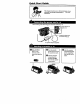
Table of contents Quick Start Guide .................................. 4 Getting started Using this manual ...................................6 Checking supplied accessories .............. 8 Step 1 Preparing the power supply ..... 9 Installing the battery pack .............. 9 Charging the battery pack ............. 10 Connecting to a wall outlet ........... 13 St_ 2 Inserting a cassette ................... 14 Making your own titles ........................ 68 Labeling a cassette .......................
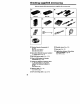
Quick Start Guide This chapter introduces you to the basic features of your camcorder. See the page in parentheses "( )" for more information. Use the battery pack when using.your eamcorder outdoors (p. 9). Open the DC IN jack cover. Connect the plug with its • mark facing up. AC power adaptor (supplied) [ O EJECTin the Slide --_OPEN/ direction of the arrow and open the lid. O Push the middle portion of the back of the cassette to insert. A Close the cassette compartment by .
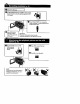
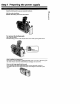
O Remove the lens cap. } 0 Set the POWER switch to CAMERA while pres_x_ the small green buttor_The picture appears on the LCD screen. O Press START/STOP. Your camcorder starts recording. To stop recording, START/STOP again. O direction of the • mark. OPEN Then, open Slide in the the LCD panel. Viewfinder O Set the POWER switch to VTR When the LCD panel is dosed, use the viewfinder placing your eye against its eyecup. O while pressing the small green button.
Getting started- Ising this manual The instructio_as in thismanual are forthetwo models listed inthetablebelow. Before you startreadingthismanual and operatingyour camcorder,check themodel number by lookingatthebottom of your camcorder.The DCR-TRV10 isthemodel used for illustration purposes.Otherwise,the model name isindicatedintheiUuslzations. Any differences inoperationareclearly indicatedinthetext, forexample,"DCR-TRV10 only.
Using this manual IN I I TV color systems differ from country need an _ system-based IV. to country. To view your recordings on a TV,you 1 Telavision programs, fdms, video tapes, and other materials may be copyrighted. Unauthorized recording of such materials may be contrary to the provision of the copyright laws. o. • The LCO screen and/or the color viewfinder are manufactured using highprecision technology.
Checking supplied accessories Make surethatthefollowingaccessories aresuppliedwith your c.arncorder. [] [] RMT-811 RMT-808 [] [] [] [] [] [] [] Wireless Remote Commander (1) (p. 132) RMT-811:DCR-TRV10 RMT-808:DCR-TRV8 [] AC-L10A/L10B/L10C AC power adaptor (I), Power cord (I) (p. 10) [] NP-FM50 battery pack (1) (p, 9, 10) [] Size AA (R6) battery for Remote Commander (2) (p. 132).
Step 1 Preparing the power supply Install the battery pack to use your camcorder outdoors. I (1) Lift up the viewfinder. (2) Slide the battery pack down until it clicks, To remove the battery pack Lift up the viewfinder. Slide the battery pack out in the direction of the arrow while pressing BA_ down. After installing the battery pack Do not carry your camcorder by holding the battery pack. If you do so, the battery pack may slide off your camcorder unintentionally, damaging your camcorder.
Step 1 Preparing the power supply I Use the battery pack after charging it for your camcorder. Your camcorder operates oray with me "InfoL1THIUM" battery "InfoLITHIUM" pack (M series), is a trademark of Sony Corporation. (1) Open the DC IN jack cover and connect the AC power adaptor supplied with your camcorder to the DC IN jack with the plug's • mark facing up. {2) Connect the power cord to the AC power adaptor. (3) Connect the power cord to a wall outlet. (4) Set the POWER switch to OFF.
Step 1 Preparing the power supply Note Prevent metallic objects from coming into contact with the metal parts of the DC plug of the AC power adaptor. This may cause a short-circuit, damaging the AC power adaptor. Remaining battery time indicator The remaining battery time indicator in the display window recording time. roughly indicates the Until your camcorder calculates the actual remaining battery time "- -- rain" appears in the display window.
Preparing the power supply Playing time _.
Step I Preparing the power supply When you use your camcorder for a long time, we recommend that you power it from a wall outlet using the AC power adaptor. (1) Open the DC IN jack cover, pulling the cover out a little and rotating it, Connect the AC power adaptor to the DC IN jack on your camcorder pl,ug's • mark facing up. (2) Cormect the power cord to the AC power (3) Connect the power with the _. ,u adaptor. cord to a wall outlet.
Step 2 Inserting a cassette (1) Slide --_OPEN/EJECT in the direction of the arrow and open the lid. The cassette compartment automatically lifts up and opens. (2) I_sh the middle portion of the back of the cassette to insert. Insert the cassette in a straight line deeply into the cassette compartment with the window facing out. (3) Close the cassette compartment by pressing the _ mark on the cassette compartment. The cassette compartment automatically goes down.
Recording - Basics -- ,ecording a picture Your camcorder automatically focuses for you. (1) Remove the lens cap by pressing both knobs on its sides and attatch the lens cap to the grip strap. (2) Install the power source and insert a cassette. See "Step 1" and "Step 2" for more information (p. 9 to p, 14). (3} Set the POWER switch to CAMERA while pressing the small green button. Your camcorder is set to the standby mode. (4) Slide OPEN in the direction of the I_ mark. Then, open the LCD panel.
Recording I a picture IIIIIIIII IIIII I Note Fasten the grip strap firmly. Do not touch the built-in microphone during recording. Note on Recording mode Your camcorder records and plays back in the SP (standard play) mode and in the LP (long play) mode. Select SP or LP in the MENU settings. In the LP mode, you can record 1.5 times as long as in the SP mode. When you record a tape in the LPmode on your camcorder, we recommend playing the tape on your camcorder.
lecording mlilMJBi a picture rig IIiE mmm_] To adjust BRIGHT. the brightness of the LCD screen, press either of the two buttons on LCD The LCD panel moves about 90 degrees the lens side. to the viewfinder side and about 180 degrees to m If you turn the LCD panel over so that it faces the other way, the Q indicator appears in the viewfinder and on the LCD sc_en (Mirror mode). g I W to dim to brighten When closing the LCD panel, set it vertically camcorder body.
Recording a picture If you record pictures with the LCD panel closed, check the picture with the viewfindel Adjust the viewfinder lens to your eyesight so that the indicators in the viewfinder come into sharp focus. Lift up the viewfinder and move the viewfinder lens adjust_nent lever.
Recording a picture Move the power zoom lever a tittle for a slower zoom. Move it further for a faster zoom. Using thezoom functionsparinglyresultsinbetter-looking recordings, "T" side: for _elephoto (subject appears closer) "W" side: for wide-angle (subject appears farther away) amamam ! I m Zoom greater thaia 10x is performed digitally, if you set D ZOOM to ON in the MENU settings. The digital zoom function is set to OFF at the factory. (p. 72) The right side ofthe bar shows __._._.__.
Recording a picture _.: Recording startswhen you pressSTART/STOP, and stopswhen you pi_ssit again (factory setting). ANTI GROUND SHOOTING .L: Your camcorder reoordsonly whileyou pressSTART/STOP. Use thismode to avoid recordingunnecessa_ scenes. 5SEC: When you pressuse thismode toSTART/STOP, your camcorder recordsfor5 seconds and then stopsautomatically.
Recording a picture When you shoota subjectwith thelightsou_'ebehind thesub_'t or a sub_ct with a light background, use the backlight function. Press BACK UGHT in the recording or standby mode. The [] indicator appears in the viewfmder or on the LCD screen. To cancel, press BACK LIGHT again+ m ! D. 5' I m. BACK UGHT If you press EXPOSURE when shooting backlit subjects The backlight function will be canceled.
Recording a picture IIIIIII Using +SLOW SHTR The NightShot +Slow shutter mode makes subject_ more than four times brighter than those recorded in the NightShot mode. (1) Slide NIGHTSHOT to ON in the standby or recording mode. _ indicator appears. (2) Press +SLOW SHTR until the desired NIGHTSHOT indicator flashes. The indicator changes as follows: (NIGHTSHOT) --* _1 (NIGHTSHOT1) -_ _2 (NIGHTSHOT2) _ (NIGHTSHOT) To cancel the NightShot +Slow shutter mode, slide NIGH'I_HOT to OFF.
Recording a picture Emm/ You can make a recording with the self-timer. This mode is useful when you want to record yourself. (1) Press SELFrIMER in the standby mode. The _ (self-timer) indicator appears on the LCD screen or in the viewfinder. (2) Press START/STOP. Self-timer starts counting down from 10 with a beep sound. In the last two seconds of the countdown, the beep _und gets faster, then recording starts automatically. SELFTIMER To stop the self-timer during recording Press START/STOP.
Checking the recording - END SEARCH I EDITSEARCH I Rec Review You can use these buttons to check the recorded picture or shoot so that the transition between the last recorded scene and the next scene you record is smooth. You can go to the end of the recorded section after you record. Press END SEARCH in the standby mode. The last 5 seconds of the recorded section are played back and playback monitor the sound from the speaker or headphones. You can search for the next recording stops.
Playback - Basics -- 'laying back a tape You can monitor the playback picture on the LCD screen. If you close the LCD panel, you can monitor the playback picture in the viewfinder. You can control playback using the Remote Commander supplied with your camcorder. (1) Install the power source and insert the recorded tape. (2) Set the POWER switch to VTR while pressing the small green button. The video control buttons light up. (3) Slide OPEN. Then, open the LCD panel. (4) Press "4"4to rewind the tape.
Playing back a tape Press DISPLAY on your camcorder or the Remote Commander supplied with your camcorder. The indicators appear on the LCD screen. To make the indicators disappear, press DISPLAY again. DISPLAY Using the data code function Your camcorder automatically records not only images on the tape but also the recording data (date/time or various settings when recorded) (Data code). You can only operate with the Remote Commander. Press DATA CODE on the Remote Commander in the playback mode.
'laying back a tape B mPJ_ _Jm To operate control buttons, set the POWER switch to VTR. To view a still picture (playback pause) Press II during playback. To resume playback,press II or I_. To advance the tape Press I_ in the stop mode. To resume normal playback, m press _'. To rewind the tape Press 491 in the stop mode. To change Press _ To resume normalplayback, the playback press I_. D" Ig- direction on the Remote Commander I during playback to reverse the playback direction.
ew, "n g the recording I on TV IIIIIIIII Connect your camcorder to your TV or VCR with the A/V connecting cable supplied with your camcorder to watch the playback picture on the TV screen. You can operate the playback control buttons in the same way as when you monitor playback pictures on the LCD screen. When monitoring the playback picture on the TV screen, we recommend that you power your camcorder from a wall outlet using the AC power adaptor (,p. 13).
Viewing the recording imlRlmJmmu on TV lmm a Once you conned the AV cordless IR receiver (not supplied) to your "IV or VCR, you can easily view the picture on your TV. For details, refer to the operating instructions of theav cordlessIRreceiver. LASER UNK ll Ca ¢r I LASER (1) After connecting your TV and AV cordless IR receiver, set the POWER switch on the AV cordless IR receiver to ON. (2) Turn the TV on and set the TV/VCR selector on the TV to VCR. (3) Press LASER LINK.
Advanced Photo Recording Operations -- recording You can record a still picture like a photograph. This mode is useful when you want to record a picture such as a photograph or when you print a picture using a video printer (not supplied). You can record about 510 pictures in the SP mode and about 765 pictures in the LP mode on a 60-minute tape. Besides the operatio_ndescribed here, your camcorder can record still pictures on Memory Sticks (p. 85) (DCR-TRV10only). (1) Set the POWER switch to CAMERA.
Photo recording To use the photo recording function using the Remote Commander Press PHOTO on the Remote Commander. Your camcorder records a picture on the LCD screen or m the viewfmder immediately. To use the photo recording function during normal CAMERA recording Press PHOTO deeper. The still picture is then x_orded for about seven seconds and your camcorder returns to the standby mode. You cannot select another sHIIpicture.
Using the wide mode You can record a 16:9 wide picture to watch on the 16"9wide-screan TV (16:9WIDE). Black bands appear on the screen during recording in 16:gWIDE mode [al. The picture during playing back on a normal TV [b] or a wide -screen TV [c] are compressed in the widthwise direction. If you set the screen mode of the wide-screen TV to the full mode, you can watch pictures of normal images [d]. [al In the standby mode, set 16:9W/DE to ON in the MENU settings (p. 72).
Jsing the fader function You can fade in or out to give your recording a professional [a) _,,1I appearance. .u u,a_ • FADER i M.FADER (mosaic) 2. o a. h. BOUNCE * (Fade in only) o O OVERLAP (Fade in only) (b) "dl ,b..r il_. MONOTONE When fading in, the picture gradually changes from black-and-white to color. When fading out the picture gradually changes from color to black-and-white. * You cannot use this f_nction when D ZOOM is set to ON in the MENU settings.
Using the fader function I (1) When fading in [a] In the standby mode, press FADER until the desired fader indicator flashes. When fading out [b] In the recording mode, press FADER until the desired fader indicator flashes. The indicator changes FADER ---* M.FADER no indicator The last selected fader mode (2) Press START/STOP. To cancel the fader After the fade in/out normal mode. as follows: --* BOUNCE ---* MONOTONE is indicated The fader indicator ---* OVERLAP --_ first of all.
Using the fader function Note You cannot use the following functions while using the fader [unction. use the fader function while using the following functions. - Digital effect - Low lux mode of PROGRAM AE (Overlap function only) - NightShot +Slow shutter - Photo recording Also, you cannot When the OVERLAP indicator appears Your eamcorder automatically stores the image recorded on a tape. As the image is being stored, the OVERLAP indicator flashes fast, and the playback picture ts displayed.
Using special effects - Picture effect You can digitally process images to obtain special effects like those in films or on the TV. NEG. ART [a] : The SEPIA : The B&W : The SOLARIZE [b] : The SUM [c] : The STRETCH [d] : The [a] color and brightness of the picture is reversed. picture is sepia. picture is monochrome (black-and-white). light intensity is clearer, and the picture looks like an illustration. picture expands vertically. picture expands horizontally.
lsing special effects - Picture effect While using the picture effect function You cannot select the old movie mode with DIGITAL EFFECT. When you tum the power off Your camcorder automatically returns to the normal mode, If you select the picture effect mode in the recording mode Pictures processed by the picture effect function will be recorded. When the POWER switch is set to VTR The SLIM, STRETCH, PASTEL and MOSAIC indicators settings. m do not appear in the MENU o.
Using special effects - Digital You can add special effects to recorded pictures sound is recorded normally. effect using the various digital functions. The STILL You can record a still picture so that it is superimposed orta moving picture. FLASH(FLASHMOTION) You can record still pictures successively at constant intervals. LUMI. (LUMINANCEKEY) You can swap a brighter area in a still picture with a moving picture. TRAIL You can record the picture so that an incidental image like a trail is left.
ing special effects - Digital effect (1) While your camcorder is in the standby or recording mode, press DIGITAL EFFECt. The digital effect indicator appears. (2) Turn the SEL/PUSH EXECdial to select the desired digital effect mode. The indicator changes as follows: STILL _ FLASH _ LUMI. _ TRAIL _ SLOW SHTR _ OLD MOVIE (3) Press the SEL/PUSH EXEC dial. The indicator lights up and the bars appear. In the STILL and LUMI, modes, the still picture is stored in memory.
Using special effects - Digital effect II Notes • The following functions do not work during digital effect:. - Fader - Low lux mode of PROGRAM AE - Photo _o_ - NightShot +Slow shutter * The followingfunctiondoes not work in theslow shuttermode: - PROGRAM AE •The followingfunctionsdo not work intheold movie mode: - Wide mode - Pictureeffect - PROGRAM AE When you turn the power off The digital effect will be automaticall_ canceled. When recording in the slow shutter mode Auto focus may not be effective.
,djusting the white balance manually You can manuaUy adjust and set the white balance. This adjustment makes white subjects look white and allows motx natural color balance. Normally white balance automatically adjusted. In the standby The selected or recording white balance mode, select the desired indicator white balance is mode in the MENU appears.
Using the PROGRAM AE function You can select PROGRAM AE (Auto Exposure) mode to suit your specific shooting requirements. • Spotlight mode This mode prevents people's faces, for example, from appearing excessively white when shooting subjects lit by strong light at weddings or in the theater. Soft portrait mode This mode brings out the subject while creating a soft background for subjects such as people or flowers, and faithfully reproduces skin color.
ing the PROGRAM AE function (1) Press PROGRAM AE in the standby mode. The PROGRAM AE indicator appears. (2) Turn the SEL/PUSH EXEC dial to select the desired PROGRAM AE mode. The indicator changes as follows: I- 1 m o. @ D. 2 O 5" O "D O To turn the PROGRAM AE function Press PROGRAM off AE. Notes • In the spotlight, sports lesson and beach & ski modes, you cannot take close-ups. This is because your camcorder is set to focus only on subjects in the middle to far distance.
Adjusting the exposure manually You can manually adjust and set the exposure. Adjust the exposure following cases: • The subject is bacldit • Bright subject and dark background • To record dark pictures (e,g. night scenes) faithfully (1) Press EXPOSURE in the standby The exposure indicator appears. (2) Turn the SEL/PUSH or recording manually in the mode, EXEC dial to adjust the brightness. 1 2 To return to the automatic Press EXPOSURE again.
Focusing manually You can gain better results by manually adjusting the focus in the foltowing cases: • The autofocus mode is not effective when shooting - subjects through glass coated with water droplets - horizontal stripes - subjects with little contrast with backgrounds such as walls and sky • When you want to change the focus from a subject in the foreground to a subject in the background Jr'Shooting a stationary subject when using a tripod B gt 8 (1) Set FOCUS to MANUAL in the standby or recordi
Advanced Playback Playing Operations back a tape with picture effects During playback, you can process a scene using the picture effect functions: SOLARIZE, SEPIA and B&W. During playback, select the desired picture effect mode in the MENU settings For details o[ each picture effect function, see page 36, NEG.ART, (p, 72). MENU To cancel the picture effect function Set P EFFECTto OFF in the MENU settings. Notes • You cannot process externaLly input scenes using the picture effect function.
Playing back a tape with digital effects During playback, you can process a scene using the digital effect functions: STILL, FLASI-LLUML _aKiTRAIL (1) During playback, press DIGITAL EFFECT and turn the SEL/PUSH EXEC dial until the desired digital effect indicator (STILL, FLASH, LUMI. or TRAIL) flashes. (2) Press the SEL/PUSH EXECdial. The digital effect indicator lights up and the bars appear. In the STILL or LUMI.
Quickly locating a scene using the zero set memory function Your camcorder goes forward or backward to automatically stop at a desired scene having a tape counter value of "0:00:00". You can do this with the Remote Commander. Use this function, forexample, to view a desired scene later on during playback. (1) In the playback mode, press DISPLAY. (2) Press ZERO SET MEMORY at the poInt you want to locate later. The tape counter shows "0:00:00" and the ZERO SET MEMORY indicator flashes.
. arching a recording Date search by date You can automatically search for the l_int where the recording date dxartb_s and start playback from that point (Date search). Use a tape with cassette memory for cot_v_tience, You can do this with the Remote Commander. Use this function to check where recording dates change or to edit the tape at each recording date. • You can use this function only when playing back a tapewith (1) Set the POWER (2) Set CM SEARCH ON.
Searching a recording by date IIIIIIIIII IIII (1) Setthe POWER switch to VTR. (2) Set CM SEARCH in IB to OFF in the MENU settings(p. 72). (3) Press SEARCH MODE repeatedly, until the date search indicator appea_ The indicator changes as follows: DATE SEARCH --_ PHOTO SEARCH ---*PHOTO SCAN _ no indicator (4) Press _ to search for the previous date or press _ to"search for the r date. Your camcorder automatically starts playback at the point where tit changes.
Searching the boundaries of recorded tape by title - Title search If you use a tape with cassette memory, you can search for the boundaries of recorded tape by title (Title search). Use the Remote Commander for this operation. (1) Set the POWER switch to VTR. (2) Set CM SEARCH in lm to ON in the MENU settings (p. 72). Factory setting is ON. (3) Press SEARCH MODE repeatedly, until the title search indicator appears. (4) Press _ or _ to select the title for playb_k.
Searching Photo for a photo - Photo search/ scan You can searchfora still pictureyou have recordedon a mini DV tape(photo searth). You can alsosearchforstill pictures one afteranotherand displayeach pictureforfive secondsautomatically regardless ofcassette memory (photo scan).Use theRemote Commander for these operations. Use this function to check or edit still pictures. You can use thisfunctiononly when playingback a tapewith cassette memory (p.109). (1) Set the POWER (2)Set CM ON.
Searching (1) (2) (3) (4) for a photo - Photo search/Photo scan Set the POWER switch to VTR. Set CM SEARCH in a to OFF in the MENU settings (p. 72). Press SEARCH MODE repeatedly, until the photo search indicator appears. Press _ or _ to select the photo for playback. Each time you press _ or I_l_l, your camcorder searches for the previous or next photo. Your camcorder automatically starts playback of the photo. To stop PressII. searching m R (1) Set the POWER switch to VTR.
-- Editing -- Dubbing a tape Using the AN connecting cable Connect your camcorder to the VCR using the A/V connecting your camcorder. Set the input selector on the VCR to LINE, if available, cable supplied with (1) Insert a blank tape (or a tape you want to _°cord over) into the VCR, and insert the recorded tape into your camcorder. (2) Set the POWER switch to VTR. (3) Play back the recorded tape on your camcorder. (4) Start recording on the VCR. AUDIO/VIDEO IVCR ,_a,..
Dubbing a tape Using the i.LINK cable (DV connecting cable) Simply connect the VMC-IL4435/2DV/4D.V i.[JNK cable (DV connecting cable) (not supplied) to [ DV IN/OUT and to DV [N/OUT of the DV products. With digital-todigital connecl_on, video and audio signals are transmitted in digital form for highquality editing. You cannot dub the litles, display indicators or the contents of cassette meIllory.
Dubbing a tape Using the i.LINK cable (DV connecting cable) Simply connect the VMC-IL4435/2DV/4DV i.LINK cable (DV connecting cable) (not supplied) to _ DV IN/OUT and to DV IN/OUT of the DV products. With digltal-todigital connection, video and audio signals are transmitted in digital form forhighquality editing. You cannot dub the titles, display indicators or the contents of cassette memory.
- DV synchro-editing (DCR-TRV10 only) By simply selecting the scenes to edit, you can duplicate the desired portion on a tape, using other equipment connected with an i.LllqK cable (DV connecting cable). The scenes can be selected by frame. Since your camcorder exchanges digital signals, you can edit with little audio and video deterioration. You cannot duplicate titles, display indicators, or the contents of cassette memory. The connection is the same as on page 55.
Editing partially on a DV tape - DV synchro-editing (DCR-TRV10 only) 9 I "_' BEEP _ COMMANOER READY 8,10 b.O :25 : 20 : 06 • d Notes * If you use other than Sony equipment synchro-editing. • If a tape has a blank portion between work correctly. with the [ DV jack, you cannot perform recorded portions, DV synchro-edifing DV may not Errors in duplicating If you connect your camcorder to Sony'e_lulpment with DV iack, the range of errors is within +/- 5 flames.
Recording video or "iV programs You can record a tape from another VCR or a TV program from a TV that has video/ audio outputs. Use your camcorder as a recorder. Turn down the volume of your camcorder. Otherwise, the picture may be distorted. (1) Insert a blank tape (or a tape you want to record over) into your camcorder. you are recording a tape from the VCR, insert a recorded (2) Set the POWER switch to VTR. If tape into the VCR. (3) Set DISPLAY to LCD in the MENU settings (p. 72).
Inserting a scene from a VCR You can insert a new scene from a VCR onto your originelly recorded specifying the insert start and end points. Use the Remote Commander operation. Connections are the same as on page 54 or 55. Insert a cassette containing the desired scene to insert into the VCR.
Inserting a scene from a VCR (1)Set the POWER switch to VTR. (Z)On the VCR, locate just before the insert start point [a], then press II to set the VCR to the playback pause mode. (3)On your camcorder, locate the insert end point It] by pressing press II to set it to the playback pause mode. _ or #'_'. Then (4)Press ZERO SET MEMORY on the Remote Commander. The ZERO SET MEMORY indicator flashes and the end point of the insert is stored in memory.
Audio dubbing You can record an audio sound to add to the original sound on a tape by connecting audio equipment or a microphone. If you connect the audio equipment, you can add sound to your recorded tape by specifying starting and ending points. The original sound will not be erased. Use the Remote Commander for this operation. U MIC (PLUG IN POWER) :Signal flow You can check the recorded to a TV. The recorded headphones.
Audio dubbing Audio equipment I I [ AUDIOL AUDIO/ VIDEO . _/V connecting UNEOUT l [_ _u_JJ; [_ _ AUDIOR cable Do not connect the video : Signal flow (yellow) plug. Note The picture is not output from the AUDIO/VIDEO jack. Check the recorded picture on the LCD screen or in the viewfinder, as well as check the recorded sound by using a speaker or headphones. No connection is necessary.
Audio dubbing Adding an audio sound on a recorded tape (1) Inert your recorded tape into your camcorder. (2) Set the POWER switch of your cameorder to VTR. (3) Locate the recording start point by pressing liP-. Then press |1 at the point where you want to start recording to set your camcorder to playback pause n_oc[e. (4) Press AUDIO DUB on the Remote Commander. (5) Press I| on the Remote Commander and at the same time start playing back the audio you want to record.
Audio dubbing Notes * New sound cannot t_" recorded 44.1 kl tz or 48 kHz) (p. 76). on a tape already recoMed in the 16 bit m_Kte (32 kl t • When an external microphone is not connected, the recording will be made the built-in microphone of your camcorder. • New _}und cannot be recorded on a tape already recorded in the LP mode. • You cannot add audio with the _ DV IN/OUT jack.
Superimposing a title it 3'ou use a tape with ca_':_'tte memory° you cax'Lsut_erm_po_, the title v,'hile recording or ,_fter ro:ording. Whcn you play back fl_e tape, the title is displayed for five s_;onds from die point where you superimposed it. Yott ,,:ar_select ot_e of eight the cok_r, size and position preset titles of titles,;, and tv,'o custom tide,_ _,p. I+,8), You caz'| ,dso se]ec (1) Press TITLE to display the title'menu. (2) Turn the SEL/PUSH EXEC dial to select 12_,then press the dial.
Superimposing a title TITLE If you You use a cassette cannot portion set to prevent superimpose accidental or erase the title. erasure Slide the write-protect tab so that the red is not visible. To use the custom title If you want to use the custom title, select [t3 in step 2. If you have not made any custom title," ..." appears on the display.
Superimposing a title (1) Set the POWER switch to VTR. (2) Press MENU to display the menu. (3) Turn the SEL/PUSH EXEC dial to select r_ then press the dial. (4) Turn the SEL/PUSH EXEC dial to select TITLEERASE, Title erase display appears. (5) Turn the SEL/PUSH the dial. EXEC dial to select then press the title you want the dial. to erase, then press "ERASE OK ?" indicator appears.
Making B your own titles ou have can make to two titles and store them in the cassette can up to up 20 characters. (1) Press TITLE in the standby (2) Turn (3) Turn the SEL/PUSH the SEL/PUSH (6) Repeat title. (8) Press 1 EXEC dial to select steps 4 and 5 until you have (7) To finish making [SET], then press Each title or VTR mlle. EXEC dial to select EXEC dial to select line (CUSTOM2), then press the dial. (4) Turn the SEL/PUSH EXEC dial to select then press the dial, (5) Turn the SEL/PUSH dial.
Making your own titles I II To change e title you have stored In step 3, select CUSTOM1 or CUSTOM2, depending on which title you wL._tto change. then press the SEL/PUSH EXECdial. Turn the SEL/PUSH EXECdial to select [("],then press the dial to delete the title. The last character is erased. Enter the new title as desired. ff you take S minutes or longer to enter characters in the standby mode while a cassette is in your camcorder The power automatically goes off.
Labeling a cassette If you use a tape with ca_,ette n_emo_,, you can label a cassette, The label can consist of up to 10 characters and is stored in cass, ette memory. When you in,_,rt the labeled cassette and turn the power on, the label is displayed on the LCD screen, in the viewfinder, or on the TV screen. (1) Insert the cassette you want to label. (2) Set the POWER switch to VTR.
Labeling a cassette IIII I To erase a character In step 6 turn the SEL/PUSH character is erased. EXEC dial to select 1(-], then press the dial To change the label you have made [rtsert the cassette t___ change the label, and operate The last in the same way to make a new label. If you use a cassette set to prevent accidental erasure You cannot label it. Slide the write-protect tab_ that the red portion If the _.. mark appears in step 5 The cassette memory is full.
-- Customizing Your Changing Camcorder- the MENU settings To change the rmKte settings in the MENU _,ttings, select the menu items with the SEL/PUSH EXEC dial. The factory settings can be partially changed. Fi_t, select lhe icon, then the menu item and then the nrtKte. {1) In the standby or VTR mode, the desired icon, then press the dial to (3) Turn the SEL/PUSH set. EXEC dial to select the desired item, then press the dial to (4) Turn the SEL/PUSH to set.
Changing the MENU settings To make the MENU display disappear PrL_s MENU, Menu items are displayed as the following MANUALSET [] CAMERA SET VTR SET LCD/VF a icons: SET MEMORY SET (DCR-TRV10 CM SET TAPE SET only) SETUP MENU OTHERS Selecting the mode setting Menu items differ depending kon/item Mode of each item on the position • isthefactoryseeLng. ot the POWER switch.
Changing the MENU settings POWER Icon/item Mode Meaning D • OFF Not ON To record 3 or 4 pictures To record 9 picutures CONTINUOUS (DCR-TRVI0 only) MULTI QUALITY (DCR-TRV10 only) • SCRN continuously MEMC)RY cotltinuoush, continuously (p. 80) (p. 8(_) FINE To record still pictures in the fine image mode, using the Memory Stick STANDARD To rc, cord quality FLD./FRAME switch to ,t'cord • FIELD still pictures mode, in the standard us!.
Changing the MENU settings i| POWER switch Icon/item Mode Meaning I_1 REC MODE • SP To record in the SP(Standard Play) mode VTR To inrease the retarding time to 1,5 times tile SP mode CAMER/ To record in the 12-bit mode (two stereo sounds) VTR CAMERi LP AUDIO MODE @ 1281'1" 16BIT REMAIN To record in the 16-bit mode (the one stereo sound with high quality) • AUTO To display the remaining tape bar: • for about 8 seconds after your camcorder is turned on and calculates the remaining amount
Changing the MENU settings POWER Icon/item Mode CLOCK SET AUTO TV ON Meaning switch To reset the date @ OFF ON "IV INPUT • VIDEO1 VIDEO2 VIDEO3 LTR SIZE • NORMAL or time (p. 78) CAMERA MEMORY -- VTR To automatically turn on the Sony TV whe_l using the laser link function CAMERA To switch the video input on a Sony TV when using the la,_-r link ht_ction (p.
Resetting the date and time The clock is set to East Coast Standard Time at the factory. If you do not use your camcorder for about a half year, the date and time settings may be released (bars may appear) because the vanadi{tm-lithium battery installed in your camcorder will have been discharged. First, set the year, then the month, the day, the hour and then the minute. (1) While your camcorder is in the stat'_dby mode, press MENU to display the MENU settings.
-- Memory Using _tICK operations -- a Memory - DCR-TRVIO Stick-introduction only You can record and play back still images on a Memory Stick sttpplied with your camcorder. You can easily play back, re-record or delete still images. You can also record images from a mini DV tape on a Memory Stick or vice versa. You can exchange image data with other equipment such as a personal computer etc.
Using a Memory Stick-introduction III Notes • Prevent metallic obj_,_ctsor your finger from coming into contact of the connecting section. • Stick its label on the labeling position. • Do not bend, drop or apply strong shock to Memory Sticks. • Do not disassemble or modify Memory SticKs. • Do not let Memory Sticks get wet.
Using a Memory inserting Stick-introduction a Memory (1) Slide MEMORY Stick OPEN in the direction of the arrow. con_partment opens. (2) Insert a Memory Stick in as far as it can go with Then, O close the Memory The Memory its rounded Stick corner facing up. Stick compartment. ACCESS lamp M_MORY OPEN O W ® 3 o Memory Stick compartment o _o €# To eject a Memory Stick Open the Memory Stick comes out. Stick compartment in step 1, press MEMORY EJECT. The Memory 2.
Using a Memory Selecting Stick-introduction Image quality mode You can select image quality mode in still picture recording. If you do l_ot make any selection, the unit automatically records in FINE mode. (1) Set the POWER switch to MEMORY. Make sure tt_at the lock is set to the left (unlock) position. (2) Press MENU to make the MENU display appear. (3) Turn the SEL/PUSH (4) Turn the SEL/PUSH EXEC dial to select _, then press the dial. EXEC dial to select QUALITY, then press the dial.
Using a Memory Image Stick-introduction quality settings Setting Meaning FINE (FINE) Use this mode when you want to record high quality images. The image is con'tpressed to about 1/6. STANDARD (STD) This is the standard in'rage quality. compressed to about 1/ 10. The image is Differences in image quality mode Recorded images are compressed in JPEG format before being stored into memory. The memory capacity allotted to each image varies depending on the selected image quality mode.
Using a Memory Formatting Stick-introduction (initializing) a Memory Stick (1) Insert a Memory Stick into your camcorder. (2) Set the POWER switch to MEMORY. Make sure that the lock is set to the left (unlock) position. (3) Press MENU to make the MENU display appear. (4) Turn the SEL/PUSH EXEC dial to select _, then press the dial. (5) Turn the SEL/PUSH EXEC dial to select FORMAT, then press the dial. (6) Turn the SEL/PUSH EXEC dial again to select OK, then press the dial.
hecording - Memory still images on Memory photo recording Sticks III - DCR-TRVIO only You can select the FIELD or FRAME mode in still picture recording. Your camcorder com[_n.sates for camera_hake when recording moving subjects in the FIELD mode. Your camcorder records still images in high quality in the FRAME mode. Select the FIELD or FRAME in the MENU settings (p. 72). Before operation Insert a Memory Stick into your camcorder. (1) Set the POWER switch to MEMORY.
Recording recording still images on Memory Sticks - Memory photo When you are recording a still image You can neither turn off the power nor press PHOTO, When you press the PHOTO button on the Remote Commander Your cameorder the button. Recording immoAiately records the image that is on the _reen when you pres,, images continuously You can record still pictures before recording. continuously.
Recording recording I Illl still images on Memory Sticks [ - Memory photo IIII (1) Set the POWER switdl to MEMORY. Make sure that the lock is set to the left (unkx:k} position. (2) Press MENU to make the MENU display appear. {31 Turn the SEL/PUSH EXEC dial to select 9, thm_ press file dial. (4) Turn the SEL/PUSH EXEC clial to select CONTINUOUS, then press the dial. (5) Turn the SEL/PUSH EXEC dial to select the desired setting, then press the dial.
Recording recording still images on Memory Sticks - Memory photo Continuous shooting Setting Meaning (indicator settings OFF Your camcorder sh(x_ts one image ,it a time. (no indicator) ON Your camcorder shoots MULTI SCRN Your camcorder shoots 9 still images at atx_ut 0.3 sec interx,als and displays the images on a single page dMded into 9 boxes.
I Recording an image as a still image from a mini DV tape - DCR-TRVIO only Your camcorder can read moving picture data recorded on a mini DV tape and record as a still unage on a Memory Stick. Your camcorder can also take in moving picture data through the input connector and record it as a still image on a Memor\' Stick. it Before operation Insert a recorded mira DV tape and a Memory Stick into your camcorder (1) Set the POWER (2) Press (3) Keep switch to VTR. I_.
Recording an image from Recording a mini DV tape as a still image a still image from other (1) Set the POWER switch equipment to VTR and set DISPLAY in _ to LCD in the MENU settings. (2) Play back the recorded tape, or turn the TV on to _ (3) Follow the steps 3 and 4 on page 89. When recording the image through the desired program. the AUDIO/VIDEO jack S VIDEO OUT S VIDEO VIDEO AUDIO/VIDEO VCR A/\! connecting cable Signal flow Connect the yellow plug of the A/V connecting the TV.
Copying still images - Photo save - DCR-TRVIO from a mini DV tape only Using the _,arch tapes and record function, you can automaticaUy take in only still images them on a Memory Stick in sequence. Before operation • Insert a recorded • Insert a Memory mini DV tape and rewind Slick into your camcorder. from mini DV the tape. (1) Set the POWER switch to VTR. (2) Press MENU to make the MENU display appear. (3) Turn the SEL/PUSH EXEC dial to select _, then press the dial.
i: Copying still images from a mini DV tape - Photo save To stop copying Press MENU to stop copying. When the memory of the Memory Stick is full "MEMORY FULL" appears on the LCD screen, and the copying Memory Stick and repeat the procedure from step 2. stops. Insert another When the ACCESS lamp is lit or flashing Never shake or strike your camcorder. As well do not turn the power off, e_ct a Memory Stick or remove the battery pack. Otherwise, the image data breakdown may O_CHr.
liewing a still picture )layback - Memory photo - DCR-TRVIO only YOUcall play back still images recorded on a Memory Stick. You can al_ images at a time by selecting the index screen. play back 6 Before operation Insert a Memory Stick inlo your camcorder. (1) Set the POWER switch to MEMORY or VTR. Make sure that the lock is set to the left (unlock) position. (2) Slide OPEN in the direction of the I_ mark. Then, open tile LCD panel. (3) Press MEMORY PLAY. The last recorded image is displayed.
Viewing a still picture - Memory photo playback To play back recorded images on a TV _Jeen • Connect your camcurder to the TV with the A/V connecting cable supplied wi_h your camcorder before the operatiorL • When operating memory photo playt_ck on a TV or the LCD screen, the image quality may appear to have deteriorated. This is not a malfunction, The image data is as good as ever.
Viewing a still picture - Memory photo playback 1_ mark JL_ DSCO0006 • To display • To display To return 6 t 100_ the following 6 images, keep pressing MEMORY the previous 6 images, keep pressing MEMORY to the normal playback screen (single Press MEMORY +/- to move the I_ mark to the i_nage you want screen, then press MEMORY PLAY. screen) to display on full Note When displaying the index screen, the number appears above each image.
Viewing a still picture Viewing - Memory the recorded photo playback images using a personal computer The image data recorded with wmr camcorder is compressed in the IPEGformat, If rot use tile application software, "i_ictureGear 3.2Lite" supplied with your camcorder, _-ou can see images recorded on a Memory Stick on a computer screen.
Superimposing a still picture in a Memory Stick on a moving picture M. CHROM/M. LUMI/C. CHROM - DCR-TRVIO only You can superin'qoose a still picture moving picture you are recording. you have recorded M. CHROM (Memory chroma key) You can swap a blue area of a still picture moving picture. on ,1 Memor', such as an illustratkm Stick on top of the or a frame with a M.
Superimposing a still picture in a Memory - M. LUMI/C. CHROM/M. Stick on a moving picture CHROM Illllllll I Before operation Insert a recorc[ed Memor\' Illl Stick ot_ your camcorder (1) ,Set the POWER switch to CAMERA. (2) Press MEMORY PLAY in tile standbv The last recorded or last composed scretm as a thumbnail image. (3) Turn the SEL/PUStl to set. mode. image appears EXEC dial to select on the lower the desired mode, then part of the press the dial The mode changes as follows: M.
Superimposing - M. CHROM/M. a still picture in a Memory LUMIIC. CHROM Stick on a moving picture Items to adust M. CHROM The color (blue) scheme of the area in the still pichare which is to be swapped with a moving picture M. LUMI The color (bright) scheme of the area in the still picture swapped with a moving picture C.
Preventing accidental - Image protection erasure - DCR-TRVIO only lo pre:'ent accidental erasure ot irnportal_t imag_.,s,you c,n",protect seh.'cted images. Before operation Inert a Memory Stick into your camcorder. (1) Play back the image you want to protect. (2) Press MENU to make the MENU display (31 Turn the SEL/PUSH EXEC dial to select appear, _, then press (4) Turn (5) Turn PROTECT, then press the dial. ON, then press the dial.
Writing a print mark - PRINT MARK - DCR-TRV10 only You can specify the recorded still image to print out. This function is useful for printing out still images later. Your camcorder conforms with the DPOF (Digital Print Order Format) standard for specifying the still images to print out. Before operation Insert a Memory Stick into your camcorder.
Deleting images • DCR-TRV10 Deleting selected only images Before operation Inert a Memory Stick into vour camcordt, (1) Play back the image you warn to delete. (2) Press MEMORY the LCD screen. DELETE with (3) Press DELETE again. MEMORY r. a sharp-polluted The se[ected object. image "DELETE?" appears on is deleted. To cancel deleting an image Press MEMORY - in step 3. To delete an Press MEMORY and 3.
Deleting images Before operation [nsmt a Memory Stick into y_ur camcorder. (1) _'t the ['OWER switch to MEMORY. Make sure thai the lock is set to the left (unh_'k) position. (2) l'ress MENU to make the MENU display appear. (3) Turn the SEL/PUSH EXEC dial to select _, then press the dial. {4) Turn the SEL/PUSH EXEC dial to select DELETE ALL, then press the dial. (5) Turn the SEL/PUSI I EXEC dial to select OK, then press the dial. "OK"changes to "EXECUTE.
Deleting images To cancel deleting all the images in the _:le,.'t _' RETURN in step 4, then press the SEL/PUSH Memory EXEC. While "DELETING" appears Do not turn the POWER switch or press any buttons. If the write-protect tab on the Memory Stick is set to LOCK You cannot delete images.
L.opylng the image recoroeo Sticks to mini DVtapes - DCR-TRV10 only You can copy still images DV tape. _wtitles recorded on Memory Before operation Insert a mini DV tape for recording and a Memory (1) Set the POWER switch to VTR. {2) Using control buttons, the video search on Memory Stick and rec( rd them to a mini Stick into your camcorder. a point where you want to record the desired still image. Set the mini DV tape t_playback pause mode.
Playing back images in a continuous To view the recorded images loop - SLIDE SHOW on TV Connect your camcorder to a TV with Ihe A/V connecting camcorder before operation. If you change the Memory Stick during operation The slide show does not operate. If you change the Memory steps again from the beginning.
Playing back images in a continuous To view the recorded images loop - SLIDE SHOW on TV Connect your camcorder to a TV with tile A/V connecting camcorder before operation. If you change the Memory Stick during operation File slide show does not operate. If you change tile Memory steps again from the beginning.
-- Additional Usable Selecting Information -- cassettes cassette types You can use the "'l]l_" mini DV cassette only*. You cannot use any other G!8 ram, HiI_ Hi8, It Digital& VlISIVHS, _1_] VHSC, SVlI_I _VHS, S[V_ItS[_S-Vtt_, 111Betamax, [_a) ED Betamax or 1_• DYz cassette. * There are two types of mini DV cassettes: with cassette nremory and without memory. We recommend you to use the tape with cassette uremory. cassette The IC memory is mounted on this type of mini D]_Lcassette.
Usable cassettes Audio mode 12-bit mode: The original sound can be recorded in stereo 1, and the new sound in stereo 2 in 32 kHz. The balance between stereo l and stereo 2 can be adjusted by selecting AUDIO MIX in the MENU settings during playback. Bolh sounds can be played back. 16-bit mode: A new sound cannot be recorded but the original sound can be recorde_ high quality. Moreover, it can also play back sound recorded in 32 kHz, 44.1 kHz or kltz. When playing back a tape recorded in the 16-bi! m,.
Troubleshooting IIIIII I 11 \'eu rUL'_ iCLto any problem troublestlont contact appears worked the problem. using your If the probten_ catncorder, persists, use the tt;llowh'_g disconnect your Sony dealer or k_cal authorized Sony service facility, on lhe LCD screen or in the viewfinder, the self-diagnosis See page 1 to. In the recording table In the power source and II "(':E3F3:OE3" display fuc_ction has mode Symptom Cause and/or Corrective START/STOP does not operate.
Troubleshooting Symptom Cause and/or Corrective Actions A vertical hand appears when yon sh_l a subjt_cl such as lights or a candle flame against a dark background. • The contrast between the subject and background high. Your camcorder is not a malfunction. is tc A vertical band appears when you shoot a very bright subject. • Your camcorder Some tiny white spots appear in the viewfinder or on the LCD screen, • Slow shutter, low lux or NightShot +Slow shutter mot activated. This is not a malfunction.
Troubleshooting Symptom Cause and/or Corrective Actions The new _.mnd added to the recorded tape is not heard. • AUDIO MIX is set to ST1 side in the MENU settings. -) Adjust AUDIO MIX in the MENU settings. (p. 72) Tile lille is not displayed. • TITLE DSPL is set to OFF in the MENU settings. -_ Set it to ON in the MENU settings. (p. 72) The date search or title search does not work correctly. " The tape has a blank portion (p.
Troubleshooting When operating - DCR-TRVIO using Recording d_,s not function. "_'_tl cannot Stick. format Stick • Tbe POWER switch is set to CAMERA. + Set it to lvlEMORY. (p. 82) ful_t'tiOl_. caimot Memory Cause and/or Corrective Actions Symptom ]lw Memory Stick d_,s not ThL_ image the only • The Memory Stick has already been recorded to its full capacity, Erase unnecessary images and record again. (p. 102.85) • The Memory Stick is not inserted. Insert a Memory Stick. (p.
"roubleshooting ,ymptom he cas_tte Cause and/or Corrective Actions label is not recorded. " The tape has no cassette memory. + Use a tape with cassette memory. (p. 109) • The cassette memory is full. Erase some titles. (p. 67) • The tape is set to prevent accidental erasure. 4. Slide the write-protect tab so that red portion visible. (p. 14) is not Vhile editing using the i.LINK cable DV cormecting cable), recording _icture cannot be monitored. • Remove the i.
Self-diagnosis display Ytmr camcorder has a self diagnosis display tunction. This function displays tile current conditinn of your camcorder as a 5-digi! code (a combinatitm of a letter and figures) m the viewtinder, on the LCD screen or in the display window. If a 5 digit code is displayed, check the to[lowing code chart. The last two digits (indicated by IZllZl)will differ depending on tilt" state o[ your camcorder.
Naming indicators and messages tf ir, dicators and messages appear in the viewfinder, on the LCD scroen or in the display window, check the folh_wing: _ the page in parentheses "( )" tor more information. • The wamirtg messages do no|appear in tile mirror mode. • The indicators and messages are displayed in yellow. Warning indicators The video heads are dirty Slow flashing: • You need to clean the heads using the _my cassette (nol supplied) (p. 121).
Warning indicators and messages Warning messages • CL(.'KTK SET Re,_,t the date and time (p. 78). • For "InfoLITItlUM" BATTERY ONLY • I_ CLEANING • _ ,, _ U_ an "lnIoLIHIUM" batt_,,ry pack (p. 12). CASSETTE FULL 16BIT The video heads are dirty (p, 121), The tape cassette memory AUDIO is full MODE is set to 16BIT.* You cannot dub new sound (p. 76). • _ REC MODE REC MODE is set to LP.* You cannot • _ TAPE There is no recorded portion dub new sound on the tape. You cannot (p. 76).
Using your camcorder Using your camcorder abroad abroad You can use your camcorder in any country or area with the AC power supplied with your camcorder within 100 V to 240 V AC, 50/60 Hz. When charging the battery pack, use a commercially available necessary, depending on the design of the wall outlet [b]. adaptor AC plug adaptor [aI [a], if [b] Your camcorder is an Nr[SC system based camcorder.
Maintenance precautions Moisture information and condensation I! Your camcorder is brought directly from a cold place to a warm place, moisture may condense inside your camcorder, on the surface of the tape, or nn the lens. In this condition, the tape may stick to the head drum and be damaged or your camcorder may not operate correctly. If there is moisture inside your canlcorder, the beep s,_unds and the [] indicator flashes'.
laintenance information Maintenance Cleaning To ensure and precautions information the normal video head recording anti clear pictures, clean the video heads. The video head may be dirty when: • mosaic-pattern noise appears on tile playback picture. • playback pictures do not move. • playback pictures do not appear. • the _ indicator and "_ CLEANING CASSETFE" message appear or the _ indicator flashes on the LCD screen or in tl_ viewfinder.
Maintenance information and precautions Precautions Camcorder operation • Operate >our camcorder on 7.2V (battery pack)or _.4VIAL' power adaptorL • For l)(_ i[lSII'uL or A(." operatioil, rise the accessories recoilllllellded ill [lliS oper_ltiug lid.ms • If any solid ohlect or liquid get reside the casillg, uophlg your camcorder and have it checked by a Sony dealer before operating it an} lurlher. • Avoid rough handling m" mechanical shock.
Maintenance information and precautions • The unit btKomes warm during use. This is not a malfunction. • Do not place the unit in ltKations that are: - Extremely hot or cold - Dusty or dirty - Very humid Vibrating Battery pack • Use only the specified charger or video equipment with the charging function. "To prevent accident from a short circuit, do not allow metal objects to come into contact with the battery terminals. _'• Keep the battery pack away from fire.
Specifications Video camera recorder I.)tltptll Video recording system 2 rotar\ heads I h'licai scamm_g s?.Mem Audio recording system pllotar} heads, PCM sxstem Quanlization: t2 bits(Fs 32 kl D, stereo I, stereo 2), !6 bit_ {Fs 48 kHz, stereoi Video signal N r.q4_-color, EIA standards Usable cassette Mini DV cassette with fie _""|_" mark printed Tape speed SP: Appmx 1881 minis LP: Appro×. 12 56 mm/s Recording/playback time (usmg cassette DVM60) SP 1 botH 1.
- Quick Reference -- ,,dentifying the parts and controls Camcorder [] [] [] ,O €. P_ Viewfinder lens adjustment lever (p. 18) [] PHOTO button (p. 30, 85) [] BATT release lever (p. 9) [] OPEN button (p. 15) _1 PROGRAM AE button (p. 43) [] SEL/PUSH EXECdial (p. 32, 72) [] [] This mark indicates ro g EXPOSUREbutton (p. 44) that this product is a genuine accessory for Sony video products.
Identifying the parts and controls [] 8_ Focus ring (p. 45) [] Camera recording [_ Infrared rays emitter [] Microphone [] FOCUS switch (p. 45) Viewfinder (p. 9, 18) Display window lamp (p. 15) (p. IM) Remote sensor (p. 132) (p. 21,29) [] BACK LIGHT button FADER button (p. 21) (p. 34) f Note on the Carl Zeiss lens Your camcorder is equipped with a Carl Zeiss lens which can reproduce a fine image.
Identifying the parts and controls [] [] [] [] .... MEMORY LCD screen (p. 17) LCD BRIGHT buttons [] VOLUME buttons [] RESET button [] J (p. 17) (IX_R-TRVI0 (p. 115) MEMORY (p. 93, 98) (DCR-TRV10 2_ MEMORY (DCR-TRVt0 • _ (p. 94) r_ 124_ MEMORY + button (p. 25) MEMORY PLAY button (EK'R-TRV10 only) INDEX button (DCR- I'RV10 only) only) (p. 93, 98) - button only) (p. 93, 98) DELETE button only) (p.
Identifying the parts and controls [] [] [] _t Power zoom lever (p. l_I) 3_ ACCESS lamp (DCR-TRV10 [] Hooks for shoulder [] START/STOP button only) (p. 81) strap (p. 15) Attaching the shoulder strap Attach the shoulder strap supplied LASER LINK button (p. 2q) i40_ EDITSEARCH buttons Lock (DCR-TRV10 L4_ POWER switch with your camcorder (p. 24) only) (p. 16) (p.
Identifying the parts and controls iiiiiiii [] [] [] Video control buttons (p. 25, 27, 58) • ST(.)P MEMORY OPEN button (DCR-TRV10 only) (p. 81) Fastening the grip strap Fasten the grip strap 130 EJECT button (DCR-TRV10 REW (rewind) I1_ PLAY {playback) FF (fastforward} II PAUSE (pause) • REC (recording) The control buttons light up when you set the POWER switch to VTR, [] [45] MEMORY (stop) firmly. only) (p.
Identifying the parts and controls [] [] [] [] ]r [] [] [] [] _ DV IN/OUT jack (p. 55) This "LLINK" mark is a trademark of Sony Corporation and indicates that this [] --_ OPEN/EJECT lever (p. 14) [] Tripod receptacle Make sure that the length of the tripod screw is less than 9/32 inch (6.5 ram). Otherwise, you cannot attach the tripod securely and the screw may damage your camcorder. product is in agreement with IEEE 13941995 specifications and their revisions. The [ DV IN/OUT compatible.
Identifying the Remote parts and controls Commander 1he btltlons that ha\l' lhe sdlne 11,1Me 011 the [_ellloh.,_'o[111_lalldL'l |un_'tinl_ idelltic,ll_vto lhe h_iHons on \ our RMT-808 [1] PHOTO button (p. 26) 13] Memory control buttons (1)CR-TI?.V 10 only) (p. 93, 94, 98) [4_ SEARCH MODE button [] _/IH_t buttons control (p. 49, 51, 52) (p. 49, 51, 52) buttons on "_our _1|n_ol'd_'r RMT-Bll (r. 30, 851 [2 t DISPLAY button _Is camcorder [] Video [] REC button (p.
Identifying Operation the parts and controls indicators [] i [] [] [] _120rain t_]_ [] --E 16_ "ST I L LIIIIIIII -16:9WIDE NEG. ART [] [] _ -- -" [] SEARCN o _o & [] Cassette memory [] Remaining indicator battery time (p. 109) LCD bright indicator (p. 17)/Volume indicator (p. 25) [] PROGRAM AE indicator (p. 43) [] Backlight indicator (p, 21) [] SteadyShot off indicator (p. 73) indicator (p. 20) [] [] Zoom indicator (p. 19)/Exposure indicator (p.
Identifying the parts and controls 1171 Tape counter indicator (p 48)/5SEC mode indicator (p. 201/Time code indicator (p. 20)/Self-diagnosis indicator (p. I lo1/ Photo mode indicator (p. _])/Image number indicator (l_'H TRV|O only) (,p, 94) [] Remaining tape indicator (p. 207/ Memory playback (DCR-TRV indicator ZERO SET MEMORY indicator [] END SEARCH indicator [] Audio mode indicator (DCR-TRVIO only1 This indicator appears when M,CHROM/M.I.UMI/C.CHROM functions work. [] (p. 48) (p.
uick Function Functions to Guide adjust exposure (in the "In a dark place • In insufficient light • In dark environments fireworks, or general • Shooting recording mode) NIGHTSHOT (p. 21) Low lux mode (p. 42) Sunset & moon mode (p. 42) such as sunset, night views backlit subjects • In spotlight, event IBACK LIGH1 (p.
Index A,B I, J, K, L R AC power adaplor ................. It) Adjusting view finder ............. 18 ANTI GROUND SI K_:DTING i.I.INK ..................................... 131 Image prot_'x'tioo ................... 1011 hnage quality me,de ............... 82 INDEX [Multiple) display ... q4 "In{_._LITttlU M" battery ........ 12 hffrared rays emitter .... 21.29 ]PEG ....... _........................... 7_ Labeling a cassette .............. 70 LANC ................................. 131 LASER LINK ..........
Identifying the parts and controls [] ® [] SELFTIMER button [] END SEARCH button [] DISPLAY button [] 128 ................................................................ START/STOP (p. 23) (p. 24) (p. 26) MODE switch (p. 20) _31}DIGITAL EFFEL'-I"button _2_ TITLE button 3_3]MENU button _4_ Speaker (p, 66/ (p. 32, 72) ] (p.
3-866-543-tl PictureGear Version © 1999 by Sony Corporation 3.
Program © 1997-1999 Documentation Sony Corporation © 1999 Sony Corporation @ 1999 Sony Corporation PiclureGear, Memory All rights Stick @ reserved is a trademark of Sony Corporation. Microsoft. MS-DOS and Windows are registered (USA) in the USA and in other countries.
Table of Contents Before Use Program Features ........................................................................................ Precautions for Use ..................................................................................... 4 6 About the Operating Envirohment .................................................... 6 About Color Display Settings ............................................................. 6 How to Use this Manual ....... _.....................................................
Before Use I Program Features PictureGear Version 3.2 Lite (hereafter referred to simply as PictureGear) is software application that makes it easy to list, manage, and display image files stored in Memory Sticks or on a computer's hard disk. In PictureGear, each displayed image is called a slide. Note The example screens in this document are for the English version.
Zoom Display A slide selected window magnified, of a Slide I inthe List View can be displayed (Single-Image reduced View). Slides displayed zoomed in a separate in Single-Image m View can be and scrolled. Print Slides Slides can be printed, either singly or as multiple slides per page, Play Movies in the Movie Playback Window MPEG1 and AVI format movie files can be played in separate windows. A corresponding still image appears in-the List View.
Precautions The hardware follows: for Use and software IBM PC/AT requirements or compatible for using with the following PictureGear capabilities. - Minimum 90 MHz Pentium - Minimum 32 MB_main - Minimum 30 MB available - Minimum capability. 640 × 480 pixel Hi Color (16-bit color) display Operating System Microsoft Windows About Using with CPU (166 MHz or faster recommended) memory (64 MB or more recommended) hard disk space (for Standard installation driver 95, 98 or NT4.0.
E How to Use this Manual C This manual describes how to get PictureGear up and ruluxing. Refer to the PictureGear on-line help to learn more about specific program operations. Help is accessible by running PictureGear and selecting How to Use PictureGear in the Help menu. Information too new to be included in the+operating manual is available in the ReadMe file located under Start menu - Programs - PictureGear 3.2Life. Please be sure to read it.
Installing PictureGear Insert the PictureGear CD-ROM When the CD-ROM drive access Language dialog box appears. into lamp the CD-ROM drive. turns off, the Choose Setup Note If this dialog box does not appear when the CD-ROM is inserted, start the Windows Explorer and double click on the installation file (SETUP.EXE) on the CD-ROM. 2 3 Click _ to select the language to use from the displayed language list. The Welcome dialog box appears.
Click [Next] if the displayed destination If you want to change the destination folder, destination folder, and then click [Next]. folder is acceptable. click [Browse], change the o The Setup Type dialog box appears. 6 Click [Next] if you want to perform the Standard setup. To change the setup type, click either [Compact] or [Custom], click [Next]. • Standard: the PictureGear and then program and sample data are installed. • Compact: only the PictureC, ear program is installed.
8 Click [Finish]. The Setup Complete dialog box appears. Checking the Open ReadMe box displays the ReadMe document after installation, so you can see the latest information about the program, 9 Click [Finishl. If the Open ReadMe box was checked in the previous step, the ReadM, document is displayed: After reading the document, close it and dick [Finish] in the PictureGear Setup dialog box. Installation is now complete. Microsoft DirectX Media Runtime Version 5.
d Basic Operation R Starting the Program 0 PictureGear can be started by the following procedure. 1 Turn on the PC and load Windows. 2 Click the Start button X_ o on the task bar. The Start menu appears. Point to Programs on the Start menu, and click PictureGear Lite from the list of programs. PictureGear starts and the main window appears. Sample slides are displayed automatically in the View Area. 3.
Closing PictureGear PictureGear can be closed by either of the following • Click File in the menu bar, and then click Close. • Click the Close button window. at the top right comer methods: of the PictureGear main "_° Hint While from running the help PictureGear menu, you can press or click _ to display the F1 key or select PictureGear on-line How to Use PictureGe_ help. Note Some time is required before the sample slides appear.
Viewing Slides When PictureGear is run the first time, sample slides installed on the hard disk are displayed automatically. To dispIay other slides, specify the folder containing the slides you want to view (page 14). O Initial Folder List "o The Samples folder icon in the folder list indicates that it is the open folder when PictureGear is run the first time. The slides in the Samples folder are therefore displayed. The Samples folder is in the PictureGear3.2Lite to he in the Sony folder.
Locate the folder in the PictureGear to display, and click it. Locating folder list containing the slides you w a Folder Manipulate _ Fron* _,_ (nternet _J Microsoft the folder list as follows to locate the desired folder. Explorer {_ Office L..3Net CJ Out 12]P_ _ _,,y Mkcro_oftOffice ra._ o_ r_rl p_ When you click [] _ _ Al_l_at_a _ ¢atroot Data if_..30om m_r_l --I Fq Oonf_ _ Folder pict,le_ear _.
Using the Folder List To display the folders "Wl_ttna drive or folder with a [] mark, chck the [] mark. It changes to a [] mark. To display parts of the list that are not displayed in the folder hst, drag the scroll bar up and down or left and right, Clicking on the [] mark changes it back to [] as the folders within it are no longer displayed / _" Contents of the View Area: Only slides in the folder selected in the folder list are displayed.
Using with External Devices This part describes PictureGear operation when connected with external devices. See the PictureGear on-line help and the device manuals for more details. IIIIIIIIII Using a Video Camera With a Sony video camera connected to the PC, PictureGear images between the PC and the camera. lets you transf_ Note The video camera described here refers to the device with which the software was bundled (or with the devices for which the accessory kit bundle is intended).
The Video Camera Settings dialog box appears. "_'_Hint If the "Loading images by background process" box is checked, images can be loaded by background processing. Refer to the on-line help for details, Click [Detail]. The Video Camera Settingsdialog box appears. m c ::r m_ x _a ¢D Make the desired settings, and click [OK]. Baud Rate: Normally 115200 bps. A slower rate may be used if serial communications problems occur. Serial Port: Select the PC port that corresponds to the connection in step 2.
Using the First Time 1 Check the connections video camera's and confirm internal flash that an image isstored in tk memory. In the File menu, point to Connections, and click Video Camera. The Video Camera folder icon appears in the folder list, and images in the folder appear in the View Area. Video Camera folder icon "_" Hint If a message box appears Connections • Decrease and Settings, the baud rate.
Using a Digital Still Camera With a Sony digital still camera connected to the PC, PictureGear transfer photo images between the PC and the camera. lets you Note The digital still camera described here refers to the device with which the software was bundled (or with the devices for which the acce_ory kit bundle is intended). Other devices are not compatible.
6 Click [Detail]. The Digital Still Camera Settings dialog box appears. Make the desired settings, and click [OK]. Baud Rate: Normally 115200bps. A slower rate may be used if serial communications problems occur. Serial Port: Select the PC port that corresponds to the connection in ste 2. See the PC operating manual for the port number. Close the Digital Still Camera Settings dialog box. Oick [OK]. The settings are refreshed and the dialog box closes.
"i_° Hint If a message box appears indicating a communications problem, refer to steps 6 and 7 of Connections and Settings, and perform the following steps: ° Decrease the baud rate. • Confirm that the port settings are correct. Note If an image has been read and any of the following actions taken, repeat the procedure from step 1. - The digital still camera has been turned off and back on. - The cable has been disconnected. - Any new image has been taken, or an image deleted with the digital camera.
Using a Memory Stick Serial Port Adapter (for Handycams) With the Sony Memory Stick (MS) Serial Port Adapter (for Handycams) connected to the PC, PictureGear lets you transfer images between the PC and Memory Sticks. Note The Memory Sticks described here refer to those in which images have been stored by the device with which the software was bundled (or with the devices for which the accessory kit bundle is intended).
"_" Hint If the "Loading images by background process" box is checked, images can be loaded by background processing. Refer to the on-line help for details. 6 Click [Detail]. The MS-Serial Port Adapter Settingsdialog box appears. m c 3 Make the desired settings, and click [OK]. Baud Rate: Normally 115200 bps. A slower rate may be used if serial communications problems occur. Serial Port: Select the PC port that corresponds to the connection in step 2. See the PC operating manual for the port number.
"_" Hint If a message Com_ections box appears indicating a communications and Settings, and perform the following • Decrease the baud • Confirm that problem, steps: refer to steps 6 and rate. the port settings are correct. Note If an image has been read and any of the following actions taken, repeat the procedur from step 1. Power to the MS Serial Port Adapter The cable has been The Memory has been turned off and back on. disconnected. Stick was removed.
Storing Images Images from External read from the on-llne external devices can be stored Devices on the PC hard disk. Refer to help for details. 1 Click the slide you wish to store in the View Area to select it. 2 Drag the selected Folder List. slide to the The image at the destination. is stored Refer to the operating details.
Miscellaneous How to Uninstall PictureGear If PictureGear is not being used and you need to free up space on the hard disk, it can be uninstalled as follows. 1 In the File menu, click Close to close PictureGeaJ 2 On the task bar, click the Start button, Control Panel. The Control Panel opens. 3 point to Settings, and eli Double click Add/Remove Programs. " The Add/Remove Programs Properties dialog box appears. 4 Click the Install/Uninstall 5 Click on PictureGear tab. 3.
In Case of Trouble If a problem occurs, please check the following items, if you cannot the problem, contact the location indicated in the operating manual device with which you received this software. Symptom PietureGear resolve for the Cause/Remedy does not run There might be a problem with the PictureGear program on the hard disk. Uninstall and then reinstall PictureGear (page 26) Sample slide do not display Click the sample slide folder in the folder list.
SonyOline Printed in Japan http://www.world.sony.