
User Manual
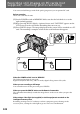
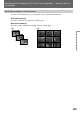
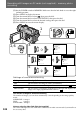

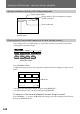
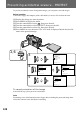
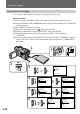
Table Of Contents
- Before you begin
- Getting started
- Basic operations
- Advanced operations
- Using alternative power sources
- Changing the mode settings
- Photo recording
- Shooting with all the pixels ミ PROG. SCAN
- Using the FADER function
- Shooting with backlighting
- Using the wide mode function
- Enjoying picture effect
- Recording with various effects ミ digital effect
- Shooting with manual adjustment
- Using the PROGRAM AE function
- Focusing manually
- Interval recording
- Cut recording
- Superimposing a title
- Making a custom title
- Labeling a cassette
- Watching on a TV screen
- Viewing the picture with the picture effect
- Viewing the picture with the digital effect
- Searching the boundaries of recorded tape with date ミ date search
- Searching the boundaries of recorded tape with title ミ title search
- Searching for a photo ミ photo search/photo scan
- Returning to a pre-registered position
- Displaying recording data ミ data code function
- Editing onto another tape
- Editing partially on a mini DV tape ミ DV synchro-editing
- Recording from a VCR or TV
- Replacing recording on a tape ミ insert editing
- Audio dubbing
- Memory card slot operations
- Using the memory card slot ミ introduction
- Recording an image from a mini DV tape as a still image
- Copying still images from a mini DV tape ミ photo save
- Recording still images on PC cards (not supplied) ミ memory photo recording
- Viewing a still picture ミ memory photo playback
- Preventing accidental erasure ミ PROTECT
- Deleting images
- Copying the image recorded with the memory card slot to mini DV tapes
- Playing back images in a continuous loop ミ SLIDE SHOW
- Additional information
- Usable cassettes and playback modes
- Charging the vanadium-lithium battery in the camcorder
- Resetting the date and time
- Simple setting of clock by time difference
- Tips for using the battery pack
- Maintenance information and precautions
- Using your camcorder abroad
- Trouble check
- Self-diagnosis function
- Specifications
- Identifying the parts
- Warning indicators
- Index

105
Memory card slot operations
Viewing a still picture – memory photo
playback
You can play back still images recorded on a floppy disk or PC card. You can also play back
6 images at a time by selecting the index screen.
Before operation
Connect the floppy disk adapter (with a disk inside) or insert a PC card into the unit.
(1) Set the POWER switch to MEMORY. Make sure that the lock knob is set to the right
(unlock) position.
(2) While pressing OPEN, open the LCD panel.
(3) Press MEMORY PLAY. The last recorded image is displayed.
(4) Press MEMORY +/– to select the desired still image. To see the previous image,
press MEMORY –. To see the next image, press MEMORY +.
To stop memory photo playback
Press MEMORY PLAY again. Otherwise, the image through the lens will not appear on the
screen.
To play back recorded images on a TV screen
•Connect this camcorder to the TV with the supplied A/V connecting cable before
operation. You cannot play back images using the LASER LINK function.
•When operating memory photo playback on a TV or the LCD screen, the image quality
may appear to have deteriorated. This is not a malfunction. The image data is as good as
ever.
•Turn the audio volume of the TV down before operation, or there may be noise (howling)
coming from the TV speakers.
Image data modified with personal computers or shot with other equipment
You may not be able to play them back with this camcorder.
1
POWER
OFF
CAMERA
MEMORY
VTR
3
1
2
PLAY
4