
User Manual
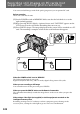
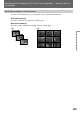
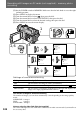

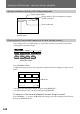
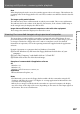
Table Of Contents
- Before you begin
- Getting started
- Basic operations
- Advanced operations
- Using alternative power sources
- Changing the mode settings
- Photo recording
- Shooting with all the pixels ミ PROG. SCAN
- Using the FADER function
- Shooting with backlighting
- Using the wide mode function
- Enjoying picture effect
- Recording with various effects ミ digital effect
- Shooting with manual adjustment
- Using the PROGRAM AE function
- Focusing manually
- Interval recording
- Cut recording
- Superimposing a title
- Making a custom title
- Labeling a cassette
- Watching on a TV screen
- Viewing the picture with the picture effect
- Viewing the picture with the digital effect
- Searching the boundaries of recorded tape with date ミ date search
- Searching the boundaries of recorded tape with title ミ title search
- Searching for a photo ミ photo search/photo scan
- Returning to a pre-registered position
- Displaying recording data ミ data code function
- Editing onto another tape
- Editing partially on a mini DV tape ミ DV synchro-editing
- Recording from a VCR or TV
- Replacing recording on a tape ミ insert editing
- Audio dubbing
- Memory card slot operations
- Using the memory card slot ミ introduction
- Recording an image from a mini DV tape as a still image
- Copying still images from a mini DV tape ミ photo save
- Recording still images on PC cards (not supplied) ミ memory photo recording
- Viewing a still picture ミ memory photo playback
- Preventing accidental erasure ミ PROTECT
- Deleting images
- Copying the image recorded with the memory card slot to mini DV tapes
- Playing back images in a continuous loop ミ SLIDE SHOW
- Additional information
- Usable cassettes and playback modes
- Charging the vanadium-lithium battery in the camcorder
- Resetting the date and time
- Simple setting of clock by time difference
- Tips for using the battery pack
- Maintenance information and precautions
- Using your camcorder abroad
- Trouble check
- Self-diagnosis function
- Specifications
- Identifying the parts
- Warning indicators
- Index

107
Memory card slot operations
Viewing a still picture – memory photo playback
Note
When displaying the index screen, the number appears above each image. This indicates the
recording order on the floppy disk or PC card. These numbers are different from the data file
names.
The image quality mode indicator
The indicator may show a different mode in which you recorded. This is not a malfunction.
The indicator shows the volume of the data file. For instance, if the volume of SFN image is
small enough, it may be displayed as FIN or STD.
Image data modified with personal computers or shot with other equipment
Those image data cannot be displayed on the index screen.
Viewing the recorded images using a personal computer
The image data recorded with this camcorder is compressed in the JPEG format. If your
personal computer has an application software that allows you to see JPEG images, you can
see images recorded on a floppy disk or PC card on a computer screen. For detailed
instructions on operation, refer to the operating instruction supplied with the application
software.
Example: Operation on a computer that has Windows 95 installed
(1) Start the Windows 95, and insert the floppy disk into the disk drive of your
computer.
(2) Open “My Computer,” and double-click on “3.5 inch FD.”
(3) Double-click on the file of the desired image.
Examples of recommended OS/application software
OS
•Windows 3.1
•Windows 95
•Windows NT3.51 or newer versions, etc.
Application
•Microsoft Internet Explorer, etc.
Notes
•For Macintosh, you can use the floppy disk recorded with this camcorder using the PC
Exchange with Mac OS system 7.5 or higher. A viewing application for Macintosh is also
necessary for viewing images.
•When you see images recorded with the camcorder on a personal computer, the display
may show lines on the edge of the screen, depending on the status of video input signals at
the moment. This is not a malfunction.