
User Manual
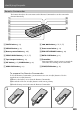
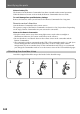


Table Of Contents
- Before you begin
- Getting started
- Basic operations
- Advanced operations
- Using alternative power sources
- Changing the mode settings
- Photo recording
- Shooting with all the pixels ミ PROG. SCAN
- Using the FADER function
- Shooting with backlighting
- Using the wide mode function
- Enjoying picture effect
- Recording with various effects ミ digital effect
- Shooting with manual adjustment
- Using the PROGRAM AE function
- Focusing manually
- Interval recording
- Cut recording
- Superimposing a title
- Making a custom title
- Labeling a cassette
- Watching on a TV screen
- Viewing the picture with the picture effect
- Viewing the picture with the digital effect
- Searching the boundaries of recorded tape with date ミ date search
- Searching the boundaries of recorded tape with title ミ title search
- Searching for a photo ミ photo search/photo scan
- Returning to a pre-registered position
- Displaying recording data ミ data code function
- Editing onto another tape
- Editing partially on a mini DV tape ミ DV synchro-editing
- Recording from a VCR or TV
- Replacing recording on a tape ミ insert editing
- Audio dubbing
- Memory card slot operations
- Using the memory card slot ミ introduction
- Recording an image from a mini DV tape as a still image
- Copying still images from a mini DV tape ミ photo save
- Recording still images on PC cards (not supplied) ミ memory photo recording
- Viewing a still picture ミ memory photo playback
- Preventing accidental erasure ミ PROTECT
- Deleting images
- Copying the image recorded with the memory card slot to mini DV tapes
- Playing back images in a continuous loop ミ SLIDE SHOW
- Additional information
- Usable cassettes and playback modes
- Charging the vanadium-lithium battery in the camcorder
- Resetting the date and time
- Simple setting of clock by time difference
- Tips for using the battery pack
- Maintenance information and precautions
- Using your camcorder abroad
- Trouble check
- Self-diagnosis function
- Specifications
- Identifying the parts
- Warning indicators
- Index

141
Additional information
Identifying the parts
Operation indicators
!§ Recording mode indicator (p. 30)
!¶ Standby/Recording indicator (p. 12)/Tape
transport mode indicator (p. 22)/Image
quality mode indicator (p. 95)
!• Warning indicators (p. 143)
!ª Time code indicator (p. 13) /Self diagnosis
indicator (p. 132)/Image number indicator
(p. 106)
@º Remaining tape indicator (p. 142)/Memory
playback indicator (p. 106)
@¡ ZERO SET MEMORY indicator (p. 80)
@™ END SEARCH indicator (p. 24)
@£ Gain indicator (p. 81)
@¢ Audio mode indicator (p. 30)
@∞ Microphone level indicator (p. 48)
@§ Continuous mode indicator (p. 104)
@¶ ND filter indicator (p. 49)
@• Video flash ready indicator (p. 33)
@ª Self-timer indicator (p. 18)
1 Cassette memory indicator (p. 116)
2 Remaining battery indicator (p. 120)
3 Zoom indicator (p. 14) /Exposure indicator
(p. 44)/ Data file name indicator (p. 92)
4 Digital effect indicator (p. 42)
5 PROG.SCAN indicator (p. 35)/
16:9WIDE indicator (p. 39)
6 Picture effect indicator (p. 40)
7 White balance indicator (p. 46)
8 Gain shift indicator (p. 53)
9 AE shift indicator (p. 52)
0 Shutter speed indicator (p. 45)
!¡ Aperture indicator (p. 55)
!™ Program AE indicator (p. 54)
!£ Back light indicator (p. 38)
!¢ Steady shot OFF indicator (p. 51)
!∞ Manual focus/Infinity indicator (p. 57)
120min STBY 0:12:34
–+
12min
ST I LL ZERO SET
PROG . SCAN MEMORY
NEG. ART END
SEARCH
.
–
3
10000
F1.6 12
dB
16BIT
A
AE
8
7
6
5
4
3
2
1
9
0
!¡
!™
!£
!¢
!∞
@£
@™
@¡
@º
!ª
!•
!¶
!§
@¢
@∞
@§
@¶
@•
@ª