
User Manual
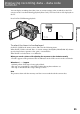
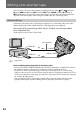
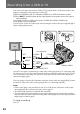

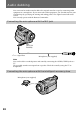
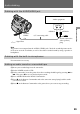
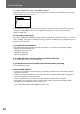
Table Of Contents
- Before you begin
- Getting started
- Basic operations
- Advanced operations
- Using alternative power sources
- Changing the mode settings
- Photo recording
- Shooting with all the pixels ミ PROG. SCAN
- Using the FADER function
- Shooting with backlighting
- Using the wide mode function
- Enjoying picture effect
- Recording with various effects ミ digital effect
- Shooting with manual adjustment
- Using the PROGRAM AE function
- Focusing manually
- Interval recording
- Cut recording
- Superimposing a title
- Making a custom title
- Labeling a cassette
- Watching on a TV screen
- Viewing the picture with the picture effect
- Viewing the picture with the digital effect
- Searching the boundaries of recorded tape with date ミ date search
- Searching the boundaries of recorded tape with title ミ title search
- Searching for a photo ミ photo search/photo scan
- Returning to a pre-registered position
- Displaying recording data ミ data code function
- Editing onto another tape
- Editing partially on a mini DV tape ミ DV synchro-editing
- Recording from a VCR or TV
- Replacing recording on a tape ミ insert editing
- Audio dubbing
- Memory card slot operations
- Using the memory card slot ミ introduction
- Recording an image from a mini DV tape as a still image
- Copying still images from a mini DV tape ミ photo save
- Recording still images on PC cards (not supplied) ミ memory photo recording
- Viewing a still picture ミ memory photo playback
- Preventing accidental erasure ミ PROTECT
- Deleting images
- Copying the image recorded with the memory card slot to mini DV tapes
- Playing back images in a continuous loop ミ SLIDE SHOW
- Additional information
- Usable cassettes and playback modes
- Charging the vanadium-lithium battery in the camcorder
- Resetting the date and time
- Simple setting of clock by time difference
- Tips for using the battery pack
- Maintenance information and precautions
- Using your camcorder abroad
- Trouble check
- Self-diagnosis function
- Specifications
- Identifying the parts
- Warning indicators
- Index
89
Advanced operations
LINE OUT
LR
AUDIO L
AUDIO R
Ç
: Signal flow
Audio equipment
A/V connecting cable
AUDIO/
VIDEO
Do not connect the
video (yellow)
plug.
Audio dubbing
Dubbing with the AUDIO/VIDEO jack
Note
The picture is not output from the AUDIO/VIDEO jack. Check the recorded picture on the
LCD screen or in the viewfinder, as well as check the recorded sound by using a speaker or
headphones.
Dubbing with the built-in microphones
No connection is necessary.
Adding an audio sound on a recorded tape
(1)Insert your recorded tape into the camcorder.
(2)Set the POWER switch to VTR.
(3)On the camcorder, locate the point where the recording should begin by pressing 0 or
). Then press P to set it to playback pause mode.
(4)Press AUDIO DUB on the Remote Commander .
(5)Press P on the Remote Commander and at the same time start playing back the audio
you want to record.
(6)Press p on the Remote Commander at the point where you want to stop recording.