4-114-319-11(1) Startup Guide The Startup Guide explains how to connect, setup and use your Wireless Link.
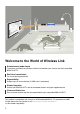
Welcome to the World of Wireless Link Entertainment made simple ransmitter and Receiver provide a wireless link between your sources and your compatible T BRAVIA HDTV Real time transmission For a true gaming experience Expandability Support up to 5 source devices (4 HDMI and 1 component) Simple Operation Control your BRAVIA HDTV and all connected sources using the supplied remote Clean and Cable-free Easy to mount receiver remains concealed behind your compatible BRAVIA HDTV This product is compa
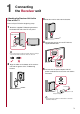
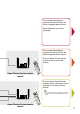
1 Connecting the Receiver unit Attaching the Receiver Unit to the Rear of the TV 3 Slide the receiver unit onto the bracket. Power off your TV before beginning setup. 1 Attach the supplied TV Mounting bracket to the bottom left side of the TV rear panel. Plastic Fastener 4 Connect the receiver unit and TV with the supplied HDMI cable. Guide Pin • Do not push on the head of the Plastic Fastener until you have inserted the fastener into the hole of the TV.
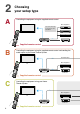
2 Choosing your setup type A Controlling the equipment using the supplied remote control Other Equipment AV POW ER TV POW ER You can connect up to 5 sources to the transmitter.
You can operate equipment connected to the transmitter unit with the supplied remote control. Some equipment may not be supported. You can operate equipment connected to the transmitter unit with the supplied remote control. Use your Home Theater System remote control to control the Volume. Home Theater System Home Theater System remote control Use your Home Theater System remote control to select the sources attached to your Home Theater System.
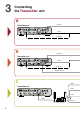
3 Connecting the Transmitter unit A IR Blaster Transmitter unit R AUDIO L 5 COMPONENT IN Y PR PB IR BLASTER R - AUDIO - L (1080i/720p/480p/480i) DIGITAL AUDIO OUT 4 3 DC IN 9V 2 1 (OPTICAL) SERVICE HDMI IN Component B IR Blaster Transmitter unit R AUDIO L 5 COMPONENT IN Y PR PB IR BLASTER R - AUDIO - L HDMI (1080i/720p/480p/480i) DIGITAL AUDIO OUT 4 3 DC IN 9V 2 1 (OPTICAL) SERVICE IN Component OPTICAL AUDIO C HDMI Transmitter unit R AUDIO L 5 COMPONENT IN PR PB Y HDMI
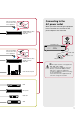
Connecting to the AC power outlet Place the IR Blaster near the IR receiver of the equipment. VCR/DVD/Blu-ray Disc/ Satellite receiver/ Cable box When you finish connecting the equipment to the transmitter unit, connect the AC power adapter to the wall outlet. DC IN 9V Transmitter unit Place the IR Blaster near the IR receiver of the equipment.
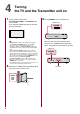
4 Turning the TV and the Transmitter unit on 1 Turn the power of the TV on. Set Control for HDMI in the Settings menu of the TV On. Then select the HDMI input that the receiver unit is connected to. 3 Press POWER on the transmitter unit. POWER button POWER TV • If POWER LED of the receiver unit does not light up, confirm Control for HDMI setting of the TV is On.
4 Verify the Wireless LINK LEVEL. The LINK LEVEL LEDs located on the front of the transmitter unit allows you to verify the Wireless LINK LEVEL between the transmitter and the receiver units. LINK LEVEL LED LINK LEVEL When the units are establishing a link, the LINK LEVEL LED blinks. After the wireless connection is established, the LED stops blinking. Optimal environment for placement of the units Follow the suggestions below to create an optimal environment for your Wireless Link.
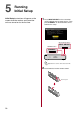
5 Running Initial Setup Initial Setup instructions will appear on the screen when the receiver and transmitter units are turned on for the first time. 1 Press INPUT SELECT on the transmitter unit to highlight your language choice. Then, press CONNECT on the transmitter unit to continue the setup. Initial Step 1: Setup Select a language Highlight a choice by pressing INPUT SELECT on your t r a n s m i t t e r. P r e s s C O N N E C T t o continue.
3 On your remote control, press and hold the IN 1 button. While holding IN 1, press the RETURN button. Hold both for at least 2 seconds. Initial Initial Setup Activation complete To s e t u p I R B l a s t e r , p r e s s SETUP; otherwise press RETURN to exit. Setup Step2: 4 Initial Setup is complete. Activate your remote control On your remote, press and hold IN 1. While holding IN 1, press RETURN. Hold both for at least 2 seconds.
6 Configuring the remote control Configure the IR Blaster to control your connected equipment using the supplied remote control. You can control connected equipment with your remote by using the IR Blaster (supplied). 1 Press SETUP on the remote control to display the Setup menu. Setup IR Blaster Language HDMI 1 HDMI 2 HDMI 3 HDMI 4 If you chose setup type C, you cannot use the IR Blaster to control connected equipment. Exit the Setup menu by pressing SETUP on the remote control to skip these steps.
4 Press to highlight Category (equipment type), and press . Select an equipment type from the list, and press . Setup/IR Blaster/HDMI 1 Category Cable Box Maker Satellite Code VCR Te s t ( P o w e r DV D Save and Ex BD 7 Press to highlight Test (Power On/Off) and press . Test to see if the selected equipment power turns on and off. You may need to test more than one code to find the right code for your equipment.
7 Using the supplied remote control Operating your TV AV POWER TV POWER HDMI IN 1 IN 2 COMPONENT IN 5 POWER IN 3 The following buttons are for operating your TV. Press the TV button before using them. IN 4 DISPLAY TV Button PICTURE WIDE CC FREEZE TV POWER Press to turn the TV on and off. TV You must first press the TV function button to operate the TV. INPUT Press to select the input of the TV. PICTURE Press to change the picture mode. WIDE Press to change the wide mode.
Operating equipment connected to the transmitter unit • You must connect the IR Blaster and complete setup for all connected equipment before you can operate them. 1 Press POWER to turn the transmitter unit on. 2 Press IN 1-4 HDMI or IN 5 COMPONENT to select the desired input source. AV POWER TV POWER HDMI IN 1 IN 2 COMPONENT IN 5 POWER IN 3 IN 4 DISPLAY TV The connected equipment can be operated without aiming the remote control directly at the equipment.
For Your Convenience Please contact Sony Customer Support directly if you: • Have questions on the use of your module after reading the Startup Guide or Reference Guide • Experience difficulty operating your module For United States http://www.sony.com/tvsupport or to speak with a support representative: 1-866-918-2485 For Canada http://www.sony.