4-295-278-12(1) Table of Contents Digital Photo Frame Let’s Use Handbook Enjoying More Troubleshooting Index DPF-HD1000/HD800/HD700
Read this before using • Do not press against the LCD screen. The screen may become discolored, and that may cause a malfunction. • Exposing the LCD screen to direct sunlight for a long period may cause malfunctions. • The LCD screen is manufactured using extremely high-precision technology, and over 99.99% of the pixels are operational for effective use. However, there may be some tiny black points and/ or bright points (white, red, blue, or green in color) that constantly appear on the LCD screen.
Table of Contents Table of Contents Let’s Use Let’s Use Identifying the parts ············································································ 4 Compatible Memory Card/USB memory ············································ 6 Preparation: 1 Checking included items ··········································· 8 Preparation: 2 Attaching the stand ··················································· 9 Preparation: 3 Turning on the photo frame····································· 11 Preparation: 4
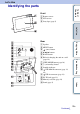
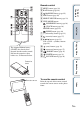
Let’s Use Identifying the parts Table of Contents Front A Remote sensor B LCD screen C Sony logo (page 9) Let’s Use Enjoying More Rear A Speaker B MENU button C (enter) button D v/V/B/b buttons E BACK button Troubleshooting F Holes for hanging the unit on a wall (page 10) G VIEW MODE button (page 16) H 1 (on/standby) button I Standby indicator J USB Mini-B connector (page 14, 42) K USB A connector (page 14) L DC IN jack (page 11) Continued r Index M Memory card slot (page 14) N Stand (page 9) 4GB
Remote control B BACK button (page 20) C MARKING button (page 29) D SORT button (page 30) E SELECT DEVICE button (page 23) Table of Contents A MENU button (page 38) F VIEW MODE buttons SLIDESHOW button (page 16) Let’s Use CLOCK button (page 16) SINGLE button (page 16) INDEX button (page 16) G 1 (on/standby) button (page 12) H (zoom in) button (page 27) I v/V/B/b buttons (page 13) K L (zoom out) button (page 27) IMPORT button (page 21) M N DELETE button (page 31) ROTATE button (page 28) Enjoying Mo
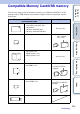
Compatible Memory Card/USB memory Memory cards/USB memory supported by the photo frame • “Memory Stick Micro” (“M2”) Not necessary miniSD/miniSDHC adaptor microSD/microSDHC adaptor Index • microSD card • microSDHC card “M2” adaptor (Duo size) Troubleshooting • miniSD card • miniSDHC card Not necessary Enjoying More • SD memory card • SDHC memory card • SDXC memory card Adaptor Let’s Use • “Memory Stick Duo” (Not compatible/Compatible with “MagicGate”) • “Memory Stick PRO Duo” • “Memory Stick
Table of Contents Let’s Use Enjoying More • The photo frame has been demonstrated to be operable with “Memory Stick Duo” with a capacity of 32 GB or less manufactured by Sony Corporation. • “M2” is an abbreviation for “Memory Stick Micro”. In this section, “M2” is used to describe a “Memory Stick Micro”. • The photo frame has been demonstrated to be operable with an SD memory card with capacity of 2 GB or less.
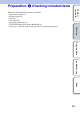
Preparation: 1 Checking included items Table of Contents Let’s Use Make sure that the following items are included. • Digital photo frame (1) • Remote control (1) • Stand (1) • AC adaptor (1) • Operating Instructions (1) • CD-ROM (Digital Photo Frame Handbook) (1) • Warranty (1) (In some regions, the warranty is not packaged together.
Preparation: 2 Attaching the stand Table of Contents Turn the stand clockwise as far as it will go, such that it is firmly attached to the stand socket on the rear panel. Let’s Use • Do not place the photo frame on an unstable or tilted surface. To change the orientation of the photo frame Enjoying More Troubleshooting You can set the photo frame to portrait or landscape orientation by rotating it without moving the stand.
To hang the photo frame on a wall 4 mm (3/16 inch) screws suitable for the holes on the rear of the unit. More than 25 mm (1 inch) Table of Contents 1 Prepare commercially available Ø 5 mm (7/32 inch) Holes for hanging the unit on the wall Let’s Use 10 mm (13/32 inch) 2 Drive the commercially available screws into the wall. Approx. 2.5 mm - 3 mm (1/8 inch) on the rear of the unit. Index • Use screws suited for the wall material.
Connecting the AC adaptor Table of Contents Preparation: 3 Turning on the photo frame Connect the AC adaptor as illustrated below. The photo frame is automatically turned on. Let’s Use To wall outlet Index When using it for the first time c Proceed to “Preparation: 4 Setting up the photo frame” (page 13). If the initial settings have already been made c Proceed to “Enjoying a slideshow” (page 14).
Turning on/off the power Press 1 (on/standby). The standby indicator changes from red to green. Table of Contents To turn on the power To turn off the power Hold 1 (on/standby) pressed until the power turns off. The standby indicator changes from green to red. Let’s Use Enjoying More • Do not turn the photo frame off or disconnect the AC adaptor from an AC outlet or the DC IN jack of the photo frame. Doing so may damage the photo frame.
1 Press MENU with the initial display. 2 Press B/b to select the (Settings) tab. 3 Press v/V to select [Language Setting] then press (enter). (enter). 5 Press v/V to select [Date/Time Settings] then press (enter). 1 Press v/V to select [Date] and press (enter). 2 Press B/b to select the month, day, and year, press v/V to select a value, then press (enter). Enjoying More 6 Set the date.
Enjoying a slideshow Insert the memory card or USB memory firmly into the corresponding slot with its front facing away from the screen. Playback automatically begins, and images in the memory card or USB memory are displayed one after another as a slideshow. Have the labels of memory cards facing outward • When Enjoying More “Memory Stick Duo” USB memory Let’s Use SD memory card Table of Contents Insert a memory card or USB memory.
Let’s Use Enjoying More • Do not simultaneously insert multiple memory cards and USB memory into the memory card slots A/B or the USB connector. If multiple memory cards and USB memory media are inserted, the photo frame may be damaged. • Note the following when you select a slideshow using the image stored in a memory card. – Owing to the characteristics of memory card devices, images may be subject to data errors when read too often. – Do not run a slideshow for a long time with a small number of images.
Changing the view mode 1 Press VIEW MODE on the remote control to select the desired view Table of Contents You can change the view mode to another one except with a slideshow or change the display style as you prefer. mode. Operation button View mode Let’s Use slideshow Displays a single screen, one after another. clock and calendar Displays a clock or calender. single image display Displays a single image on the screen.
Slideshow styles Description Display example Displays a single screen, one after another. Table of Contents Style Single View Clock View Time Machine Displays a calendar with the date and time while showing images one after another. With this style current date and time are displayed. Displays each image with the date and time when it was taken. With this style, the current date and time are not displayed. Displays images while switching among the various slideshow style and effects (page 39).
Single View styles Description Display example Displays an entire image on the screen. Table of Contents Style Entire Image Displays an image over the whole screen. Let’s Use Fit to Screen Displays image information, such as the image number, file name, and shooting date, while displaying the entire image. Fit to Screen (with Exif) Displays image information, such as the image number, file name, and shooting date in “Fit to Screen” mode.
The following information is displayed: – File size – Playback duration – Movie file size (video width × video height) – Video codec – Audio codec Table of Contents Overview of the information display 4 Setting information Icons Meaning 1 Display style (In Single View mode) – Entire Image – Fit to Screen – Entire Image (with Exif) – Fit to Screen (with Exif) Icons Meaning Internal memory SD memory card input USB memory input 3 Image details When a movie file is played – File format (AVI, MOV, MP4,
Playing a movie Table of Contents 1 Press . 2 Select a movie file you want to play. 3 Press (enter). The selected movie file starts playback. Press VOL +/VOL – during playback or playback pause of the movie file. Function To pause playback Operation Press (enter). To resume playback, press To stop playback (enter) again. (enter), normal playback starts from that Press BACK. Troubleshooting • Depending on the movie file, fast forward/backward playback may not be available with the photo frame.
Saving still images Table of Contents Saving images in your photo frame (import) If you save the data of a memory card in internal memory, the still images can be displayed on this photo frame without the memory card. 1 Press Enjoying More IMPORT when an image stored in the memory card is displayed on the screen. (enter). (enter). Continued r Index [Import This Image]: The image currently displayed is imported to the internal memory. This item cannot be selected on the slideshow display.
3 Select the folder in which you want to save the files then press A confirmation screen for importing images is displayed. A new folder is created automatically when you select [New folder]. 4 Select [Yes] and press (enter). Table of Contents (enter). The image(s) is (are) imported to the specified folder. 5 Press (enter) when confirmation screen is displayed. Importing movie files from the memory card to internal memory is not available.
Specifying the playback memory 1 Press SELECT DEVICE. Table of Contents You can specify the device among a memory card, internal memory, etc, the contents of which you want to have displayed. To operate using the buttons on the photo frame • Press MENU then select the (Select device) tab with B/b. Let’s Use If the memory card you want to select is not inserted, insert it now. press (enter). The images in the selected memory are displayed.
Enjoying More 1 Press MENU, select (Settings) tab with B/b, then select [Slideshow Table of Contents Playing a slideshow with background music BGM Settings]. 2 Select [Import BGM] and press (enter). press (enter). A check mark (✔) is displayed next to the selected file. 4 Repeat step 3 if you want to select two or more files. Let’s Use 3 Select a music file you want to play from the built-in music file list then 5 Press MENU. See “Enjoying a slideshow” (page 14).
Importing a music file Table of Contents You can use your favorite music file as background music by importing it to the photo frame. • Before importing a music file, make sure that the file can be played with the photo frame. For files that can be played, see “Background music” (page 56) of “Specifications”. 1 Insert a memory card or USB memory that contains a music file into the 2 Press MENU, select (Settings) tab with B/b, then press v/V to select [Slideshow BGM Settings].
Table of Contents • Playback of the imported music file is enabled only as background music for a slideshow. • The music files provided in the internal memory at the factory as BGM1, BGM2, and BGM3 cannot be deleted. • Up to 40 music files can be imported to internal memory of the photo frame. • Up to 200 music files can be shown on the importing music file list display. • Only the file name is displayed for a music file. A song title and artist’s name cannot be shown.
Adjusting image size and orientation To enlarge an image, press (zoom in) in Single View mode. To reduce an enlarged image, press (zoom out). Table of Contents Enlarging/reducing an image You can enlarge an image from 1.5 times to 5 times (maximum) the original scale. You can pan an enlarged image. Let’s Use To operate using the buttons on the photo frame 1 Press MENU in Single View mode. 2 Press B/b to select the (Editing) tab. 3 Press v/V to select [Zoom] then press (enter).
Rotating an image ROTATE on the remote control. The image rotates 90 degrees counterclockwise each time you press the button. Table of Contents Press To operate using the buttons on the photo frame (enter). • An enlarged image cannot be rotated. • A movie file cannot be rotated. Enjoying More • For an internal memory image, image rotation data will be retained even after the power is turned off. • You can also rotate the index image display. Let’s Use 1 Press MENU in Single View mode.
Registering a favorite mark 1 Press MARKING when an image for which you want to register a mark is displayed on the screen. Table of Contents You can produce a slideshow with only the images preselected bearing the marks. You can easily check for images with marks using the index image display or single view mode. To operate using the buttons on the photo frame (enter). 2 Select the desired mark then press 3 Select an item then press (enter).
Sorting images (Filtering) 1 Press SORT when an image is displayed on the screen. Table of Contents You can sort images stored in internal memory or a memory card according to date, folder, image orientation (vertical/horizontal), marks, or movies/still images. To operate using the buttons on the photo frame 1 Press MENU with an image displayed on the screen. 2 Press B/b to select the (Editing) tab, select [Sort] with v/V, then press (enter). 3 Select the desired option item, then press (enter).
Deleting an image DELETE when an image you want to delete is displayed on the screen. To operate using the buttons on the photo frame 1 Press MENU with an image you want to delete displayed on the screen. 2 Press B/b to select the (Editing) tab, select [Delete] with v/V, then press 2 Select an item then press (enter). (enter). A deletion confirmation screen is displayed. (enter). The image is deleted. 5 Press Enjoying More 3 Press MENU.
To format the internal memory 2 Press B/b to select the (Settings) tab. 3 Press v/V to select [Initialize] then press 4 Select [Format Internal Memory] then press (enter). Table of Contents 1 Press MENU button. (enter). A confirmation screen for initializing the internal memory is displayed. (enter). • Note that all the images added to the internal memory will be deleted by formatting.
Table of Contents Exporting an image from internal memory You can export images in internal memory to a memory card. 1 Press MENU when an image stored in internal memory is displayed on the screen. (Editing) tab. Let’s Use 2 Press B/b to select the 3 Press v/V to select [Export] then press (enter). (enter). 5 Press MENU. A screen for selection of the memory card to which the image is to be exported is displayed.
7 Select a destination folder then press A confirmation screen for exporting the image is displayed. When you select [New folder] the folder in which the image will be stored is created automatically. 8 Select [Yes] then press Table of Contents (enter). (enter). The image is exported. (enter) when the confirmation screen is displayed. The image is copied to the specified memory card. • Any device that is not recognized by the photo frame is displayed in gray and cannot be selected.
Using the auto power on/off timer 1 Press MENU. 2 Press B/b to select the Table of Contents You can use the timer function to turn the photo frame on or off automatically. (Settings) tab. 3 Press v/V to select [Auto Power ON/OFF] then press (enter). Let’s Use 4 Select [Setup Method] then press (enter). Select an item and press (enter). 5 Select [Time Setting] then press (enter). Troubleshooting Set the time for the selected Setup Method as mentioned in “Setting the time” (page 36).
Setting the time When [Advanced] is selected: Table of Contents Perform the setting according to the Setup Method selected in step 4 of “Using the auto power on/off timer” (page 35). 1 Press v/V/B/b to set the time after which you want the power automatically turned on then press (enter). Let’s Use You can set the time by one-hour units independently for each day of the week. The color of the selected time zone changes to blue, and the power turns on.
When [Simple] is selected: Table of Contents 1 Select an item for which you want to set the time. (enter). Select [Enable] 2 Set the time. 1 Select [Auto ON time] or [Auto OFF time] and press (enter). 2 Press B/b to select the hour or minute, press v/V to adjust it, and press (enter). Let’s Use Select [Power-ON timer] or [Power-OFF timer] then press and press (enter). 3 Select the day of the week.
Changing the settings Table of Contents 1 Press MENU. 2 Press B/b to select the (Settings) tab. Let’s Use 3 Press v/V to select the item you want to change then press (enter). The setting screen for the selected item is displayed. (enter). This enables you to change the setting (page 39). 5 Select a setting value then press (enter). 6 Press MENU. Enjoying More 4 Select the setting you want to change then press The menu closes.
Overview of the available settings Slideshow Settings Setting Description Effect Center Cross: Transitions to the next image as though the previous image were being pushed from the center to the four corners. Vert. Blinds: Transitions to the next image as though blinds were being lowered vertically. Horiz. Blinds: Transitions to the next image as though blinds were being pulled horizontally. Fade*: Transitions to the next image by fading the current image out and fading the next image in.
Setting Description ON*: Plays BGM while a slideshow is running. OFF: Not plays BGM while a slideshow is running. Select BGM Selects BGM on a list of music files in internal memory (BGM1*, BGM2*, BGM3*). Import BGM Imports music files stored on a memory card for BGM. Delete BGM Deletes music files imported to internal memory.
General Settings Description Auto display orientation ON*/OFF: Rotates the orientation of images automatically according to the orientation of the photo frame or not. LCD brightness Sets the brightness of the LCD screen to a level from 1 to 10* Image import size Resize*: Resizes the images and save them to internal memory when importing images from a memory card. You can save more images. However, when the images are displayed on a large monitor via a computer, etc.
Connecting to a computer Table of Contents Connecting to a computer allows you to view images in the internal memory of the photo frame with a computer and copy them to a computer and to copy images from a computer to the photo frame. 1 Connect the AC adaptor to the photo frame and to the AC outlet then turn the photo frame on. 2 Connect the computer and photo frame with a commercially available Let’s Use USB cable.
System requirements Recommended OS: Microsoft Windows 7 SP1/ Windows Vista SP2 /Windows XP SP3 Port: USB port Macintosh Table of Contents Windows Recommended OS: Mac OS X (v. 10.4 or later) Port: USB port To disconnect from a computer Enjoying More Troubleshooting • Use a Mini-B TYPE USB cable. If you use a commercially available USB cable, use a USB cable with a Mini-B TYPE plug (be sure to connect the Mini-B TYPE USB connector to the photo frame) shorter than 3 meters.
Table of Contents Copying images and music from a computer • This section shows an example of a connection with Windows 7 SP1. Depending on the OS you use, the screen display and procedures may vary. 1 Connect the photo frame to the computer. 2 When the [AutoPlay] window appears on the computer display, click on [Open folder to view files]. Let’s Use See “Connecting to a computer” (page 42). If the [AutoPlay] window does not appear, select the removable disc then open it.
Copying a music 1 Move the cursor in this window and double-click on the [MUSIC] folder. Table of Contents After performing step 2 of “Copying images and music from a computer” (page 44), proceed as follows: 2 Open the folder that contains the music you want to copy then copy the file to [MUSIC] folder by drag-and-drop. Let’s Use • Copy music files to the [MUSIC] folder. If you copy them to any folder other than the [MUSIC] folder, they cannot be played.
Troubleshooting Troubleshooting Table of Contents Before submitting the photo frame for repair, try using the following guidance to solve the problem. If the problem persists, consult with your Sony dealer or Sony service facilities. x Power supply The power is not turned on. Let’s Use • Is the AC power plug inserted correctly? c Insert the power plug properly. Nothing happens even if you operate the photo frame. c Turn off the power (page 11) and turn it back on again.
Images are not played back in the order of shooting date. Some images are not displayed. Troubleshooting • Did you rename the file with a computer or other device? c If you named or renamed the file on your computer and the file name includes characters other than alphanumeric characters, the file name may not be displayed properly on the photo frame. Also, for a file created on a computer or other device, a maximum of 10 characters from the beginning of the file name can be displayed.
x Playing a movie file Table of Contents A movie file is not played. • Does the mark appear in index or single view mode? c The movie file is not supported by the photo frame (page 55). Fast forward/backward playback is not available. c Fast forward/backward playback of some movie files may not be available with the photo frame An image cannot be saved. Troubleshooting Index Continued r Enjoying More • Is the memory card write-protected? c Cancel write-protection and try again.
An image cannot be deleted. Table of Contents Let’s Use • Is the memory card write-protected? c Use the device you are using to cancel write-protection and try deleting again. • Is the write-protect switch of the memory card in the LOCK position? c Slide the write-protect switch to the enable position. • Are you using a “Memory Stick-ROM”? c It is not possible to delete an image from or format a “Memory Stick-ROM”.
x Photo Frame c Turn off the power (page 12) and turn it back on again. The message “Do you wan to refresh the internal memory?” is displayed. Table of Contents Nothing happens even if you operate the photo frame. c For the refreshing operation, see “About refresh mode” (page 51). A memory card cannot be ejected.
About refresh mode If the remote control does not operate, replace the battery (CR2025 lithium battery) with a new one. 1 Slide the battery holder out while Enjoying More To replace the battery of the remote control Let’s Use • Do not turn off the power while the internal memory is being refreshed. It may cause a malfunction. • We recommend that you perform periodic backup of your data to avoid losing them.
Enjoying More WARNING Battery may explode if mistreated. Do not recharge, disassemble or dispose of in fire. Let’s Use Using a battery other than the specified one may result in the battery’s rupturing. Dispose of used batteries as specified by the local authorities. Do not leave the remote control in a very hot and humid place. Make sure that no foreign objects get inside the remote control when you, for example, replace the battery. • Incorrect use of the battery may cause leakage and corrosion.
Precautions On the AC adaptor Notes on using a memory card “Memory Stick Duo” • For the latest information on the “Memory Stick Duo” types supported by the photo frame, see the “Memory Stick” compatibility information on the Sony Web site. • The photo frame supports FAT32. However, we do not guarantee the operations of all the “Memory Stick Duo” media. • Data reading/recording that requires “MagicGate” copyright protection cannot be performed.
Enjoying More Troubleshooting Index • Some commercially available card adaptors have projected terminals on the back. This type of adaptor may not work properly with the photo frame. • Data reading/recording that requires copyright protection cannot be performed. • When using a card, be sure to check the correct insertion direction of the card. Incorrect insertion may cause damage to the photo frame.
Specifications Model name LCD screen LCD panel Total number of dots DPF-HD1000 25.7 cm/10.1-inches, TFT active matrix 20 cm/8-inches, TFT active matrix DPF-HD700 18 cm/7-inches, TFT active matrix 1,152,000 dots (800 × 3 (RGB) × 480 dots) Effective display area 16:10 Display aspect ratio Actual viewable size 23.4 cm/9.2-inches Total number of dots 1,628,748 dots (914×3 (RGB) × 594 dots) LCD backlight life Compatible file formats*1 Still image 16.2 cm/6.
Model name DPF-HD1000 DPF-HD800 DPF-HD700 Image file name Internal memory capacity*8 DCF format, 256 characters within 8th hierarchy The file name includes characters other than alphanumeric characters, the image may not be displayed on the photo frame. 9,999 files for a memory card/an internal device 2 GB (Approx. 4,000 images*9 can be saved.) Power requirements Power consumption With the AC adaptor Without the AC adaptor DC IN jack, DC 5V At the maximum load: 11.3 W normal mode: 6.
AC adaptor Model name AC-P5022 Table of Contents Power requirements AC 100 V to 240 V, 50 Hz/60 Hz, 0.4 A Rated output voltage DC 5 V, 2.2 A Dimensions (width/height/depth) Approx. 79 mm × 34 mm × 65 mm (3 1/8 inches × 1 3/8 inches × 2 5/8 inches) (excluding the protruding parts) Mass Approx. 105 g (3 3/4 oz) Let’s Use See the label of AC adaptor for more details. Design and specifications are subject to change without notice. Manufactured under license from Dolby Laboratories.
On trademarks and License • • • • Index Continued r Troubleshooting • Enjoying More • • THIS PRODUCT IS LICENSED UNDER THE MPEG-4 VISUAL PATENT PORTFOLIO LICENSE FOR THE PERSONAL AND NONCOMMERCIAL USE OF A CONSUMER FOR (i) ENCODING VIDEO IN COMPLIANCE WITH THE MPEG-4 VISUAL STANDARD (“MPEG-4 VIDEO”) AND/OR (ii) DECODING MPEG-4 VIDEO THAT WAS ENCODED BY A CONSUMER ENGAGED IN A PERSONAL AND NONCOMMERCIAL ACTIVITY AND/OR WAS OBTAINED FROM A VIDEO PROVIDER LICENSED BY MPEG LA TO PROVIDE MPEG-4 VIDEO.
Table of Contents Let’s Use (ii) DECODE AVC VIDEO THAT WAS ENCODED BY A CONSUMER ENGAGED IN A PERSONAL AND NONCOMMERCIAL ACTIVITY AND/OR WAS OBTAINED FROM A VIDEO PROVIDER LICENSED TO PROVIDE AVC VIDEO. NO LICENSE IS GRANTED OR SHALL BE IMPLIED FOR ANY OTHER USE. ADDITIONAL INFORMATION MAY BE OBTAINED FROM MPEG LA, L.L.C. SEE HTTP://WWW.MPEGLA.
Index Index Copying (Associated file)...............................19 Image ................................................44 (Clock and calendar) mode..............16 Music ................................................45 (Editing) tab.........21, 27, 28, 29, 30, 33 (Favorite mark).......................... 19, 29 (Index) mode ...................................16 D [Date/Time Settings] ..............................40 Image ................................................31 (Protected file) ..
Reset ...................................................... 38 Information display ................................19 Rotating an image.................................. 28 Initial display .........................................11 S [Initialize]...............................................41 Internal memory ...............................32 Saving (import) Movies ............................................. 22 Setting...............................................38 Inserting Memory card ......
V Clock and calendar ...........................16 Index.................................................16 Single image display ........................16 Table of Contents View mode .............................................16 Slideshow .........................................16 Volume............................................. 20, 24 Z Zoom out................................................27 Let’s Use Zoom in ..................................................
© 2011 Sony Corporation http://www.sony.