C:\#WORK\@DPF\DPF-V1000N\Writer-OP\06_FinalDelivery\4155758111\4155758111DPFX1000NCEK\01GBDPFX1000NCEK\010COV.
C:\#WORK\@DPF\DPF-V1000N\Writer-OP\06_FinalDelivery\4155758111\4155758111DPFX1000NCEK\01GBDPFX1000NCEK\020REG.fm Master: Left WARNING To reduce fire or shock hazard, do not expose the unit to rain or moisture. Do not expose the batteries to excessive heat such as sunshine, fire or the like. CAUTION Replace the battery with the specified type only. Otherwise, fire or injury may result. Dispose of used batteries according to the instructions.
C:\#WORK\@DPF\DPF-V1000N\Writer-OP\06_FinalDelivery\4155758111\4155758111DPFX1000NCEK\01GBDPFX1000NCEK\020REG.fm Master: Right Disposal of waste batteries (applicable in the European Union and other European countries with separate collection systems) This symbol on the battery or on the packaging indicates that the battery provided with this product shall not be treated as household waste. On certain batteries this symbol might be used in combination with a chemical symbol.
C:\#WORK\@DPF\DPF-V1000N\Writer-OP\06_FinalDelivery\4155758111\4155758111DPFX1000NCEK\01GBDPFX1000NCEK\020REG.fm Master: Left On trademarks and copyrights • , BRAVIA, “PhotoTV HD”, , , “Memory Stick”, , “Memory Stick Duo”, , “MagicGate Memory Stick”, “Memory Stick PRO”, , “Memory Stick PRO Duo”, , “Memory Stick PRO-HG Duo”, , “Memory Stick Micro”, , , “Memory StickROM”, , “MagicGate”, and are trademarks or registered trademarks of Sony Corporation.
C:\#WORK\@DPF\DPF-V1000N\Writer-OP\06_FinalDelivery\4155758111\4155758111DPFX1000NCEK\01GBDPFX1000NCEK\010TOC.fm Master: Right Table of Contents Before operation Enjoying your photo frame in various ways ...............................................7 Features ..........................................8 Checking included items ...............10 Identifying the parts ......................10 Basic operations Preparing the remote control ........14 Setting the stand ..........................
C:\#WORK\@DPF\DPF-V1000N\Writer-OP\06_FinalDelivery\4155758111\4155758111DPFX1000NCEK\01GBDPFX1000NCEK\010TOC.fm Master: Left Using an external device (with Bluetooth) Transferring images using Bluetooth ......................................62 CompactFlash card .........................75 Notes on using a memory card .......76 Specifications ...............................77 Index ............................................79 Using an external device (with a computer) Connecting to a computer .........
C:\#WORK\@DPF\DPF-V1000N\Writer-OP\06_FinalDelivery\4155758111\4155758111DPFX1000NCEK\01GBDPFX1000NCEK\030C01.fm Master: Right.L0 Before operation Enjoying your photo frame in various ways The Sony DPF-X1000N, DPF-V1000N is a digital photo frame for easily displaying images taken with a digital camera or other device, without using a computer.
C:\#WORK\@DPF\DPF-V1000N\Writer-OP\06_FinalDelivery\4155758111\4155758111DPFX1000NCEK\01GBDPFX1000NCEK\030C01.fm Master: Left Features x Support for various memory cards* Supports various memory cards and other devices, such as a “Memory Stick”, CompactFlash card, SD memory card, xDPicture Card, and USB memory. Just insert a memory card removed from a digital camera or other device, and you will be able to view the images immediately. (.
C:\#WORK\@DPF\DPF-V1000N\Writer-OP\06_FinalDelivery\4155758111\4155758111DPFX1000NCEK\01GBDPFX1000NCEK\030C01.fm Master: Right x Automatic rotation of images The photo frame automatically rotates images to their proper orientation. Images are also automatically rotated when the photo frame is set in either the portrait or landscape position. (.
C:\#WORK\@DPF\DPF-V1000N\Writer-OP\06_FinalDelivery\4155758111\4155758111DPFX1000NCEK\01GBDPFX1000NCEK\030C01.fm Master: Left Checking included items Make sure that the following items are included. • Digital photo frame (1) • Stand (1) • Card slot cover (1) • Connector cover (1) • Remote control (1) • AC adaptor (1) • AC power cord (1) • Operating Instructions (this manual) (1) • Read This First (1) • Warranty (1) (In some regions, the warranty is not supplied.
C:\#WORK\@DPF\DPF-V1000N\Writer-OP\06_FinalDelivery\4155758111\4155758111DPFX1000NCEK\01GBDPFX1000NCEK\030C01.fm Master: Right Rear Before operation A EXT INTERFACE connector (.page 62) Connect a Bluetooth adaptor (optional: DPPA-BT1) when you want to transfer images wirelessly from a BLUETOOTH compatible mobile phone or digital camera. You can also connect a digital camera, USB memory, or photo storage compatible with USB mass storage. B USB B connector (.
C:\#WORK\@DPF\DPF-V1000N\Writer-OP\06_FinalDelivery\4155758111\4155758111DPFX1000NCEK\01GBDPFX1000NCEK\030C01.fm Master: Left S T U V Buzzer Brightness sensor Card slot cover Holes for hanging unit on the wall (.
C:\#WORK\@DPF\DPF-V1000N\Writer-OP\06_FinalDelivery\4155758111\4155758111DPFX1000NCEK\01GBDPFX1000NCEK\030C01.fm Master: Right Remote control 13 GB DPF-X1000N, DPF-V1000N 4-155-758-11 (1) Before operation A Auto Touch-up button (.page 40) B VIEW MODE button (.page 22) C SLIDE-SHOW ( ) button (.page 22) D INDEX ( ) button (.page 22) E SINGLE ( ) button (.page 22) F MENU button G BACK button H 1 (on/standby) button I CLOCK ( ) button (.page 22) J Zoom in ( )/Zoom out ( ) buttons (.
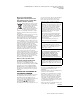
C:\#WORK\@DPF\DPF-V1000N\Writer-OP\06_FinalDelivery\4155758111\4155758111DPFX1000NCEK\01GBDPFX1000NCEK\040C02.fm Master: Left.L0 Basic operations Preparing the remote control The supplied lithium battery (CR2025) has already been inserted into the remote control. Pull out the protective sheet before use as shown in the figure. Replacing the battery of the remote control If the remote control stops working, replace the battery (CR2025 lithium battery) with a new one. 1 Pull out the battery holder.
C:\#WORK\@DPF\DPF-V1000N\Writer-OP\06_FinalDelivery\4155758111\4155758111DPFX1000NCEK\01GBDPFX1000NCEK\040C02.fm Master: Right • Using a battery other than the specified one may result in the battery rupturing. • Dispose of used batteries as specified by the local authorities. • Do not leave the remote control in a very hot and humid place. • Take care that no foreign objects get inside the remote control when you, for example, replace the battery.
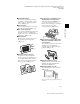
C:\#WORK\@DPF\DPF-V1000N\Writer-OP\06_FinalDelivery\4155758111\4155758111DPFX1000NCEK\01GBDPFX1000NCEK\040C02.fm Master: Left When the photo frame is placed in the portrait orientation, the image is also automatically rotated to its proper orientation. The directions indicated on the direction button on the rear panel depend on the orientation of the photo frame. To display the photo frame on the wall You can hang the photo frame on the wall using the following procedure.
C:\#WORK\@DPF\DPF-V1000N\Writer-OP\06_FinalDelivery\4155758111\4155758111DPFX1000NCEK\01GBDPFX1000NCEK\040C02.fm Master: Right • When you want to re-insert the memory card, remove the photo frame from the wall, then eject and re-insert the memory card while the photo frame is placed on a stable surface. • Store the stand in the place provided when you hang the photo frame on the wall. • Connect the AC power cord to the photo frame and set the power switch to ON.
C:\#WORK\@DPF\DPF-V1000N\Writer-OP\06_FinalDelivery\4155758111\4155758111DPFX1000NCEK\01GBDPFX1000NCEK\040C02.fm Master: Left • After use, remove the AC adaptor from the DC IN 8.4 V jack of the photo frame, and remove the AC power cord from the outlet. • Even if your photo frame is turned off, AC power (house current) is still supplied to it while connected to the wall outlet via the AC adaptor.
C:\#WORK\@DPF\DPF-V1000N\Writer-OP\06_FinalDelivery\4155758111\4155758111DPFX1000NCEK\01GBDPFX1000NCEK\040C02.fm Master: Right Turning off the power Hold 1 (on/standby) on the photo frame or remote control until the power turns off. The standby indicator turns to red from green. Note Do not turn the photo frame off or disconnect the AC adaptor from the photo frame before the standby indicator turns red. Doing so may damage the photo frame.
C:\#WORK\@DPF\DPF-V1000N\Writer-OP\06_FinalDelivery\4155758111\4155758111DPFX1000NCEK\01GBDPFX1000NCEK\040C02.fm Master: Left 6 Select the format of the date. 1 Press v/V to select [Date Display Order] and then press . 2 Press v/V to select a format and then . press • Y-M-D • M-D-Y • D-M-Y 7 Set the day to start the week for the calendar. You can set the day that appears on the very left when the calendar is displayed. 1 Press v/V to select [First Weekday] and then press .
C:\#WORK\@DPF\DPF-V1000N\Writer-OP\06_FinalDelivery\4155758111\4155758111DPFX1000NCEK\01GBDPFX1000NCEK\040C02.fm Master: Right To remove a memory card Remove the memory card from its slot in the opposite direction from which it was inserted. Notes Basic operations • When inserting the memory card, it will only insert part of the way, so do not try to force it as this could damage the memory card and/or photo frame.
C:\#WORK\@DPF\DPF-V1000N\Writer-OP\06_FinalDelivery\4155758111\4155758111DPFX1000NCEK\01GBDPFX1000NCEK\040C02.fm Master: Left Changing the display 1 Press VIEW MODE. The view mode screen is displayed. 3 Press B/b/v/V or VIEW MODE to select the style you want and then press . Note 2 Select the group you want. Group Slideshow If you have not operated the photo frame for an extended period of time, the style the cursor is on will be selected automatically.
C:\#WORK\@DPF\DPF-V1000N\Writer-OP\06_FinalDelivery\4155758111\4155758111DPFX1000NCEK\01GBDPFX1000NCEK\040C02.fm Master: Right Slideshow display Group Slideshow Image Explanation A Single view Displays one image after another. B Multi image view Displays multiple images at the same time. C Clock view Displays images with the present date and time. D Calendar view Displays images, one after another, while showing a calendar. The present date and time is displayed.
C:\#WORK\@DPF\DPF-V1000N\Writer-OP\06_FinalDelivery\4155758111\4155758111DPFX1000NCEK\01GBDPFX1000NCEK\040C02.fm Master: Left Tips • If the power is on, and no memory card is inserted, and no device is connected, the images stored in internal memory are displayed. If no images are saved in internal memory, demonstration mode starts automatically. Demonstration mode ends if a button other than 1 (on/standby) is pressed. • For details on the playback order in a slideshow display, see page 56.
C:\#WORK\@DPF\DPF-V1000N\Writer-OP\06_FinalDelivery\4155758111\4155758111DPFX1000NCEK\01GBDPFX1000NCEK\040C02.
C:\#WORK\@DPF\DPF-V1000N\Writer-OP\06_FinalDelivery\4155758111\4155758111DPFX1000NCEK\01GBDPFX1000NCEK\040C02.fm Master: Left Single view mode Group A Image Style Explanation A Entire image Displays an entire image in the screen. You can switch the images to be displayed by pressing B/b. B Fit to screen Displays an image over the whole screen. You can switch the images to be displayed by pressing B/b.
C:\#WORK\@DPF\DPF-V1000N\Writer-OP\06_FinalDelivery\4155758111\4155758111DPFX1000NCEK\01GBDPFX1000NCEK\040C02.fm Master: Right Index image display Group Style Explanation A Index 1 Displays a list of large thumbnails. You can select an image by pressing B/b/v/V. B Index 2 Displays a list of thumbnails. You can select an image by pressing B/b/v/V. C Index 3 Displays a list of small thumbnails. You can select an image by pressing B/b/v/V.
C:\#WORK\@DPF\DPF-V1000N\Writer-OP\06_FinalDelivery\4155758111\4155758111DPFX1000NCEK\01GBDPFX1000NCEK\040C02.fm Master: Left About the information display 4 Setting information Icons Meaning Protect indication Associated file indication (Displayed when there is an associated file such as a motion file or a miniature e-mail image file.) Displays when you have registered a mark. The following information is displayed.
C:\#WORK\@DPF\DPF-V1000N\Writer-OP\06_FinalDelivery\4155758111\4155758111DPFX1000NCEK\01GBDPFX1000NCEK\050C03.fm Master: Right.L0 Advanced operations Enjoying a slideshow You can display images stored in the internal memory or on a memory card, one after another, automatically. When you turn on the photo frame, the slideshow plays continuously from the previous play. 1 Press VIEW MODE. Changing the settings of the slideshow 1 The menu is displayed. 2 Select Press B/b to select the (Settings) tab.
C:\#WORK\@DPF\DPF-V1000N\Writer-OP\06_FinalDelivery\4155758111\4155758111DPFX1000NCEK\01GBDPFX1000NCEK\050C03.fm Master: Left • When the screen is too bright, it may make you feel nauseous. Be careful that you do not make the brightness settings too bright when you use the photo frame. Tip You can also use the VIEW MODE button on the photo frame.
C:\#WORK\@DPF\DPF-V1000N\Writer-OP\06_FinalDelivery\4155758111\4155758111DPFX1000NCEK\01GBDPFX1000NCEK\050C03.fm Master: Right *: Factory default settings Item Setting Description Slideshow Settings Interval Set a value from 3 sec., 7 sec.*, 20 sec., 1 min., 5 min., 30 min., 1 hour, 3 hours, 12 hours, 24 hours for the interval between images. Note An image may not switch at the intervals you set on the menu, depending on the style of the slideshow, color effect, or image size.
C:\#WORK\@DPF\DPF-V1000N\Writer-OP\06_FinalDelivery\4155758111\4155758111DPFX1000NCEK\01GBDPFX1000NCEK\050C03.fm Master: Left Refresh mode Due to one of the characteristics of the device, images stored for a long time or read many times may be subject to data error when read too often. This photo frame refreshes the internal memory automatically to prevent these errors, depending on the status of the internal memory.
C:\#WORK\@DPF\DPF-V1000N\Writer-OP\06_FinalDelivery\4155758111\4155758111DPFX1000NCEK\01GBDPFX1000NCEK\050C03.fm Master: Right 1 Press B/b/v/V to select the image to Slideshow display add to the album and then press .A check mark will be attached to the check box of each selected image. Repeat this operation to add multiple images at the same time. Index image display Press v/V to select [Add this image], [Selected images] or [Add all images] and then press .
C:\#WORK\@DPF\DPF-V1000N\Writer-OP\06_FinalDelivery\4155758111\4155758111DPFX1000NCEK\01GBDPFX1000NCEK\050C03.fm Master: Left 6 Press when the confirmation screen is displayed. Exporting an image Notes • Images in the internal memory cannot be added to the album. • Do not turn off the power, remove the memory card, or disconnect the external device while an image is being added. Doing so may damage the photo frame or memory card, or damage the data.
C:\#WORK\@DPF\DPF-V1000N\Writer-OP\06_FinalDelivery\4155758111\4155758111DPFX1000NCEK\01GBDPFX1000NCEK\050C03.fm Master: Right 5 Specify the image to export from the image list. 7 About the image list 6 Press v/V to select the device to which to export the image and then press . The confirmation screen used to decide whether to export or not is displayed. Tip A new folder is created automatically when you select [New folder]. 8 Press v/V to select [Yes] and then press . The exporting is finished.
C:\#WORK\@DPF\DPF-V1000N\Writer-OP\06_FinalDelivery\4155758111\4155758111DPFX1000NCEK\01GBDPFX1000NCEK\050C03.fm Master: Left To cancel the selection, select images to cancel and then press to delete the check mark in the check box. 2 Press MENU. The delete confirmation screen is displayed. Deleting an image 1 Press MENU when an image is displayed on the screen. The menu is displayed. 2 Press B/b to select the tab. 6 (Editing) The screen used for editing is displayed.
C:\#WORK\@DPF\DPF-V1000N\Writer-OP\06_FinalDelivery\4155758111\4155758111DPFX1000NCEK\01GBDPFX1000NCEK\050C03.fm Master: Right Tips • You can also use the MENU button on the photo frame. • You can enlarge or reduce the image when you select the index image display. Registering a mark You can produce a slideshow only with images which have been selected beforehand and have been marked. You can easily check for images with marks using the index image display or single view mode.
C:\#WORK\@DPF\DPF-V1000N\Writer-OP\06_FinalDelivery\4155758111\4155758111DPFX1000NCEK\01GBDPFX1000NCEK\050C03.fm Master: Left to the check box of all the images. Go to step 7. 6 Specify the image to which you want to attach a mark from the image list. About the image list During a search: Displays all the images applicable to the criteria used for the search. Other than during a search: Displays all images in the device. Refer to “Searching for an image (Filtering)” (page 39).
C:\#WORK\@DPF\DPF-V1000N\Writer-OP\06_FinalDelivery\4155758111\4155758111DPFX1000NCEK\01GBDPFX1000NCEK\050C03.fm Master: Right Searching for an image (Filtering) You can search for an image which is stored in internal memory or on a memory card. You can filter an image using various criteria, such as the event, the folder in which the image is saved, the orientation of the image or mark, etc. 1 Press MENU when an image is displayed on the screen. The menu is displayed. Press B/b to select the tab.
C:\#WORK\@DPF\DPF-V1000N\Writer-OP\06_FinalDelivery\4155758111\4155758111DPFX1000NCEK\01GBDPFX1000NCEK\050C03.fm Master: Left Specifying the playback device You can specify the memory card or external device to be displayed. 1 Press MENU. The menu is displayed. 2 Press B/b to select the device) tab. (Select The screen used for selecting a device is displayed. Tip Insert the device at this point during the procedure if the device you want to use cannot be selected.
C:\#WORK\@DPF\DPF-V1000N\Writer-OP\06_FinalDelivery\4155758111\4155758111DPFX1000NCEK\01GBDPFX1000NCEK\050C03.fm Master: Right 4 Press v/V to select the method used to save the image. If you select [Save as new image], the image is saved as a new image. When you select [Overwrite], the image is overwritten. A confirmation screen is displayed when you select [Overwrite]. Go to step 7.
C:\#WORK\@DPF\DPF-V1000N\Writer-OP\06_FinalDelivery\4155758111\4155758111DPFX1000NCEK\01GBDPFX1000NCEK\050C03.fm Master: Left Adjusting the image size and position Enlarging/reducing an image You can enlarge or reduce an image in single view mode. 1 To enlarge an image, press (zoom in) on the remote control. To reduce an enlarged image, press (zoom out). Each press of the button enlarges the image further. You can enlarge an image to a maximum of 5 times the original scale.
C:\#WORK\@DPF\DPF-V1000N\Writer-OP\06_FinalDelivery\4155758111\4155758111DPFX1000NCEK\01GBDPFX1000NCEK\050C03.fm Master: Right Tips • For an internal memory image, image rotation data will be retained even after the power is turned off. • You can rotate the image of the index image display. Using the CreativeEdit function You can enjoy decorated images using the CreativeEdit function. 1 Press MENU. The menu is displayed. 2 Press B/b to select the tab.
C:\#WORK\@DPF\DPF-V1000N\Writer-OP\06_FinalDelivery\4155758111\4155758111DPFX1000NCEK\01GBDPFX1000NCEK\050C03.fm Master: Left 4 Select an image. Items When you select a template with multiple images, repeat the procedures below to select an image for each area. / Procedures Zooms an image in or out. Move the image with B/b/ v/V, and then press . Image area Rotates an image 90° clockwise. Adjusts for backlit, out-offocus, or the red-eye phenomenon automatically.
C:\#WORK\@DPF\DPF-V1000N\Writer-OP\06_FinalDelivery\4155758111\4155758111DPFX1000NCEK\01GBDPFX1000NCEK\050C03.fm Master: Right Items Procedures Select the desired stamp with B/b/v/V, and then press . Saves the edited image on a memory card, external device, or in internal memory. x Superimposing characters 1 Press v/V to select [Keyboard] after selecting (Text) using B/b, and then press . The keyboard is displayed. Finishes the making Scrapbook. 2 Input characters.
C:\#WORK\@DPF\DPF-V1000N\Writer-OP\06_FinalDelivery\4155758111\4155758111DPFX1000NCEK\01GBDPFX1000NCEK\050C03.fm Master: Left 3 Select a font. Press B/b/v/V to select [FONT] and then press repeatedly until the desired font appears. You can select from 5 fonts: Gothic, rounded Gothic, Italic, rounded Italic, and hand-writing-style. Making a Calendar 1 From the CreativeEdit menu (page 43), press B/b/v/V to select (Calendar) and then press .
C:\#WORK\@DPF\DPF-V1000N\Writer-OP\06_FinalDelivery\4155758111\4155758111DPFX1000NCEK\01GBDPFX1000NCEK\050C03.fm Master: Right 5 Set the calendar. 1 Press B/b/v/V to select the calendar area and press . The calendar setting window is displayed. Item Settings/Procedures 2 Press B/b/v/V to select a desired stamp, and press . The calendar is displayed. 3 Press B/b/v/V to select a 2 Press v/V to select the item that you .
C:\#WORK\@DPF\DPF-V1000N\Writer-OP\06_FinalDelivery\4155758111\4155758111DPFX1000NCEK\01GBDPFX1000NCEK\050C03.fm Master: Left Superimposing a message on an image Tip To superimpose handwritten characters or an illustration, draw them with a black ink pen on a sheet of white paper, shoot them with a digital camera, and save the image on a memory card. 3 Superimpose a handwritten or a standard format message over the background image.
C:\#WORK\@DPF\DPF-V1000N\Writer-OP\06_FinalDelivery\4155758111\4155758111DPFX1000NCEK\01GBDPFX1000NCEK\050C03.fm Master: Right 4 If necessary, trim the image. When you do not want to trim an image, press . The color selection window is displayed. 5 Press B/b/v/V to select the desired color and then press . The window used for adjusting the superimposed image is displayed. For how to adjust an image, see step 5 on page 44. 6 Press B/b to select and press .
C:\#WORK\@DPF\DPF-V1000N\Writer-OP\06_FinalDelivery\4155758111\4155758111DPFX1000NCEK\01GBDPFX1000NCEK\050C03.fm Master: Left Adding a frame 1 Making layout panels From the CreativeEdit menu (page 43), press B/b/v/V to select (Frame) and then press . The Frame templates are displayed. You can select the layout of the photo displaying as follows. • 2 panels, 4 panels, 9 panels, 13 panels, 16 panels 1 From the CreativeEdit menu (page 43), press B/b/v/V to select (Layout Print) and then press .
C:\#WORK\@DPF\DPF-V1000N\Writer-OP\06_FinalDelivery\4155758111\4155758111DPFX1000NCEK\01GBDPFX1000NCEK\050C03.fm Master: Right Changing the settings of the auto power on/off function 5 Set the time setting. [Simple] The timer function to turn the photo frame on/ off automatically can be set. Main power needs to be switched ON for this function. 1 Press MENU. The menu is displayed. 2 Press B/b to select the (Settings) tab. 3 Press v/V to select [Auto power ON/ OFF] and press .
C:\#WORK\@DPF\DPF-V1000N\Writer-OP\06_FinalDelivery\4155758111\4155758111DPFX1000NCEK\01GBDPFX1000NCEK\050C03.fm Master: Left zone changes to gray, after you select the blue time zone and then press . The power supply of the photo frame is turned off while it is in the gray time zone. Tip The power is turned off automatically at the time you set for [Auto power OFF] when you are using the photo frame. The power is turned on automatically at the time you set for [Auto power ON] during the standby mode.
C:\#WORK\@DPF\DPF-V1000N\Writer-OP\06_FinalDelivery\4155758111\4155758111DPFX1000NCEK\01GBDPFX1000NCEK\050C03.fm Master: Right Setting the time to be alarmed 1 2 Press MENU. You can change the following settings. The menu is displayed. • • • • • • Press B/b to select the (Settings) tab. The settings screen is displayed. 3 Changing the settings Press v/V to select [Alarm Setting] and press .
C:\#WORK\@DPF\DPF-V1000N\Writer-OP\06_FinalDelivery\4155758111\4155758111DPFX1000NCEK\01GBDPFX1000NCEK\050C03.fm Master: Left 3 Press v/V to select the item you want to change and then press . The setting screen of the selected item is displayed. Tip You can also use the MENU button on the photo frame. For example, when [Slideshow Settings] is selected. 4 Press v/V to select the item you want to change and then press . This enables you to set each of the items (page 55).
C:\#WORK\@DPF\DPF-V1000N\Writer-OP\06_FinalDelivery\4155758111\4155758111DPFX1000NCEK\01GBDPFX1000NCEK\050C03.fm Master: Right Items to set *: Factory default settings Item Setting Slideshow Settings Refer to “Enjoying a slideshow” (page 29). Image Quality Picture mode Auto Touch-up Setting Description Expresses the image with the contrast and natural color. Standard* Expresses the image impressively and with enhanced color.
C:\#WORK\@DPF\DPF-V1000N\Writer-OP\06_FinalDelivery\4155758111\4155758111DPFX1000NCEK\01GBDPFX1000NCEK\050C03.fm Master: Left *: Factory default settings Item Setting Description Auto power ON/OFF Setup method Advanced* Sets the auto power ON/OFF function according to a day of the week by one hour units. Simple Sets the auto power ON/OFF function finely in one minute increments. Date/time settings Sets the date, time, first day of a week, etc. (.
C:\#WORK\@DPF\DPF-V1000N\Writer-OP\06_FinalDelivery\4155758111\4155758111DPFX1000NCEK\01GBDPFX1000NCEK\050C03.fm Master: Right *: Factory default settings Item Setting Description Initialize Format internal memory You can format the internal memory. Notes • All the images added to the internal memory will be deleted. • Do not format the internal memory by using a connection to a PC or other external device.
C:\#WORK\@DPF\DPF-V1000N\Writer-OP\06_FinalDelivery\4155758111\4155758111DPFX1000NCEK\01GBDPFX1000NCEK\050C03.fm Master: Left Connecting to a high definition TV to view images 3 Connect the HDMI OUT jack (A type connector) of the photo frame and the HDMI IN jack of the TV. Connecting to a high definition TV The photo frame is capable of HDMI output. If you connect the photo frame to a TV with an HDMI input, you can display images in higher definition on the TV.
C:\#WORK\@DPF\DPF-V1000N\Writer-OP\06_FinalDelivery\4155758111\4155758111DPFX1000NCEK\01GBDPFX1000NCEK\050C03.fm Master: Right Notes • Operation is not guaranteed with all TVs. • If you connect a TV, the LCD screen of the photo frame turns off. • If [Control for HDMI] is set to off in the TV settings, the input is not changed automatically. The setting method differs depending on the TV. Refer to the operating instructions supplied with the TV.
C:\#WORK\@DPF\DPF-V1000N\Writer-OP\06_FinalDelivery\4155758111\4155758111DPFX1000NCEK\01GBDPFX1000NCEK\050C03.fm Master: Left Note With the TV remote control, you cannot perform the following operations: • Zooming in/Zooming out • Crop and save • Add to album/Export/Marking/Delete On control for HDMI When the [Control for HDMI] is set to [ON], you can use the following operations: • Turning off the photo frame power together with the television.
C:\#WORK\@DPF\DPF-V1000N\Writer-OP\06_FinalDelivery\4155758111\4155758111DPFX1000NCEK\01GBDPFX1000NCEK\050C03.fm Master: Right Operating an external device connected to the photo frame You can connect a mass-storage-complaint digital camera, a USB memory device, a photo storage device, or other external device to the photo frame and display an image directly from the external device. Notes 1 2 Connect the photo frame to the AC power source. (.
C:\#WORK\@DPF\DPF-V1000N\Writer-OP\06_FinalDelivery\4155758111\4155758111DPFX1000NCEK\01GBDPFX1000NCEK\060C04.fm Master: Left.L0 Using an external device (with Bluetooth) Transferring images using Bluetooth You can connect a Bluetooth adaptor (optional) to the EXT INTERFACE connector of the photo frame and transfer images from a Bluetooth compatible mobile phone or other device. The transferred images are saved in internal memory. 1 2 3 Connect the photo frame to the AC power source. (.
C:\#WORK\@DPF\DPF-V1000N\Writer-OP\06_FinalDelivery\4155758111\4155758111DPFX1000NCEK\01GBDPFX1000NCEK\060C04.fm Master: Right – Where a wireless LAN is established or a microwave oven is being used near-by, or other electromagnetic waves are emitted. • We cannot guarantee that this product works with all devices enabled with Bluetooth wireless technology. • Sony cannot assume any responsibility for any information leakage that may be caused by the use of Bluetooth communications.
C:\#WORK\@DPF\DPF-V1000N\Writer-OP\06_FinalDelivery\4155758111\4155758111DPFX1000NCEK\01GBDPFX1000NCEK\070C05.fm Master: Left.L0 Using an external device (with a computer) Connecting to a computer You can connect to a computer to view and copy images from the internal memory of the photo frame to the computer, and copy images from the computer to the photo frame. System requirements To connect a computer to the picture frame, your computer must satisfy the following recommended system requirements.
C:\#WORK\@DPF\DPF-V1000N\Writer-OP\06_FinalDelivery\4155758111\4155758111DPFX1000NCEK\01GBDPFX1000NCEK\070C05.fm Master: Right 4 When the [AutoPlay] window appears on the computer display, click [Open folder to view files]. If the [AutoPlay] window does not appear, click [Computer (My Computer)] in the Start menu, and then open the removable disc. 5 Move the cursor in this window and right click, and then click [New] [Folder]. Name this new folder.
C:\#WORK\@DPF\DPF-V1000N\Writer-OP\06_FinalDelivery\4155758111\4155758111DPFX1000NCEK\01GBDPFX1000NCEK\080C06.fm Master: Right Error messages If an error message appears If an error occurs, one of the following error messages may be displayed on the LCD screen of the photo frame. Follow the corresponding solution below to solve the problem. Error message Meaning/Solutions No Memory Stick. / No CompactFlash card. / No SD Memory Card. / No xD-Picture Card. / No External Device.
C:\#WORK\@DPF\DPF-V1000N\Writer-OP\06_FinalDelivery\4155758111\4155758111DPFX1000NCEK\01GBDPFX1000NCEK\080C06.fm Master: Right Error message Meaning/Solutions Error reading the Memory Stick. / • An error has occurred. If this error message is displayed Error reading the CompactFlash frequently, check the status of the memory card or external card. / Error reading the SD device with a device other than the photo frame. Memory Card. / Error reading the • In the case of an external device: xD-Picture Card.
C:\#WORK\@DPF\DPF-V1000N\Writer-OP\06_FinalDelivery\4155758111\4155758111DPFX1000NCEK\01GBDPFX1000NCEK\090C07.fm Master: Right Troubleshooting If trouble occurs Before submitting the photo frame for repair, try using the following guidance to solve the problem. If the problem persists, consult with your Sony dealer or Sony service facilities. Power supply Symptom Check item Cause/Solutions The power cannot be turned on. • Is the AC power plug inserted correctly? c Insert the power plug properly.
C:\#WORK\@DPF\DPF-V1000N\Writer-OP\06_FinalDelivery\4155758111\4155758111DPFX1000NCEK\01GBDPFX1000NCEK\090C07.fm Master: Right Symptom Check item Cause/Solutions Some images are not displayed. • Are the images displayed in the index view? c If the image is displayed in the index view but cannot be displayed as single image, the image file may be damaged even though its thumbnail preview data is fine.
C:\#WORK\@DPF\DPF-V1000N\Writer-OP\06_FinalDelivery\4155758111\4155758111DPFX1000NCEK\01GBDPFX1000NCEK\090C07.fm Master: Left Symptom Check item The file name is not displayed properly. • Did you rename the file with c If you named or renamed the file on your a computer or other device? computer and the file name includes characters other than alphanumeric characters, the file name may not be able to be displayed properly on the photo frame.
C:\#WORK\@DPF\DPF-V1000N\Writer-OP\06_FinalDelivery\4155758111\4155758111DPFX1000NCEK\01GBDPFX1000NCEK\090C07.fm Master: Right Symptom Check item Cause/Solutions Cannot delete an image. • Is the memory card writeprotected? c Use the device you are using to cancel write-protection and try deleting again. • Is the write-protect switch of c Slide the write-protect switch to the the memory card in the enable position.
C:\#WORK\@DPF\DPF-V1000N\Writer-OP\06_FinalDelivery\4155758111\4155758111DPFX1000NCEK\01GBDPFX1000NCEK\090C07.fm Master: Left Remote control Symptom Check item Cause/Solutions Nothing happens • Is the battery inserted in the even if you operate remote control properly? the remote control. — • Is there a protective sheet inserted? c Replace the battery. (.page 14) c Insert a battery. (.page 14) c Insert a battery in the proper orientation. (.
C:\#WORK\@DPF\DPF-V1000N\Writer-OP\06_FinalDelivery\4155758111\4155758111DPFX1000NCEK\01GBDPFX1000NCEK\100ADD.fm Master: Right.L0 Additional information Precautions Safety • Be careful not to set or drop any heavy objects on the power cord, or to damage the power cord in any way. Never operate this photo frame with a damaged power cord. • Should any solid object or liquid fall into the cabinet, unplug the photo frame and have it checked by qualified personnel before operating it any further.
C:\#WORK\@DPF\DPF-V1000N\Writer-OP\06_FinalDelivery\4155758111\4155758111DPFX1000NCEK\01GBDPFX1000NCEK\100ADD.fm Master: Left Restrictions on duplication TV programs, films, video tapes, portraits of other people, or other materials may be copyrighted. Unauthorized use of such materials may infringe the provisions of the copyright law. Disposing of the photo frame Even if you perform [Format internal memory], the data in the internal memory may not be erased completely.
C:\#WORK\@DPF\DPF-V1000N\Writer-OP\06_FinalDelivery\4155758111\4155758111DPFX1000NCEK\01GBDPFX1000NCEK\100ADD.fm Master: Right *6 protection technology developed by Sony using authentication and encryption. The photo frame does not support 8 bit parallel data transfer. Notes on use The SD memory card slot of the photo frame allows you to use the following: • SD memory card*1 • miniSD card, microSD card (An adaptor is necessary.
C:\#WORK\@DPF\DPF-V1000N\Writer-OP\06_FinalDelivery\4155758111\4155758111DPFX1000NCEK\01GBDPFX1000NCEK\100ADD.fm Master: Left • CompactFlash Memory Card (Type I/ Type II) and CF+Card (Type I/Type II)compatible CompactFlash Card*6 You can also use the Smart Media card by using a commercially available CompactFlash card adaptor*7. However, we do not guarantee proper operations for all types of CompactFlash cards. *6 *7 Use a CompactFlash card with a power specification of 3.3V or 3.3V/5V.
C:\#WORK\@DPF\DPF-V1000N\Writer-OP\06_FinalDelivery\4155758111\4155758111DPFX1000NCEK\01GBDPFX1000NCEK\100ADD.fm Master: Right Specifications x Photo frame Model in operation mode including the AC adaptor DPF-X1000N, at the maximum load DPF-V1000N normal mode* 14.6W 10.1W * The definition of the normal mode is a status which allows the performance of a slideshow using images stored in the internal memory with the default settings without inserting a memory card or connecting an external device.
C:\#WORK\@DPF\DPF-V1000N\Writer-OP\06_FinalDelivery\4155758111\4155758111DPFX1000NCEK\01GBDPFX1000NCEK\100ADD.fm Master: Left DPF-V1000N: Approx. 306 × 207 × 168 mm (12 1/8 × 8 1/4 × 6 5/8 inches) (width/height/depth) [When the photo frame is hanging on the wall] DPF-X1000N: Approx. 305 × 210 × 48 mm (12 1/8 × 8 3/8 × 1 15/16 inches) DPF-V1000N: Approx. 306 × 210 × 48 mm (12 1/8 × 8 3/8 × 1 15/16 inches) (width/height/depth) Mass DPF-X1000N: Approx. 1,330 g (47 oz) DPF-V1000N: Approx.
C:\#WORK\@DPF\DPF-V1000N\Writer-OP\06_FinalDelivery\4155758111\4155758111DPFX1000NCEK\01GBDPFX1000NCEK\010IX.fm Master: Right Index A AC adaptor 17 Accessories 10 Adding to the internal memory 32 Alarm 52, 55 Associated file 28 Auto power ON/OFF 55 Auto power on/off 51 Auto Touch-up 40 B Bluetooth 62 C D Date/time settings 19, 56 DC IN 8.
C:\#WORK\@DPF\DPF-V1000N\Writer-OP\06_FinalDelivery\4155758111\4155758111DPFX1000NCEK\01GBDPFX1000NCEK\110BCO.fm Master: Left Printed using VOC (Volatile Organic Compound)-free vegetable oil based ink.