3-197-729-11 (1) Before you begin Digital Photo Printer DPP-FP60/FP60BT Making various printing Printing from a PictBridge camera or external device Printing from a PC Troubleshooting Additional information Operating Instructions Before operating this printer, please read this manual thoroughly and retain it for future reference. 2007 Sony Corporation Please read the supplied "Read This First".
WARNING To reduce fire or shock hazard, do not expose the unit to rain or moisture. For the Customer in Europe This product has been tested and found compliant with the limits set out in the EMC Directive for using connection cables shorter than 3 meters (9.8 feet). Attention The electromagnetic fields at the specific frequencies may influence the picture of this digital photo printer.
Duplication, edition, or printing of a CD, TV programs, copyrighted materials such as pictures or publications, or any other materials except for your own recording or creation is limited to private or domestic use only. Unless you hold copyright or have permission of copyright holders for the materials to be duplicated, use of those materials beyond this limit may infringe the provisions of the copyright law and be subject to the copyright holder’s claim for damages.
Notice for users Program © 2007 Sony Corporation Documentation ©2007 Sony Corporation All rights reserved. This manual or the software described herein, in whole or in part, may not be reproduced, translated or reduced to any machine readable form without prior written approval from Sony Corporation.
Printing from a PictBridge camera or external device Printing from the PictBridge digital camera ................................. 28 Printing from a Bluetooth-compliant device ............................................. 29 Compatible profiles for Bluetooth communication ....................................... 29 Printing procedures ................................. 29 Printing from an external device ........... 31 Additional information Precautions ...........................................
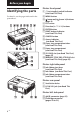
Before you begin Identifying the parts For details, see the pages indicated in the parentheses. Printer front panel 1 1 (on/standby) switch/indicator (.Read This First) 2 MENU button 3 (zoom out)/ (zoom in) buttons (page 8) 4 LCD screen 5 Direction (f/F/g/G) buttons 6 ENTER button 7 PRINT button/indicator (.Read This First) 8 CANCEL button 9 Access indicator (.Read This First) 0 Paper tray compartment door (.Read This First) qa Paper tray compartment (.Read This First) qs SD CARD slot (.
LCD screen display An image preview 1 Input/setting indications Input indications and settings information for an image are displayed. Icons Meaning Protect indication DPOF preset indication Associated file indication (Displayed when there is an associated file such as a motion file or a miniature e-mail image file.
Image list 1 Cursor (orange frame) You can move the cursor by pressing g/ G/f/F. 2 Operation tips 3 Scroll bar Indicates the position of the image among the total number of images. 8 GB Switching the screen display between an image preview and image list You can switch an image preview and the image list as follows: • To display the image list In an image preview, press (zoom out). When an image is enlarged, press repeatedly.
Making various printing Making easy printing (Index/DPOF/All) The Easy Printing menu allows you to print multiple images stored on a memory card or an external device at one time. The printer provides the following three easy printing methods: Buttons to be used in easy printing g/G/f/F/ENTER Making various printing • Index printing You can print a list (index) of all the images contained in a memory card or an external device, which allows you to check the contents of the selected media easily.
3 Press f/F to select “Index Print”, “DPOF Print”, or “Print All” and then press ENTER. The confirmation dialog box is displayed. Note If there are no DPOF preset images when you selected “DPOF Print,” an error message will be displayed. 4 Press g/G to select “Yes” to start printing or “No” to cancel printing, and then press ENTER. Editing an image Displaying the Edit menu You can display the Edit menu and edit or add an effect to an image. You can print or save an image being previewed.
Cursor Edit menu Enlarging and reducing an image size 1 2 Display the Edit menu. Press (zoom in) to enlarge an image or (zoom out) to reduce the size of it. Each time you press the button, the image becomes larger or smaller: Items / : up to 60% Procedures Increases or reduces the size of an image by pressing the buttons on the printer. Moves an image. Rotates an image. Adjusts the picture quality of an image. Note The picture quality of an enlarged image may be deteriorated depending on its size.
Adjust icon Rotating an image 1 2 Adjust menu Display the Edit menu (page 11). Press g/G to select (Rotate) and then press ENTER. The Rotate menu is displayed. Rotate icon Rotate menu 3 Press f/F to select the desired adjustment tool and press ENTER. The adjustment slider appears. When “Brightness” is selected. 3 Press f/F to select the direction to rotate the image and then press ENTER. • Rotate 90° Clockwise: Each time you press ENTER, the image rotates 90° clockwise.
Adding a special filter to an image 1 2 Display the Edit menu (page 11). Press g/G to select then press ENTER. (Filter) and The Filter menu is displayed. Filter menu Filter icon Correcting the red-eye phenomenon You can correct the red-eye phenomenon of a subject shot using a flash. Note 1 2 Display the Edit menu (page 11). Press g/G to select (Red-eye correction) and then press ENTER. The adjustment frame appears on the image, which indicates the range for red-eye correction adjustment.
3 Press ENTER. The frame is fixed in the current position. To change the size of the adjustment frame Press g/G to select (Enlarge) or (Reduce) and press ENTER. Each time you press ENTER, the frame becomes larger or smaller. You can also enlarge or reduce the size by pressing (zoom in) or (zoom out) buttons on the printer. Printing an edited image 1 The dialog box to specify the print quantity is displayed. 2 4 Press g/G to select Press ENTER. The adjustment takes effect.
The dialog box for setting date is displayed. You can save the date with the image. 2 Set date. Press f/F to select the number and press g/G to select the day, month or year. Then press ENTER. With images saved in a memory card or an external device, you can make the following prints: Menu You can make... Layout Print A print with 2/4/9/13/16 split images. Calendar Calendars with your favorite images.
2 Press g/G to select (Creative Print) and then press ENTER. The Creative Print menu is displayed. Making layout prints You can make a print with 2-split, 4-split, 9split, 13-split, or 16split images. 1 2 Display the Creative Print menu. Press g/G to select “Layout print”, then press ENTER. The layout print templates are displayed. To undo the operation midway Press CANCEL. The window of the previous step is displayed. Depending on the step, you cannot undo the operation.
4 Press g/G/f/F to select the desired image area and press ENTER. 7 Press g/G/f/F to select the desired image, and then press ENTER. The window used for adjusting the image position is displayed. and press The selected image is added to the image area. When you select a template with multiple images, repeat the steps 4 through 7 to select an image for each area. The window for selecting an image is displayed. 5 Press g/G to select ENTER.
Image area Calendar area 2 Press f/F to select the following items and then press g/G to select an option. Tip You can select and set an image area or calendar area in any order. 4 Item Select an image. Start Y/M Set the first month and the year starting the calendar. Press g/G to select the month or year and press f/F to set the number. Press ENTER. When you select a template with multiple images, repeat the procedures below to select an image for each area.
Viewing a slideshow You can perform a slideshow of the images saved in a memory card or an external device. You can also manually print an image being displayed. 3 The window to specify the way how images are switched is displayed. Press f/F to select “Automatic” to switch images automatically or “Manual” to switch them manually. Then press ENTER. 5 Press f/F to select “Execute”, and press ENTER.
Searching for an image The Search menu allows you to search a memory card or an external device for an image by image number or date. Note You can search for the images saved as DCF files only. Buttons to be used in this section g/G/f/F/ENTER 3 Press f/F to select the search key and press ENTER. The dialog box used for specifying the criteria for searching is displayed. 4 Press g/G to select an item and press f/F to specify numbers. • When you select “By File No.
• When you select “By Folder No.”: Specify the folder number of the images you want to search for: Filing images Buttons to be used in this section g/G/f/F/ENTER CANCEL MENU Press ENTER. Searching starts. When the search is complete, the search results will be displayed. If no images have been found “No images were found” will be displayed. 6 Press ENTER. Deleting selected images You can select and delete images on a memory card. 1 The menu bar is displayed. The searched image is displayed.
3 Press f/F to select “Delete Image” and press ENTER. Formatting a “Memory Stick” The image list is displayed. You can format a “Memory Stick”. Trash icon 1 Press MENU. The menu bar is displayed. 2 Press g/G to select (File operation) and then press ENTER. The File operation menu is displayed. 3 Press f/F to select “Memory Stick Format” and press ENTER. The confirmation dialog box is displayed. 4 Press g/G/f/F to move the trash icon to the image you want to delete, then press ENTER.
Changing the print settings (Print setup) 2 Press g/G to select (Print setup) and then press ENTER. The Print setup menu is displayed. Print setup menu The Print setup menu allows you to change various print settings listed on pages 24 and 25. Buttons to be used in this section CANCEL MENU 1 Note Press MENU. Setting items which cannot be selected and changed are displayed in gray. The menu bar is displayed.
Item Settings Contents Auto Fine Print 3 Photo*/ Vivid The function automatically corrects the picture quality so that an image may be printed in more vivid, clear and beautiful pictures. It is especially effective for a darker image with low contrast. The pictures are corrected to reproduce natural skin colors, vivid tree leaf green, or clear sky blue. •Photo: Adjusts an image automatically so that the image is printed with natural and beautiful pictures.
Item Settings Contents Date Print On Prints the date of shooting with an image when the image is a file recorded in the DCF (Design rule for Camera File system) format. To make a print with the date of shooting, shoot an image in the DCF file format. When the image is saved with the printer, the date of saving is printed. Off* Prints an image without the date. Adjusts the colors and sharpness of a print.
Changing the display and printer preferences (Display/ Printer setup) 2 Press g/G to select (Display/ Printer setup) and then press ENTER. The Display/Printer setup menu is displayed. Display/Printer setup menu The Display/Printer setup menu allows you to change the display and printer preferences listed on page 27. Buttons to be used in this section g/G/f/F/ENTER CANCEL MENU 1 3 The setting window for the selected item is displayed (next page).
Item Listing Order Icon Contents Ascending* In the image list window, the images are displayed in the order of their image numbers, starting from the smallest number. Descending In the image list window, the images are displayed in the order of their image numbers, starting from the largest number. On* In the image list window, the images without thumbnail (miniature image used as index) data will be displayed as an icon.
Printing from a PictBridge camera or external device Printing from the PictBridge digital camera You can connect a PictBridge-compliant digital camera and print an image directly from your digital camera. When printing from a PictBridge connector, make sure to remove memory card(s) from the printer in advance. 1 3 Connect the printer to the AC power source (. Read This First). Press 1 (on/standby) switch to turn on the printer. The 1 (on/standby) indicator of the printer lights in yellow green.
Printing from a Bluetooth-compliant device By connecting the Sony DPPA-BT1* Bluetooth USB adaptor to your printer, you can print an image of a Bluetoothcompliant mobile phone, digital camera, or other device. * DPPA-BT1 is supplied with the DPP-FP60BT and is optional with the DPP-FP60. Maximum number of pixels to be handled 6 400 (H) x 4 800 (V) dots (Maximum 5 MB or less) Printing procedures When printing from a PictBridge connector, make sure to remove memory card(s) from the printer in advance.
For printing procedures, refer to the manual of the Bluetooth device you use. • Since a Bluetooth device and a wireless LAN (IEEE802.11b/g) device use the same frequency ranges, wave interferences may occur when the product is used near a device equipped with a wireless LAN. This may cause deterioration in the communication speed and connection conditions.
Printing from an external device You can connect a mass-storage-complaint digital camera, a USB memory, a photo storage device, or other external device and print an image directly from the external device. Use the USB cable supplied with the digital camera or other external device, if necessary. Printing in the direct mode is possible. To PictBridge connector Notes 1 Set your digital camera or other external device ready for printing with the Mass Storage-compliant printer.
Printing from a PC You can print the images from a PC by installing the supplied software on your PC and connecting it to the printer. This section explains how to install the supplied software on your PC and how to use the supplied Picture Motion Browser software to print an image. Please also refer to the operating instructions supplied with your PC for operating the PC. Installation of the software is necessary only when you connect the printer to your PC for the first time.
Notes Installing the printer driver Follow the procedures below to install the driver. Notes • Before installing the driver, do not connect the printer to the PC . • When using the Windows Vista/XP/2000, log on to Windows as a “Computer administrator” user account. • Be sure to close all running programs before installing the software. • The dialog boxes in this section are those in Windows XP, unless otherwise specified.
Note Use a B-type USB cable shorter than 3m in length. 9 Wait for a while, then check to see that “Sony DPP-FP60” is added to the “Printers and Faxes”. The setup starts. 5 When “Sony DPP-FP60/70/90 printer driver has been successfully installed.” dialog is displayed, click “Finish”. 6 Connect the printer to the AC power source (. Read This First). 7 Press 1 (on/standby) switch to turn on the printer. 8 Connect the USB connectors of the printer and your PC with a USB cable (not supplied).
Uninstalling the printer driver 12 Select “Windows Driver Package – Remove the printer driver as follows: 1 Disconnect the USB cable (not supplied) from your printer and the PC. 2 Click “Start” - “Printers and Faxes”. 3 Select “DPP-FP60”, and click “Delete” from the “File” menu. The confirmation dialog box is displayed. 4 5 Click “Yes”. Check to see that “DPP-FP60” is removed from the “Printers and Faxes” window.
5 Click “Next.” The license agreement dialog box is displayed. 6 Read the agreement thoroughly, and if you agree, check “I accept the terms of the license agreement” and click “Next”. Uninstalling the Picture Motion Browser When this software is no longer needed, remove it from your PC as follows: 1 2 Click “Start” - “Control Panel”. 3 Select “Sony Picture Utility” and click “Change/Remove” . Open “Add or Remove Programs.” The software uninstallation starts.
Printing photos from the Picture Motion Browser 2 Click “Start”. You can use the Picture Motion Browser to print an image from your PC using P size print paper. 1 Start the Picture Motion Browser window using either of the following methods: The main window of the Picture Motion Browser is displayed. When the Picture Motion Browser is started for the first time The dialog box to register a viewed folder is displayed. If images have already been saved in the “My Pictures” folder, click “Register Now.
3 Click the folder containing the photos you want to print. •Print date taken: When checked, an image is printed with the date of shooting if the image is a file recorded in the DCF (Design rule for Camera File system) format. As an example, the “sample” folder is selected in the following explanation. 4 Select the photos that you want to print and click (print). Properties Specifies paper size, orientation, and other details. The Print dialog box is displayed.
Items Functions Orientation Select the orientation of an image when printed: •Portrait •Landscape Page Order Select the order of the pages when printed: •Front to Back •Back to Front Pages Per Sheet Specify the number of copies per sheet to be printed. Select “1”. 8 Click “Advanced”. The “DPP-FP60 Advanced Options” dialog box is displayed.
Items Functions Printer Features •Borderless Print: To print an image without borders, select “ON”. To print with borders, select “OFF”. Depending on the application software, an image will be printed with borders even if “ON” is selected. Set an image to be printed fully in the print range. 9 In the “Paper/Quality” tab, specify the color or paper source. Items Functions Tray Selection From the “Paper Source” dropdown list box, elect “Automatically Select”. Color To print in colors, select “Color”.
To display the Windows help 2 Click on the upper right on the dialog box and then click the desired item on the screen. Select the folder you want to register and then click “Register.” To stop printing 1 Double-click on the printer icon on the taskbar, and open the “Print” dialog box. 2 Click the document name that you want to cancel printing of and then click “Cancel” from the “Document” menu. Note You cannot register the whole drive. The dialog box used for confirming the deletion is displayed.
Printing from a commerciallyavailable application software You can use a commercially-available application software to print an image from the DPP-FP60. Select “DPP-FP60” as “Printer” in the print dialog box, and select the print paper size in the page setup dialog box. For details in print settings, see steps 6 and 7 on pages 38 and 39.
Troubleshooting If trouble occurs If you run into any problems using the printer, use the following guidance to solve the problem. If the problem persists, consult your Sony dealer. Power Symptom Check Cause/Solutions The 1 (on/ standby) switch cannot be turned on. • Is the AC power cord properly connected? c Connect the AC power cord to an AC outlet securely. (.Read This First) Displaying images Check Cause/Solutions The LCD screen displays no images.
Symptom Check Cause/Solutions Some images in the image list are not displayed or not printed even if they are displayed. • Are thumbnail images displayed in the image list? c If the image is displayed but cannot be printed, the file used for printing is damaged. c If there are no images stored in the memory card or an external device, the “No image file” message appears.
Symptom Check Cause/Solutions Some images in the image list are not displayed or not printed even if they are displayed. • Did you name or rename an image file with your PC? c When you name or rename an image file on your computer and its file name includes characters other than alphanumeric characters, the file name may not be displayed correctly or the image may not be displayed on the printer (read error).
Printing Symptom Check Paper does not feed. • Is the print paper properly c If print paper is not properly loaded, set in the paper tray? the printer may develop trouble. (.Read This First) Cause/Solutions Check the following: • Insert the correct set of print paper and ink ribbon. • Load the print paper in the correct direction in the tray. • You can insert the maximum 20 sheets of print paper into the tray. If the sheets exceeds 20, remove the extra sheets.
Printed results Symptom Check Cause/Solutions The printed pictures are inferior in quality. • Did you print preview image data? c Depending on the type of digital camera used, preview images may be displayed along with the primary images in the thumbnail list. The printed quality of the preview images will not be as good as the primary images. Note that if you delete the preview images, the data for the primary images may be damaged.
Symptom Check The printed pictures are inferior in quality. • Did you shoot an image in c When you shoot an image in the RAW the RAW file format? file format, a highly-compressed JPEG file may be also recorded. As the printer does not support the RAW file format, it may use the JPEG file to print an image. A RAW file can be printed from a PC. For details, see the operating instructions of the digital camera you are using.
Symptom Check Cause/Solutions c Because of differences in the phosphor method or profiles of a LCD screen, please regard the image being displayed on the display as just a reference. To adjust picture quality, do either of the following: – Menu - Print setup - Color Setting (.page 25) – Menu-Edit-Adjust (.page 12) (The setting takes effect only on the image being displayed.
Symptom Check Cause/Solutions The image cannot be printed fully in the print range. Borders remains. • Did you select “Yes” for “Borders” in the Print setup menu? c Set “No” by selecting Menu - Print setup - Borders. (.page 24) • Is the aspect ratio of the image correct? c Depending on the type of digital camera used, the aspect ratio of the recorded image differs, so the image may not be printed covering the entire printable area.
Symptom Check Cause/Solutions The picture is too bright, dark, reddish, yellowish, or greenish. c Adjust an image by selecting Menu Edit - Adjust. (.page 12) The eyes of the subject are red. c Adjust for the red-eye phenomenon by selecting Menu - Edit - Red-eye correction. (.page 13) Red-eye correction does not take effect with “Red-eye correction” menu. c Set the size of the adjustment frame to be two to seven times as large as the eye. (.
Saving or deleting an image Symptom Check Cause/Solutions You cannot save • Is the memory card or an an image. external device protected? c Use your digital camera or external device to release the protection and then try saving again. • Is the write-protect switch of the memory card in the LOCK position? c Slide the write-protect switch to the write enable position. (.page 66) • Is the memory card full? c Delete unnecessary images (.
Others Symptom Check Cause/Solutions You cannot insert the ink ribbon smoothly. c If the ink ribbon does not click into place, remove it and then re-insert it. Only when the ink ribbon is too slack to be loaded, wind the ink ribbon in the direction of the arrow to remove the slack. (.Read This First) The ink ribbon cannot be removed. c Turn off the 1 (on/standby) switch and then turn it on. After the motor sound stops, try to remove the ink ribbon.
Connecting with a digital camera Symptom Check Cause/Solutions The PictBridge mark does not appear on the LCD screen of the digital camera. • Is the digital camera connected correctly? c Connect the cable correctly. • Is the 1 (on/standby) switch turned on? c Turn on the 1 (on/standby) switch • Does the firmware of your c See the manual supplied with your camera, or consult with the digital camera support the manufacturer.
Connecting with a computer Symptom Check Cause/Solutions The images of the memory card or an external device inserted in the printer are not displayed on the PC. c The printer does not provide the function for viewing the memory card or an external device images from the printer. You lost the supplied CDROM and want to obtain a new one. c Please download the printer driver from the Customer support home page (.page 69). Or contact your Sony dealer.
Symptom Check • Is there an anti-virus The printer program or other driver cannot be program running on installed. the system? Cause/Solutions c If there is an anti-virus program or other program running on the system, exit it and then start installing the driver. • Did you log onto c To install the driver in Windows Vista/ Windows Vista/XP/ XP/2000 Professional, log onto Windows 2000 Professional using using an Administrator user account.
Symptom Print quantity specified in the “Pages Per Sheet” in the “Layout” tab of the “Sony DPPFP60 Properties” dialog box does not match the actual print quantity and printed results. Colors of the printed image from a PC are different from those printed from a memory card. Check Cause/Solutions c Depending on the application you use, the print quantity setting of the application you use may have priority over the setting specified in the printer driver dialog box.
If an error message appears If an error occurs, the following error messages may be displayed on the LCD screen. Follow the solution described here to solve the problem. Printer Error messages Meaning/Solutions Error occurred with printer. Turn it c An error has occurred with the printer. Unplug off and on, then retry. the AC power cord of the printer, connect it again and then try operating again. If this occurs again, consult with your Sony dealer or Sony service facilities.
Error messages Meaning/Solutions Protected. Cancel protect then try again. c The “Memory Stick” is write-protected. Release the write-protection. (.page 66) The Memory Stick/SD Card/ External Device is full. c There is no free memory space in the selected memory card or external device. Delete unnecessary images or replace with a one having sufficient memory space. The Memory Stick/SD Card/ External Device has trouble. c An error may have occurred.
Ink ribbon Error messages Meaning/Solutions No ink ribbon. Insert ink ribbon and press [PRINT]. c The ink ribbon is not inserted in the printer. Set the ink ribbon into the printer. (.Read This First) If “cleaning cartridge” is displayed, set the cleaning cartridge. No ink ribbon. Insert P size ink ribbon and press [PRINT]. End of ink ribbon End of ink ribbon. Insert P size ink ribbon and press [PRINT]. Ink ribbon type incorrect. Insert P size ink ribbon and press [PRINT].
If paper jams If the print paper jams, an error message is displayed and you cannot make printing. Please do not remove the paper tray and ink ribbon from the printer, and remove the jammed paper. In case you removed the paper tray, do not re-insert the paper tray until the jammed paper is ejected. 1 Turn off the power of the printer and then turn it on. Please wait for the print paper to be ejected automatically.
4 Place the cleaning sheet into the paper tray with the no-imprint side facing up. surface without imprints 5 Set the paper tray into the printer and press PRINT. The cleaning cartridge and cleaning sheet will clean inside the printer. After the cleaning is finished, the cleaning sheet is automatically ejected. 6 Remove the cleaning cartridge and sheet from the printer. Tip Keep the cleaning cartridge and cleaning sheet together for future cleaning.
Additional information Precautions On safety On installation • Avoid placing the printer in a location subject to: – vibration – high humidity – excessive dust – direct sunlight – extremely high or low temperatures • Do not use electrical equipment near the printer. The printer will not work properly in electromagnetic fields. • Do not place heavy objects on the printer. • Leave enough room around the printer so that the ventilation holes are not blocked.
On restrictions on duplication If duplicating documents with the printer, pay special attention to the following: • Duplication of banknotes, coins, or securities is against the law. • Duplication of blank certificates, licenses, passports, private securities, or unused postal stamps is also against the law. • TV program, films, video tapes, others’ portraits or other materials may be copyrighted. Unauthorized video printing of such materials may infringe the provisions of the copyright law.
Notes on storing print packs About the Memory Cards About the “Memory Stick” What is “Memory Stick”? “Memory Stick” is a compact-size IC recording medium with a large capacity. It has been designed not only for exchanging/ sharing digital data among “Memory Stick” complaint products, but also for serving as an insertable/removable external storage medium that can save data.
copyrightprotected data correctly. When the authentication is established, the data encryption is performed. When the data is played, the authentication is also performed. Only when authentication is established, the data is decrypted to the original status and played. Copyright-protected data cannot be played with a device other than authenticated ones. *2 The printer is equipped with a slot compatible with both standard-size and Duo-size media.
• When you use a “Memory Stick Duo” without the write-protect switch, be careful not to edit or delete the data by accident. • When you slide the write-protect switch of the “Memory Stick Duo”, use a thin-pointed device. • Do not attach any other material than the supplied label on the labeling position. When you attach the supplied label, be sure to attach it to the labeling position. Be careful that the label does not stick out.
Specifications x Printer Printing method Dye sublimation printing (Yellow/ Magenta/Cyan 3 pass) Resolution 300 (H) x 300 (V) dpi Image processing per dot 256 levels processing (8 bits for each Yellow/Magenta/Cyan), approx. 16 770 000 colors Printing size P (Post Card/4 x 6 inch) size: 101.6 x 152.4 mm (maximum, borderless) Printing time (per sheet) Memory card*1*2*3*4: Approx. 64 sec. PictBridge*3*5: Approx. 75 sec. Via PC*6: Approx. 61 sec. Input/Output connectors USB for PC connection USB 1.
Dimensions Approx. 60 x 30.5 x 122 mm (2 3/8 x 1 1/4 x 4 7/8 inches) (w/h/d, excluding protruding parts and cables) Mass Approx. 305 g (11 oz) *4: *5: Design and specifications are subject to change without notice. *6: * The total number of sheets of P size print paper that the printer can print is estimated to be approximately 2,000. *1: Print Settings: Borderless, No time stamp, AutoFine Print 3: ON (Photo) *2: When printing a photo (4.
Glossary DCF (Design rule for Camera File system) This camera conforms with the DCF (Design rule for Camera File system) standard established by JEITA (Japan Electronics and Information Technology Industries Association) to maintain file exchangeability and compatibility between digital cameras and related products. Complete exchangeability and compatibility, however, are not guaranteed.
Index A Adjusting an image 12 All printing 9 Associated file indication 7 Auto Fine Print 3 24 B Bluetooth device 29 Borders/Borderless 24, 40 C D Date Display Order 27 Date print 25 Deleting an image 21 Demonstration mode 27 Detailed image data display 7 Display/Printer setup 26 DPOF 7, 9 O Easy printing 9 Edit menu 10 Enlarging and reducing an image size 8, 11 Error messages 58 Exif Print 24 External device 31 On/standby indicator 28, 31, 34 On/standby switch 28, 31, 34 Orientation 39 P Language 2
S Saving an image 14 Screen indications 7 SD Card Notes on use 67 Types 67 Searching for an image 20 Sepia 13 Setting the print quantity 7 Slideshow 19 Special filter 13 Specifications 68 Switching the screen display 8 System requirement 32 T Troubleshooting 43 U Uninstalling Picture Motion Browser 36 Printer driver 35 USB connector 34 W Write-protect switch 66 Z Zoom in 8 Zoom out 8 Printed using VOC (Volatile Organic Compound)-free vegetable oil based ink.