3-206-417-12 (1) Printer Driver Installation Guide This guide describes installation and use of the Printer Drivers for Windows 2000, Windows Me, Windows 98, and Macintosh. Before Using this Software Before using the printer driver, be sure to read the “ReadMe” file located in the same folder of the printer driver on the CD-ROM.
Windows 2000 Table of Contents Windows 2000 Printer Driver Installing the Printer Driver .................................4 Removing the Printer Driver ................................5 To remove the printer driver ...............................5 To delete the INF file ..........................................5 Using the Printer Driver ........................................6 [Paper] Tab ..........................................................6 [Graphics] Tab ..........................................
Windows 2000 Printer Driver DPP-MP1
Windows 2000 5 Make sure that the [Search for a suitable driver ...] option is selected, and then click the [Next] button. The next screen opens. 6 Insert the provided “digital photo printer for DPPMP1” CD-ROM into the CD-ROM drive. 7 Click the [Specify a location] check box on, and then click the [Next] button. The following dialog box opens. 8 Click the [Browse] button, click the [Win2000] folder on the CD-ROM, and then click the [OK] button. The next screen opens.
Windows 2000 9 Click the [Next] button. Removing the Printer Driver This section describes the procedure to remove the printer driver. After removing the printer driver, delete the INF file as described further. To remove the printer driver If the [Digital Signature Not Found] dialog box opens, click the [Yes] button. The next screen opens. 1 Turn on the computer. 2 Select [Printers] from [Settings] in the [Start] menu. The [Printers] window opens. 3 Select the printer that you want to remove.
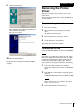
Windows 2000 Using the Printer Driver You can use the printer driver [Printing Preferences] to set the default settings for the paper size, orientation, and other important settings. Open the [Printers] folder in the [Control Panel], right-click the [Sony DPP-MP1] icon, and then select [Printing Preferences]. [Orientation] Select [Portrait] or [Landscape] for the print direction. [Copies] Set the number of copies to print. You can select from 1 to 24 for the number of copies.
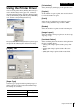
Windows 2000 [Graphics] Tab [Color Balance] This tab presents adjustments for image color, brightness and so forth. From the [Color Adjust] pull-down list, you can select [Digital Camera Correction], [Color Balance], [Sharpness], or [Color Correction], and then adjust the image with the settings provided for each selection.
Windows 2000 [Color Correction] Select the color correction method. • Select [Printer Hardware Color Correction] to have the printer correct the color automatically. • Select [ICM Color Correction] to use a color profile for color correction.
Windows Me Printer Driver DPP-MP1
Windows Me 6 Click the [Finish] button. A dialog box opens. 7 Click [Yes] to re-start your computer. If the [System Settings Change] dialog box does not open after the desktop screen appears, re-start the computer. 8 After the computer re-starts, the next screen appears. Installing the Printer Driver 1 Connect the DPP-MP1 to the computer. 2 Switch the DPP-MP1 on. 3 Switch on the computer. After Windows Me starts, the [Add New Hardware Wizard] opens.
Windows Me 10 Click the [Finish] button. After the files are copied, the next screen opens. Removing the Printer Driver This section describes the procedure to remove the printer driver. After removing the printer driver, remove the Sony USB driver. To remove the printer driver 11 Click the [Finish] button. The printer driver installation for the USB connection is complete. 1 Turn on the computer. 2 Select [Printers] from [Settings] in the [Start] menu. The [Printers] window opens.
Windows Me 4 Click the [OK] button. When the removal procedure finishes, the following dialog box opens. Using the Printer Driver You can use the printer's [Properties] sheet to set the default settings for the paper size, orientation, and other important settings. Double-click the [My Computer] icon, double-click [Printers], right-click the [Sony DPP-MP1] icon, and then click [Properties]. Note If another printer is using the Sony USB driver, the following dialog box appears. Click the [OK] button.
Windows Me [Orientation] Select [Portrait] or [Landscape] for the print direction. [Copies] Set the number of copies to print. You can select from 1 to 24 for the number of copies. [Graphics] Tab This tab presents adjustments for image color, brightness and so forth. From the [Color Adjust] pull-down list, you can select [Digital Camera Correction], [Color Balance], [Sharpness], or [Color Correction], and then adjust the image with the settings provided for each selection.
Windows Me [Color Balance] [Color Correction] You can adjust the balance for each color by dragging the slider to the left or right, entering a value directly into a box, or clicking the arrows next to a box to increase or decrease the setting. Select the color correction method. • Select [Printer Hardware Color Correction] to have the printer correct the color automatically. • Select [ICM Color Correction] to use a color profile for color correction.
Windows 98 Printer Driver DPP-MP1
Windows 98 5 Make sure the first item, [Search for the best driver ...] is selected, and then click the [Next] button. The next screen opens. 6 Insert the provided “digital photo printer DPPMP1” CD-ROM into the CD-ROM drive. 7 Click the [Specify a location] check box on, click the [Browse] button, open the [Win9X] folder on the CD-ROM, and then click the [Next] button. The next screen opens. 8 Click the [Next] button. After the files are copied, the next screen appears.
Windows 98 9 Click the [Finish] button. A dialog box opens. 13 Make sure the first item, [Search for the best driver ...] is selected, and then click the [Next] button. The next screen opens. 10 Click [Yes] to re-start your computer. If the [System Settings Change] dialog box does not open after the desktop screen appears, re-start the computer. 11 After the computer re-starts, the next screen appears.
Windows 98 16 Click the [Finish] button. After the files are copied, the next screen opens. Removing the Printer Driver This section describes the procedure to remove the printer driver. After removing the printer driver, remove the Sony USB driver. To remove the printer driver 17 Click the [Finish] button. The printer driver installation for the USB connection is complete. 1 Turn on the computer. 2 Select [Printers] from [Settings] in the [Start] menu. The [Printers] window opens.
Windows 98 4 Click the [OK] button. When the removal procedure finishes, the following dialog box opens. Using the Printer Driver You can use the printer's [Properties] sheet to set the default settings for the paper size, orientation, and other important settings. Double-click the [My Computer] icon, double-click [Printers], right-click the [Sony DPP-MP1] icon, and then click [Properties]. Note If another printer is using the Sony USB driver, the following dialog box appears. Click the [OK] button.
Windows 98 [Paper Type] Select the type of paper loaded for printing. Types of printer packs that can be loaded and maximum image size settings are as follows, Print Pack Max. Image Size SVM-24CS 1010 × 628 pixels [Graphics] Tab This tab presents adjustments for image color, brightness and so forth.
Windows 98 [Color Balance] [Color Correction] You can adjust the balance for each color by dragging the slider to the left or right, entering a value directly into a box, or clicking the arrows next to a box to increase or decrease the setting. Select the color correction method. • Select [Printer Hardware Color Correction] to have the printer correct the color automatically. • Select [ICM Color Correction] to use a color profile for color correction.
Macintosh Printer Driver DPP-MP1 © 2001 Sony Corporation
Macintosh Installing the Printer Driver Removing the Printer Driver Install the printer driver from the CD-ROM provided with the printer. Remove the printer driver with the following procedure. 1 Note Insert the provided “digital photo printer for DPPMP1” CD-ROM into the CD-ROM drive. The “PRINTER SOFTWARE” icon is displayed on the desktop. 2 Double-click the “Driver” icon to open the folder. 3 Double-click the “Chooser” icon to open the folder. 4 Double-click [DPP-MP1 Install-English].
Macintosh Making Printer Settings Select the DPP-MP1 with the Chooser Select the DPP-MP1 with the Chooser it use it for the first time, or whenever you want to use it after using another printer. First, make sure that the DPP-MP1 is properly connected to the Macintosh with the USB cable, and that the DPP-MP1 is on. 1 Select [Chooser] on the Apple menu. The “Chooser” window opens. 2 Select the DPP-MP1 icon from among those displayed in the “Chooser” window’s left-hand frame.
Macintosh Making Print Settings The [Print] dialog box appears when you select [Print] from the “File” menu. Select [General] or [Color Adjust] in the pull-down list at the top of the dialog box and make settings for both. • After setting options, printing starts when you click the [Print] button. • If you click the [Cancel] button, printing is canceled. • If you click the [Preview] button, a window like the following appears to show the expected appearance of the printed image on the Macintosh’s screen.
Macintosh • Select [Custom] to manually adjust the [Brightness], [Contrast], and [Saturation] of the image. • Click [Restore Defaults] to restore all custom changes made to their defaults. s [Sharpness] s [Color Balance] You can adjust the sharpness of the image outline by dragging the slider left or right. The larger the value, the more the image outline is emphasized. • Clicking [Restore Defaults] restores the sharpness setting to its default.