4-530-690-21(1) Digital Still Camera / Instruction Manual GB Cámara fotografía digital / Manual de instrucciones ES DSC-HX400/HX400V
English Learning more about the camera (“Help Guide”) “Help Guide” is an on-line manual. Refer to it for in-depth instructions on the many functions of the camera. 1 Access the Sony support page. http://www.sony.net/SonyInfo/Support/ 2 Select your country or region. 3 Search for the model name of your camera within the support page. • Check the model name on the bottom of your camera. Viewing the Guide This camera is equipped with a built-in instruction guide.
Owner’s Record The model and serial numbers are located on the bottom. Record the serial number in the space provided below. Refer to these numbers whenever you call your Sony dealer regarding this product. Model No. DSC-HX400/DSC-HX400V Serial No. _____________________________ Model No. AC-UB10C/AC-UB10D Serial No. _____________________________ GB WARNING To reduce fire or shock hazard, do not expose the unit to rain or moisture.
• Be sure to charge the battery pack using a genuine Sony battery charger or a device that can charge the battery pack. • Keep the battery pack out of the reach of small children. • Keep the battery pack dry. • Replace only with the same or equivalent type recommended by Sony. • Dispose of used battery packs promptly as described in the instructions. [ AC Adaptor Use the nearby wall outlet (wall socket) when using the AC Adaptor.
For Customers in the U.S.A. If you have any questions about this product, you may call: Sony Customer Information Center 1-800-222-SONY (7669) The number below is for the FCC related matters only. [ Regulatory Information Declaration of Conformity GB Trade Name: SONY Model No.: DSC-HX400V Responsible Party: Sony Electronics Inc. Address: 16530 Via Esprillo, San Diego, CA 92127 U.S.A. Telephone No.: 858-942-2230 This device complies with Part15 of the FCC Rules.
For Customers in Canada This device complies with Industry Canada licence-exempt RSS standard(s). Operation is subject to the following two conditions: (1) this device may not cause interference, and (2) this device must accept any interference, including interference that may cause undesired operation of the device.
[ Disposal of waste batteries and electrical and electronic equipment (applicable in the European Union and other European countries with separate collection systems) This symbol on the product, the battery or on the packaging indicates that the product and the battery shall not be treated as household waste. On certain batteries this symbol might be used in combination with a chemical symbol. The chemical symbols for mercury (Hg) or lead (Pb) are added if the battery contains more than 0.
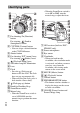
Identifying parts • When the Zoom/Focus switch is set to MF or DMF, turn the manual ring to adjust the focus. A For shooting: Fn (Function) button For viewing: (Send to Smartphone) button B CUSTOM (Custom) button • You can assign a desired function to the CUSTOM button. C Shutter button D For shooting: W/T (zoom) lever For viewing: (Index) lever/ (Playback zoom) lever E Self-timer lamp/AF illuminator F Lens G Flash • Press the (Flash pop-up) button to use the flash.
J Mode dial (Intelligent Auto)/ (Superior Auto)/ (Program Auto)/ (Aperture Priority)/ (Shutter Priority)/ (Manual Exposure)/ 1/2 (Memory recall)/ (Movie)/ (iSweep Panorama)/ (Scene Selection) K Control dial L Wi-Fi sensor (built-in) M (N Mark) • Touch the mark when you connect the camera to a smartphone equipped with the NFC function. • NFC (Near Field Communication) is an international standard of the short-range wireless communication technology.
* For details on compatible accessories for the multi interface shoe and the Multi/Micro USB Terminal, visit the Sony web site, or consult your Sony dealer or local authorized Sony service facility. You can also use accessories that are compatible with the accessory shoe. Operations with other manufacturers’ accessories are not guaranteed.
Inserting the battery pack Battery eject lever GB 1 Open the cover. the battery pack. 2 Insert • While pressing the battery eject lever, insert the battery pack as illustrated. Make sure that the battery eject lever locks after insertion. • Closing the cover with the battery inserted incorrectly may damage the camera.
Charging the battery pack For customers in the USA and Canada Power cord (Mains lead) For customers in countries/ regions other than the USA and Canada Power/Charge lamp Lit: Charging Off: Charging finished Flashing: Charging error or charging paused temporarily because the camera is not within the proper temperature range the camera to the AC Adaptor (supplied), 1 Connect using the micro USB cable (supplied). the AC Adaptor to the wall outlet (wall socket).
Notes • If the Power/Charge lamp on the camera flashes when the AC Adaptor is connected to the wall outlet (wall socket), this indicates that charging is temporarily stopped because the temperature is outside the recommended range. When the temperature gets back within the appropriate range, the charging resumes. We recommend charging the battery pack in an ambient temperature of between 10°C to 30°C (50ºF to 86ºF).
• If you connect the camera to a computer when power is turned on, the battery is not charged but the camera will be powered by the computer, which allows you to import images to a computer without worrying about the battery running out. Notes • Note the following points when charging via a computer: – If the camera is connected to a laptop computer that is not connected to a power source, the laptop battery level decreases. Do not charge for an extended period of time.
• The number for “Shooting (still images)” is based on the CIPA standard, and is for shooting under the following conditions: (CIPA: Camera & Imaging Products Association) – DISP is set to [Display All Info.]. – Shooting once every 30 seconds. – The zoom is switched alternately between the W and T ends. – The flash is used once every two times. – The power is turned on and off once every ten times.
Inserting a memory card (sold separately) Ensure that the notched corner is faced correctly. 1 Open the cover. the memory card (sold separately). 2 Insert • With the notched corner facing as illustrated, insert the memory card until it clicks into place. 3 Close the cover.
x Memory cards that can be used Memory card For still images For movies Memory Stick XC-HG Duo™ A Memory Stick PRO Duo™ (Mark2 only) Memory Stick PRO-HG Duo™ B Memory Stick Micro™ (M2) SD memory card C D (Mark2 only) SDHC memory card (Class 4 or faster) GB (Class 4 or faster) SDXC memory card (Class 4 or faster) microSD memory card (Class 4 or faster) microSDHC memory card (Class 4 or faster) microSDXC memory card (Class 4 or faster) • In this manual, the products in the table are collec
Setting the clock ON/OFF (Power) Control button Select items: v/V/b/B Set: z the ON/OFF (Power) button. 1 Press The Date & Time setting is displayed when you turn on the camera for the first time. • It may take some time for the power to turn on and allow operation. that [Enter] is selected on the screen, then press 2 Check z on the control button. a desired geographic location by following the 3 Select on-screen instructions, then press z.
Shooting still images/movies Shutter button GB Mode dial : Intelligent Auto : Movie MOVIE W/T (zoom) lever W: zoom out T: zoom in Shooting still images the shutter button halfway down to focus. 1 Press When the image is in focus, a beep sounds and the z indicator lights. 2 Press the shutter button fully down to shoot an image. Shooting movies the MOVIE (Movie) button to start recording. 1 Press • Use the W/T (zoom) lever to change the zoom ratio. 2 Press the MOVIE button again to stop recording.
• For the continuous shooting time of a movie recording, refer to “Number of still images and recordable time of movies” (page 29). When movie recording is finished, you can restart recording by pressing the MOVIE button again. Recording may stop to protect the camera depending on the ambient temperature. Viewing images Control dial W: zoom out T: zoom in Control button (Playback) (Delete) Select images: B (next)/b (previous) or turn the control dial Set: z the (Playback) button.
Introduction of other functions Control dial Fn (Function) GB MENU Control button x Control button DISP (Display Contents): Allows you to change the screen display. (Drive Mode): Allows you to switch between shooting methods, such as single shooting, continuous shooting or bracket shooting. (Exposure Comp.): Allows you to compensate the exposure and brightness for the entire image. (Photo Creativity): Allows you to operate the camera intuitively and shoot creative images easily.
x Menu Items (Camera Settings) Image Size Selects the size of still images. Aspect Ratio Selects the aspect ratio for still images. Quality Sets the image quality for still images. Panorama: Size Selects the size of panoramic images. Panorama: Direction Sets the shooting direction for panoramic images. File Format Selects the movie file format. Record Setting Selects the size of the recorded movie frame. Drive Mode Sets the drive mode, such as for continuous shooting.
Lock-on AF Sets the function to track a subject and continue focusing. Smile/Face Detect. Selects to detect faces and adjust various settings automatically. Sets to automatically release the shutter when a smile is detected. Soft Skin Effect Sets the Soft Skin Effect and the effect level. Auto Obj. Framing Analyzes the scene when capturing faces, close-ups, or subjects tracked by the Lock-on AF function, and automatically trims and saves another copy of the image with a more impressive composition.
Peaking Color Sets the color used for the peaking function. Exposure Set. Guide Sets the guide displayed when exposure settings are changed in the shooting screen. Zoom Setting Sets whether to use the Clear Image Zoom and Digital Zoom when zooming. FINDER/MONITOR Sets the method for switching between the viewfinder and screen. Write Date Sets whether to record a shooting date on the still image. Function Menu Set. Customizes the functions displayed when the Fn (Function) button is pressed.
(Application) Application List Displays the application list. You can select the application you want to use. Introduction Displays instructions on using the application. (Playback) Delete Deletes an image. View Mode Sets the way in which images are grouped for playback. Image Index Displays multiple images at the same time. Slide Show Shows a slide show. Rotate Enlarge Image GB Rotates the image. Enlarges the playback images.
Mode Dial Guide Turns the mode dial guide (the explanation of each shooting mode) on or off. Display Quality Sets the display quality. Pwr Save Start Time Sets the length of time until the camera turns off automatically. PAL/NTSC Selector (only for 1080 50i compatible models) By changing the TV format of the device, shooting in a different movie format is possible. Demo Mode Sets demonstration movie playback to on or off.
Version Displays the camera software version. Setting Reset Restores settings to their defaults. Features of PlayMemories Home™ The software PlayMemories Home allows you to import still images and movies to your computer and use them. PlayMemories Home is required for importing AVCHD movies to your computer.
• If the software PMB (Picture Motion Browser), supplied with models released before 2011, has already been installed on your computer, PlayMemories Home will overwrite it during the installation. Use PlayMemories Home, the successor software of PMB. x System requirements You can find the system requirements for the software at the following URL: www.sony.
Adding functions to the camera You can add the desired functions to your camera by connecting to the application download website (PlayMemories Camera Apps™) via the Internet. http://www.sony.net/pmca • After installing an application, you can call up the application by touching an NFC-enabled Android smartphone to the N mark on the camera, using the GB [One-touch(NFC)] function.
x Movies The table below shows the approximate maximum recording times. These are the total times for all movie files. Continuous shooting is possible for approximately 29 minutes (a product specification limit). The maximum continuous recording time of an MP4 (12M) format movie is about 15 minutes (limited by the 2 GB file size restriction).
Notes on using the camera Functions built into this camera • This manual describes 1080 60i-compatible devices and 1080 50i-compatible devices. – To determine whether your camera supports the GPS function, check the model name of your camera. GPS-compatible: DSC-HX400V GB GPS-incompatible: DSC-HX400 – To check whether your camera is a 1080 60i-compatible device or 1080 50icompatible device, check for the following marks on the bottom of the camera.
Do not use/store the camera in the following places • In an extremely hot, cold or humid place In places such as in a car parked in the sun, the camera body may become deformed and this may cause a malfunction. • Under direct sunlight or near a heater The camera body may become discolored or deformed, and this may cause a malfunction.
On charging the battery • If you charge a battery that has not been used for a long time, you may be unable to charge it to the proper capacity. This is due to the battery characteristics. Charge the battery again. • Batteries which have not been used for more than a year may have become deteriorated. Warning on copyright Television programs, films, videotapes, and other materials may be copyrighted. Unauthorized recording of such materials may be contrary to the provisions of the copyright laws.
Specifications Camera [System] Image device: 7.82 mm (1/2.3 type) Exmor R™ CMOS sensor Total pixel number of camera: Approx. 21.1 Megapixels Effective pixel number of camera: Approx. 20.4 Megapixels Lens: ZEISS Vario-Sonnar T* 50× zoom lens f = 4.3 mm – 215 mm (24 mm – 1 200 mm (35 mm film equivalent)) F2.8 (W) – F6.3(T) While shooting movies (16:9): 26.5 mm – 1 325 mm*1 While shooting movies (4:3): 32.
[Power, general] Power: Rechargeable battery pack NP-BX1, 3.6 V AC Adaptor AC-UB10C/UB10D, 5V Power consumption: Approx. 1.4 W (during shooting with the LCD screen) Approx. 1.1 W (during shooting with the viewfinder) Operating temperature: 0 °C to 40 °C (32 °F to 104 °F) Storage temperature: –20 °C to +60 °C (–4 °F to +140 °F) Dimensions (CIPA compliant): 129.6 mm × 93.2 mm × 103.2 mm (5 1/8 inches × 3 3/4 inches × 4 1/8 inches) (W/H/D) Mass (CIPA compliant) (Approx.): 660 g (1 lb 7.
Trademarks • Memory Stick and are trademarks or registered trademarks of Sony Corporation. • “AVCHD Progressive” and the “AVCHD Progressive” logotype are trademarks of Panasonic Corporation and Sony Corporation. • Dolby and the double-D symbol are trademarks of Dolby Laboratories. • The terms HDMI and HDMI HighDefinition Multimedia Interface, and the HDMI Logo are trademarks or registered trademarks of HDMI Licensing LLC in the United States and other countries.
GB GB 37
Español Más información sobre la cámara (“Guía de Ayuda”) La “Guía de Ayuda” es un manual on-line. Consúltela para ver instrucciones exhaustivas sobre las muchas funciones de la cámara. 1 Acceda a la página de soporte de Sony. http://www.sony.net/SonyInfo/Support/ 2 Seleccione su país o región. 3 Busque el nombre del modelo de su cámara en la página de atención al cliente. • Compruebe el nombre de modelo en la parte inferior de su cámara.
Consejos para tomar imágenes La cámara visualiza consejos para tomar imágenes para el modo de toma de imagen seleccionado. 1 Pulse el botón (Guía en la cámara) en modo de toma de imagen. 2 Seleccione el consejo deseado para tomar imágenes, después pulse z del botón de control. Se visualiza el consejo para tomar imágenes. • Puede desplazar la pantalla utilizando v/V y cambiar los consejos para tomar imágenes utilizando b/B.
Nombre del producto: Cámara Digital Modelo: DSC-HX400/DSC-HX400V POR FAVOR LEA DETALLADAMENTE ESTE MANUAL DE INSTRUCCIONES ANTES DE CONECTAR Y OPERAR ESTE EQUIPO. RECUERDE QUE UN MAL USO DE SU APARATO PODRÍA ANULAR LA GARANTÍA. AVISO Para reducir el riesgo de incendio o descarga eléctrica, no exponga la unidad a la lluvia ni a la humedad.
[ Adaptador de ca (FUENTE DE ALIMENTACIÓN) Utilice una toma de corriente de la pared cercana cuando utilice el adaptador de ca (FUENTE DE ALIMENTACIÓN). Desconecte el adaptador de ca (FUENTE DE ALIMENTACIÓN) de la toma de corriente de la pared inmediatamente si se produce algún malfuncionamiento mientras utiliza el aparato.
[ Tratamiento de las baterías y equipos eléctricos y electrónicos al final de su vida útil (aplicable en la Unión Europea y en países europeos con sistemas de tratamiento selectivo de residuos) Este símbolo en el producto, en la batería o en el embalaje indica que el producto y la batería no pueden ser tratados como un residuo doméstico normal. En algunas baterías este símbolo puede utilizarse en combinación con un símbolo químico.
Comprobación de los elementos suministrados El número entre paréntesis indica el número de piezas. • Cámara (1) • Batería recargable NP-BX1 (1) • Cable micro USB (1) • Adaptador de ca (FUENTE DE ALIMENTACIÓN) AC-UB10C/UB10D (1) • Cable de alimentación (no suministrado en EE.UU.
Identificación de las partes J Conmutador de zoom/enfoque K Anillo manual • Cuando el conmutador de zoom/ enfoque esté ajustado a AF/ ZOOM, gire el anillo manual para realizar la función de zoom. • Cuando el conmutador de zoom/ enfoque esté ajustado a MF o DMF, gire el anillo manual para ajustar el enfoque. A Para toma de imagen: Botón Fn (Función) Para visionado: Botón (Enviar a smartphone) B Botón CUSTOM (Personalizado) • Puede asignar una función deseada al botón CUSTOM.
I Botón ON/OFF (Alimentación) y luz de alimentación/carga J Dial de modo (Auto. inteligente)/ (Automático superior)/ (Programa auto.)/ (Priorid. abertura)/ (Prior. tiempo expos.)/ (Exposición manual)/ 1/2 (Recuperar memoria)/ (Película)/ (iBarrido panorámico)/ (Selección escena) K Dial de control L Sensor de Wi-Fi (incorporado) M (marca N) • Regule el dial de ajuste de dioptrías a su vista hasta que la visualización aparezca claramente en el visor.
* Para ver detalles sobre accesorios compatibles para la zapata de interfaz múltiple y el terminal multi/micro USB, visite el sitio web de Sony, o consulte con el distribuidor de Sony o con la oficina de servicio local autorizada de Sony. También puede utilizar accesorios que sean compatibles con la zapata para accesorios. Las operaciones con accesorios de otros fabricantes no están garantizadas.
Inserción de la batería Palanca de expulsión de la batería ES 1 Abra la tapa. la batería. 2 Inserte • Mientras pulsa la palanca de expulsión de la batería, inserte la batería como se muestra en la ilustración. Asegúrese de que la palanca de expulsión de la batería se bloquea después de insertar la batería. • Si cierra la tapa con la batería insertada incorrectamente podrá dañar la cámara.
Carga de la batería Para clientes en Estados Unidos y Canadá Cable de alimentación Para clientes en países y regiones fuera de Estados Unidos y Canadá Lámpara de alimentación/carga Encendida: Cargando Apagada: Carga finalizada Parpadea: Error de carga o carga puesta en pausa temporalmente porque la cámara no está dentro del rango de temperatura apropiado la cámara al adaptador de ca (suministrado), 1 Conecte utilizando el cable micro USB (suministrado).
Notas • Si la lámpara de alimentación/carga de la cámara parpadea cuando el adaptador de ca está conectado a la toma de corriente de la pared, indica que la carga se ha detenido temporalmente porque la temperatura está fuera del rango recomendado. La carga se reanuda cuando la temperatura vuelve a estar dentro del rango adecuado. Le recomendamos cargar la batería a una temperatura ambiente de entre 10 °C a 30 °C • La batería podrá no cargarse eficazmente si la sección del terminal de la batería está sucia.
x Carga mediante conexión a un ordenador La batería se puede cargar conectando la cámara a un ordenador utilizando un cable micro USB. A una toma USB • Si conecta la cámara a un ordenador cuando la alimentación está conectada, la batería no se cargará pero la cámara será alimentada por el ordenador, lo que le permite importar imágenes a un ordenador sin tener que preocuparse de que se agote la batería.
x Duración de la batería y número de imágenes que se pueden grabar y reproducir Duración de la batería Número de imágenes Tomar (imágenes fijas) Pantalla Aprox. 150 minuto Aprox. 300 imágenes Visor Aprox. 190 minuto Aprox. 380 imágenes Toma típica de película Pantalla Aprox. 50 minuto — Visor Aprox. 55 minuto — Toma continua de película Pantalla Aprox. 85 minuto — Visor Visionado (imágenes fijas) Aprox. 95 minuto — Aprox. 250 minuto Aprox.
x Suministro de alimentación Puede utilizar el adaptador de ca AC-UD10 (se vende por separado) o ACUD11 (se vende por separado) para tomar y reproducir imágenes mientras suministra alimentación cuando toma o reproduce imágenes. Notas • Si toma o reproduce imágenes cuando la cámara está conectada al adaptador de ca suministrado, no se suministrará alimentación a través del adaptador de ca.
Inserción de una tarjeta de memoria (se vende por separado) ES Asegúrese de que la esquina recortada está orientada correctamente. 1 Abra la tapa. la tarjeta de memoria (se vende por separado). 2 Inserte • Con la esquina recortada orientada como se muestra en la ilustración, inserte la tarjeta de memoria hasta que encaje con un chasquido. 3 Cierre la cubierta.
x Tarjetas de memoria que se pueden utilizar Tarjeta de memoria Para imágenes Para películas fijas Memory Stick XC-HG Duo™ A Memory Stick PRO Duo™ (Mark2 solamente) Memory Stick PRO-HG Duo™ B C D Memory Stick Micro™ (M2) (Mark2 solamente) Tarjeta de memoria SD (clase 4 o más rápida) Tarjeta de memoria SDHC (clase 4 o más rápida) Tarjeta de memoria SDXC (clase 4 o más rápida) Tarjeta de memoria microSD (clase 4 o más rápida) Tarjeta de memoria microSDHC (clase 4 o más rápida) Tarjeta de m
Ajuste del reloj ON/OFF (Alimentación) Botón de control ES Seleccionar elementos: v/V/b/B Ajustar: z el botón ON/OFF (Alimentación). 1 Pulse El ajuste de fecha y hora se visualiza cuando la cámara es encendida por primera vez. • Es posible que la alimentación lleve algún tiempo en conectarse y permitir la operación. que [Intro] está seleccionado en la pantalla, 2 Compruebe después pulse z del botón de control.
Toma de imágenes fijas/películas Botón disparador Dial de modo : Auto. inteligente : Película MOVIE Palanca W/T (zoom) W: alejar con zoom T: acercar con zoom Toma de imágenes fijas el botón disparador hasta la mitad para enfocar. 1 Pulse Cuando la imagen está enfocada, suena un pitido y se ilumina el indicador z. 2 Pulse el botón disparador a fondo para tomar una imagen. Toma de películas el botón MOVIE (Película) para comenzar a grabar.
• Para el tiempo de toma continua de una grabación de película, consulte “Número de imágenes fijas y tiempo grabable de películas” (página 31). Cuando termine la grabación de película, puede volver a grabar pulsando el botón MOVIE otra vez. Es posible que la grabación se detenga para proteger la cámara dependiendo de la temperatura ambiente.
Presentación de otras funciones Dial de control Fn (Función) MENU Botón de control x Botón de control DISP (Mostrar contenido): Le permite cambiar la visualización en pantalla. (Modo manejo): Le permite cambiar entre los métodos de toma de imagen, como toma única, toma continua o toma con variación. (Compensar exp.): Le permite compensar la exposición y el brillo para toda la imagen. (Creatividad fotogr.): Le permite utilizar la cámara intuitivamente y tomar imágenes creativas fácilmente.
x Elementos de menú (Ajustes de cámara) Tamaño imagen Selecciona el tamaño de las imágenes fijas. Relación aspecto Selecciona la relación de aspecto para las imágenes fijas. Calidad Ajusta la calidad de imagen para las imágenes fijas. Panorama: tamaño Selecciona el tamaño de las imágenes panorámicas. Panorama: dirección Ajusta la dirección de toma de imagen para las imágenes panorámicas. Formato archivo Selecciona el formato de archivo de película.
Amplific. enfoque RR ISO Alta Amplía la imagen antes de hacer la toma para que pueda comprobar el enfoque detalladamente. Ajusta el procesamiento de reducción de ruido para la toma de imágenes de alta sensibilidad. AF de bloqueo Ajusta la función para seguir un motivo y continuar enfocando. Sonrisa/Detec. cara Selecciona para detectar caras y hacer varios ajustes automáticamente. Ajusta para liberar el obturador automáticamente cuando se detecta una sonrisa.
Línea de cuadrícula Ajusta una visualización de línea de cuadrícula para permitir alinear con el contorno de una estructura. Rev.automática Ajusta la revisión automática para visualizar la imagen capturada después de hacer la toma. Nivel de resalte Resalta el contorno de los rangos de enfoque con un color específico cuando se enfoca manualmente. Color de resalte Ajusta el color utilizado en la función de resalte. Guía ajuste exposic.
Conf. punto acceso Puede registrar su punto de acceso manualmente. Edit. Nombre Dispos. Puede cambiar el nombre de dispositivo bajo Wi-Fi Direct. etc. Mostr. Direcc. MAC Visualiza la dirección MAC de la cámara. Rest. SSID/Cntrsñ Restaura el nombre SSID y la contraseña para la conexión del smartphone. Restablecer conf. red Restaura todos los ajustes de red. (Aplicación) Lista de aplicaciones Visualiza la lista de aplicaciones. Puede seleccionar la aplicación que quiere utilizar.
Ajustes de volumen Ajusta el volumen para la reproducción de películas. Señales audio Ajusta los sonidos de funcionamiento de la cámara. Ajustes GPS (DSC-HX400V solamente) Ajusta la función GPS. Ajustes de carga Ajusta la función de subida de datos a Internet de la cámara cuando se utiliza una tarjeta Eye-Fi. Menú mosaico Ajusta si se visualiza o no el menú de títulos cada vez que pulsa el botón MENU.
ES 28 Número archivo Ajusta el método utilizado para asignar números de archivo a imágenes fijas y películas. Selec. carpeta grab. Cambia la carpeta seleccionada para almacenar imágenes. Carpeta nueva Crea una carpeta nueva para guardar imágenes fijas y películas (MP4). Nombre carpeta Ajusta el nombre de carpeta para imágenes fijas. Recuperar BD imág. Recupera el archivo de base de datos de imagen y habilita la grabación y la reproducción.
Características de PlayMemories Home™ El software PlayMemories Home le permite importar imágenes fijas y películas a su ordenador y utilizarlas. Para importar películas AVCHD a su ordenador se requiere PlayMemories Home.
x Requisitos del sistema Puede encontrar los requisitos del sistema para el software en la URL siguiente: www.sony.net/pcenv/ x Instalación de PlayMemories Home en un ordenador el explorador de Internet de su ordenador, 1 Utilizando vaya a la URL siguiente, después instale PlayMemories Home. www.sony.net/pm/ • Para más detalles sobre PlayMemories Home, consulte la siguiente página de soporte de PlayMemories Home (inglés solamente): http://www.sony.co.
Para añadir funciones a la cámara Puede añadir las funciones deseadas a su cámara conectándose al sitio web de descarga de aplicaciones (PlayMemories Camera Apps™) a través de Internet. http://www.sony.net/pmca • Después de instalar una aplicación, puede invocar la aplicación tocando la marca N de la cámara con un smartphone Android que admita NFC, utilizando la función [Un solo toque (NFC)].
x Películas La tabla de abajo muestra los tiempos de grabación máximos aproximados. Son los tiempos totales para todos los archivos de película. Es posible tomar imágenes continuamente durante 29 minuto aproximadamente (un límite específico del producto).
Notas sobre la utilización de la cámara Funciones incorporadas en esta cámara • Este manual describe los dispositivos compatibles con 1080 60i y los dispositivos compatibles con 1080 50i. – Para determinar si su cámara admite la función GPS, compruebe el nombre de modelo de su cámara.
• No agite ni golpee la cámara. Podrá ocasionar un mal funcionamiento y no poder grabar imágenes. Además, el soporte de grabación podrá volverse inutilizable o los datos de imagen podrán dañarse. No utilice o almacene la cámara en los siguientes lugares • En un lugar muy caluroso, frío o húmedo En lugares como un automóvil aparcado al sol, es posible que el cuerpo de la cámara se deforme. Esto podría ocasionar un mal funcionamiento.
Acerca de la protección de recalentamiento Dependiendo de la temperatura de la cámara y de la batería, es posible que no pueda grabar películas o que la alimentación se desconecte automáticamente para proteger la cámara. Antes de que se desconecte la alimentación o de que no pueda grabar más películas se visualizará un mensaje en la pantalla. En este caso, deje la alimentación desconectada y espere hasta que la temperatura de la cámara y de la batería haya bajado.
Especificaciones Cámara [Sistema] Dispositivo de imagen: Sensor de 7,82 mm (tipo 1/2,3 ) Exmor R™ CMOS Número total de píxeles de la cámara: Aprox. 21,1 Megapíxeles Número efectivo de píxeles de la cámara: Aprox.
[Alimentación, general] Alimentación: Batería recargable NP-BX1, cc 3,6 V Adaptador de ca (FUENTE DE ALIMENTACIÓN) AC-UB10C/ UB10D, cc 5 V Consumo: Aprox. 1,4 W (durante la toma con la pantalla LCD) Aprox. 1,1 W (durante la toma con el visor) Temperatura de funcionamiento: De 0 °C a 40 °C Temperatura de almacenamiento: De –20 °C a +60 °C Dimensiones (cumple con CIPA): 129,6 mm × 93,2 mm × 103,2 mm (An/Al/Pr) Peso (cumple con CIPA) (Aprox.
Marcas comerciales • Memory Stick y son marcas comerciales o marcas comerciales registradas de Sony Corporation. • “AVCHD Progressive” y el logotipo de “AVCHD Progressive” son marcas comerciales de Panasonic Corporation y Sony Corporation. • Dolby y el símbolo de la doble D son marcas comerciales de Dolby Laboratories.
ES ES 39
ES 40
ES ES 41
ES 42
ES ES 43
© 2014 Sony Corporation Printed in China