Digital Still Camera/Cámara fotografía digital Instruction Manual Manual de instrucciones GB ES DSC-T100 For details on the advanced operations, please access “Cyber-shot Handbook” and “Cyber-shot Step Up Movie” contained on the supplied CD-ROM via a computer. Para obtener más información sobre las opciones avanzadas, consulte la “Guía práctica de Cybershot” y la “Guía avanzada de Cyber-shot” del CDROM suministrado mediante un ordenador.
G:\DSC-T100\2319294611\2319294611\2319294611DSCT100U2\01GB-DSCT100\020REG.fm master:Left_Safety English Owner’s Record The model and serial numbers are located on the bottom. Record the serial number in the space provided below. Refer to these numbers whenever you call upon your Sony dealer regarding this product. Model No. DSC-T100 Serial No. ______________________ WARNING To reduce fire or shock hazard, do not expose the unit to rain or moisture. For Customers in the U.S.A.
G:\DSC-T100\2319294611\2319294611\2319294611DSCT100U2\01GB-DSCT100\020REG.fm master:Right [ Cleaning Unplug the set from the wall outlet before cleaning or polishing it. Do not use liquid cleaners or aerosol cleaners. Use a cloth lightly dampened with water for cleaning the exterior of the set. long periods of time, unplug it from the wall outlet and disconnect the antenna or cable system. This will prevent damage to the set due to lightning and power-line surges.
Read this first CAUTION Replace the battery with the specified type only. Otherwise, fire or injury may result. For Customers in the U.S.A. and Canada [ RECYCLING LITHIUM-ION BATTERIES Lithium-Ion batteries are recyclable. You can help preserve our environment by returning your used rechargeable batteries to the collection and recycling location nearest you. For more information regarding recycling of rechargeable batteries, call toll free 1-800-822-8837, or visit http://www.rbrc.
– Connect the equipment into an outlet on a circuit different from that to which the receiver is connected. – Consult the dealer or an experienced radio/TV technician for help. [ Disposal of Old Electrical & Electronic Equipment (Applicable in the European Union and other European countries with separate collection systems) The supplied interface cable must be used with the equipment in order to comply with the limits for a digital device pursuant to Subpart B of Part 15 of FCC Rules.
Notes on using your camera [ Internal memory and “Memory Stick Duo” back up Do not turn off the camera or remove the battery pack or “Memory Stick Duo” while the access lamp is lighted, as the internal memory data or “Memory Stick Duo” data may be destroyed. Always protect your data by making a back up copy. [ Notes on recording/playback • Before you record, make a trial recording to make sure that the camera is working correctly. • This camera is neither dust-proof, nor splashproof, nor water-proof.
Table of contents IMPORTANT SAFEGUARDS ..................................................................... 2 Read this first ............................................................................................ 4 Notes on using your camera .................................................................... 6 Getting started ................................................................................. 8 Checking the accessories supplied .........................................................
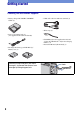
Getting started Checking the accessories supplied • Battery charger BC-CSG/BC-CSGB/BCCSGC (1) • USB, A/V cable for multi-use terminal (1) • Wrist strap (1) • Power cord (mains lead) (1) (not supplied in the USA and Canada) • CD-ROM (Cyber-shot application software/ “Cyber-shot Handbook”/“Cyber-shot Step-up Guide”) (1) • Instruction Manual (this manual) (1) • Rechargeable battery pack NP-BG1 (1)/ Battery case (1) Attach the strap and pass your hand through it, to prevent the camera from damage by being dr
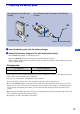
1 Preparing the battery pack For customers in the USA and Canada Plug For customers other than those in the USA and Canada ɟ ɟ CHARGE lamp CHARGE lamp Power cord (mains lead) 1 Insert the battery pack into the battery charger. GB 2 Connect the battery charger to the wall outlet (wall socket). The CHARGE lamp lights on, and charging starts. When the CHARGE lamp turns off, charging is finished (Practical charge).
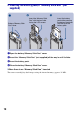
2 Inserting the battery pack/a “Memory Stick Duo” (not supplied) ɟ Battery/“Memory Stick Duo” cover ɠ Insert the “Memory Stick Duo” with the front side facing the LCD screen. Insert the battery pack while pressing the battery eject lever with the tip of the battery pack. 1 Open the battery/“Memory Stick Duo” cover. 2 Insert the “Memory Stick Duo” (not supplied) all the way in until it clicks. 3 Insert the battery pack. 4 Close the battery/“Memory Stick Duo” cover.
[ To check the remaining battery time Press POWER button to turn on and check the remaining battery on the LCD screen. Battery remaining indicator Battery remaining guidelines Sufficient power remaining Battery almost fully charged Battery half full Battery low, recording/ playback will stop soon. Change the battery with fully charged one, or charge the battery. (The warning indicator flashes.) • It takes about one minute until the correct battery remaining indicator appears.
3 Turning the camera on/setting the clock POWER button Lens cover ɟ Control button 1 2 3 HOME button z button 1 Press the POWER button or slide the lens cover downward. 2 Set the clock with the control button. 1 Select the date display format with v/V, then press z. 2 Select each item with b/B and set the numeric value with v/V, then press z. 3 Select [OK], then press z. [ To change the date and time Press the HOME button, and select [ Clock Settings] in (Settings) (page 17).
Shooting images easily (Auto adjustment mode) The following procedure is for shooting a still image. ɠ Shutter button Microphone Flash Self-timer lamp Zoom button MENU button Control button Tripod receptacle (bottom) Lens cover Lens HOME button DISP button Flash button Macro button Self-timer button GB 1 Slide the lens cover downward. 2 Hold the camera steady, keeping your arm at your side. Position the subject in the center of the focus frame. 3 Shoot with the shutter button.
Zoom/Flash/Macro/Self-timer/Display [ Using the zoom Press [ to zoom, press to undo zoom. Flash (Selecting a flash mode for still images) Press B ( ) on the control button repeatedly until the desired mode is selected. : Flash Auto Strobes when there is insufficient light or backlight (default setting) : Flash forced on SL : Slow synchro (Flash forced on) The shutter speed is slow in a dark place to clearly shoot the background that is out of flash light.
Viewing/deleting images (Playback) button (Index)/ (playback zoom) button (playback zoom) button MENU button ɟ Control button Multi connector (bottom) 1 Press HOME button (Playback). If you press when the camera is powered off, the camera is turned on automatically and set to playback mode. To switch to the shooting mode, press again. GB 2 Select an image with b/B on the control button. Movie: Press z to play back a movie. (Press z again to stop playback.) Press b/B to rewind/fast forward.
[ Viewing an index screen Press to display the index screen while a still image is displayed. Then, select an image with v/V/b/B. To return to the single image screen, press z. • You can also access the index screen by selecting [ Index Display] on the HOME screen. • Each time you press , the number of pictures on the index screen changes. [ To delete images in index mode 1 Press MENU while the index screen is displayed. 2 Select [Delete] with v and select [Multiple Images] with b/B, then press z.
Learning the various functions – HOME/Menu Using the HOME screen The HOME screen is the gateway screen for all the functions of your camera. You can select the shooting mode or playback mode, or change the settings from the HOME screen. z button Control button GB HOME button 1 Press HOME to display the HOME screen. Category Item Guide 2 Select a category with b/B. 3 Select an item with v/V, then press z.
For details on the operation 1 page 17 HOME screen items The following categories and items are displayed when you press the HOME button. A description of the selected category or item is displayed on the screen by the guide. Category Items Shooting Auto Adjustment Scene Selection Program Auto Movie Mode View Images Single Image Index Display Slide Show Printing, Other Print Music Tool Download Music Manage Memory Memory Tool Memory Stick Tool Format Change REC.
Using menu items z button MENU button Control button GB 1 Press MENU to display the menu. Function Guide • The menu can be displayed only when the camera is in shooting mode or playback mode. • Different items are available, depending on the selected mode. 2 Select the desired item with v/V on the control button. If the desired item is hidden, keep pressing v/V until the item appears on the screen. 3 Select the desired setting with b/B on the control button.
For details on the operation 1 page 19 Menu items The available menu items vary depending on the camera mode. The shooting menu is available only in the shooting mode, and the viewing menu is available only in the playback mode. Also, different items are available depending on the selected shooting mode (such as Auto Adjustment, Scene Selection, Program Auto, Movie Mode) on the HOME screen. Menu for shooting Scene Selection Selects the preset settings according to the scene.
Enjoying your computer You can display images shot with the camera on the computer. Also, you can use still images and movies from the camera more than ever by taking advantage of the software. For details, refer to “Cyber-shot Handbook.” Supported Operating Systems for USB connection and application software (supplied) For Windows users For Macintosh users USB connection Windows 2000 Professional, Windows XP*, Windows XP Vista* Mac OS 9.1/9.2/ Mac OS X(v10.1 to v10.
Viewing “Cyber-shot Handbook” or “Cyber-shot Step-up Guide” [ For Windows users [ For Macintosh users 1 Turn on your computer, and insert the CD- Turn on your computer and insert the CDROM (supplied) into the CD-ROM drive. Follow the instructions below. ROM (supplied) into the CD-ROM drive. The screen below appears. To view the “Cyber-shot Handbook” 1 Select the [Handbook] folder and copy “Handbook.pdf” stored in the [GB] folder to your computer. 2 After copying is complete, double-click “Handbook.
Indicators on the screen Each time you press v (DISP) button, the display changes (page 14). [ When shooting still images A Battery remaining Low battery warning E Image size Shooting mode (Scene Selection) Shooting mode (Program) White balance [ When shooting movies WB Recording mode Metering mode GB Face Detection SteadyShot Vibration warning Self-timer - Protect DPOF Print order (DPOF) mark [ When playing back PictBridge connecting Zoom scaling 1.3 1.3 Zoom scaling Color mode VOL.
B Red-eye reduction 1.0m Focus preset distance z AE/AF lock ISO400 ISO number Flash charging NR slow shutter White balance Metering mode SL Flash mode 125 Shutter speed F3.5 Aperture value +2.0EV Exposure Value C:32:00 Self-diagnosis display AF range finder frame indicator ISO400 ISO number +2.0EV Exposure Value Macro/Close Focus 500 Shutter speed Playback F3.
Battery life and memory capacity Battery life and number of images that can be recorded/viewed The tables show the approximate number of images that can be recorded/viewed and the battery life when you shoot images in [Normal] mode with the battery pack at full capacity and at an ambient temperature of 25°C (77°F). The numbers of images that can be recorded or viewed take into account changing the “Memory Stick Duo” as necessary.
Number of still images and recording time of movies The number of still images and the length of time available for recording movies may vary, depending on the shooting conditions and/or the recording media used. • You can select the image size to be used when shooting from the menu (page 19, 20). [ The approximate number of still images (Units: Images) Capacity Internal memory Approx.
Troubleshooting If you experience trouble with your camera, try the following solutions. 1 Check the items below, and refer to “Cyber-shot Handbook (PDF)”. If a code such as “C/E:ss:ss” appears on the screen, refer to “Cyber-shot Handbook”. 2 Remove the battery pack, and insert the battery pack again after about one minute, and turn on the power. 3 Initialize the settings (page 18). 4 Consult your Sony dealer or local authorized Sony service facility.
The battery remaining indicator is incorrect. • This phenomenon occurs when you use the camera in an extremely hot or cold location. • The displayed battery remaining differs from the current one. Fully discharge and then charge the battery pack to correct the display. • The battery pack is discharged. Install the charged battery pack (page 9). • The battery pack is dead. Replace it with a new one. Cannot charge the battery pack • You cannot charge the battery pack using the AC Adapter (not supplied).
Precautions [ Do not use/store the camera in the following places • In an extremely hot, cold or humid place In places such as in a car parked in the sun, the camera body may become deformed and this may cause a malfunction. • Under direct sunlight or near a heater The camera body may become discolored or deformed, and this may cause a malfunction. • In a location subject to rocking vibration • Near strong magnetic place • In sandy or dusty places Be careful not to let sand or dust get into the camera.
Specifications Camera [System] Image device: 7.18 mm (1/2.5 type) color CCD, Primary color filter Total pixel number of camera: Approx. 8 286 000 pixels Effective pixel number of camera: Approx. 8 083 000 pixels Lens: Carl Zeiss Vario-Tessar 5× zoom lens f = 5.8 – 29.0 mm (35 – 175 mm when converted to a 35 mm still camera) F3.5 – 4.
Español Nombre del producto: Cámara Digital Modelo: DSC-T100 POR FAVOR LEA DETALLADAMENTE ESTE MANUAL DE INSTRUCCIONES ANTES DE CONECTAR Y OPERAR ESTE EQUIPO. [ Tratamiento de los equipos eléctricos y electrónicos al final de su vida útil (aplicable en la Unión Europea y en países europeos con sistemas de recogida selectiva de residuos) RECUERDE QUE UN MAL USO DE SU APARATO PODRÍA ANULAR LA GARANTÍA.
Índice Notas sobre la utilización de la cámara ................................................... 4 Introducción ..................................................................................... 5 Comprobación de los accesorios suministrados ..................................... 5 1 Preparación de la batería ...................................................................... 6 2 Inserción de la batería o de un “Memory Stick Duo” (no suministrado) ....................................................
Notas sobre la utilización de la cámara [ Copia de seguridad de la memoria interna y del “Memory Stick Duo” No apague la cámara ni extraiga la batería ni el “Memory Stick Duo” con la lámpara de acceso encendida, ya que, de lo contrario, es posible que los datos de la memoria interna o del “Memory Stick Duo” se destruyan. Realice siempre una copia de seguridad de sus datos para protegerlos.
Introducción Comprobación de los accesorios suministrados • Cargador de la batería BC-CSG/BC-CSGB/ BC-CSGC (1) • Cable USB, A/V para terminal multiuso (1) • Correa de la muñeca (1) • Cable de alimentación (suministro eléctrico) (1) (no suministrado en EE. UU.
1 Preparación de la batería Para los clientes de EE. UU. y Canadá Conector Para los clientes que no sean de EE. UU. ni Canadá ɟ ɟ Indicador luminoso CHARGE Indicador luminoso CHARGE Cable de alimentación 1 Introduzca la batería en el cargador. 2 Conecte el cargador de la batería a una toma de corriente de pared. El indicador luminoso CHARGE se enciende y la batería empieza a cargarse. Cuando el indicador luminoso CHARGE se apaga, la carga ha finalizado (carga práctica).
2 Inserción de la batería o de un “Memory Stick Duo” (no suministrado) ɟ Tapa de la batería/ “Memory Stick Duo” Introduzca el “Memory Stick Duo” con la parte frontal orientada hacia la pantalla LCD. ɠ Introduzca la batería presionando la palanca de expulsión de la batería con la punta de ésta. 1 Abra la tapa de la batería/“Memory Stick Duo”. ES 2 Introduzca el “Memory Stick Duo” (no suministrado) hasta que llegue al final y quede encajado. 3 Introduzca la batería.
[ Para comprobar el tiempo restante de la batería Pulse el botón POWER para encender y comprobar la carga restante en la pantalla LCD. Indicador de carga restante Significado de la carga restante Carga suficiente Batería casi totalmente cargada Batería medio cargada Batería baja; la grabación o reproducción se detendrán pronto. Cambie la batería por otra totalmente cargada o cargue la batería. (El indicador de advertencia parpadea).
3 Encendido de la cámara y ajuste del reloj Botón POWER Cubierta del objetivo ɟ Botón de control 1 2 Botón HOME 3 Botón z ES 1 Pulse el botón POWER o deslice la cubierta del objetivo hacia abajo. 2 Ajuste el reloj con el botón de control. 1 Seleccione el formato de visualización de la fecha con v/V y, a continuación, pulse z. 2 Seleccione cada elemento mediante b/B, ajuste el valor numérico con v/V y, a continuación, pulse z. 3 Seleccione [OK] y, a continuación, pulse z.
Toma de imágenes fácilmente (modo de ajuste automático) El procedimiento siguiente es para tomar imágenes fijas. ɠ Botón del Micrófono Indicador Flash luminoso del autodisparador disparador Botón del zoom Botón MENU Botón de control Rosca para trípode (parte inferior) Tapa del objetivo Botón HOME Objetivo Botón DISP Botón del flash Botón de macro Botón del autodisparador 1 Deslice la cubierta del objetivo hacia abajo. 2 Sujete la cámara sin moverla y mantenga el brazo en el costado.
Zoom/Flash/Macro/Autodisparador/Pantalla [ Uso del zoom Pulse para aumentar el zoom y disminuirlo. [ para Flash (selección de un modo de flash para imágenes fijas) Pulse B ( ) del botón de control varias veces hasta que se seleccione el modo que desee.
Visualización/borrado de imágenes Botón (reproducción) Botón (índice)/ (zoom de reproducción) Botón (zoom de reproducción) Botón MENU ɟ Botón de control Conector múltiple (parte inferior) 1 Pulse Botón HOME (reproducción). Si se pulsa cuando la cámara está apagada, la cámara se enciende automáticamente en modo de reproducción. Para pasar al modo de toma de imágenes, pulse otra vez. 2 Seleccione una imagen mediante b/B del botón de control. Película: Pulse z para reproducir películas.
[ Visualización de una pantalla de índice Pulse para ver la pantalla de índice al visualizar una imagen fija. A continuación, seleccione una imagen con v/V/b/B. Para regresar a la pantalla de una sola imagen, pulse z. • También puede acceder a la pantalla de índice si selecciona [ Visualización índice] en la pantalla HOME. • Cada vez que se pulsa , cambia el número de imágenes de la pantalla de índice. [ Para borrar imágenes en el modo de índice 1 Pulse MENU cuando se muestre la pantalla de índice.
Explicación de las distintas funciones – HOME/Menú Uso de la pantalla HOME La pantalla HOME es la pantalla de acceso a todas las funciones de la cámara. Es posible seleccionar el modo de toma de imágenes o el modo de reproducción, o cambiar la configuración de la pantalla HOME. Botón z Botón de control Botón HOME 1 Pulse HOME para visualizar la pantalla HOME. Categoría Elemento Guía 2 Seleccione una categoría con b/B. 3 Seleccione un icono con v/V y, a continuación, pulse z.
Para obtener más información acerca del funcionamiento 1 página 14 Elementos de la pantalla HOME Las categorías y elementos siguientes aparecen al pulsar el botón HOME. La guía muestra una descripción de la categoría o el elemento seleccionado en la pantalla. Categoría Elementos Toma de imagen Ajuste automático Selección escena Programa automático Modo película Visionado de imágs.
Uso de los elementos de menú Botón z Botón MENU Botón de control 1 Pulse MENU para visualizar el menú. Guía funciones • Sólo es posible mostrar el menú cuando la cámara está en el modo de toma de imágenes o en el modo de reproducción. • Hay diferentes elementos disponibles, en función del modo seleccionado. 2 Seleccione el elemento deseado con v/V del botón de control. Si el elemento deseado está oculto, siga pulsando v/V hasta que el elemento aparezca en la pantalla.
Para obtener más información acerca del funcionamiento 1 página 16 Elementos de menú Los elementos de menú disponibles varían en función del modo de la cámara. El menú para la toma de imágenes está disponible únicamente en el modo de toma de imágenes, mientras que el menú de visualización sólo está disponible en el modo de reproducción.
Prestaciones del ordenador Las imágenes tomadas con la cámara se pueden ver en el ordenador. También se pueden utilizar más que nunca las imágenes fijas y películas de la cámara gracias al software. Para obtener información detallada, consulte la “Guía práctica de Cyber-shot”. Sistemas operativos admitidos para la conexión USB y software de aplicación (suministrado) Para usuarios de Windows Para usuarios de Macintosh Conexión USB Windows 2000 Professional, Windows XP*, Windows XP Vista* Mac OS 9.1/9.
Visualización de la “Guía práctica de Cyber-shot” o “Guía avanzada de Cyber-shot” [ Para usuarios de Windows [ Para usuarios de Macintosh 1 Encienda el ordenador e inserte el CD- Encienda el ordenador e inserte el CDROM (suministrado) en la unidad de CDROM. Siga las instrucciones que se proporcionan a continuación. ROM (suministrado) en la unidad correspondiente. Aparece la pantalla siguiente.
Indicadores de la pantalla Cada vez que se pulsa el botón v (DISP), cambia la pantalla (página 11).
B 1.0m Distancia de enfoque predefinida z Bloqueo AE/AF ISO400 Número ISO 12/12 Número de imagen/Número de imágenes grabadas en la carpeta seleccionada 00:00:00 Tiempo de grabación restante Cambiar carpeta Obturación lenta NR 125 Velocidad de obturación F3.5 Valor de abertura +2.
Duración de la batería y capacidad de la memoria Duración de la batería y número de imágenes que se pueden grabar/ver Las tablas muestran el número aproximado de imágenes que se pueden grabar/ver y la duración de la batería al tomar imágenes en el modo [Normal] con toda la capacidad de la batería y a una temperatura ambiente de 25 °C. En los números de imágenes que pueden grabarse o verse se tiene en cuenta el cambio de “Memory Stick Duo” según sea necesario.
Número de imágenes fijas y tiempo de grabación de películas El número de imágenes fijas y el tiempo disponible para grabar las películas pueden variar en función de las condiciones de la toma y/o del soporte de grabación utilizado. • Se puede seleccionar el tamaño de imagen utilizado para tomar imágenes en el menú (página 16, 17). [ Número aproximado de imágenes fijas (Unidades: imágenes) Capacidad Tamaño Memoria interna Aprox.
Solución de problemas Si tiene algún problema con la cámara, intente primero las siguientes soluciones. 1 Compruebe los elementos siguientes y consulte la “Guía práctica de Cyber-shot (PDF)”. Si aparece un código como “C/E:ss:ss” en la pantalla, consulte la “Guía práctica de Cyber-shot”. 2 Extraiga la batería, vuelva a insertarla después de un minuto aproximadamente y conecte la alimentación. 3 Inicialice los ajustes (página 15).
El indicador de batería restante es incorrecto. • Este fenómeno ocurre cuando utiliza la cámara en un lugar muy cálido o muy frío. • La carga de batería restante que se indica difiere de la actual. Descargue la batería totalmente y vuelva a cargarla para corregir la indicación. • La batería está descargada. Instale la batería cargada (página 6). • La batería está descargada. Reemplácela por una nueva. No se puede cargar la batería • No se puede cargar la batería con el adaptador de ca (no suministrado).
Visualización de imágenes La cámara no puede reproducir imágenes. • Pulse (reproducción) (página 12). • El nombre de la carpeta o del archivo ha sido modificado en el ordenador. • Si se ha procesado un archivo de imagen con un ordenador o si se ha grabado el archivo de imagen con un modelo distinto al de la cámara, la reproducción en esta cámara no está garantizada. • La cámara se encuentra en el modo USB. Elimine la conexión USB.
Precauciones [ No utilice/almacene la cámara en los siguientes lugares [ Acerca de la temperatura de funcionamiento • En lugares extremadamente calurosos, fríos o húmedos. En lugares tales como en un automóvil estacionado bajo el sol, es posible que el cuerpo de la cámara se deforme, lo que podría provocar un fallo de funcionamiento. • Bajo la luz solar directa o cerca de una estufa. El cuerpo de la cámara puede decolorarse o deformarse y esto puede ocasionar un fallo de funcionamiento.
Especificaciones Camera [Sistema] PRINT Image Matching III: Compatible PictBridge: Compatible Dispositivo de imagen: CCD de color de 7,18 mm (tipo 1/2,5), filtro de color primario Número total de píxeles de la cámara: Aprox. 8 286 000 píxeles Número efectivo de píxeles de la cámara: Aprox.
Additional information on this product and answers to frequently asked questions can be found at our Customer Support Website. En la página Web de atención al cliente puede encontrar información adicional sobre este producto y respuesta a las preguntas hechas con más frecuencia. Printed on 70% or more recycled paper using VOC (Volatile Organic Compound)-free vegetable oil based ink. Impreso en papel 70% o más reciclado utilizando tinta hecha con aceite vegetal exento de compuesto orgánico volátil (COV).