® Activate and install your Sony® SVR-3000 Complete Guided Setup Use the TiVo® service— it's easy!
STEP 1 Activate and install Let’s get started! This guide describes the basics for setting up your new Sony SVR Recorder. Activating and installing a basic system takes about 25 minutes. Completing onscreen Guided Setup takes less than an hour. See the Installation Guide for additional installation examples, further details, more diagrams, and troubleshooting. (E.g., it includes an example setup with a DVD player and A/V receiver, and one with a TV with only one input.
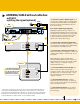
INSTALLATION EXAMPLES SATELLITE or CABLE BOX Connect Satellite or Cable Box to SVR Recorder. Use either a composite cable alone (shown), or connect an S-video cable and the L/R audio (red and white) ends of a composite cable. Satellite Receiver or cable box Satellite OUT In Audio R L Video S-Video Ch 3/4 RF Out Serial Control SVR Recorder * OR To record shows or display live TV, the SVR 3000 must change the channel on your cable box or satellite receiver.
SATELLITE or CABLE BOX with VCR Connect Satellite or Cable Box to SVR Recorder. Use either a composite cable alone (shown), or an S-video cable and the L/R audio (red and white) ends of a composite cable. Satellite Receiver or cable box Satellite In OUT Serial Control Audio R L Video S-Video Ch 3/4 SVR Recorder ** OR composite cable alone (shown), or connect an S-video cable and the L/R audio (red and white) ends of a composite cable. Control Cable Connection.
ANTENNA/CABLE without cable box -with VCR -splitting the signal (optional) Connect your cable or antenna signal. If you do not want to split the signal, connect the cable coming from the wall directly to the “VHF/UHFIN” jack on the back of the SVR Recorder, and then skip to step . Splitter OUT SVR Recorder IN OUT OUT * VCR Audio Video IN Antenna In Ch 3/4 OUT RF Out If you want to split the signal (optional).
For more examples and details, see the Installation Guide. ANTENNA or CABLE without box Connect the cable or antenna signal to the SVR Recorder OUT SVR Recorder. Connect the cable coming from the wall to the VHF/UHF-IN jack on the SVR Recorder. Connect the SVR Recorder to the TV . Use T either a composite cable alone (shown), or connect an S-video cable and the L/R audio (red and white) ends of a composite cable. * Connect phone and power.
STEP 2 Complete Guided Setup Stepping through Guided Setup Guided Setup is the last step before you can start using your SVR Recorder with the TiVo® service. The TiVo service lets you schedule Season Pass™ recordings, create WishList™ searches, use TiVo Suggestions, and take advantage of other exclusive TiVo DVR (digital video recorder) features. When you see the Welcome screen, you are ready to begin Guided Setup.
STEP 3 Use the TiVo service—it's easy! ® TiVo Central ® Control Your TV and Stereo The TiVo button takes you to TiVo Central, where you can access all of the features unique to the TiVo® service. You can program the POWER, VOLUME, MUTE, and TV INPUT buttons on the TiVo remote to control your TV and A/V stereo system. See the Installation Guide for instructions. Find Out What’s on TV Go straight to live TV by pressing the LIVE TV/GUIDE button.