
User's Manual

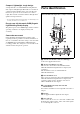
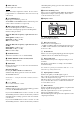


Table Of Contents
- Table of Contents
- Features
- Parts Identification
- Preparation
- Setting the Receiving Channel
- Using the Encrypted Transmission Function
- Menu Displays and Detailed Settings
- UTILITY Menu
- RX (tuner) 1/2 Menu
- TX (Transmitter Virtual) 1/2 Menu
- Using the Cross Remote
- Changing the Settings on the Transmitter
- Block Diagram
- Troubleshooting
- Important Notes on Operation
- Specifications
- Carrier Frequencies and Channel Steps

6
Preparation
The separately-sold DWA-SLAS1 or DWA-SLAU1
digital wireless adapter is required to use this device.
DWA-SLAS1: This is used to connect a Sony camcorder,
DWA-01D/F01D wireless adapter, or other Sony devices.
DWA-SLAU1: Used when connected to a UniSlot
®
standard device.
Attaching DWA-SLAS1/SLAU1
This section uses the DWA-SLAS1 drawing for
explanations, but the DWA-SLAU1 can be attached using
the same procedure.
Attaching the bracket
Attach the bracket included with the DWA-SLAS1/
SLAU1 to the receiver.
1
Align the front of the receiver (surface with text) with
the printed side of the bracket included with the
DWA-SLAS1/SLAU1, then pass the bracket through
the bottom of the receiver.
Pass the bracket through the receiver so that the slot
attachment screw attached to the bracket faces
upward.
2
Use the screws included with the DWA-SLAS1/
SLAU1 to secure the bracket to the receiver.
Use four screws on the DWA-SLAS1 and two screws
on the bracket mounting screw hole to secure the
accessories on the receiver.
Attaching the DWA-SLAS1/SLAU1 main
unit
1
Align the slot connector on the bottom of the receiver
and the DWA-SLAS1/SLAU1 receiver connector,
then insert the DWA-SLAS1/SLAU1 into the receiver.
• Make sure there are no foreign objects in the
terminals before connecting the devices.
• Applying excessive force can damage the terminals,
so take adequate caution.
2
Use the two screws attached to the bottom of the
DWA-SLAS1/SLAU1 main unit to secure it to the
receiver.
Attaching to Sony camcorder
The DWA-SLAS1 digital wireless adapter (sold
separately) main unit can be attached to the wireless
receiver slot of compatible Sony camcorders.
The audio signal, which is converted to digital by the
digital wireless transmitter, can be recorded as is to the
camcorder, allowing you to create a fully digital system.
1
Remove the cover from the slot for the wireless
receiver on the camcorder, and insert the receiver into
the slot.
To avoid inserting the receiver in the wrong direction,
confirm the location of the mounting screws and
compatibility pin before inserting the wireless
receiver.
Printed side
Notes