2-661-555-16(1) DVD Home Theatre System Operating Instructions DAV-DZ110/DZ111/DZ410 ©2006 Sony Corporation
Installing 3 WARNING To reduce the risk of fire or electric shock, do not expose this apparatus to rain or moisture. Do not install the appliance in a confined space, such as a bookcase or built-in cabinet. To prevent fire, do not cover the ventilation of the apparatus with news papers, table-cloths, curtains, etc. And don’t place lighted candles on the apparatus. To prevent fire or shock hazard, do not place objects filled with liquids, such as vases, on the apparatus.
Table of Contents Welcome! ................................................ 2 About This Manual ................................. 5 This System Can Play the Following Discs .................................................6 Getting Started – BASIC – Step 1: Assembling the Speakers ............................. 9 Step 2: Connecting the System and TV ............................................. 12 Step 3: Positioning the System... 18 Step 4: Performing the Quick Setup........................................
Advanced Settings and Adjustments Locking Discs ....................................... 63 (CUSTOM PARENTAL CONTROL, PARENTAL CONTROL) Getting Optimal Surround Sound for a Room .............................................. 66 (SPEAKER FORMATION) Calibrating the Appropriate Settings Automatically ................................. 68 (AUTO CALIBRATION) Using the Setup Display........................ 70 Setting the Display or Sound Track Language ........................................
1) MP3 (MPEG1 Audio Layer 3) is a standard format defined by ISO/MPEG which compresses audio data. 2) DAV-DZ110/DZ410 only. 3) DivX® is a video file compression technology, developed by DivX, Inc. 4) DivX, DivX Certified, and associated logos are trademarks of DivX, Inc. and are used under license. About This Manual • The instructions in this manual describe the controls on the remote. You can also use the controls on the system if they have the same or similar names as those on the remote.
This System Can Play the Following Discs Format of discs Disc logo The system can play DVD-ROMs/DVD+RWs/ DVD-RWs/DVD+Rs/DVD-Rs recorded in the following formats: – MP3 audio tracks, JPEG image files and DivX video files* of format conforming to UDF (Universal Disc Format) * DAV-DZ110/DZ410 only DVD VIDEO Example of discs that the system cannot play DVD-RW/ DVD-R DVD+RW/ DVD+R The system cannot play the following discs: • CD-ROMs/CD-Rs/CD-RWs other than those recorded in the formats listed on page 6 •
DATA CDs/DATA DVDs created in Packet Write format cannot be played. Music discs encoded with copyright protection technologies This product is designed to play back discs that conform to the Compact Disc (CD) standard. Recently, various music discs encoded with copyright protection technologies are marketed by some record companies. Please be aware that among those discs, there are some that do not conform to the CD standard and may not be playable by this product.
Getting Started – BASIC – Getting Started – BASIC – See Unpacking in Specifications, page 83. Inserting batteries into the remote You can control the system using the supplied remote. Insert two R6 (size AA) batteries by matching the 3 and # ends on the batteries to the markings inside the compartment. When using the remote, point it at the remote sensor on the system. Note • Do not leave the remote in an extremely hot or humid place. • Do not use a new battery with an old one.
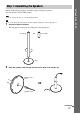
Step 1: Assembling the Speakers Getting Started – BASIC – Before connecting the speakers, attach the speaker stand to the speaker. (For the speakers of DAV-DZ410 only.) Note • Spread a cloth on the floor to avoid damaging the floor. Tip • You can use the speaker without the speaker stand by installing it on the wall (page 23). 1 Secure the post to the base. The long post is for floor use, the short post is for tabletop use.
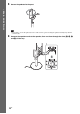
Secure the pedestal to the post. Getting Started – BASIC – 3 Note • If it is hard to secure the pedestal, remove and secure it again. Securing the pedestal forcibly may ruin the screw threads. 4 Connect the speaker cords to the speaker, then run them through the slots (A, B, C, and D) all the way.
5 Slide the speaker down slowly onto the pedestal. Getting Started – BASIC – Adjust the length of the speaker cord. Note • Do not catch the speaker cord between the speaker and the pedestal. • Do not drop the speaker when mounting. 6 Secure the speaker with the screws in order 1 to 2.
Getting Started – BASIC – Step 2: Connecting the System and TV This hookup is the basic connection of the system to the speakers and TV. For other TV connections, see page 24. For other component connection, see page 27. To accept progressive signals, see page 25. Refer to the connection diagram below, and read the additional information from 1 to 4 on the following pages.
DAV-DZ111 Center speaker AM loop antenna (aerial) COMPONENT VIDEO OUT SPEAKER Y P B/C B P R/C R EURO AV AM FRONT R FRONT L CENTER WOOFER SUR R SUR L (DVD ONLY) OUTPUT(TO TV) R AUDIO IN L LINE COAXIAL FM 75 AC power cord (mains lead) FM wire antenna (aerial) Subwoofer TV Surround speaker (R) Surround speaker (L) continued 13GB Getting Started – BASIC – Front speaker (L) Front speaker (R)
DAV-DZ410 Front speaker (L) Getting Started – BASIC – Front speaker (R) Center speaker AM loop antenna (aerial) COMPONENT VIDEO OUT SPEAKER Y P B/C B P R/C R EURO AV AM FRONT R FRONT L CENTER WOOFER SUR R SUR L (DVD ONLY) OUTPUT(TO TV) R AUDIO IN L LINE COAXIAL FM 75 AC power cord (mains lead) FM wire antenna (aerial) Subwoofer TV Surround speaker (R) 14GB Surround speaker (L)
1 Connecting the Speakers The connector and color tube of the speaker cords are the same color as the label of the jacks to be connected. Color tube (+) (–) Note • Do not catch the speaker cord insulation in the SPEAKER jack. To avoid short-circuiting the speakers Short-circuiting of the speakers may damage the system. To prevent this, be sure to follow these precautions when connecting the speakers.
Getting Started – BASIC – When you connect using the SCART (EURO AV) cord, check that the TV conforms to S video or RGB signals. If the TV conforms to S video, change the input mode of the TV to RGB signals. Refer to the operating instructions supplied with the TV to be connected. Tip • When you want to output the TV sound or stereo sound of a 2 channel source from the 6 speakers, select the “Dolby Pro Logic,” “Dolby Pro Logic II MOVIE,” or “Dolby Pro Logic II MUSIC” sound field (page 33).
4 Make sure the AM loop antenna (aerial) is connected firmly by pulling softly. To connect the FM wire antenna (aerial) Getting Started – BASIC – Connect the FM wire antenna (aerial) to the COAXIAL FM 75 Ω jack. FM wire antenna (aerial) (supplied) FM wire antenna (aerial) (supplied) or COAXIAL FM 75 Ω jack COAXIAL FM 75 Ω jack Note • Be sure to fully extend the FM wire antenna (aerial). • After connecting the FM wire antenna (aerial), keep it as horizontal as possible.
Getting Started – BASIC – Step 3: Positioning the System Positioning the speakers For the best possible surround sound, all the speakers other than the subwoofer should be the same distance from the listening position (A). However, this system allows you to place the center speaker up to 1.6 meters (5 ft) closer (B) and the surround speakers up to 5.0 meters (16 ft) closer (C) to the listening position. The front speakers can be placed from 1.0 to 7.0 meters (3 to 23 ft) (A) from the listening position.
LANGUAGE SETUP OSD: MENU: AUDIO: SUBTITLE: ENGLISH ENGLISH FRENCH SPANISH PORTUGUESE Follow the steps below to make the minimum number of basic adjustments for using the system. "/1 5 Press X/x to select a language. The system displays the menu and subtitles in the selected language. 6 Press ENTER. The Setup Display for selecting the aspect ratio of the TV to be connected appears. SCREEN SETUP TV TYPE: SCREEN SAVER: BACKGROUND: LINE: 4:3 OUTPUT: C/X/x/c ENTER DISPLAY 1 2 Turn on the TV.
Getting Started – BASIC – • [VIDEO]: outputs video signals. • [RGB]: outputs RGB signals. Note • If your TV does not accept RGB signals, no picture appears on the TV screen even if you select [RGB]. Refer to the instructions supplied with your TV. 10 Press ENTER. A.CAL MIC Calibration mic The Setup Display for selecting the speaker formation appears. 11 Press C/c to select the speaker formation image as the speakers are actually positioned, then press ENTER.
YES Getting Started – BASIC – Measurement complete. FRONT L : YES FRONT R : YES CENTER : NONE SUBWOOFER : YES SURROUND L : NONE SURROUND R : NONE If OK, unplug calibration mic and select YES. NO Note • If measurement fails, follow the message then retry [AUTO CALIBRATION]. To quit the Quick Setup Press DISPLAY in any Step. Tip • If you change the position of the speakers, reset the speaker settings.
Getting Started – ADVANCED – Turning off the Demonstration 5 X/x/c ENTER After connecting the AC power cord (mains lead), the demonstration appears in the front panel display. When you press "/1 on the remote, the demonstration turns off. Note • When you press "/1 on the system, the demonstration does not turn off. • When you set the demonstration mode in the AMP menu to on, the demonstration does not turn off even though you press "/1 on the remote.
For the other speakers (DAV-DZ410) Installing the Speakers on a Wall Prepare screws (not supplied) that are suitable for the hole on the back of each speaker. See the illustrations below. 400 mm (15 3/4 inch) 8 to 10 mm (11/32 to 13/32 inch) 4 mm (5/32 inch) 30 mm (1 3/16 inch) 4.6 mm (3/16 inch) 3 Hole on the back of the speaker 4.6 mm (3/16 inch) 10 mm (13/32 inch) 10 mm (13/32 inch) 2 Hang the speakers on the screws. Getting Started – ADVANCED – 1 Fasten the screws to the wall.
TV Hookup (Advanced) Select a hookup suitable for the jacks on your TV. Connecting the video cords Sends a played back DVD image to a TV. Check the jacks of your TV, and choose connection method A or B. Picture quality improves in order from A (standard) to B (component).
B To connect to a TV with the COMPONENT VIDEO IN jacks Connect a component video cord (not supplied). To use the COMPONENT VIDEO OUT jacks (Y, PB/ CB, PR/CR), your TV monitor must be equipped with via COMPONENT VIDEO IN jacks (Y,PB/CB, PR/CR). If your TV accepts progressive format signals, you must use this connection and set the output channel of the system to progressive format (page 25). When connecting to a standard 4:3 screen TV Depending on the disc, the image may not fit your TV screen.
x P AUTO (PROGRESSIVE AUTO) Select this setting when: – your TV accepts progressive signals, and, – the TV is connected to the COMPONENT VIDEO OUT jacks. Normally select this under the above condition. This automatically detects the software type, and selects the appropriate conversion method. Note that the picture will not be clear or no picture will appear if you select these settings when either of the above conditions are not met.
Other Component Hookup You can enjoy sound using the speakers of this system by connecting the AUDIO OUT jacks of another component. For video connection of other components, connect directly to the TV. Getting Started – ADVANCED – Connecting the system and the other component Outputs the other component through the speakers of this system. VCR, digital satellite receiver or PlayStation 2, etc.
Tip • When listening to MP3 format recordings using a portable audio source, you can enhance the sound. Press FUNCTION to select “AUDIO.” Connect the portable audio source. Press SOUND FIELD repeatedly until “A.F.D. STD” appears in the front panel display. To cancel, select other than “A.F.D. STD.” Note • Be sure to make connections securely to avoid hum and noise.
Place one disc on the tray, and then press A. Basic Operations Playing Discs A Note • Do not forcibly press the disc tray closed with your finger, as this may cause malfunction. • Do not place more than one disc on the tray. Disc tray Connect headphones 6 Press H. The system starts playback (continuous play). Adjust the volume on the system. The volume level appears on the TV screen and in the front panel display.
Basic Operations To Press Replay the previous scene* (instant replay) during playback. Briefly fast forward the current scene** (instant advance) during playback. Enjoying the Radio or Other Components * DVD VIDEOs/DVD-RWs/DVD-Rs only. The button can be used except for DivX video files (DAV-DZ110/DZ410 only). ** DVD VIDEOs/DVD-RWs/DVD-Rs/DVD+RWs/ DVD+Rs only. The button can be used except for DivX video files (DAV-DZ110/DZ410 only).
1 2 3 Press AMP MENU. Press X/x repeatedly until “ATTENUATE” appears in the front panel display, then press ENTER or c. Press X/x to select a setting. • ATT ON: attenuates the input level. The output level is changed. • ATT OFF: normal input level. 5 Enjoying TV or VCR Sound from All Speakers You can enjoy TV or VCR sound from all the speakers in this system. For details, see “TV Hookup (Advanced)” (page 24) and “Other Component Hookup” (page 27). Press ENTER. FUNCTION The setting is reflected.
Basic Operations Selecting the Movie or Music Mode You can choose a suitable sound mode for movies or music. MOVIE/ MUSIC Press MOVIE/MUSIC during playback. Press MOVIE/MUSIC repeatedly until the mode you want lights up in the front panel display. The default setting is underlined. • AUTO: selects the mode automatically to produce the sound effect depending on the disc. • MOVIE: provides the sound for movies. • MUSIC: provides the sound for music.
Automatic outputting of the original sound Sound Adjustments Enjoying Surround Sound by Using Sound Field The auto decoding function automatically detects the type of audio signal being input (Dolby Digital, DTS, or standard 2 channel stereo) and performs the proper decoding if necessary. This mode presents the sound as it was recorded/encoded, without adding any effects (e.g. reverberation). However, if there are no low frequency signals (Dolby Digital LFE, etc.
Using only the front speaker and subwoofer x 2 CHANNEL STEREO This mode outputs the sound from the front left and right speakers and subwoofer. Standard 2 channel (stereo) sources completely bypass the sound field processing. Multi channel surround formats are downmixed to two channels. This allows you to play any source using only the front left and right speakers and subwoofer. Enjoying the surround sound by headphones x HEADPHONE 2 CHANNEL STEREO This mode outputs the sound from headphone L/ R.
Opposite direction Various Functions for Playing Discs × 2b t 1m t 2m t 3m Searching for a Particular Point on a Disc 3m (DVD VIDEO/DVD-VR mode/DivX video*/ VIDEO CD only) × 2b (DVD VIDEO only) (Scan, Slow-motion Play, Freeze Frame) Note • Depending on the DVD/DivX video*/VIDEO CD, you may not be able to do some of the operations described. * DAV-DZ110/DZ410 only. Locating a point quickly by playing a disc in fast forward or fast reverse (Scan) (except for JPEG) Press /m or M/ while playing a disc.
Searching for a Title/ Chapter/Track/Scene, etc. You can search a DVD by title or chapter, and you can search a VIDEO CD/CD/DATA CD/ DATA DVD by track, index, or scene. As titles and tracks are assigned unique numbers on the disc, you can select the desired one by entering its number. Or, you can search for a scene using the time code. 1 Press DISPLAY. (When playing a DATA CD/DATA DVD with JPEG image files, press DISPLAY twice.) The Control Menu appears. 2 3 Press ENTER.
Searching by Scene (Picture Navigation) You can divide the screen into 9 subscreens and find the desired scene quickly. 1 Resuming Playback from the Point Where You Stopped the Disc (Resume Play) Press PICTURE NAVI during playback. The following display appears. CHAPTER VIEWER Press PICTURE NAVI repeatedly to select an item. When you stop the disc, the system remembers the point where you pressed x and “RESUME” appears in the front panel display.
To enjoy a disc that is played before by resume playback (Multi-disc Resume) (DVD VIDEO, VIDEO CD only) This system stores the point where you stopped the disc for up to 40 discs and resumes playback the next time you insert the same disc. If you store a resume playback point for the 41st disc, the resume playback point for the first disc is deleted. To activate this function, set [MULTI-DISC RESUME] in [CUSTOM SETUP] to [ON]. For details, see “[MULTI-DISC RESUME] (DVD VIDEO/VIDEO CD only)” (page 74).
PROGRAM ALL CLEAR 1. TRACK – – 2. TRACK – – 3. TRACK – – 4. TRACK – – 5. TRACK – – 6. TRACK – – 7. TRACK – – 5 0:00:00 T –– 01 02 03 04 05 06 cancel a program, select [--] under [T], then press ENTER. To cancel all of the tracks in the programmed order 1 Follow steps 1 to 3 of “Creating Your Own For example, select track [02]. Press X/x to select [02] under [T], then press ENTER. 2 Press X and select [ALL CLEAR]. 3 Press ENTER. ALL CLEAR 1. TRACK 2. TRACK 3. TRACK 4. TRACK 5. TRACK 6. TRACK 7.
Playing in Random Order (Shuffle Play) Note • Same song may be played repeatedly during MP3 playback. Press DISPLAY during playback. The Control Menu appears. 2 Press X/x to select then press ENTER. [SHUFFLE], The options for [SHUFFLE] appear. T 6 (14) 2:50 PLAY CD OFF OFF TRACK 3 Press X/x to select the item to be shuffled. x When playing a VIDEO CD or CD • [TRACK]: shuffles tracks on the disc. x When Program Play is activated • [ON]: shuffles tracks selected in Program Play.
• [TRACK] (MP3 audio tracks only): repeats the current track. • [FILE] (DivX video files only): repeats the current file.* Playing Repeatedly (Repeat Play) * DAV-DZ110/DZ410 only. 4 You can play all the titles, tracks or albums on a disc or a single title, chapter, track, or album repeatedly. You can use a combination of Shuffle or Program Play modes. Press DISPLAY during playback. The Control Menu appears. 2 Press X/x to select then press ENTER.
Using the DVD’s Menu A DVD is divided into a lot of sections, which make up a picture or music feature. These sections are called “titles.” When you play a DVD which contains several titles, you can select the title you want using TOP MENU. When you play DVDs that allow you to select items such as the language for the subtitles and the language for the sound, select these items using MENU. 1 Press TOP MENU or MENU. The disc’s menu appears on the TV screen. The contents of the menu vary from disc to disc.
• [2: MAIN+SUB] Note • [2: MAIN], [2: SUB], and [2: MAIN+SUB] do not appear when one audio stream is recorded on the disc. x When playing a VIDEO CD, CD, DATA CD (MP3 audio), or DATA DVD (MP3 audio) x When playing a DATA CD (DivX video) or DATA DVD (DivX video) (DAV-DZ110/DZ410 only) The choice of DATA CD or DATA DVD audio signal formats differ, depending on the DivX video file contained on the disc. The format is shown in the display. (DVD, DivX video* only) * DAV-DZ110/DZ410 only.
About audio signals Audio signals recorded in a disc contain the sound elements (channels) shown below. Each channel is output from a separate speaker. • Front (L) • Front (R) • Center • Surround (L) • Surround (R) • Surround (Monaural): This signal can be either the Dolby Surround Sound processed signals or the Dolby Digital sound’s monaural Surround audio signals.
Viewing Information About the Disc 6 Track and index* * VIDEO CD only. When playing a DATA CD (MP3 audio) or DATA DVD (MP3 audio) 1 Playing time and current track number 2 Track (file) name Tip Viewing the playing time and remaining time in the front panel display * DAV-DZ110/DZ410 only. Press DISPLAY. Each time you press DISPLAY while playing the disc, the display changes 1 t 2 t ... t 1 t ... Some displayed items may disappear after a few seconds.
• C **:**:** Playing time of the current chapter • C–**:**:** Remaining time of the current chapter x When playing a VIDEO CD (with PBC functions) • **:** Playing time of the current scene x When playing a VIDEO CD (without PBC functions) or CD • T **:** Playing time of the current track • T–**:** Remaining time of the current track • D **:** Playing time of the current disc • D–**:** Remaining time of the current disc x When playing a DATA CD (MP3 audio) or DATA DVD (MP3 audio) • T **:** Playing time of
Checking the date information Changing the Angles (JPEG only) You can check the date information during playback when the Exif* tag is recorded in the JPEG image data. Press DISPLAY twice during playback. The Control Menu appears. 1(8) 1(20) If various angles (multi-angles) for a scene are recorded on a DVD VIDEO, you can change the viewing angle. Press ANGLE during playback. Each time you press ANGLE, the angle changes.
Displaying the Subtitles * * * DAV-DZ110/DZ410 only. If subtitles are recorded on a disc, you can turn the subtitles on or off while playing. If multilingual subtitles are recorded on the disc, you can change the subtitle language while playing, or turn the subtitles on or off whenever you want. Press SUBTITLE during playback. Each time you press SUBTITLE, the subtitle language changes. Adjusting the Delay Between the Picture and Sound (A/V SYNC) * * DAV-DZ110/DZ410 only.
About MP3 Audio Tracks and JPEG Image Files What is MP3/JPEG? MP3 is audio compression technology that satisfies the ISO/MPEG regulations. JPEG is image compression technology. You can play back DATA CDs (CD-ROMs/CDRs/CD-RWs) or DATA DVDs (DVD-Rs/DVDRWs/DVD+Rs/DVD+RWs/DVD-ROMs) recorded in MP3 (MPEG1 Audio Layer 3) or JPEG format.
When you insert a DATA CD or DATA DVD and press H, the numbered tracks (or files) are played sequentially, from 1 through 7. Any sub-albums/tracks (or files) contained within a currently selected album take priority over the next album in the same tree. (Example: C contains D so 4 is played before 5.) When you press MENU and the list of album names appears (page 50), the album names are arranged in the following order: A t B t C t D t F t G.
Pressing MENU again will display the album list. 1 2 3 4 Press x. 5 6 7 8 To play the next or previous MP3 audio track 9 10 11 12 13 14 15 16 To stop playback Press C/X/x/c to select the image you want to view and press ENTER. To return to the previous display Press O RETURN. To turn off the display Press MENU. Selecting a JPEG image file or album To play the next or previous JPEG image file 1 Press C/c when the Control Menu is not displayed.
Press CLEAR to return to normal view. To stop playback Press x. Tip • A scroll box is displayed at the right side of the screen. To display the additional image files, select the bottom image and press x. To return to the previous image, select the top image and press X. Playing Audio Tracks and Images as a Slide Show with Sound You can play a slide show with sound by first placing both MP3 and JPEG files in the same album on a DATA CD or DATA DVD.
• [NORMAL]: sets the duration to about 6 to 9 seconds. (Images that are four million pixels or more will lengthen the duration.) • [FAST]: sets the duration shorter than [NORMAL]. • [SLOW1]: Sets the duration longer than [NORMAL]. • [SLOW2]: Sets the duration longer than [SLOW1]. You can turn the album list on and off by pressing MENU repeatedly. Tip • When you select [AUTO], the system can recognize up to 300 MP3 tracks and 300 JPEG files in a single album.
• [MODE4]: The images randomly cycle through the effects. • [MODE5]: The next image slides over the previous image. • [OFF]: Turns off this function. 4 Enjoying DivX® Videos (DAV-DZ110/DZ410 only) Press ENTER. The selected setting takes effect. About DivX Video Files DivX® is a video file compression technology, developed by DivX, Inc. This product is an official DivX® Certified product. You can play DATA CDs and DATA DVDs that contain DivX® video files.
files with the extension “.AVI” or “.DIVX” if they do not contain a DivX video. To go to the next or previous page Tip Press C/c. • For details about playable MP3 audio tracks or JPEG image files on DATA CDs or DATA DVDs, see “Discs that the system can play” (page 49). To turn off the display Note Selecting an album 1 Press MENU. A list of albums on the disc appears. Only albums that contain DivX video files are listed. To stop playback Press x.
Tip • If the number of viewing times is preset, you can play the DivX video files as many times as the preset number. The following occurrences are counted: – when the system is turned off. – when another file is played. – when the disc tray is opened. Playing VIDEO CDs with PBC Functions (Ver.2.0) (PBC Playback) With PBC (Playback Control) functions, you can enjoy simple interactive operations, search functions, and other such operations.
Tuner Functions Presetting Radio Stations You can preset 20 FM stations, and 10 AM stations. Before tuning, make sure to turn down the volume to minimum. 1 2 Press FUNCTION repeatedly until “TUNER FM” or “TUNER AM” appears in the front panel display. Press and hold TUNING + or – until the auto scanning starts. 3 4 5 Press MENU. Press X/x repeatedly until “MEMORY” appears in the front panel display. Press ENTER. A preset number appears in the front panel display.
Naming preset stations You can enter a name for preset stations. These names (for example, “XYZ”) appear in the system’s front panel display when a station is selected. Note that no more than one name can be entered for each preset station. Note • You cannot enter a name for preset stations of the Radio Data System (RDS) (page 59). 1 Press FUNCTION repeatedly until “TUNER FM” or “TUNER AM” appears in the front panel display. The last received station is tuned in.
Using the Radio Data System (RDS) What is the Radio Data System? The Radio Data System (RDS) is a broadcasting service that allows radio stations to send additional information along with the regular program signal. This tuner offers convenient RDS features, such as station name display. RDS is available only for FM stations.* Note Tuner Functions • RDS may not work properly if the station you are tuned to is not transmitting the RDS signal properly, or if the signal strength is weak.
Other Operations Controlling the TV with the Supplied Remote You can control your TV (SONY only) with the supplied remote. Controlling TVs with the remote To control the TV You can control the TV by using following buttons. Using the THEATRE SYNC Function THEATRE SYNC allows you to turn on your SONY TV and this system, changes the system mode to “DVD,” and then switches the TV’s input source you set with one button push.
Operating for the THEATRE SYNC function Using the Sound Effect Point the remote to the direction of TV and this system, then press THEATRE SYNC once. Reinforcing bass frequencies If this function does not work, change the transmit time. The transmit time varies depending on the TV. You can reinforce bass frequencies. To change the transmit time Press and hold TV CH + while entering the code for transmit time (see the table) using the number buttons. Press DYNAMIC BASS.
Using the Sleep Timer You can set the system to turn off at a preset time, so you can fall asleep listening to music. You can preset the time in 10 minutes decrements. Press SLEEP. Each time you press this button, the minutes display (the remaining time) changes as follows: SLEEP 90M t SLEEP 80M t SLEEP 70M R r SLEEP OFF T SLEEP 10M ..... SLEEP 60M To check the remaining time Press SLEEP once. To change the remaining time Press SLEEP repeatedly to select the desired time.
4 Advanced Settings and Adjustments Press X/x to select [ON t], then press ENTER. x If you have not entered a password The display for registering a new password appears. Locking Discs (CUSTOM PARENTAL CONTROL, PARENTAL CONTROL) PARENTAL CONTROL Enter a new 4-digit password, then press ENTER . You can set 2 kinds of playback restrictions for the desired disc. • Custom Parental Control You can set playback restrictions so that the system will not play inappropriate discs.
To play a disc for which Custom Parental Control is set 12(27) 18(34) T 1:32:55 1 Insert the disc for which Custom Parental DVD VIDEO Control is set. OFF ON PLAYER PASSWORD The [CUSTOM PARENTAL CONTROL] display appears. CUSTOM PARENTAL CONTROL 3 Custom parental control is already set. To play, enter your password and press ENTER . Press X/x to select [PLAYER t], then press ENTER. x If you have not entered a password The display for registering a new password appears.
PARENTAL CONTROL LEVEL: STANDARD: 5 PARENTAL CONTROL LEVEL: STANDARD: OFF USA PG13 USA The lower the value, the stricter the limitation. Press X/x to select [STANDARD], then press ENTER. The selection items for [STANDARD] are displayed. 4: To turn off the Parental Control function Set [LEVEL] to [OFF] in Step 8. PARENTAL CONTROL LEVEL: STANDARD: OFF USA USA OTHERS To play a disc for which Parental Control is set 1 Insert the disc and press H. The display for entering your password appears.
Changing the password 1 Press DISPLAY while the system is in stop mode. The Control Menu appears. 2 Press X/x to select [PARENTAL CONTROL], then press ENTER. The options for [PARENTAL CONTROL] appear. 3 Press X/x to select [PASSWORD t], then press ENTER. The display for entering the password appears. 4 5 6 Enter your 4-digit password using the number buttons, then press ENTER. Enter a new 4-digit password using the number buttons, then press ENTER.
• [ALL FRONT - NO CENTER]: when installing the front and surround speakers in front of the listening position. • [STANDARD]: when installing all the speakers normally. • [NO CENTER]: when installing the front and surround speakers. • [SECOND ROOM]: when installing the front speakers in one room and surround speakers in another. 6 Press ENTER. The selected setting takes effect. 7 Press X/x to select [YES] or [NO], then press ENTER.
• The front panel display indicates the selected [SPEAKER FORMATION]. It does not indicate the speakers which output sound. • When you change the [SIZE] setting in [SPEAKER SETUP], the [SPEAKER FORMATION] setting returns to [STANDARD]. Calibrating the Appropriate Settings Automatically (AUTO CALIBRATION) D. C. A. C. (Digital Cinema Auto Calibration) can set the appropriate surround sound automatically. Note • Loud test sound is output when [AUTO CALIBRATION] starts. You cannot turn the volume down.
face the calibration mic, and there should be no obstruction between the speakers and the calibration mic. Be quiet during the measurement. • Reflections from walls or the floor may affect measurements. • If an error message appears, follow the message, then select [YES]. An error message appears when: –the headphones are connected. –the calibration mic is not connected. –front speakers are not correctly connected. –surround speakers are not correctly connected.
– – – – do not change the disc. do not insert or eject a disc. do not connect the headphones. do not disconnect the calibration mic. Using the Setup Display By using the Setup Display, you can make various adjustments to items such as picture and sound. For an overall list of Setup Display items, see page 94. Displayed items differ depending on the country model. Note • Playback settings stored in the disc take priority over the Setup Display settings and not all the functions described may work.
Note Selected item SCREEN SETUP TV TYPE: 16:9 COLOR SYSTEM (VIDEO CD): AUTO SCREEN SAVER: ON BACKGROUND: JACKET PICTURE FULL 4:3 OUTPUT: • When you turn the system on after resetting and no disc is in the system, the guide message appears on the TV screen. To perform the Quick Setup (page 19), press ENTER, to return to normal screen, press CLEAR. Setup items 5 Select an item using X/x, then press ENTER. The options for the selected item appear.
Setting the Display or Sound Track Language [LANGUAGE SETUP] [LANGUAGE SETUP] allows you to set various languages for the on-screen display or sound track. Select [LANGUAGE SETUP] in the Setup Display. To use the display, see “Using the Setup Display” (page 70). LANGUAGE SETUP OSD: MENU: AUDIO: SUBTITLE: Settings for the Display [SCREEN SETUP] Choose settings according to the TV to be connected. Select [SCREEN SETUP] in the Setup Display. To use the display, see “Using the Setup Display” (page 70).
[4:3 LETTER BOX] [4:3 PAN SCAN] x [LINE] Selects the output method for video signals from the EURO AV T OUTPUT (TO TV) jack on the rear panel of the system. [VIDEO] Outputs video signals. [RGB] Outputs RGB signals. Note • If your TV does not accept RGB signals, no picture appears on the TV screen even if you select [RGB]. Refer to the instructions supplied with your TV.
Custom Settings [CUSTOM SETUP] Use this to set up playback related and other settings. Select [CUSTOM SETUP] in the Setup Display. To use the display, see “Using the Setup Display” (page 70). The default settings are underlined. CUSTOM SETUP AUTO PAUSE MODE: OFF TRACK SELECTION: ON MULTI-DISC RESUME: OFF AUDIO DRC: Registration Code DivX: x [PAUSE MODE] (DVD VIDEO/DVD-R/ DVD-RW only) x [MULTI-DISC RESUME] (DVD VIDEO/ VIDEO CD only) Switches the Multi-disc Resume setting on or off.
Settings for the Speakers [SPEAKER SETUP] To obtain the best possible surround sound, set for the size of the speakers you have connected and their distance from your listening position. Then use the test tone to adjust the level and the balance of the speakers to the same level. Select [SPEAKER SETUP] in the Setup Display. For details, see “Using the Setup Display” (page 70). The default settings are underlined. Note • When you select an item, the sound cuts off for a moment.
[SUBWOOFER] 0.0 dB Set this between –6.0 dB and +6.0 dB in 1.0 dB increments. x [LEVEL (SURROUND)] 0.0 - 7.0 m**/ 0 - 23 ft You can vary the level of surround speakers as follows. Be sure to set [TEST TONE] to [ON] for easy adjustment. (This settings appear except when you set [SURROUND] to [NONE] in the [SIZE] setting.) [L/R] 0.0 dB Be sure to change the value in the Setup Display when you move the speakers. [L/R] 3.0 m/10 ft* (appears except when you set [SURROUND] to [NONE] in the [SIZE] setting.
6 Press X/x repeatedly to select [ON], then press ENTER. You will hear the test tone from each speaker in sequence. 7 From your listening position, adjust the value of [LEVEL (FRONT)] or [LEVEL (SURROUND)] using C/X/x/c. Returning to the Default Settings You can return the system parameters, such as preset stations, to the default settings. The test tone is emitted from only the speaker which you are adjusting. 8 9 "/1 A x Press ENTER when you have finished making adjustments.
If you have any questions or problems concerning your system, please consult your nearest Sony dealer. Additional Information Precautions On power sources • AC power cord (mains lead) must be changed only at the qualified service shop. • The unit is not disconnected from the AC power source (mains) as long as it is connected to the wall outlet (mains), even if the unit itself has been turned off.
Notes about the Discs On handling discs • To keep the disc clean, handle the disc by its edge. Do not touch the surface. • Do not stick paper or tape on the disc. Troubleshooting If you experience any of the following difficulties while using the system, use this troubleshooting guide to help remedy the problem before requesting repairs. Should any problem persist, consult your nearest Sony dealer. Note that if service personnel changes some parts during repair, these parts may be retained.
Even though you set the aspect ratio in [TV TYPE] of [SCREEN SETUP], the picture does not fill the screen. • The aspect ratio on the disc is fixed. Color irregularity occurs on the TV screen. The subwoofer and the front speakers in this system are magnetically shielded to prevent magnetic leakage. However, some leakage may occur, as a high-strength magnet is employed. If this happens, check the following items: • If the speakers are used with a CRT-based TV or projector, install the speakers at least 0.
The remote does not function. • There are obstacles between the remote and the system. • The distance between the remote and the system is too far. • The remote is not pointed at the remote sensor on the system. • The batteries in the remote are weak. The disc does not play. • There is no disc inserted. • The disc is upside down. Insert the disc with the playback side facing down. • The disc is skewed on the disc tray. • The system cannot play CD-ROMs, etc. (page 6).
You cannot perform some functions such as Stop, Search, Slow-motion Play, or Repeat Play. • Depending on the disc, you may not be able to perform some of the operations above. See the operating manual that came with the disc. Messages do not appear on the screen in the language you want. • In the Setup Display, select the desired language for the on-screen display in [OSD] under [LANGUAGE SETUP] (page 72). The language for the sound track cannot be changed.
Specifications DVD system Laser Amplifier section DAV-DZ110 Stereo mode (rated) 108 W + 108 W (3 ohms at 1 kHz, 1 % THD) Surround mode (reference) RMS output power, 10 % THD Front: 142 W + 142 W (with SS-TS51) Center*: 142 W (with SS-CT51) Surround*: 142 W + 142 W (with SS-TS51) Subwoofer*: 140 W (with SS-WS51) DAV-DZ111 Stereo mode (rated) Tuner section System PLL quartz-locked digital synthesizer system FM tuner section Tuning range 87.5 – 108.
Mass (approx.) 5.6 kg Speakers (DAV-DZ111) Front/Surround Speaker system Speaker unit Rated impedance Dimensions (approx.) Mass (approx.) Bass reflex, magnetically shielded 65 mm dia. cone type 3.0 ohms 90 × 132 × 107 mm (w/h/d) 0.5 kg Speaker unit Rated impedance Dimensions (approx.) Mass (approx.) Bass reflex, magnetically shielded 65 mm dia. cone type 3.0 ohms 200 × 92 × 107 mm (w/h/d) 0.7 kg Subwoofer Speaker system Speaker unit Rated impedance Dimensions (approx.) Mass (approx.
Glossary Album Section of a music piece or an image on a data CD containing MP3 audio tracks or JPEG files. x Music mode The Music mode is for use with any stereo music recordings, and provides a wide and deep sound space. Dolby Surround Pro Logic Digital Cinema Auto Calibration was developed by Sony to automatically measure and adjusts the speaker settings to your listening environment in a short period of time.
Control functions are provided with the DVD. DVD-RW A DVD-RW is a recordable and rewritable disc that is the same size as a DVD VIDEO. The DVD-RW has two different modes: VR mode and Video mode. DVD-RWs created in Video mode have the same format as a DVD VIDEO, while discs created in VR (Video Recording) mode allow the contents to be programmed or edited. DVD+RW A DVD+RW (plus RW) is a recordable and rewritable disc. DVD+RWs use a recording format that is comparable to the DVD VIDEO format.
compressed while sounds we can hear are not compressed. VIDEO CDs can hold 6 times the audio information of conventional audio CDs. There are 2 versions of VIDEO CDs. • Version 1.1: You can play only moving pictures and sounds. • Version 2.0: You can play high-resolution still pictures and enjoy PBC functions. This system conforms to both versions.
Language Code List The language spellings conform to the ISO 639: 1988 (E/F) standard.
Index to Parts and Controls For more information, refer to the pages indicated in parentheses. Front panel A "/1 (on/standby) (29) F B Front panel display (90) G PHONES jack (29) C A (open/close) (29) H VOLUME control (29) D Disc operation (29) I AUDIO IN/A.
Front panel display About the indications in the front panel display A Lights up when the time information of a title or chapter appears in the front panel display. (DVD only) (45) G Lights up when the DYNAMIC BASS is selected. (61) B Lights up when a station is received. (Radio only) (57) I Lights up when the system outputs progressive signals (DVD function only). (25) C Monaural/Stereo effect (Radio only) (57) D Lights up when the sleep timer is set.
Guide to the Control Menu Display DISPLAY Use the Control Menu to select a function and to view related information. Press repeatedly to turn on or change the Control Menu display as follows: DISPLAY Control Menu display The Control Menu display 1 and 2 will show different items depending on the disc type. For details about each item, see the pages in parentheses.
Currently playing title number1) Currently playing chapter number2) Total number of titles1) Total number of chapters2) Control Menu items 12 (27) 18 (34) T 1:32:55 Selected item Function name of selected Control Menu item DVD VIDEO Playback status (N Playback, X Pause, x Stop, etc.
[SPEAKER FORMATION] (pages 66, 68) Sets the speaker formation./Adjust the level of each speaker automatically. [PROGRAM] (page 38) Selects the track to play in the order you want. [SHUFFLE] (page 40) Plays the track in random order. [REPEAT] (page 41) Plays the entire disc (all titles/all tracks/all albums) repeatedly or one title/chapter/track/album repeatedly. [A/V SYNC] (page 48) Adjusts the delay between the picture and sound.
DVD Setup Display List You can set the following items with the DVD Setup Display. The order of the displayed items may be different from the actual display.
AMP Menu List You can set the following items with AMP MENU on the remote.
Index Numerics 16:9 72 4:3 LETTER BOX 72 4:3 OUTPUT 73 4:3 PAN SCAN 72 5.
Slide Show 52 Slow-motion Play 35 Sound Field 33 SPEAKER FORMATION 66 SPEAKER SETUP 75 DISTANCE 75 LEVEL 76 SIZE 75 SUBTITLE 48, 72 T TEST TONE 76 THEATRE SYNC 60 TIME/TEXT 36 TITLE 36 Title 86 TRACK 36 Track 86 TRACK SELECTION 74 Troubleshooting 79 TV Hookup 24 TV TYPE 72 U Unpacking 84 Usable discs 6 V VIDEO CD 86 97GB
Remote control BUTTON DESCRIPTIONS ALPHABETICAL ORDER A–O P–Z AMP MENU wg (22, 30, 60, 62, 95) ANGLE 5 (47) AUDIO 4 (42) CLEAR ef (36, 60, 71) D.