
Operation Manual


9
Connecting the Projector
Preparation
B Preparation
Connecting the Projector
• Make sure all the equipment is powered off when connecting the projector.
• Use the proper cables for each connection.
• Insert the cable plugs firmly; Loose connections may reduce performance of picture signals or
cause a malfunction. When pulling out a cable, be sure to grip it by the plug, not the cable itself.
• For more information, refer also to the instruction manuals of the equipment you are connecting.
• Use a no-resistance audio cable.
Connection with a computer is explained for each input signal.
INPUT A/INPUT B
• The audio input connector is available only on VPL-EW276/EW246/EW226/EX276/EX246/
EX226.
• It is recommended that you set the resolution of your computer to 1280 × 800 pixels (VPL-EW276/
EW246/EW226) or 1024 × 768 pixels (VPL-EX276/EX272/EX246/EX242/EX226/EX222) for
the external monitor.
INPUT C
Notes
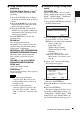
Connecting a Computer
For connecting a computer with an RGB output connector.
RGB output
connector
Audio output
connector
Mini D-sub 15-pin cable (supplied)
Computer
Audio cable (Stereo mini plug)
(not supplied)
Notes
For connecting a computer with an HDMI output connector.
HDMI output
connector
HDMI cable
(not supplied)
Computer