LCD Digital Colour TV Operating Instructions KDL-52V4000/52V42xx KDL-46V4000/46V42xx KDL-40V4000/40V42xx KDL-40S40xx/40U40xx U © 2008 Sony Corporation 4-109-032-11(1)
NOTICE FOR CUSTOMERS IN THE UNITED KINGDOM For a list of compatible cable providers, refer to the support web site: http://support.sony-europe.com/TV/ DVBC/ A moulded plug complying with BS1363 is fitted to this equipment for your safety and convenience. Should the fuse in the plug supplied need to be replaced with the same rating of fuse approved by ASTA or BSI to BS 1362 (i.e., marked with or ) must be used.
Table of Contents Start-up Guide 4 Safety Information ............................................................................................................................ 9 Precautions ..................................................................................................................................... 10 Remote Control and TV Controls/Indicators................................................................................ 12 Watching TV Watching TV...............................
Start-up Guide 1: Checking the accessories Mains lead (Type BF)* (1) Stand (1) and screws (4) 2: Attaching the stand (except for KDL-52V4000/ 52V42xx) Remote RM-ED013 (1) Size AA batteries (R6 type) (2) * Do not remove the ferrite cores. To insert batteries into the remote Push and lift the cover to open. ~ • If using an electric screwdriver, set the tightening torque at approximately 1.5 N·m (15 kgf·cm).
Start-up Guide 3: Connecting an aerial/Set Top Box/recorder (e.g. DVD recorder) Connecting a Set Top Box/recorder (e.g. DVD recorder) with HDMI Connecting a Set Top Box/recorder (e.g. DVD recorder) with SCART Set Top Box/recorder (e.g. DVD recorder) Set Top Box/recorder (e.g.
4: Preventing the TV from toppling over 5: Bundling the cables 6: Performing the initial set-up 1 Install a wood screw (4 mm in diameter, not supplied) in the TV stand. 2 Install a machine screw (M5 × 12, not supplied) into the screw hole of the TV. 3 Tie the wood screw and the machine screw with a strong cord.
4 8 5 9 Select “Home” for the best TV settings to use the TV in the home. 6 10 Control for HDMI Do you want to enable control for compatible HDMI devices? Make sure that the aerial is connected. Yes No 7 11 When you select “Cable”, we recommend that you select “Quick Scan” for quick tuning. Set “Frequency” and “Network ID” according to the information supplied from your cable provider. If no channel is found using “Quick Scan”, try “Full Scan”(though it may take some time).
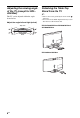
Adjusting the viewing angle of the TV (except for KDL40U40xx) Detaching the Table-Top Stand from the TV ~ This TV can be adjusted within the angles shown below. • Remove the screws guided by the arrow marks of the TV. • Do not remove the Table-Top Stand for any reason other than to wall-mount the TV.
Safety Information Ventilation s Never cover the ventilation holes or insert anything in the cabinet. s Leave space around the TV set as shown below. s It is strongly recommended that you use a Sony wall-mount bracket in order to provide adequate air-circulation. Installed on the wall Installation/Set-up 30 cm Install and use the TV set in accordance with the instructions below in order to avoid any risk of fire, electrical shock or damage and/or injuries.
s Do not modify the mains lead. s Do not put anything heavy on the mains lead. s Do not pull on the mains lead itself when disconnecting the mains lead. s Do not connect too many appliances to the same mains socket. s Do not use a poor fitting mains socket. Prohibited Usage Do not install/use the TV set in locations, environments or situations such as those listed below, or the TV set may malfunction and cause a fire, electrical shock, damage and/or injuries.
Disposal of the TV set Disposal of Old Electrical & Electronic Equipment (Applicable in the European Union and other European countries with separate collection systems) This symbol on the product or on its packaging indicates that this product shall not be treated as household waste. Instead it shall be handed over to the applicable collection point for the recycling of electrical and electronic equipment.
Remote Control and TV Controls/Indicators Remote control and TV controls * * * Buttons on the TV will work the same as those on the remote control. * In TV menu, these buttons will work as F/f/G/g/ z • The number 5, N, PROG + and AUDIO buttons have a tactile dot. Use the tactile dots as a reference when operating the TV. Button Description 1 "/1 (TV standby) Press to turn the TV on and off from standby mode. 2 1 (Power) Press to turn the TV on or off.
6 PROG +/–/ / In TV mode: Press to select the next (+) or previous (–) channel. In Analogue Text mode: Press to select the next ( ) or previous ( ) page. 7 2 +/– (Volume) Press to adjust the volume. 8 % (Mute) Press to mute the sound. Press again to restore the sound. z • In standby mode, if you want to turn on the TV without sound, press this button. 9 / (Input In TV mode: Press to display a list of equipment connected to the TV (page 23).
qk Number buttons In TV mode: Press to select channels. For channel numbers 10 and above, press the second and third digits in quick succession. In Analogue Text mode: Press to enter a page number. Press to return to the channel that was last viewed (for more than five seconds). ql (Previous channel) w; (Screen mode) Press to change the screen format (page 17). wa (Subtitle setting) Press to display the “Subtitle Setting” menu (page 33) (in digital mode only).
Indicators Indicator Description 1 Lights up in green when you select “Picture Off” (page 28). Lights up in orange when you set the timer (page 28). — Picture Off / Timer 2 1 — Standby Lights up in red when the TV is in standby mode. 3" — Power/ Timer REC Lights up in green when the TV is on. Lights up in orange when you have set the timer recording (page 18). Lights up in red during timer recording. 4 Remote control sensor Receives IR signals from the remote. Do not put anything over the sensor.
Watching TV 3 Press the number buttons or PROG +/– to Watching TV select a TV channel. To select channel numbers 10 and above using the number buttons, enter the second and third digits in quick succession. To select a digital programme using the Digital Electronic Programme Guide (EPG), see page 18. In digital mode An information banner appears briefly. The following icons may be indicated on the banner.
To navigate through Digital Text, follow the instructions on the screen. To exit Digital Text, press RETURN. To move around, press F/f/G/g. To select items, press and the number buttons. To access shortcuts, press the coloured buttons. Zoom* Displays cinemascopic (letter box format) broadcasts in the correct proportion. 14:9* In analogue mode, press /.
Using the Digital Electronic Programme Guide (EPG) * 1 In digital mode, press GUIDE. 2 Perform the desired operation as shown in the following table or displayed on the screen. * This function may not be available in some countries/ areas. Digital Electronic Programme Guide (EPG) To Do this View a programme Press F/f/G/g to select a programme, then press Turn off the EPG Press GUIDE. Sort programme information by category – Category list 1 2 Press the blue button.
To Do this Cancel a recording/reminder – Timer list 1 2 3 4 5 Press . Press F/f to select “Timer list”, then press . Press F/f to select the programme you want to cancel, then press . Press F/f to select “Cancel Timer”, then press . A display appears to confirm that you want to cancel the programme. Press G/g to select “Yes”, then press . • You can set recorder timer recordings on the TV only when the connected recorder is compatible with SmartLink.
Using the Digital Favourite List * You can specify up to four of your favourite channel lists. 1 In digital mode, press . 2 Perform the desired operation as shown in the following table or displayed on the screen. Digital Favourite List * This function may not be available in some countries/ areas. To Do this Create a Favourite list for the first time 1 2 3 Press to select “Yes”. Press the yellow button to select the Favourite list. Press F/f to select the channel you want to add, then press .
Using Optional Equipment Connecting Optional Equipment You can connect a wide range of optional equipment to your TV. Using Optional Equipment For service use only Connect to 1 2 / / AV2 Input symbol on screen Description AV1 AV1 When you connect a decoder, the TV tuner outputs scrambled signals to the decoder, and the decoder unscrambles the signals before outputting them. / AV2 SmartLink provides a direct link between the TV and a recorder (e.g. DVD recorder).
Connect to Input symbol on screen 4 HDMI IN 1 or 2 HDMI 1 or HDMI 2 9 HDMI IN 3 HDMI 3 Description Digital video and audio signals are input from the connected equipment. In addition, when you connect the equipment that is compatible with control for HDMI, communication with the connected equipment is supported. Refer to page 30 to set up this communication.
3 Press the number buttons or PROG +/– to Viewing Pictures from Connected Equipment Turn on the connected equipment, and perform one of the following operations. For equipment connected to the scart sockets using a fully-wired 21-pin scart lead Start playback on the connected equipment. The picture from the connected equipment appears on the screen. For an auto-tuned recorder For other connected equipment To return to single picture mode Press or RETURN. z • The picture framed in green is audible.
To make the control for HDMI settings Using BRAVIA Sync (Control for HDMI) The control for HDMI function enables the TV to communicate with the connected equipment that is compatible with the function, using HDMI CEC (Consumer Electronics Control). For example, by connecting Sony equipment that is compatible with control for HDMI (with HDMI cables), you can control them together. Be sure to connect the equipment correctly, and make the necessary settings.
Using Menu Functions Navigating through menus Menu functions allow you to enjoy various convenient features of this TV. You can easily select channels or input sources, and change the settings for your TV. 2 1 6 Settings Displays the “Settings” menu where most of the advanced settings and adjustments are performed. 1 Press F/f to select a menu item, then press . 2 Press F/f/G/g to select an option or adjust a setting, then press . For details about settings, see pages 26 to 34.
TV Settings Menu Picture Picture Mode Sets a picture mode when displaying an input other than a PC. The options for “Picture Mode” may differ depending on the “Video/Photo” setting (page 28). Vivid (“Shop”, see Enhances picture contrast and sharpness. page 7) Display Mode Standard (“Home”, see page 7) For standard pictures. Recommended for home entertainment. Cinema For viewing film-based content. Most suitable when viewing the TV in a theatre-like environment.
Advanced Settings Allows you to set “Picture” settings in more detail. These settings are not available when “Picture Mode” is set to “Vivid”. Adv. Contrast Enhancer Automatically adjusts “Backlight” and “Contrast” to the most suitable settings judging from the brightness of the screen. This setting is especially effective for dark images scenes, and will increase the contrast distinction of the darker picture scenes. Live Colour Makes colours more vivid. Sound Sound Effect Sets the sound mode.
Features Quick Start The TV turns on faster than usual within two hours after switching to standby mode. However, power consumption in standby mode is higher than usual. Power Saving Reduces power consumption of the TV by adjusting the backlight. When you select “Picture Off”, the picture is switched off, and the (Picture Off) indicator on the TV front panel lights up in green. The sound remains unchanged.
Set-up Auto Start-up You can run the initial set-up that appeared when you first connected the TV (page 6), and select the language, country/area and tune in all available channels again. Even if you have made the settings when you first connected the TV, you may need to change the settings after moving house, or to search for newly launched channels. Language Sets the language displayed on the menu screens. Screen Settings Screen Format See “To change the screen format manually” on page 17.
AV Set-up AV Preset Uses preset labels to assign a name to connected equipment. Edit: Allows you to create your own label. Press F/f to select the desired letter or number, then press g. Repeat this step until you complete the name, then select “OK” and press . Skip Skips unnecessary input sources. Sets a signal to be input from the / / AV2 socket. Usually, set to “Auto”. However, depending on the connected equipment, the signal may not be correctly detected even though “Auto” is selected.
Control for HDMI Sets whether or not to link the operations of the TV and the connected equipment that is compatible with control for HDMI. When set to “On”, the following menu items can be performed. However, power consumption in standby mode is higher than usual. If the specific Sony equipment that is compatible with control for HDMI is connected, this setting is applied to the connected equipment automatically when the “Control for HDMI” is set to “On” using the TV.
Manual Programme Preset Press F/f to select the programme number you want to manually tune (if tuning a recorder, select channel 00), then press . System/Channel 1 2 3 4 Press F/f to select “System”, then press . Press F/f to select one of the following TV broadcast systems, then press RETURN. B/G: For western European countries/areas I: For the United Kingdom D/K: For eastern European countries/areas L: For France Press F/f to select “Channel”, then press .
Decoder Allows you to view and record the scrambled channel when using a decoder connected directly to scart connector / AV1, or / / AV2 via a recorder. ~ • This option is not available when “United Kingdom” is selected for “Country” (page 7). Confirm Saves changes you have made to the “Manual Programme Preset” settings. Digital Auto Tuning Tunes in the available digital channels. You can retune the TV after moving house, or to search for newly launched channels.
Audio Description Provides audio description (narration) of visual information, when such information is available. Mixing Level Adjusts the TV main audio and Audio Description output levels. Radio Display Displays the screen wallpaper when you listen to a radio broadcast. You can select the screen wallpaper colour, or display a random colour. To cancel the screen wallpaper display temporarily, press any button. Parental Lock Sets an age restriction to viewing or recording programmes.
Additional Information Specifications Model name KDL-40S40xx/ 40U40xx KDL-40V4000/ 40V42xx KDL-46V4000/ 46V42xx KDL-52V4000/ 52V42xx System Panel system LCD (Liquid Crystal Display) Panel TV system Analogue: Depending on your country/area selection: B/G/H, D/K, L, I Digital: DVB-T/DVB-C Colour/video system Analogue: PAL, SECAM, NTSC 3.58, 4.
Model name Dimensions (Approx.) (w × h × d) Mass (Approx.) KDL-40S40xx/ 40U40xx KDL-40V4000/ 40V42xx KDL-46V4000/ 46V42xx KDL-52V4000/ 52V42xx with Table-Top 99.7 × 69.1 × 27.9 cm Stand 98.6 × 68.4 × 27.9 cm 112.0 × 78.2 × 30.7 cm 126.2 × 87.1 × 34.7 cm 99.7 × 64.4 × 11.0 cm 98.6 × 64.6 × 11.0 cm 112.0 × 74.2 × 11.5 cm 126.2 × 82.9 × 11.9 cm with Table-Top 23.0 kg Stand 21.5 kg 29.0 kg 38.0 kg 20.0 kg 18.5 kg 25.0 kg 32.
Troubleshooting Check whether the 1 (standby) indicator is flashing in red. When the 1 (standby) indicator is flashing The self-diagnosis function is activated. 1 Count how many times the 1 (standby) indicator flashes between each two second break. For example, the indicator may flash three times, go off for two seconds, then flash again three times.
Condition Explanation/Solution Sound The picture is good, but there • Press 2 +/– or % (Mute). is no sound. • Check if the “Speaker” is set to “TV Speaker” (page 30). • When using HDMI input with Super Audio CD or DVD-Audio, DIGITAL AUDIO OUT (OPTICAL) may not output audio signals. Channels You cannot select your desired • Switch between digital and analogue mode, and select the desired channel. digital/analogue channel. Some channels are blank. • The channel is for scrambled/subscription service only.
For useful information about Sony products 4-109-032-11(1) U Printed in Slovak Republic