
User manual
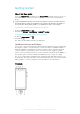
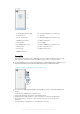


Table Of Contents
- Contents
- Getting started
- Device security
- Learning the basics
- Battery and Maintenance
- Downloading applications
- Internet and networks
- Synchronizing data on your device
- Basic settings
- Typing text
- Calling
- Contacts
- Messaging and chat
- Music and FM Radio
- Camera
- Photos and videos in Album
- Videos
- Connectivity
- Smart Apps and Features That Save You Time
- Travel and maps
- Clock and Calendar
- Accessibility
- Support and Legal

1. Charging/Notification light
2. Headset jack
3. Front camera lens
4. Auxiliary microphone
5. Ear speaker
6. Proximity/Light sensor
7. Volume key
8. Power key
9. Main microphone
10. Charger/USB Type-C™ cable port
11. Speaker
12. Wi-Fi/GPS/Bluetooth antenna area
13. Main camera lens
14. Flashlight
15. Nano SIM/memory card slot cover
16. NFC™ detection area
17. Main antenna area
Assembly
Your device only supports nano SIM cards. The nano SIM card and the memory card
have separate slots in the same holder. Make sure you don’t confuse the two.
To prevent data loss, be sure to turn off your device or unmount the memory card before you
drag out the holder to remove the nano SIM card or memory card from the device.
To Insert the Nano SIM Card and the Memory Card
Do not cut your SIM card, for example, using a blade or scissors, as this may damage your
device.
1
Open the nano SIM/memory card slot cover.
2
Using your fingernail, drag out the nano SIM card tray.
3
Firmly place the SIM card in the correct orientation as shown in the illustration.
4
Insert the memory card in the correct orientation into its slot as shown in the
illustration.
5
Gently push the tray back into the slot until it fits into place.
7
This is an Internet version of this publication. © Print only for private use.