00COKF50/42SX200U.
01GBKF50/42SX200U.fm Page 2 Tuesday, January 7, 2003 10:53 AM NOTICE FOR CUSTOMERS IN THE UNITED KINGDOM A moulded plug complying with BS1363 is fitted to this equipment for your safety and convenience. Should the fuse in the plug supplied need to be replaced, a 5 AMP fuse approved by ASTA or BSI to BS 1362 (i.e. marked with 2 or @) must be used.
01GBKF50/42SX200U.fm Page 3 Tuesday, January 7, 2003 10:53 AM Introduction Thank you for choosing this Sony “Grand Wega” model. Before operating the TV set, please read this manual thoroughly and retain it for future reference. • Symbols used in the manual: • Buttons shaded white on the remote control show the • Important information. buttons you have to press to follow the sequence • Information on a feature. of instructions. • 1,2... Sequence of instructions.
01GBKF50/42SX200U.fm Page 4 Tuesday, January 7, 2003 10:53 AM Safety Information Safety Information This set is to operate on a 220-240V AC supply only. Take care not to connect too many appliances to the same power socket as this could result in fire or electric shock. Do not open the cabinet and the rear cover of the TV. Refer to qualified service personnel only. Do not cover the ventilation openings of the TV For ventilation, leave a space of at least 10cm all around the set.
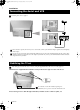
01GBKF50/42SX200U.fm Page 5 Tuesday, January 7, 2003 10:53 AM Overview Checking the Accessories Supplied s 2 Brackets 1 Hexagon key 2 Screws 1 Cleaning cloth Two batteries (AAA size) One Remote Control (RM-905) GB Overview of TV Buttons Lamp indicator (see page 34) On/Off Switch Press on the mark , on the front of the TV set to reveal the front connectors.
01GBKF50/42SX200U.fm Page 6 Tuesday, January 7, 2003 10:53 AM Overview Overview of Remote Control Buttons To Temporarily Switch Off: Press to temporarily switch off TV (the standby indicator on the TV set lights up in red). Press again to switch on TV from standby mode. After 15-30 minutes without a signal and without any button being pressed, the TV set switches automatically into standby mode. Muting the Sound: Press to mute TV sound. Press again to restore the sound.
01GBKF50/42SX200U.fm Page 7 Tuesday, January 7, 2003 10:53 AM Installation Inserting Batteries into the Remote Control Always remember to dispose of used batteries in an environmental friendly way. GB Make sure you insert the batteries using the correct polarities.
01GBKF50/42SX200U.fm Page 8 Tuesday, January 7, 2003 10:53 AM Installation Connecting the Aerial and VCR Connecting cables are not supplied. or OUT IN VCR The Scart lead is optional, however if you use a Scart lead to connect your VCR it can improve picture and sound quality when using it. If you do not use a Scart lead, after automatically tuning the TV set, refer to the "Manually Tuning the TV" section of this instruction manual, to tune in the set to the output of your VCR.
01GBKF50/42SX200U.fm Page 9 Tuesday, January 7, 2003 10:53 AM First Time Operation Switching on the TV set and Automatically Tuning The first time you switch on your TV, a sequence of menu screens appear on the TV enabling you to 1) choose the language of the menu screen, 2) choose the country in which you wish to operate the TV set, 3) search and store all available broadcast channels and 4) change the order in which the broadcast channels appear on the screen.
01GBKF50/42SX200U.fm Page 10 Tuesday, January 7, 2003 10:53 AM First Time Operation 6 After all available broadcast channels are captured and stored, the Programme Sorting menu appears automatically on the screen enabling you to change the order in which the channels appear on the screen. a) If you wish to keep the broadcast channels in the tuned order, go to step 7.
01GBKF50/42SX200U.fm Page 11 Tuesday, January 7, 2003 10:54 AM Menu System Changing the Screen Format This feature allows you to change the size of the TV picture. 1 Press the button on the remote control repeatedly to select one of the following formats. Smart Smart: imitation of wide screen effect for 4:3 broadcast. 4:3: conventional 4:3 picture size, full picture information. 14:9: compromise between 4:3 and 16:9 picture size. Zoom: widescreen format for letterbox movies.
01GBKF50/42SX200U.fm Page 12 Tuesday, January 7, 2003 10:54 AM Menu System On Screen display Menus Guide Picture Adjustment Picture Adjustment Picture Mode Contrast Brightness Colour Sharpness Reset AI Noise Reduction Colour Tone Select: Picture Mode Contrast Brightness Colour Sharpness Reset AI Noise Reduction Colour Tone Personal On Off Normal Select: Enter Menu: Select: Enter: Sound Effect Equaliser Adjustment Virtual Effect Balance Auto Vol.
01GBKF50/42SX200U.fm Page 13 Tuesday, January 7, 2003 10:54 AM Menu System Adjusting the Picture Although the picture is adjusted at the factory, you can modify it to suit your own taste. 1 2 3 Press the button on the remote control to display the menu on the screen. Push the joystick Picture Adjustment Picture Mode Contrast Brightness Colour Sharpness Reset AI Noise Reduction Colour Tone to enter the Picture Adjustment menu.
01GBKF50/42SX200U.fm Page 14 Tuesday, January 7, 2003 10:54 AM Menu System Adjusting the Sound Although the sound is adjusted at the factory, you can modify it to suit your own taste. 1 Press the button on the remote control to display the menu on the screen. 2 Push the joystick to select the symbol, then push enter to the Audio Adjustment menu. 3 to Push the joystick or to select the item you wish to change, then push to enter.
01GBKF50/42SX200U.fm Page 15 Tuesday, January 7, 2003 10:54 AM Menu System 4 Push the joystick / / or to alter the selected item, then press the button to store the new adjustment. 5 Repeat steps 3 and 4 to alter the other items. 6 Press the button to exit and return to the normal TV screen. * This TV has been designed to create the “Dolby Surround” sound effect by simulating the sound of four speakers with two speakers.
01GBKF50/42SX200U.fm Page 16 Tuesday, January 7, 2003 10:54 AM Menu System Using the Features Menu Using the Features menu you can: a) Select if you want to listen to the sound from the TV set directly or through an external amplifier. b) Automatically adjust the size of picture. c) Select a time period after which the TV set switches itself into standby mode. d) Lock the buttons on the TVset. In this way, the TV set only works by using the remote control buttons.
01GBKF50/42SX200U.fm Page 17 Tuesday, January 7, 2003 10:54 AM Menu System Manually Tuning the TV Use this function to preset channels (TV Broadcast) or a video input source one by one to the programme order of your choice. 1 Press the button on the remote control to display the menu on the screen. 2 Push the joystick to select the enter the Set Up menu.
01GBKF50/42SX200U.fm Page 18 Tuesday, January 7, 2003 10:54 AM Menu System Labelling a channel Names for channels (TV Broadcasts) are usually taken automatically from Teletext if available. You can however name a channel or an input video source using up to five characters (letters or numbers). Using this function, you can easily identify which channel (TV Broadcasts) or video source you are watching. 1 Press the button on the remote control to display the menu on the screen.
01GBKF50/42SX200U.fm Page 19 Tuesday, January 7, 2003 10:54 AM Menu System Skipping Programme positions You can programme this TV set to skip any unused programme numbers when they are selected with the PROG +/- buttons. To cancel this function afterwards, proceed in the same way as described below but by selecting Off instead of On in step 6. 1 Press the button on the remote control to display the menu on the screen.
01GBKF50/42SX200U.fm Page 20 Tuesday, January 7, 2003 10:54 AM Menu System Using the "Further Programme Preset" function With this feature you can: a) Individually attenuate the strength of a channel signal in case there is a strong local aerial signal (characteristically a striped picture). b) Individually adjust the volume level of each channel. c) Normally the automatic fine tuning (AFT) will operating, however you can manually fine-tune the TV to obtain better reception if the picture is distorted.
01GBKF50/42SX200U.fm Page 21 Tuesday, January 7, 2003 10:55 AM Menu System Inputting Your Personal ID You can programme this TV set with a personal code, using up to eleven characters (letters and numbers). By using this function it will be possible to identify your TV set if it is ever stolen. This code can only be input once! Make sure you make a note of it in this instruction manual. 1 Press the button on the remote control to display the menu on the screen.
01GBKF50/42SX200U.fm Page 22 Tuesday, January 7, 2003 10:55 AM Menu System Using the Demo Mode This function provides an overview of some of the features available on this TV set. 1 Picture Adjustment Press the button on the remote control to display the menu on the screen.
01GBKF50/42SX200U.fm Page 23 Tuesday, January 7, 2003 10:55 AM Menu System Adjusting the H Centre picture for an RGB source When connecting an RGB source, such as a DVD player, to Scart connector :1/ the H Centre of the picture. 1 1 or :2/ Press the button repeatedly on the remote control until the symbol …1 or …2 appears on the screen. • …1 symbol for devices connected to the :1/ 1 Scart • …2 symbol for devices connected to the :2/ 2 Scart 2 you may need to readjust …1 connector. connector.
01GBKF50/42SX200U.fm Page 24 Tuesday, January 7, 2003 10:55 AM Menu System Labelling and Selecting the screen format of Input Sources This function enables you to select the size of the picture coming from the input source. It also allows you to assign a name to the optional equipment you have connected to the sockets of this TV set. This name can contain up to 5 characters (letters or numbers). 1 Press the button on the remote control to display the menu on the screen.
01GBKF50/42SX200U.fm Page 25 Tuesday, January 7, 2003 10:55 AM Menu System Using Multi PIP (Picture In Picture) Multi PIP (Picture in Picture) mode displays a succession of 12 still pictures and a 13th that is live. You can manually select which channel you wish to watch, either full-screen or in the PIP. 1 Press the button on the remote control to select the PIP mode. Now 13 programme positions appear on the screen, with the current channel in the centre.
01GBKF50/42SX200U.fm Page 26 Tuesday, January 7, 2003 10:55 AM Teletext Teletext Most TV channels broadcast information via Teletext. The index page of the teletext service (usually page 100) gives you information on how to use the service. ! Please use a TV channel with a strong signal, otherwise there may be Teletext errors. Switching Teletext on and off 1 Select the TV channel which carries the teletext service you want 2 3 4 5 to view. Press the button once for Picture and Teletext (P&T).
01GBKF50/42SX200U.fm Page 27 Tuesday, January 7, 2003 10:55 AM Teletext Using the Teletext menu 1 With Teletext switched on, press the button on the remote control to display the teletext menu on the TV screen. 2 Push the joystick or to select your chosen item, then push to to display the relevant sub menu. 3 To remove the teletext menu from the screen, press the button.
01GBKF50/42SX200U.fm Page 28 Tuesday, January 7, 2003 10:55 AM NexTView NexTView * * (depending on availability of service) NexTView is an on-screen electronic programme guide (EPG), providing you with programme information for different broadcasters. Selecting your NexTView provider 1 2 3 4 5 Picture Adjustment Picture Mode Contrast Brightness Colour Sharpness Reset AI Noise Reduction Colour Tone The TV set automatically selects the best NexTView provider for you.
01GBKF50/42SX200U.fm Page 29 Tuesday, January 7, 2003 10:55 AM NexTView Using the Long Info menu With this menu screen, you can set timers or record selected programmes. 1 Push or column. 2 Press the screen. to select a future programme in the programme list button to display the Long Info menu on the TV To set the timer Push the joystick or to highlight the icon then press the button repeatedly to "set the timer" or "cancel the timer".
01GBKF50/42SX200U.fm Page 30 Tuesday, January 7, 2003 10:55 AM Optional Connections Connecting Optional Equipment Using the following instructions, you can connect a wide range of optional equipment to this TV set. 1 S.VHS/Hi8/DVC camcorder 2 “PlayStation”* To avoid picture distortion: • Do not B connect equipment to F and G connectors at the same time. Dolby Surround Amplifier DVD D F G E A * “PlayStation” is a product of Sony Computer Entertainment, Inc.
01GBKF50/42SX200U.fm Page 31 Tuesday, January 7, 2003 10:56 AM Optional Connections Using Optional Equipment Additional Information when connecting equipment Connecting a VCR We recommend you connect your VCR to the C socket using a scart lead. If you do not have a scart lead, use the “Manually Tuning the TV” section of this instruction manual to tune in the channel of the VCR test signal to TV programme number “0”. Also refer to your VCR instruction manual to get the VCR test signal.
01GBKF50/42SX200U.fm Page 32 Tuesday, January 7, 2003 10:56 AM Optional Connections Smartlink Smartlink is a direct link between the TV set and a VCR. Rear For Smartlink you need: • A VCR which supports Smartlink, NextView Link, Easy Link or Megalogic. Megalogic is a trademark of Grundig Corporation. EasyLink is a trademark of Philips Corporation. • A fully-wired 21 pin SCART cable to connect your VCR to the Scart connector :3/q3 (SMARTLINK) on the rear of the TV set.
01GBKF50/42SX200U.fm Page 33 Tuesday, January 7, 2003 10:56 AM Additional Information Remote Control Configuration for VCR/DVD In it’s default condition this remote control operate the basic functions of this Sony TV, Sony DVDs and most Sony VCRs. To control VCRs and DVDs of other manufacturers and some Sony VCR models, please complete the following steps: Before you start, look up the 3 digit code for your brand of DVD or VCR from the list below.
01GBKF50/42SX200U.fm Page 34 Tuesday, January 7, 2003 10:56 AM Additional Information Replacing the Lamp When the lamp becomes dark or the picture colour is not normal or the lamp indicator on the TV set flashes, replace with a new lamp. • Only use the lamp XL-2000E for replacement. If you use another lamp, it may cause damage to the TV set. • Do not remove the lamp except when replacing it. • Before replacing the lamp, turn off the power and disconnect the power cord.
01GBKF50/42SX200U.fm Page 35 Tuesday, January 7, 2003 10:56 AM Additional Information Optimum Viewing Area For the best picture quality, try to position the TV set so that you can view the screen from within the areas shown below.
01GBKF50/42SX200U.fm Page 36 Tuesday, January 7, 2003 10:56 AM Additional Information Specifications TV system B/G/H, D/K, I, L Colour system PAL, SECAM NTSC 3.58, 4.43 (only Video In) Channel coverage VHF: E2-E12 UHF: E21-E69 CATV: S1-S20 HYPER: S21-S41 D/K: R1-R12, R21-R69 I: UHF B21-B69 L: F2-F10, B-Q, F21-F69 Projected picture size • KF-50SX200U: 50 inches (approx. 127 cm measured diagonally). • KF-42SX200U: 42 inches (approx. 107 cm measured diagonally).
01GBKF50/42SX200U.fm Page 37 Tuesday, January 7, 2003 10:56 AM Additional Information Troubleshooting Here are some simple solutions to problems which may affect the picture and sound. Problem Solution No picture (screen is dark), no sound. • Plug the TV set in. • Press the button on the front of the TV set. • If the indicator is on in red colour, press TV button on the remote control. • Check the aerial connection. • Check that the selected video source is on.
01GBKF50/42SX200U.fm Page 38 Tuesday, January 7, 2003 11:21 AM Television Channel Number Guide for United Kingdom Only the main transmitters are listed. Information regarding the regional sub-relay channel numbers can be obtained by contacting The BBC Engineering Information Dept., Telephone Number 020 7852 5040.
02BCKF50/42SX200U.fm Page 1 Tuesday, January 7, 2003 11:00 AM http://www.sony.net/ Sony España, S.A.