3-072-315-31 (1) Video Camera Recorder Operating Instructions Before operating the unit, please read this manual thoroughly, and retain it for future reference. Gebruiksaanwijzing Lees, alvorens het apparaat in gebruik te nemen, de gebruiksaanwijzing aandachtig door en bewaar ze voor eventuele naslag.
English Nederlands Welcome! Welkom Congratulations on your purchase of this Sony Handycam VisionTM. With your Handycam VisionTM, you can capture life’s precious moments with superior picture and sound quality. Your Handycam VisionTM is loaded with advanced features, but at the same time it is very easy to use. You will soon be producing home video that you can enjoy for years to come. Gefeliciteerd met uw aankoop van deze Sony Handycam VisionTM.
English Main Features Taking moving images, and playing them back •Recording a picture (p. 26) •Playing back a tape (p. 38) Others Functions to adjust exposure in the recording mode •BACK LIGHT (p. 33) •NightShot (p. 34) •PROGRAM AE (p. 51) •Built-in light (p. 62) •Manual exposure (p. 54) Functions to give images more impact •Digital zoom (p. 30) The default settings is set to OFF. (To zoom greater than 20×, select the digital zoom power in D ZOOM in the menu settings.) •FADER (p. 46) •Picture effect (p.
Nederlands Belangrijke kenmerken Bewegende beelden opnemen en afspelen • Opnemen (p. 26) • Een cassette afspelen (p. 38) Overige Functies voor betere belichting tijdens het opnemen • BACK LIGHT (p. 33) • NightShot (p. 34) • PROGRAM AE (p. 51) • Ingebouwde lamp (p. 62) • Handmatig belichten (p. 54) Functies om beelden meer impact te geven • Digital zoom (p. 30) De standaard instelling is OFF. (Voor meer dan 20× zoom moet u de digitale D ZOOM in het menu instellen.) • FADER (p. 46) • Beeldeffect (p.
English Table of contents Main Features .................................................... 4 Quick Start Guide .................................... 8 Getting started Using this manual .......................................... 12 Checking supplied accessories ..................... 14 Step 1 Preparing the power supply ............. 15 Installing the battery pack ...................... 15 Charging the battery pack ...................... 16 Connecting to a wall socket ...................
Nederlands Inhoudsopgave Belangrijke kenmerken .................................... 5 Snelle startgids ........................................ 10 Montage Kopiëren van video-opnamen ...................... 66 Vlot een cassette kopiëren – Easy Dubbing ........................................ 68 Voorbereidingen Omtrent deze handleiding ............................ 12 Controleren van het bijgeleverd toebehoren ................................................ 14 Stap 1 Voorbereiden van de stroomvoorziening .
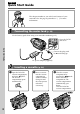
English Quick Start Guide This chapter introduces you to the basic features of your camcorder. See the page in parentheses “( )” for more information. Connecting the mains lead (p. 20) Use the battery pack when using your camcorder outdoors (p. 15). Open the DC IN jack cover. Quick Start Guide Connect the plug with its v mark facing up. AC power adaptor (supplied) Inserting a cassette (p. 24) 1 Open the lid of the cassette compartment, and press Z EJECT.
Recording a picture 1 Remove the lens cap. (p. 26) 2 Set the POWER PL AY OFF(CHG) CA ER POW ER ME RA switch to CAMERA while pressing the small green button. 4 Press START/STOP. POW ER OFF(CHG) CA ER ME RA 3 Open the LCD panel PL AY Your camcorder starts recording. To stop recording, press START/STOP again. while pressing OPEN. The picture appears on the LCD screen. Monitoring the playback picture on the LCD screen (p.
Nederlands Snelle startgids In dit hoofdstuk vindt u de eerste stappen voor het gebruik van uw camcorder kort beschreven. Zie voor nadere bijzonderheden de bladzijden waarnaar tussen haakjes “( )” wordt verwezen. Aansluiten van het netsnoer (p. 20) Voor gebruik buitenshuis dient u een batterijpak aan te brengen (p. 15). Open het klepje van de DC IN aansluiting. Snelle startgids Sluit de stekker aan met het v driehoekje boven.
Maken van een video-opname (p. 26) 2 Druk het kleine PL AY OFF(CHG) CA ER POW ER ME groene knopje op de POWER schakelaar in en zet de schakelaar in de CAMERA stand. RA 1 Verwijder de lensdop. 4 Druk op START/ POW ER OFF(CHG) CA ME RA ingedrukt en klap het LCD scherm open. Het beeld dat u kunt opnemen verschijnt op het LCD scherm. ER 3 Houd de OPEN toets PL AY STOP. De camcorder begint dan met opnemen. Om te stoppen met opnemen drukt u nogmaals op START/STOP.
— Voorbereidingen — — Getting started — Using this manual The instructions in this manual are for the four models listed in the table below. Before you start reading this manual and operating your camcorder, check the model number by looking at the bottom of your camcorder. The CCD-TRV408E is the model used for illustration purposes. Otherwise, the model name is indicated in the illustrations. Any differences in operation are clearly indicated in the text, for example, “CCD-TRV408E only.
Using this manual Precautions on camcorder care Lens and LCD screen/finder (on mounted models only) Voorzorgen bij gebruik van de camcorder Lens en LCD scherm/beeldzoeker (mits voorzien) [a] [b] [c] [d] Voorbereidingen •Het LCD scherm en de zoeker zijn vervaardigd met hoogstaande precisietechnologie, met als resultaat dat meer dan 99,99% van de beeldpunten actief is voor effectief gebruik.
Checking supplied accessories Controleren van het bijgeleverd toebehoren Make sure that the following accessories are supplied with your camcorder. Controleer of de volgende accessoires alle in de verpakking van de camcorder aanwezig zijn. 1 2 4 5 3 6 7 8 1 Wireless Remote Commander (1) (p. 124) (CCD-TRV107E/TRV208E/TRV408E only) 1 Draadloze afstandsbediening (1) (p. 124) (Alleen CCD-TRV107E/TRV208E/TRV408E) 2 AC-L10A/L10B/L10C AC power adaptor (1), Mains lead (1) (p.
Step 1 Preparing the power supply Installing the battery pack Aanbrengen van een batterijpak Schuif het batterijpak omlaag tot het vastklikt. Getting started Slide the battery pack down until it clicks. Stap 1 Voorbereiden van de stroomvoorziening Voorbereidingen To remove the battery pack Losmaken van het batterijpak Slide the battery pack out in the direction of the arrow while pressing V BATT down. Hou V BATT ingedrukt en schuif het batterijpak in de richting van de pijl omhoog en los.
Step 1 Preparing the power supply Charging the battery pack Use the battery pack after charging it for your camcorder. Your camcorder operates only with the “InfoLITHIUM” battery pack (M series). See page 105 for details of the “InfoLITHIUM” battery pack. (1) Open the DC IN jack cover and connect the AC power adaptor supplied with your camcorder to the DC IN jack with the plug’s v mark facing up. (2) Connect the mains lead to the AC power adaptor. (3) Connect the mains lead to the wall socket.
Step 1 Preparing the power supply Stap 1 Voorbereiden van de stroomvoorziening After charging the battery pack Na het opladen van het batterijpak Disconnect the AC power adaptor from the DC IN jack on your camcorder. Trek de stekker van de netspanningsadapter uit de DC IN gelijkstroomingang van de camcorder. Note Prevent metallic objects from coming into contact with the metal parts of the DC plug of the AC power adaptor. This may cause a short-circuit, damaging the AC power adaptor.
Stap 1 Voorbereiden van de stroomvoorziening Step 1 Preparing the power supply Charging time/Vereiste oplaadtijd Battery pack/ Batterijpak Full charge (normal charge)/ Volledige lading (normale lading) NP-FM30 (supplied)/(meegeleverd) 145 (85) NP-FM50 150 (90) NP-FM70 240 (180) NP-QM71 260 (200) NP-FM90 330 (270) NP-FM91/QM91 360 (300) Approximate number of minutes to charge an empty battery pack at 25°C (77°F) Aantal minuten bij benadering om een leeg batterijpak op te laden bij 25°C Recor
Stap 1 Voorbereiden van de stroomvoorziening Step 1 Preparing the power supply Playing time/Beschikbare speelduur Battery pack/ Batterijpak 120 175 195 400 465 600 695 280 570 675 865 1010 NP-FM30 (supplied)/(meegeleverd) NP-FM50 NP-FM70 NP-QM71 NP-FM90 NP-FM91/QM91 Approximate number of minutes when you use a fully charged battery pack Approximate continuous playing time at 25°C (77°F). The battery life will be shorter if you use your camcorder in a cold environment.
Step 1 Preparing the power supply Stap 1 Voorbereiden van de stroomvoorziening Connecting to a wall socket Gebruik op stroom van het lichtnet When you use your camcorder for a long time, we recommend that you power it from a wall socket using the AC power adaptor. (1) Open the DC IN jack cover, and connect the AC power adaptor to the DC IN jack on your camcorder with the plug’s v mark facing up. (2) Connect the mains lead to the AC power adaptor. (3) Connect the mains lead to a wall socket.
Stap 1 Voorbereiden van de stroomvoorziening PRECAUTION The set is not disconnected from the AC power source (wall socket) as long as it is connected to a wall socket, even if the set itself has been turned off. VOORZICHTIG Zolang de stekker in het stopcontact zit, blijft de stroomtoevoer naar het apparaat intact, ook al is de camcorder zelf uitgeschakeld. Using a car battery Use Sony DC Adaptor/Charger (optional). Refer to the operating instructions of the DC Adaptor/ Charger for further information.
Step 2 Setting the date and time Stap 2 Instellen van de datum en tijd Set the date and time settings when you use your camcorder for the first time. “CLOCK SET” will be displayed each time when you set the power switch to CAMERA unless you set the date and time settings. If you do not use your camcorder for about 6 months, the date and time settings may be released (bars may appear) because the built-in rechargeable battery in your camcorder will have been discharged.
Step 2 Setting the date and time To check the preset date and time Druk op de DATE toets om de ingestelde datum te zien. Druk op de TIME toets om de tijd te controleren. Druk op DATE (of TIME) en vervolgens op TIME (of DATE) om de datum-en tijdaanduiding samen te laten verschijnen. Druk na afloop nogmaals op de DATE en/of TIME toets. De datum en/of tijdsaanduiding verdwijnt. De jaaraanduiding verspringt als volgt: t 1995 T . . . . t 2002 T . . . .
Step 3 Inserting a cassette Stap 3 Inleggen van een videocassette When you want to record in the Hi8 system, use Hi8 video cassettes. (1) Prepare the power supply (p. 15). (2) Open the lid of the cassette compartment, and press Z EJECT. The cassette compartment opens automatically. (3) Insert a cassette into the cassette compartment with its window facing out and the writeprotect tab on the cassette up. (4) Close the cassette compartment by pressing the mark on the cassette compartment.
Step 3 Inserting a cassette Stap 3 Inleggen van een videocassette To prevent accidental erasure Slide the write-protect tab on the cassette to expose the red mark. Voorkomen van per ongeluk wissen Schuif het wispreventienokje van de videocassette opzij, zodat het rode vlakje zichtbaar wordt. Voorbereidingen Opmerkingen •Druk de cassettehouder niet met de hand omlaag. Hierdoor zou u het apparaat kunnen beschadigen.
— Recording – Basics — — Opnemen – basisbediening — Recording a picture Video-opnamen maken Your camcorder automatically focuses for you. (1) Remove the lens cap by pressing both knobs on its sides and attach the lens cap to the grip strap. (2) Install the power source and insert a cassette. See “Step 1” to “Step 3” for more information (p. 15 to 25). (3) Set the POWER switch to CAMERA while pressing the small green button. Your camcorder is set to the standby mode.
Notes •Fasten the grip strap firmly. •Do not touch the built-in microphone during recording. Opmerkingen •Trek de handgreepband stevig aan. •Let op dat u tijdens het opnemen de ingebouwde microfoon niet aanraakt. Note on Recording mode Your camcorder records and plays back in the SP (standard play) mode and in the LP (long play) mode. Select SP or LP in the menu settings (p. 81). In the LP mode, you can record twice as long as in the SP mode.
Recording a picture Video-opnamen maken Adjusting the LCD screen Instellen van het LCD scherm The LCD panel moves about 90 degrees to the viewfinder side and about 180 degrees to the lens side. If you turn the LCD panel over so that it faces the indicator appears on the screen other way, the (Mirror mode). Het LCD scherm is horizontaal tot ongeveer 90° uit te klappen en verticaal ongeveer 180° draaibaar naar de lens toe.
Recording a picture Video-opnamen maken During recording in the mirror mode DATE and TIME on your camcorder do not work. Bij opnemen in de spiegelstand DATE en TIME op de camcorder werken niet. Adjusting the brightness of the LCD screen Instellen van de helderheid van het LCD scherm (1) Kies LCD BRIGHT onder in het instelmenu in de CAMERA stand (p. 85). (2) Draai aan de SEL/PUSH EXEC regelknop om de helderheid van het LCD-scherm te regelen.
Recording a picture Video-opnamen maken After recording (1) Set the POWER switch to OFF (CHG). (2) Close the LCD panel. (3) Eject the cassette. (4) Attach the lens cap. After using your camcorder Remove the battery pack from your camcorder to avoid turning on the built-in light accidentally. Using the zoom feature Move the power zoom lever a little for a slower zoom. Move it further for a faster zoom. Using the zoom function sparingly results in better-looking recordings.
Recording a picture Video-opnamen maken Notes on digital zoom •Digital zoom starts to function when zoom exceeds 20×. •The picture quality deteriorates as you go toward the “T” side. Opmerkingen over de digitale zoomfunctie •De digitale zoomfunctie wordt ingeschakeld wanneer u meer dan 20× op uw onderwerp inzoomt. •Naarmate u verder naar de “T” tele-kant inzoomt, zal de beeldkwaliteit minder worden.
Recording a picture Video-opnamen maken Indicators displayed in the recording mode Aanduidingen in het beeld tijdens het opnemen The indicators are not recorded on tape. Deze aanduidingen worden niet mee op de band opgenomen. [a] [b] [c] [d] 40min SP REC [e] 0:00:01 [f] 32 [a]: Remaining battery time indicator [b]: Hi8 format indicator This appears while playing back or recording in Hi8 format.
Recording a picture Shooting backlit subjects – BACK LIGHT When you shoot a subject with the light source behind the subject or a subject with a light background, use the backlight function. Opnemen bij tegenlicht – BACK LIGHT Voor het maken van tegenlicht-opnamen, met achter uw onderwerp een lichtbron of een erg lichte achtergrond, kunt u ter correctie de BACK LIGHT tegenlicht-compensatie inschakelen. Druk met de camcorder in de CAMERA stand op de BACK LIGHT toets. De .
Video-opnamen maken Recording a picture Shooting in the dark – NightShot Opnemen in het donker – NightShot The NightShot function enables you to shoot a subject in a dark place. For example, you can satisfactorily record the environment of nocturnal animals for observation when you use this function. Met de NightShot nachtopnamefunctie kunt u een onderwerp ook bij duisternis helder opnemen. Zo kunt u bijvoorbeeld nachtdieren in hun natuurlijke omgeving observeren en opnemen.
Recording a picture Video-opnamen maken Using the NightShot Light Voor gebruik van de NightShot Light verlichting The picture will be clearer with the NightShot Light on. To enable the NightShot Light, set N.S.LIGHT to ON in the menu settings (p. 79). NightShot Light NightShot Light rays are infrared and so are invisible. The maximum shooting distance using the NightShot Light is about 3 m (10 feet).
Recording a picture Video-opnamen maken Superimposing the date and time on pictures You can record the date and/or time displayed on the screen superimposed on the picture. Carry out the following operations in CAMERA mode. Press DATE to record the date. Press TIME to record the time. Press DATE (or TIME), then press TIME (or DATE) to record the date and time. Press DATE and/or TIME again. The date and/ or time indicator disappears.
Checking the recording – END SEARCH Controleren van de gemaakte opnamen – END SEARCH You can use this button to record a picture from the last recorded scene successively. Met deze toets kunt u het eindpunt van de laatste opnamen opzoeken, om de volgende opname daarop soepel te laten aansluiten. Na het opnemen kunt u gemakkelijk het eind van de laatste opname opzoeken. Press END SEARCH in CAMERA mode. The last 5 seconds of the recorded section are played back and returns to the standby mode.
— Afspelen – basisbediening — Afspelen van een videocassette — Playback – Basics — Playing back a tape You can monitor the playback picture on the LCD screen. If you close the LCD panel, You can monitor the playback picture in the viewfinder. (1) Install the power source and insert the recorded tape. (2) Set the POWER switch to PLAYER while pressing the small green button. (3) Open the LCD panel while pressing OPEN. (4) Press m to rewind the tape. (5) Press N to start playback.
Afspelen van een videocassette When monitoring on the LCD screen You can turn the LCD panel over and move it back to the camcorder body with the LCD screen facing out [a]. You can adjust the angle of the LCD panel by lifting the LCD panel up by 7 degrees [b]. Video-opnamen weergeven op het LCD scherm Voor afspelen van video-opnamen kunt u het LCD scherm helemaal omkeren en dan terugklappen tegen de camcorder aan, zodat het LCD scherm naar buiten gericht staat [a].
Playing back a tape Various playback modes To operate video control buttons, set the POWER switch to PLAYER. To view a still image (playback pause) Press X during playback. To resume playback, press X or N. To advance the tape Press M in the stop mode. To resume normal playback, press N. To rewind the tape Press m in the stop mode. To resume normal playback, press N. To locate a scene monitoring the picture (picture search) Keep pressing m or M during playback.
Playing back a tape Afspelen van een videocassette In the various playback modes Sound is muted. Bij de speciale afspeelfuncties Het geluid zal bij deze afspeelfuncties gedempt zijn. When the playback pause mode lasts for 5 minutes Your camcorder automatically enters the stop mode. To resume playback, press N. When you play back a tape in reverse Horizontal noise may appear at the centre or top and bottom of the screen. This is not a malfunction.
Viewing the recording on TV Aansluitingen voor videoweergave op TV Connect your camcorder to your TV with the A/V connecting cable supplied with your camcorder to watch the playback picture on the TV screen. You can operate the playback control buttons in the same way as when you monitor playback pictures on the LCD screen. We recommend that you power your camcorder from a wall socket using the AC power adaptor, when monitoring the playback picture on the TV screen (p. 20).
Viewing the recording on TV To connect to a TV without Video/Audio input jacks Use a PAL system RFU adaptor (optional). Refer to the operating instructions of your TV and the RFU adaptor. If your TV is a stereo type If your TV/VCR has a 21-pin connector (EUROCONNECTOR) Use the 21-pin adaptor supplied with your camcorder. Gebruik voor het aansluiten een RFU-adapter (los verkrijgbaar). Zie de gebruiksaanwijzingen van de RFUadapter en uw TV-toestel.
— Uitgebreide opnamefuncties — — Advanced Recording Operations — Using the wide mode You can record a cinema-like picture (CINEMA) or a 16:9 wide picture to watch on the 16:9 widescreen TV (16:9FULL). Refer to the operating instructions of your TV. Breedbeeldopnamefunctie U kunt video-opnamen maken in een extra-breed 16:9 formaat als van een speelfilm (CINEMA), of een 16:9 formaat speciaal voor weergave op een breedbeeld-TV (16:9FULL). Zie tevens de gebruiksaanwijzing van uw TV-toestel.
Using the wide mode Breedbeeld-opnamefunctie In CAMERA mode, set 16:9WIDE to CINEMA or 16:9FULL in in the menu settings (p. 79). In de CAMERA stand zet u in het instelmenu onder het onderdeel 16:9WIDE op CINEMA of 16:9FULL (p. 84). To cancel the wide mode Set 16:9WIDE to OFF in the menu settings. Uitschakelen van de breedbeeldopnamefunctie Zet het onderdeel 16:9WIDE in het instelmenu op OFF.
Using the fader function Beelden in- en uitfaden You can fade in or out to give your recording a professional appearance. Met in- en uitfaden van beelden kunt u uw video-opnamen een professionele aanblik geven. FADER M.FADER (mosaic)/ (mozaïek) STRIPE BOUNCE (Fade in only)/ (Alleen infaden) MONOTONE When fading in, the picture gradually changes from black-and-white to colour. When fading out, the picture gradually changes from colour to black-and-white.
Beelden in- en uit-faden (1) When fading in [a] In the standby mode, press FADER until the desired fader indicator flashes. When fading out [b] In the recording mode, press FADER until the desired fader indicator flashes. The indicator changes as follows: (1) Voor in-faden [a] Zet de camcorder in de opnamepauzestand en druk op de FADER toets tot de aanduiding voor de gewenste fader-functie gaat knipperen.
Using the fader function Beelden in- en uit-faden The date, time indicator and title do not fade in or fade out Erase them before operating the fader function if they are not needed. Datum, tijd en titel faden niet in noch uit Wis ze voor u de faderfunctie gebruikt indien u ze niet nodig hebt.
Using special effects – Picture effect You can digitally process images to obtain special effects like those in films or on the TV. Speciale effecten – Beeldeffect / kleurenpalet Op digitale wijze kunt u uw video-opnamen zo treffend maken als een speelfilm of TV-productie met speciale effecten. PASTEL [a] : PASTEL [a] : Uitgebreide opnamefuncties Versterkt het contrast en geeft tekenfilm-achtige kleuren. NEG.ART [b] : De kleur en helderheid van het beeld worden omgekeerd.
Using special effects – Picture effect Speciale effecten – Beeldeffect/kleurenpalet (1) In CAMERA mode, select P EFFECT in in the menu settings (p. 79). (2) Select the desired picture effect mode in the menu settings, then press the SEL/PUSH EXEC dial. (1) Kies in de CAMERA stand het onderdeel P EFFECT onder in het instelmenu (p. 84). (2) Kies in het instelmenu het gewenste kleur/ beeldeffect en druk op de SEL/PUSH EXEC regelknop. 1 MA N U A L S E T PROGRAM AE O F F PASTE L P EFFECT N EG.
Using the PROGRAM AE function PROGRAM AE belichtingsprogramma’s You can select the PROGRAM AE (Auto Exposure) mode to suit your specific shooting requirements. Voor een optimale aanpassing aan de lichtomstandigheden kunt u kiezen uit de volgende PROGRAM AE belichtingsprogramma’s voor uw videoopnamen. SPOTLIGHT (Spotlight) This mode prevents people’s faces, for example, from appearing excessively white when shooting subjects lit by strong light in the theatre.
Using the PROGRAM AE function (1) In CAMERA mode, select PROGRAM AE in in the menu settings (p. 79). (2) Select the desired PROGRAM AE mode in the menu settings, then press the SEL/PUSH EXEC dial. PROGRAM AE belichtingsprogramma’s (1) Kies in de CAMERA stand het onderdeel PROGRAM AE onder in het instelmenu (p. 84). (2) Kies in het instelmenu het gewenste PROGRAM AE belichtingsprogramma en druk op de SEL/PUSH EXEC regelknop.
Using the PROGRAM AE function Even if the PROGRAM AE function is selected You can adjust the exposure manually. Ook al is er een PROGRAM AE belichtingsprogramma ingeschakeld U kunt nog altijd de belichting handmatig bijregelen. Bij opnemen onder het licht van een tl-buis, een natriumlamp of een kwiklamp Er kan een flikkerend effect en een zekere kleurverschuiving optreden bij de volgende programma’s.
Adjusting the exposure manually Handmatig instellen van de belichting You can manually adjust and set the exposure. Adjust the exposure manually in the following cases: – The subject is backlit – Bright subject and dark background – To record dark pictures (e.g. night scenes) faithfully U kunt de belichting met de hand instellen.
In de volgende gevallen kunt u betere opnameresultaten bereiken door handmatig scherp te stellen: •Wanneer de autofocus niet goed werkt, bij het opnemen van: – onderwerpen achter matglas of beslagen vensterglas. – onderwerpen met horizontale strepen. – onderwerpen met weinig tekening of contrast een wand, de lucht, enz.
Focusing manually Handmatig scherpstellen To focus precisely Adjust the zoom by first focusing at the “T” (telephoto) position and then shooting at the “W” (wide-angle) position. This makes focusing easier. Gemakkelijker nauwkeurig scherpstellen Stel eerst in de “T” telestand scherp op uw onderwerp en maak dan uw opnamen in de “W” groothoek-stand. Dit is de trefzekerste manier om precies scherp te stellen. When you shoot close to the subject Focus at the end of the “W” (wide-angle) position.
Superimposing a title Een titelbeeld opnemen (1) In CAMERA mode, press TITLE to display the title menu. (2) Turn the SEL/PUSH EXEC dial to select , and then press the dial. (3) Select the desired title in the menu settings, then press the SEL/PUSH EXEC dial. The titles are displayed in the language you selected. (4) Change the colour, size, or position, if necessary. 1 Turn the SEL/PUSH EXEC dial to select the colour, size, or position, then press the dial. The item appears.
Een titelbeeld opnemen Superimposing a title 1 T I TLE PRESE T T I T L E HE L LO ! H A P P Y B I R T HD A Y H A P P Y HO L I D A Y S CONGR A T U L A T I ON S ! OUR SWE E T B A B Y WE DD I NG V A C A T I ON T H E E ND [ T I T L E ] : E ND 2 PRESE T T I T L E HE L LO ! H A P P Y B I R T HD A Y H A P P Y HO L I D A Y S CONGR A T U L A T I ON S ! OUR SWE E T B A B Y WE DD I NG V A C A T I ON T H E E ND [ T I T L E ] : E ND 3 4 PRESE T T I T L E HE L LO ! H A P P Y B I R T HD A Y H A P P Y HO L I D A Y S
Een titelbeeld opnemen Note Both the date and time or either of them may not be displayed depending on the size or position of the title. Opmerking Afhankelijk van het formaat of de plaats van de titel kan de datum of tijd niet worden aangegeven, of soms geen van beide. If you display the menu or title menu while superimposing a title The title is not recorded while the menu or title menu is displayed.
Making your own titles Eigen titelbeelden samenstellen You can make up to two titles and store them in your camcorder. Each title can have up to 20 characters. (1) In CAMERA or PLAYER mode, press TITLE. (2) Turn the SEL/PUSH EXEC dial to select , then press the dial. (3) Turn the SEL/PUSH EXEC dial to select the first line (CUSTOM1 SET) or the second line (CUSTOM2 SET), then press the dial. (4) Turn the SEL/PUSH EXEC dial to select the column of the desired character, then press the dial.
Making your own titles Eigen titelbeelden samenstellen To change a title you have stored Aanpassen van een reeds eerder vastgelegde titel In step 3, select CUSTOM1 SET or CUSTOM2 SET, depending on which title you want to change, then press the SEL/PUSH EXEC dial. Turn the SEL/PUSH EXEC dial to select [C], then press the dial to delete the title. The last character is erased. Enter the new title as desired. To erase a character Select [C]. The last character is erased.
Using the built-in light You can use the built-in light to suit your shooting situation. The recommended distance between the subject and camcorder is about 1.5 m (5 feet). Press LIGHT repeatedly, until the indicator appears on the screen while your camcorder is in CAMERA mode. The built-in light turns on. If you turn the POWER switch to OFF (CHG), the built-in light turns off simultaneously. You cannot turn the built-in light on by turning the POWER switch to CAMERA again.
Using the built-in light CAUTION VOORZICHTIG Be careful not to touch the lighting section, because the plastic window and surrounding surfaces are hot while the light is on. It remains hot for a while after the light is turned off. DANGER When you press LIGHT The indicator changes as follows: t Let op dat u de omgeving van de ingebouwde videolamp niet aanraakt, want het plastic venster en de omringende delen kunnen bijzonder heet worden wanneer de lamp brandt.
Gebruik van de ingebouwde videolamp Using the built-in light •The built-in light may turn on/off when you use the PROGRAM AE or backlight function while shooting in the AUTO mode ( ). •The built-in light may turn off when inserting or ejecting a cassette. •While the end search function is working, the built-in light is turned off. •When you use the conversion lens (optional), the built-in light is blocked and may not illuminate the subject properly.
Using the built-in light CAUTION •When replacing the bulb, use only the Sony XB-3D halogen lamp (optional) to reduce the risk of fire. •To prevent possible burn hazard, disconnect the power source before replacing and do not touch the bulb until the bulb becomes cool enough to handle (for about 30 minutes or more). WAARSCHUWING •Ter vervanging mag u uitsluitend de Sony XB3D halogeenlamp (los verkrijgbaar) gebruiken, om gevaar voor brand of een elektrische schok te voorkomen.
— Editing — — Montage — Dubbing a tape Kopiëren van video-opnamen Using the A/V connecting cable Met behulp van het audio/videoaansluitsnoer Connect your camcorder to the VCR using the A/V connecting cable supplied with your camcorder. You can record and edit a picture with the connected VCR by using your camcorder as a player. in the menu settings Set DISPLAY to LCD in (The default setting is set to LCD.) If you do not make the indicators disappear, they are recorded on tapes.
Dubbing a tape Kopiëren van video-opnamen When you have finished dubbing a tape Na afloop van het kopiëren van de video-opnamen Press x on both your camcorder and the VCR. Druk zowel op de camcorder als op de videorecorder de x stoptoets in. To prevent deterioration of pictures when dubbing Set EDIT to ON in the menu settings before dubbing. If your VCR has an S video jack Connect using an S video cable (optional) to obtain optimum quality screen images.
Dubbing a tape easily – Easy Dubbing Vlot een cassette kopiëren – Easy Dubbing VCR operation for dubbing can be controlled easily by using your camcorder when the VCR is connected. You can select one of eight preset titles and two custom titles stored in your camcorder as instructed in ”Making your own titles” (p. 60). Select the desired colour, size, and background colour of titles. Om te kopiëren kan een videorecorder makkelijk worden bediend via uw camcorder.
Dubbing a tape easily – Easy Dubbing Vlot een cassette kopiëren – Easy Dubbing Step 2: Setting the VCR to operate with your camcorder Stap 2: De videorecorder instellen om met uw camcorder te werken You can control the VCR by wireless remote control. U kunt de videorecorder draadloos van op afstand bedienen.
Dubbing a tape easily – Easy Dubbing Vlot een cassette kopiëren – Easy Dubbing Buttons for cancelling recording pause on the VCR The buttons vary depending on your VCR. To cancel recording pause: – Select PAUSE if the button to cancel recording pause is X. – Select REC if the button to cancel recording pause is z. – Select PB if the button to cancel recording pause is N. De opnamepauze annuleren op de videorecorder De knoppen variëren afhankelijk van uw videorecorder.
Dubbing a tape easily – Easy Dubbing Vlot een cassette kopiëren – Easy Dubbing About the IR SETUP code The IR SETUP code is stored in the memory of your camcorder. Be sure to set the correct code depending on your VCR. The default setting is Code number 3. Betreffende de IR SETUP code De IR SETUP code wordt opgeslagen in het geheugen van uw camcorder. Let op dat u de juiste code invoert, afhankelijk van uw videorecorder. Code nummer 3 is standaard ingesteld.
Dubbing a tape easily – Easy Dubbing Vlot een cassette kopiëren – Easy Dubbing (3) Setting your camcorder and the VCR to face each other (3) De camcorder en de videorecorder tegenover elkaar plaatsen Locate the Infrared rays emitter of your camcorder and face it towards the remote sensor of the VCR. Set the devices about 30 cm (12 in.) apart, and remove any obstacles between the devices. Richt de infraroodzender van uw camcorder naar de afstandsbedieningssensor van de videorecorder.
Dubbing a tape easily – Easy Dubbing Vlot een cassette kopiëren – Easy Dubbing When the VCR does not operate correctly •After checking the code in “About the IR SETUP code,” set IR SETUP or PAUSE MODE again. •Place your camcorder at least 30 cm (12 in.) away from the VCR. •Refer to the operating instructions of your VCR. Wanneer de videorecorder niet correct functioneert •Nadat u de code hebt gecontroleerd in “Betreffende de IR SETUP code”, stelt u IR SETUP of PAUSE MODE weer in.
Dubbing a tape easily – Easy Dubbing Vlot een cassette kopiëren – Easy Dubbing Note You can put a title only into the tape of the VCR. Opmerking U kunt alleen een titel aanbrengen op de cassette in de videorecorder.
Dubbing a tape easily – Easy Dubbing Vlot een cassette kopiëren – Easy Dubbing 1 EASY DUBBING 0 :0 0 :0 0 START TITLE SEL NORMAL MODE SEL SETUP NORMAL [ E A S Y DU B ] : E ND Step 5: Performing Easy Dubbing Montage NORMAL [ E A S Y DU B ] : E ND Editing EASY DUBBING 0 :0 0 :0 0 START TITLE SEL MODE SEL NORMAL SETUP PREVIEW Stap 5: Easy Dubbing Make sure that your camcorder and VCR are connected, and that the VCR is set to recording pause.
Dubbing a tape easily – Easy Dubbing Vlot een cassette kopiëren – Easy Dubbing Note If you set the background colour to FADE in step 3, the picture may not appear properly depending on the connected VCR. Opmerking Wanneer u de achtergrondkleur in stap 3 op FADE zet, kan de beeldweergave niet goed zijn, afhankelijk van de aangesloten videorecorder. You cannot record on the VCR when: – The tape has run out. – The write-protect tab is set to expose the red mark. – The IR SETUP code is not correct.
— Uw camcorder naar eigen inzicht aanpassen — Changing the menu settings Wijzigen van de oorspronkelijke menu-instellingen To change the mode settings in the menu settings, select the menu items with the SEL/ PUSH EXEC dial. The default settings can be partially changed. First, select the icon, then the menu item and then the mode. (1) In CAMERA or PLAYER mode, press MENU. (2) Turn the SEL/PUSH EXEC dial to select the desired icon, then press the dial to set.
Changing the menu settings 1 MENU CAMERA PLAYER MA NU A L S E T P ROGR AM A E P E F F ECT PLAYER SET ED I T TBC DNR NTSC PB [ ME NU ] : E ND [ ME NU ] : E ND Wijzigen van de oorspronkelijke menu-instellingen 2 MA NU A L S E T P ROGR AM A E P E F F ECT OTHERS WOR L D T I ME BEEP COMMA ND E R D I SP L AY R E C L AMP OTHERS WOR L D T I ME BEEP COMMA ND E R D I SP L AY R E C L AMP R E T URN 3 OTHERS WOR L D T I ME BEEP 0 HR 0 HR OTHERS WOR L D T I ME BEEP COMMA ND E R ON D I SP L AY R E C L AMP
Changing the menu settings Wijzigen van de oorspronkelijke menu-instellingen Menu items are displayed as the following icons: MANUAL SET CAMERA SET PLAYER SET LCD/VF SET TAPE SET SETUP MENU OTHERS Menu-items worden voorgesteld door de volgende pictogrammen: MANUAL SET CAMERA SET PLAYER SET LCD/VF SET TAPE SET SETUP MENU OTHERS Depending on your camcorder model The menu display may be different from that in this illustration. Afhankelijk van uw camcordermodel kan het menu verschillen van de illustratie.
Changing the menu settings Notes on the SteadyShot function* •The SteadyShot function will not correct excessive camera-shake. •Attachment of a conversion lens (optional) may influence the SteadyShot function. •SteadyShot does not operate in the 16:9FULL mode. If you set STEADYSHOT to ON in the menu settings, the indicator flashes. If you cancel the SteadyShot function* appears. Your camcorder prevents excessive compensation for cameraThe SteadyShot off indicator shake.
Changing the menu settings Icon/item LCD COLOUR Mode —–– Meaning POWER switch To adjust the colour on the LCD screen, turn the SEL/PUSH EXEC dial to adjust the following bar. PLAYER CAMERA To reduce intensity VF B.L. z BRT NORMAL BRIGHT To increase intensity To set the brightness in the viewfinder normal. To brighten the viewfinder. PLAYER CAMERA Icon/item REC MODE Mode Meaning POWER switch z SP To record in the SP (Standard Play) mode.
Changing the menu settings Notes on ORC setting •Each time you eject the cassette, the ORC setting will be cancelled. If necessary, set the setting. •You cannot use this setting on a tape with the red mark on the cassette exposed. (i. e. the tape is write-protected) •When you set ORC TO SET, a non-recorded section of about 0.1 second appears on the tape. However, note that this non-recorded section disappears from the tape when you continue recording from this section.
Changing the menu settings Icon/item WORLD TIME BEEP Mode —— z MELODY To output the melody when you start/stop recording or when an unusual condition occurs on your camcorder. PLAYER CAMERA To output the beep instead of the melody. To cancel the melody and beep sound. z ON PLAYER CAMERA To deactivate the Remote Commander to avoid unintentional operations caused by other VCR’s remote control. To show the display on the LCD screen and in the viewfinder.
Wijzigen van de oorspronkelijke menu-instellingen Nederlands Overzicht van de instellingen voor elk menu-onderdeel z geeft de standaardinstelling aan. Er zullen andere menu-onderdelen verschijnen afhankelijk van de stand van de POWER schakelaar. Op het monitorscherm verschijnen alleen de items die u op dat ogenblik kunt bedienen.
Wijzigen van de oorspronkelijke menu-instellingen Opmerkingen bij de SteadyShot functie* •Als de camera te sterk beweegt, zal het beeld ook met de SteadyShot-functie niet voldoende gestabiliseerd worden. •Bij gebruik van een voorzetlens (los verkrijgbaar) kan de SteadyShot beeldstabilisatie niet altijd goed werken. •SteadyShot werkt niet in de 16:9FULL stand. Wanneer u STEADYSHOT in het instelmenu op ON zet, knippert de indicator.
Wijzigen van de oorspronkelijke menu-instellingen Pictogram/item LCD COLOUR Stand —–– Voor het regelen van de kleuren van het LCDscherm door de SEL/PUSH EXEC knop te draaien om het volgende balkje te regelen. Feller VF B.L. POWER schakelaar Betekenis Zachter z BRT NORMAL De normale helderheid van het zoekerbeeld herstellen. BRIGHT PLAYER CAMERA PLAYER CAMERA Voor een extra helder zoekerbeeld. Betreffende de VF B.L. en LCD B.L.
Wijzigen van de oorspronkelijke menu-instellingen Opmerkingen bij ORC instelling •De ORC instelling wordt geannuleerd telkens wanneer u de cassette uitwerpt. Stel desgevallend opnieuw in. •Deze instelling kan niet worden gebruikt bij een cassette waarvan het rode merkteken zichtbaar is. (d.w.z. de cassette is beveiligd tegen schrijven) •Wanneer u ORC TO SET instelt, wordt een blanco stuk van ongeveer 0,1 seconde ingelast. Dit onbespeelde stuk verdwijnt echter wanneer u verder opneemt vanaf dat punt.
Wijzigen van de oorspronkelijke menu-instellingen Pictogram/item WORLD TIME BEEP Stand —— z MELODY REC LAMP CAMERA Om een wijsje te horen wanneer u begint of stopt met opnemen of wanneer er iets vreemds aan de hand is met uw camcorder. PLAYER CAMERA Om bij de bediening een pieptoon te horen in plaats van het wijsje. OFF Om bij de bediening geen geluid te horen, geen pieptoon en geen wijsje. Om de bij uw camcorder geleverde afstandsbediening in te schakelen.
— Troubleshooting — English Types of trouble and their solutions If you run into any problem using your camcorder, use the following table to troubleshoot the problem. If the problem persists, disconnect the power source and contact your Sony dealer or local authorised Sony service facility. If “C:ss:ss” appears on the screen, the self-diagnosis display function has worked. See page 93. In the recording mode Symptom START/STOP does not operate. The SteadyShot function does not work.
Types of trouble and their solutions Symptom A vertical band appears when you shoot a very bright subject. An unknown picture is displayed on the screen. The picture is recorded in incorrect or unnatural colours. The picture appears too bright, and the subject does not appear on the screen. A horizontal black band appears when shooting a TV screen or computer screen.* Cause and/or Corrective Actions • This is not a malfunction.
Types of trouble and their solutions In the recording and playback modes Symptom Cause and/or Corrective Actions • The battery pack is not installed, or is dead or nearly dead. c Install a charged battery pack. (p. 15, 16) • The AC power adaptor is not connected to a wall socket. c Connect the AC power adaptor to a wall socket. (p. 20) The end search function does not • The tape was ejected after recording. work. • You have not recorded on the cassette yet. The battery pack discharges quickly.
Types of trouble and their solutions Others Symptom Easy Dubbing does not function. The Remote Commander supplied with your camcorder does not work.* The date or time indicator does not appear, and the bars “--:--:--” appear. The melody or beep sounds for 5 seconds. No function works though the power is on. While charging the battery pack, no indicator appears or the indicator flashes in the display window. You cannot charge the battery pack installed to your camcorder.
English Self-diagnosis display Your camcorder has a self-diagnosis display function. This function displays the current condition of your camcorder as a 5-digit code (a combination of a letter and figures) on the LCD screen, in the viewfinder or in the display window. If a 5-digit code is displayed, check the following code chart. The last two digits (indicated by ss) will differ depending on the state of your camcorder.
English Warning indicators and messages If indicators and messages appear on the screen or in the display window, check the following: See the page in parentheses “( )” for more information. Warning indicators The video heads are dirty Slow flashing: – You need to clean the heads using the Sony V8-25CLD cleaning cassette (optional) (p. 109). The battery pack is dead or nearly dead Slow flashing: – The battery pack is nearly dead. (P.
Warning indicators and messages Warning messages • CLOCK SET Set the date and time. (p. 22) • FOR “InfoLITHIUM” BATTERY ONLY Use an “InfoLITHIUM” battery pack. (p. 105) •Q NO TAPE*1) Insert a cassette tape. • Q TAPE END*1) The tape has reached the end. • CLEANING CASSETTE*2) The video heads are dirty. (p. 109) • START/STOP KEY Press START/STOP to activate the ORC setting. This message is displayed in white. (p. 81) • ORC The ORC setting is working. This message is displayed in white. (p.
— Verhelpen van storingen — Nederlands Soorten storingen en hun oplossingen Mocht u problemen met de werking of de bediening van de camcorder hebben, doorloop dan eerst de onderstaande lijst met controlepunten. Als het probleem aan de hand hiervan niet te verhelpen is, neemt u dan a.u.b. contact op met uw Sony handelaar of een plaatselijke erkende Sony onderhoudsdienst. Als “C:ss:ss” verschijnt op het scherm, heeft de zelfdiagnoseweergavefunctie gewerkt. Zie pagina 100.
Soorten storingen en hun oplossingen Symptoom Er verschijnt een verticale band in beeld bij opnemen van een erg helder verlicht onderwerp. Een onbekend beeld verschijnt op het scherm. De kleuren van de video-opnamen zien er vreemd en onnatuurlijk uit. Het beeld is te helder en het onderwerp is niet zichtbaar op het scherm.
Soorten storingen en hun oplossingen Tijdens opnemen en afspelen Symptoom Oorzaak en/of oplossing • Er is geen batterijpak op het apparaat aangebracht of het batterijpak is (bijna) leeg. c Plaats een opgeladen batterijpak. (p. 15, 16) • De netspanningsadapter is niet op het stopcontact aangesloten. c Sluit de netspanningsadapter aan op een stopcontact. (p. 20) De eindzoekfunctie werkt niet. • De cassette werd na het opnemen uitgeworpen. • Er zijn nog geen opnamen op de geplaatste cassette gemaakt.
Soorten storingen en hun oplossingen Overige Symptoom Easy Dubbing werkt niet. De bij uw camcorder geleverde afstandsbediening werkt niet.* Geen enkele functie werkt meer, hoewel de camcorder wel is ingeschakeld. Bij opladen van het batterijpak verschijnt er geen aanduiding of knippert de aanduiding in het uitleesvenster. Het batterijpak op de camcorder kan niet worden opgeladen. • Er is vocht uit de lucht in de camcorder gecondenseerd.
Nederlands Zelfdiagnose-aanduidingen Om het storingzoeken te vergemakkelijken, is deze camcorder voorzien van een zelfdiagnosefunctie. Als er iets mis is met de camcorder, toont deze op het LCD scherm, in de zoeker of in het uitleesvenster een code van vijf tekens (een letter en vier cijfers). De betekenis van deze code voor de toestand van de camcorder kunt u vinden in de onderstaande tabel.
Nederlands Waarschuwingsaanduidingen en mededelingen Als de onderstaande waarschuwingsaanduidingen en indicators oplichten of gaan knipperen op het scherm, controleert u dan de onderstaande punten: Zie voor nadere bijzonderheden de bladzijden die tussen haakjes “( )” staan vermeld. Waarschuwingsindicators De videokoppen zijn vuil Langzaam knipperend: – Reinig de koppen met een Sony V8-25CLD videokoppenreinigingscassette (los verkrijgbaar) (p. 109). Zelfdiagnose-aanduiding (p.
Waarschuwingsaanduidingen en mededelingen Waarschuwingsaanduidingen •CLOCK SET Stel datum en tijd in. (p. 22) •FOR “InfoLITHIUM” BATTERY ONLY Gebruik een InfoLITHIUM batterijpak. (p. 105) •Q NO TAPE*1) Breng een cassette in. •Q TAPE END*1) De band is ten einde. • CLEANING CASSETTE*2) De videokoppen zijn vuil. (p. 109) •START/STOP KEY Druk op START/STOP om de ORC instelling te activeren. De melding verschijnt in het wit. (p. 86) •ORC De ORC instelling is actief.
— Aanvullende informatie — — Additional Information — About video cassettes Selecting the cassette type You can use both Hi8 and standard 8 mm video cassettes on your camcorder. When you use a Hi8 video cassette, recording and playback are carried out in the Hi8 system. When you use a standard 8 mm video cassette, recording and playback are carried out in the standard 8 mm system.
About video cassettes Betreffende videocassettes Playing back an NTSC-recorded tape You can play back tapes recorded in the NTSC video system using the SP mode. However, note that the following will occur during playback of an NTSC-recorded tape. •When playing back a tape on a TV screen, you may not get the original colour depending on the TV. When you play back on a Multi System TV, set NTSC PB to the desired mode in the menu settings.
About the “InfoLITHIUM” battery pack Betreffende “InfoLITHIUM” batterijen What is the “InfoLITHIUM” battery pack? Wat is een “InfoLITHIUM” batterij ? Charging the battery pack Opladen van het batterijpak •Be sure to charge the battery pack before you start using your camcorder. •We recommend charging the battery pack in an ambient temperature of between 10°C to 30°C (50°F to 86°F) until FULL appears indicating that the battery pack is fully charged, in the display window.
About the “InfoLITHIUM” battery pack Betreffende “InfoLITHIUM” batterijen •Have spare battery packs handy for two or three times the expected recording time, and make a trial recording before the actual recording. •Do not expose the battery pack to water. The battery pack is not water-resistant. •Houd voldoende reserve-batterijen bij de hand voor twee- of driemaal de verwachte opnameduur, en maak ook proefopnamen voor u de uiteindelijke opname maakt. •Zorg dat er geen water op het batterijpak komt.
Using your camcorder abroad Using your camcorder abroad You can use your camcorder in any country or area with the AC power adaptor supplied with your camcorder within 100 V to 240 V AC, 50/60 Hz. Your camcorder is a PAL system based camcorder. If you want to view the playback picture on a TV, it must be a PAL system based TV with Video/Audio input jack. The following shows TV colour systems used overseas.
Maintenance information and precautions Onderhoud en voorzorgsmaatregelen Moisture condensation Condensvocht in de camcorder If your camcorder is brought directly from a cold place to a warm place, moisture may condense inside your camcorder, on the surface of the tape, or on the lens. In this condition, the tape may stick to the head drum and be damaged or your camcorder may not operate correctly. If there is moisture inside your camcorder, the beep sounds and the % indicator flashes.
Maintenance information and precautions Maintenance information Onderhoud en voorzorgsmaatregelen Onderhoud Als het LCD scherm vuil is, door vettig stof of vingerafdrukken, kunt u het schoonmaken met een speciale LCD reinigingsset (los verkrijgbaar). Cleaning the video head Reinigen van de videokoppen To ensure normal recording and clear pictures, clean the video heads.
Maintenance information and precautions Onderhoud en voorzorgsmaatregelen Note on video heads When the playback pictures still contain noise even if you have cleaned the video heads with a cleaning cassette, the video heads may have worn down due to long use. If this is the case, they must be replaced with new heads. Contact your Sony dealer or local authorised Sony service facility.
Maintenance information and precautions Charging the built-in rechargeable battery in your camcorder A built-in rechargeable battery is supplied with your camcorder so as to retain the date and time, etc., regardless of the setting of the POWER switch. The rechargeable battery is always charged as long as you are using your camcorder. The battery, however, will get discharged in about 6 months if you do not use your camcorder at all.
Maintenance information and precautions Precautions Onderhoud en voorzorgsmaatregelen Voorzorgsmaatregelen Camcorder operation Bediening van de camcorder •Operate your camcorder on 7.2 V (battery pack) or 8.4 V (AC power adaptor). •For DC or AC operation, use the accessories recommended in these operating instructions. •If any solid object or liquid get inside the casing, unplug your camcorder and have it checked by a Sony dealer before operating it any further.
Maintenance information and precautions Onderhoud en voorzorgsmaatregelen Built-in light Ingebouwde videolamp •Do not knock or jolt the built-in light while it is turned on as it may damage the bulb or shorten the life of the bulb. •Do not leave the built-in light on while it is resting on or against something; it may cause a fire or damage the built-in light.
Maintenance information and precautions Onderhoud en voorzorgsmaatregelen AC power adaptor Netspanningsadapter •Unplug the unit from a wall socket when you are not using the unit for a long time. To disconnect the mains lead, pull it out by the plug. Never pull the mains lead itself. •Do not operate the unit with a damaged cord or if the unit has been dropped or damaged. •Do not bend the mains lead forcibly, or place a heavy object on it. This will damage the cord and may cause fire or electrical shock.
Onderhoud en voorzorgsmaatregelen Battery pack Batterijpak •Use only the specified charger or video equipment for the charging function. •To prevent an accidental short circuit, do not allow metal objects to come into contact with the battery terminals. •Keep the battery pack away from fire. •Never expose the battery pack to temperatures above 60°C (140°F), such as in a car parked in the sun or under direct sunlight. •Keep the battery pack dry. •Do not expose the battery pack to any mechanical shock.
Maintenance information and precautions Onderhoud en voorzorgsmaatregelen Note on dry batteries (CCD-TRV107E/ TRV208E/TRV408E only) Betreffende gewone staafbatterijen (alleen CCD-TRV107E/TRV208E/ TRV408E) To avoid possible damage from battery leakage or corrosion, observe the following: – Be sure to insert the batteries with the + – polarities matched to the + – marks – Dry batteries are not rechargeable – Do not use a combination of new and old batteries – Do not use different types of batteries – Curr
English Specifications Video camera recorder System Input/output connectors S video output 4-pin mini DIN Luminance signal: 1 Vp-p, 75 Ω (ohms), unbalanced Chrominance signal: 0.3 Vp-p, 75 Ω (ohms), unbalanced Audio/Video output AV MINIJACK, 1 Vp-p, 75 Ω (ohms), unbalanced, sync negative 327 mV, (at output impedance more than 47 kΩ (kilohms)) Output impedance with less than 2.2 kΩ (kilohms)/Monaural minijack (ø 3.5 mm) RFU DC OUT Mini-mini jack (ø 2.5 mm), DC 5V General Power requirements 7.
Nederlands Technische gegevens Videocamera/ recorder Systeem Video-opnamesysteem Twee roterende koppen Schuinspoorregistratie Frequentiemodulatie Audio-opnamesysteem Roterende koppen, frequentiemodulatie Videosignaal PAL-kleursysteem, CCIR-norm Bruikbare cassettes 8mm videocassette Hi8 of standaard 8 Opname-/weergaveduur (met standaard 8/Hi8 videocassette van 90 min.) SP stand: 1,5 uur LP stand: 3 uur Vooruit-/achteruitspoelduur (met standaard 8/Hi8 videocassette van 90 min.) Ong. 5 min.
— Quick Reference — — Compleet overzicht — Identifying the parts and controls Plaats en functie van de bedieningsorganen Camcorder Camcorder 1 6 2 7 3 8 4 9 q; 1 Oogdop 2 Viewfinder lens adjustment lever (p. 31) 2 Beeldzoekerlensregelaar (p. 31) 3 V BATT release lever (p. 15) 3 V Batterijvrijmaakknop (p. 15) 4 OPEN button (p. 26) 4 OPEN knop (p. 26) 5 SEL/PUSH EXEC dial (p. 22, 77) 5 SEL/PUSH EXEC knop (p. 22, 77) 6 Power zoom lever (p. 30) 6 Motorzoomknop (p. 30) 7 POWER switch (p.
Identifying the parts and controls Plaats en functie van de bedieningsorganen qa qs qh qj qd qk qf ql qg qa Video control buttons (p. 38, 40) x STOP (stop) m REW (rewind) N PLAY (playback)* M FF (fastforward) X PAUSE (pause) qa Bandlooptoetsen (p. 38, 40) x STOP (stop) m REW (terugspoelen) N PLAY (weergave)* M FF (vooruitspoelen) X PAUSE (pauze) qs LIGHT button (p. 62) qs LIGHT knop (p. 62) qd Recording lamp (p. 26) qd Opnamelampje (p. 26) qf Infrared rays emitter (p.
Identifying the parts and controls Plaats en functie van de bedieningsorganen wh w; wj wa wk ws wl e; wd wf ea wg es wa Speaker wa Luidspreker ws LCD screen (p. 26) ws LCD-scherm (p. 26) wd EXPOSURE button (p. 54) wd EXPOSURE knop (p. 54) wf TITLE button (p. 57, 60) wf TITLE knop (p. 57, 60) wg EASY DUBBING button (p. 68) wg EASY DUBBING knop (p. 68) wh DISPLAY button (p. 39) wh DISPLAY knop (p. 39) wj END SEARCH button (p. 37) wj END SEARCH knop (p. 37) wk Viewfinder (p.
Identifying the parts and controls Plaats en functie van de bedieningsorganen ed ef eg ed DATE button (p. 36) ed DATE knop (p. 36) ef TIME button* (p. 36) ef TIME knop* (p. 36) eg COUNTER RESET button (p. 27) eg COUNTER RESET knop (p. 27) * This button has a tactile dot. * Deze toets is voorzien van een voelstip.
Identifying the parts and controls Plaats en functie van de bedieningsorganen eh el r; ej ra ek rs rd ej Cassette compartment (p. 24) ej Cassettehouder (p. 24) ek Grip strap ek Handgreepband el RESET button (p. 92) el RESET knop (p. 99) r; S VIDEO OUT jack (p. 42, 66, 68) r; S VIDEO OUT aansluiting (p. 42, 66, 68) ra Built-in light (p. 62) ra Ingebouwde lamp (p. 62) rs A/V OUT jack (p. 42, 66) rs A/V OUT aansluiting (p. 42, 66) rd RFU DC OUT (RFU adaptor DC output) jack (p.
Identifying the parts and controls Remote Commander Plaats en functie van de bedieningsorganen Afstandsbediening – CCD-TRV107E/TRV208E/TRV408E only – Alleen CCD-TRV107E/TRV208E/ TRV408E The buttons that share the same name on the Remote Commander and your camcorder function identically to the buttons on your camcorder. De toetsen op de afstandsbediening met hetzelfde opschrift als die op de camcorder hebben ook dezelfde functie.
Identifying the parts and controls To prepare the Remote Commander Insert 2 R6 (size AA) batteries by matching the + and – polarities on the batteries to the + – marks inside the battery compartment. Voorbereidingen voor afstandsbediening Plaats twee stuks R6 (AA-formaat) batterijen in het batterijvak van de afstandsbediening, met de + en – polen in de richting die staat aangegeven in het batterijvak.
Identifying the parts and controls Operation indicators Bedieningsaanduidingen LCD screen and Viewfinder/ LCD-scherm en beeldzoeker 1 2 3 4 5 6 7 Plaats en functie van de bedieningsorganen Display window/Uitleesvenster qf qg 40 min W REC 0:00:00 T M . F ADER C I N EMA E ND S E A RCH FULL qh qj 2 wd 3 wf SEP I A 8 qk 4 7 2002 00 : 05 : 5 6 9 0 qa qs qd ql w; wa ws 1 Recording mode indicator (p. 81)/ Mirror mode indicator (p. 28) 1 Opnamestandindicator (p. 86)/ Spiegelstandindicator (p.
Plaats en functie van de bedieningsorganen qa SteadyShot off indicator (CCD-TRV408E only) (p. 80) qa SteadyShot uit indicator (alleen CCD-TRV408E) (p. 85) qs Manual focusing indicator (p. 55) qs Handmatige scherpstelling-indicator (p. 55) qd Built-in light indicator (p. 62) qd Ingebouwde lampindicator (p. 62) qf STBY/REC indicator (p. 26)/ Video control mode indicator (p. 40) qf STBY/REC indicator (p. 26)/ Videobedieningsindicator (p. 40) qg Tape counter indicator (p.
English Index A, B I, J, K, L S AC power adaptor ..................... 20 Adjusting viewfinder ................ 31 A/V connecting cable ... 42, 66, 72 BACK LIGHT ............................. 33 Battery pack ................................ 15 BEEP ............................................ 83 BOUNCE ..................................... 46 “InfoLITHIUM” battery ......... 105 Infrared rays emitter ................. 34 LCD Screen ................................. 28 LP mode ...........................
Nederlands Index A, B I, J, K, L S A/V-aansluitkabel ......... 42, 66, 72 Afstandsbediening .................. 124 Afstandsbedieningssensor ..... 120 BACK LIGHT ............................. 33 Bandtelleraanduiding ............... 32 Batterij opladen .......................... 16 Batterijpak ................................... 15 Bedieningsaanduidingen ........ 126 Beeldeffect ................................... 49 Beeldovergangen ....................... 27 Beeldzoekfunctie ........................
Sony Corporation Printed in Japan *307231531*